

Turning, belongs to the category of those that require for themselves the smallest number of tools. Indeed, having acquired several basic incisors, you can do a lot of work. Further expansion of the “park” of tools allows, in general, to increase the convenience and speed of work. Of course, there are several highly specialized incisors, cartridges, back centers, which are difficult to manage without, in their field of activity. But these works are sometimes quite exotic, and such products, such as turning things with a shifted center of rotation, are not of interest to everyone and look more like a fun experiment than an example of beauty. Well, or as a kind of demonstration of skill. As well as ultra-large and ultra-small products. Super thin and extra long. All this touches the mind, but not the soul.
Turners for woodworking, craftsmen often do it themselves - partly because of the relative simplicity of the process, a third of which is close and native woodworking, partly because of the high cost of good finished cutters. When designing such a tool, it is very important to acquire a suitable piece of iron - a form, a grade of steel. And here, the old, failed files work quite well. For metal.
The file of the file has steel that is not bad for our purposes, good factory hardening, you just need to choose older pieces as workpieces. At present, only the surface is hardened. Carefully avoiding overheating, having cut the blank of the desired shape, it is necessary to sharpen it and equip it with a convenient handle, that's all. In this case, a whole layer of complex heat treatment work is omitted.
Thus, quite a lot of shapes of cutters and cutting inserts for special holders can be made from old files.
What is needed for work.
Instruments.
Set of metalwork, marking tool. Angle grinder is better than small - it is much more convenient for it to perform small and more or less accurate work. Abrasive wheels for her are thick “clean” and thin for cutting. Clearly - protective earphones and glasses. An extension cord came in handy. Large bench vise. Something, for pouring water on the workpiece, it is convenient to make a “spray bottle” out of a soft plastic bottle by melting several small holes in the cork with a hot wire. Alcohol-free, water-washable marker for marking.Tool for sharpening - electric sharpener, abrasive wheel.
Materials
Actually the file itself, of a suitable size and profile, the finished handle or materials for its manufacture - a workpiece-block, a piece of a thin-walled tube of suitable diameter. LMB, brush.
So, first of all, we determine the shape of the cutter and select a suitable file-workpiece, as already mentioned, older - now, in the manufacture of temper differently. Below, the manufacture of a rather powerful tool for face turning is shown, however, in some places it is convenient to use it for conventional turning, in the centers.
After selecting the file, it is better to grind its surface, and saw the “lazy" incisors, with a notch - not too nice and not particularly nice to hold with your hands. And given that when turning with a finished cutter, you still have to hold on to the piece of iron with your one (bare, gloved, dangerous) hand all the time, it’s better to get away. Turning is best done with a angle grinder, turning it “on your own”, sort of like working with abrasive wheels with Velcro or with petals. At the same time, it is convenient to secure the workpiece with a small clamp, periodically rearranging it. The disk is thick corundum, for stripping. The main feature is to prevent overheating and tempering of the metal of the workpiece, otherwise, the entire factory hardening of the dog under the tail. Angle grinder, a revolving tool and burn through it a piece of iron, as simple as that. Here you should pre-tune in for a long fuss. Literally a few movements with the tool and watering, several movements and watering. And so on to the right condition. Overheating can be determined visually by the colors of the discolouration - the first will be brownish. But this is an accident. The processing time should be shorter, the closer the tool to the edge or thin parts of the workpiece. It doesn’t hurt, sometimes touch the processed piece of iron with your finger - check if our watering is coping with excess heat, if you don’t hold your hand, we go to drink tea with chocolates - we earned it. If the workpiece is not hot, the order can still be sharpened.
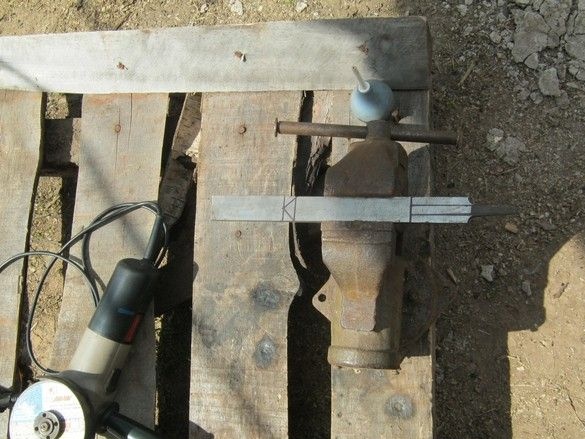
Having grind the cloves, on a smooth surface we make the marking of the piece of iron. Alcohol felt-tip pen, perfect. We take into account that the cutter is gradually shortened during periodic sharpening, but a too long piece of iron will cause the turner's hands to be in an uncomfortable position when working, and the “weight distribution” of the cutter, especially a large one, will be unpleasant.
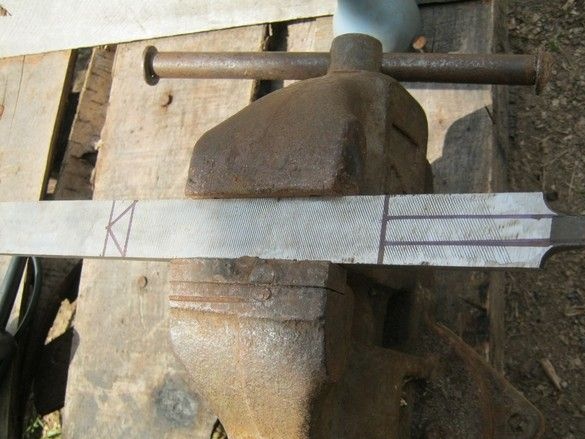
When cutting a cutter, it is convenient to use a large vise. We replace the disk with a thin detachable one, we used 1 mm thick disks. When cutting, everything said about overheating and discoloration colors remains valid. We carefully monitor this matter - the further, the more disappointing it will be to throw out an almost finished piece of iron.
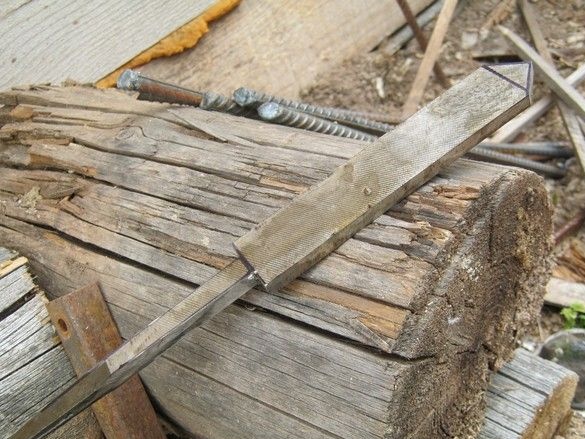
The piece of iron is cut out where necessary, round off sharp edges, grind flaws. Order. The most dreary thing was done, the handle and sharpening remained.
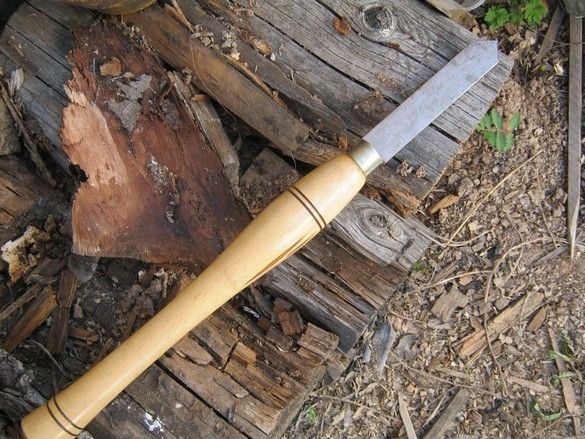
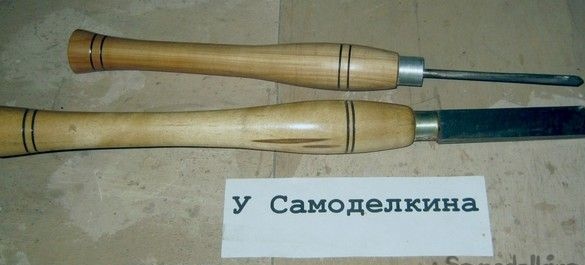
The handle of the turning tools is peculiar and, above all, quite long - for safety, well, it’s generally convenient. There are various forms of them, let's take a look at what Robert Sorby does - the locomotive in the manufacture of cutting tools for woodworkers.

Here he found a small plate with an assortment of sizes of pens, you can choose the right one. The handle is made of wood - beautifully made of fruit tree wood, simply and cheaply from birch logs without knots. They recommend making pens from maple - it “fills” hands less, however, here, you will not need to apply significant force to the instrument.
So, we decided on the size, picked up a piece of wood, turned it. Turning is simple, "in the centers", without any frills.
Decorative rings, if desired, can be applied with iron wire. A simple tool is made - a small piece of wire, to the ends of which handles are attached - short sticks.The wire is pulled by hands and pressed against the rotating part in the right place. To prevent the wire from “scouring” the part, especially on the “descents”, a small groove is made with a jamb-knife. After some time, the wire in the place of friction heats up and cauterizes the tree, at the same time "eating" the groove. The decoration can be skinned, a charred trace remains in the groove.
After sanding, the handle was varnished. On this account, there are different opinions, choose a turner. He made a metal ring from a thin-walled steel tube - a handle from a broken mop with a lever for squeezing a sponge-rag. The steel is rather thin, but the ring here is more likely decorative - I prefer to glue the piece of iron rather than drive it in. Lokomotiv-Robert, scored glands, his rings are bronze. It is certainly more beautiful.
At the end of the handle, I drilled a deep hole with a long drill of a suitable diameter, then, at half the depth I drilled it with a drill thicker, we make sure that the shank of the piece of iron enters this hole with some effort. The required volume of epoxy glue is being prepared. It is very convenient to use trays from "boxed" sweets. One "seat" is cut with scissors, the components of the glue are mixed in it. After, the little trash is thrown without regrets. A long stick lubricates the walls of the hole and the shank of the piece of iron. We stick the handle, remove the excess glue that has come out, or add with a stick when the hole is not completely filled. A cutter with a glued piece of iron is installed vertically, preferably in a warm place - the polymerization of the glue will occur faster, its strength increases. A tray with the remains of glue and a stick, until we throw it away - this is a control sample, it is convenient to use it to judge the “seizure" of glue without disturbing our cutter.
After complete hardening of the epoxy glue, it remains only to sharpen the cutter. Here, options are also possible, for example, a different vertex angle, a cutting edge angle. The latter, should not be made too sharp, otherwise the cutter will dig too far into the workpiece, it will be difficult to control. The cutting edge will dull quickly. The vertex angle, for universal use, is convenient to do less than 90 degrees.
The initial formation of the cutting edge is best done on an electric grinder, not forgetting about cooling, final fine-tuning on a low speed abrasive wheel. Cherry on a cake - polishing a blade on a leather surface with GOI paste.