

The topic of PCB manufacturing in home workshop, would be incomplete without a description of the tinning process. Consider it in principle and in relation to our boards. So.
Tinning in itself is a wonderful way to protect many metals, but most often copper and iron, from oxidation by atmospheric oxygen, the action of acids and alkalis. In essence, it consists in coating the protected metal with a thin layer of another metal that is better resistant to oxidation. One of the most commonly used metals for this purpose is tin, which is very little affected by air and moisture, and weak vegetable acids, fats, and other food components do not work at all. Covering a metal surface with a thin layer of tin is called tinning, and the tin layer itself is half-wet. When coating metal with tin, it is very important to obtain a completely uniform, dense and durable tin layer that protects the metal surface from oxidation.
Tinned steel pots and pans are a thing of the past, however, even today tinning is used to protect iron (steel) from food alkalis and acids. There is such quite common material as tinplate. In essence, this concept refers generally to sheet steel coated with a protective metal, whether it be zinc, chrome or our tin. Tin coated tin is used precisely in the food industry, in particular, from it, cans and some other kitchen-food items are made.
Tinning is also an integral operation preceding the soldering itself. It does not matter, constructive or for electrical installation. Actually, usually, wiring soldering looks like this - cleaning surfaces, applying flux, tinning. The soldered surfaces or conclusions are folded, if necessary, fixed. A flux is applied to the place of soldering. The place of soldering is heated and solder is introduced, or, a drop of molten solder is applied to the tip of a soldering iron, by the way, also previously tinned (copper tips). After spreading the solder, the heat is removed.After waiting for its complete crystallization, and then cooling, the soldering place is washed, if necessary, from flux residues (especially carefully when using acid fluxes) and, if necessary, isolated. You should know that forced cooling of the soldering place significantly reduces the mechanical properties of the seam.
Conducting tracks of printed circuit boards, for which we started a conversation, it is also customary to protect from oxidation after manufacture, at the same time preparing them for assembly (soldering). With manual installation, the installation worker can rub and scratch the oxidized soldering place, remembering the curved-handed manufacturer with a small radio bend, and with automated assembly, poor preparation of the surface of the board tracks will lead to a large percentage of rejects.
In the amateur radio practice, tinning the board tracks is based on the fact that doing it on a flat surface is uniform, much easier than later, when mounting, for each element separately. That is, time is not saved at all, saving on solder is also doubtful, given the subsequent additional fuss.
So, taming should be. The printed circuit board with tinned paths is convenient in subsequent assembly regardless of the storage time, it provides reliable mechanical contact (“common” through the mounting screws). Tinning also eliminates minor defects of the tracks and increases their load capacity. True tinning with a soldering iron, even with a large and flat "sting" is not particularly convenient. Such tinning does not look very sloppy - sagging, needles and unauthorized lintels, uneven hard-to-control midday layer.
For convenient and quick tinning, you can apply the method of immersion in the melt, for which you will have to make a small bath with an alloy "Rose", heated by a conventional household electric stove.
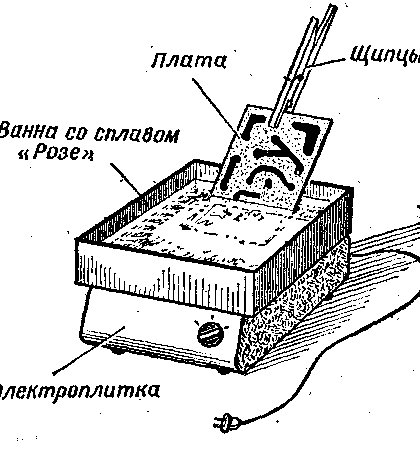
The melt temperature is 120-140 ° C. To prevent oxidation and the appearance of a slag film on the surface of the melt, it is poured with a layer of chemically pure glycerol 20-25 mm thick.
The process of tinning is as follows. With long-handled forceps, they grab the printed circuit board and decapitate in a 5% hydrochloric acid solution, then they wash it for 2-3 seconds in running water and dip it for 1-2 seconds in the Rose melt. Excess melt from the circuit board is removed using a squeegee from vacuum rubber. After that, the board is ready for assembly and installation of attachments.
Installation for tinning should be provided with a hood. To stabilize the temperature of the melt “Rose” in the bath, you can use any simple thermostat. A chromel-kopel thermocouple is used as a temperature sensor. The accuracy of temperature maintenance is ± 10 ° C.
Of course, to make such an installation, it is worthwhile no matter how significant the number of printed circuit boards or other non-food stuff requiring tinning. I once met a similar installation in production and there, it was used to quickly tin the ends of the installation wire.
For small amateur radio volumes of printed circuit boards manufactured, such an installation is, as a rule, superfluous, requiring an additional, specially equipped place and a fair amount of the expensive Rose alloy.
However, manual tinning with a vulgar soldering iron can be somewhat modernized, significantly improving the result. It will only be necessary to make the simplest instrument from improvised materials and take a soldering iron somewhat more powerful than usual. So.
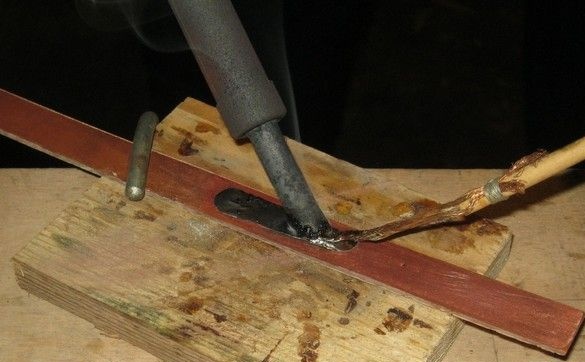
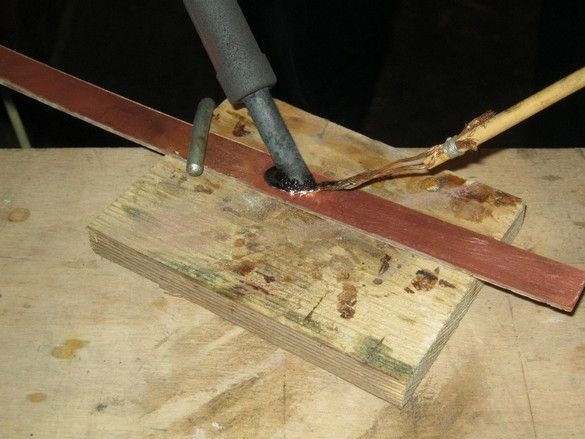
The essence of the method is the use of a capillary effect, a kind of felt-tip pen for solder. Its supply in a molten, understandable state is absorbed into a copper braid and when “painting” it is consumed much more economically and evenly, in comparison with tinning with an “unarmed” soldering iron.

What was used in the work.
Instruments.
A set of tools for radio installation. It will require a fairly powerful (65 ... 75 W) soldering iron with accessories. A special clamp for fixing the circuit board is very convenient.
Materials
Flux, solder, copper braid, better denser, better not tinned. Copper wire, a wooden stick the size of a pencil.
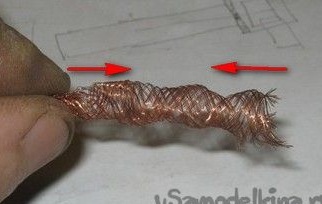
To make such a tool is simple, you just have to find the right braid. Usually, it’s not difficult - ham radio enthusiasts are first-priority buns and, say, they don’t throw out the remnants of screens after cutting cables. In addition, such a copper braid is used as short, high-current flexible conductors, often for connection or connection in ground loops. True, it is already tinned there, which in some cases can be inconvenient (the use of another solder). There is also a special thin copper braid for wiring, it is without tinning, it is used to collect surplus solder, soldering elements.

Shields from the power cable with shielded conductors are used here. They are pretty runny. In the hands of another, much denser wicker. Tinned.
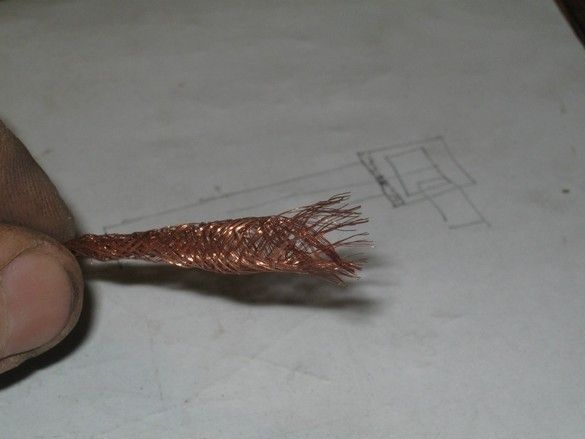
Have to invest at least one piece in another. Of course, you can use one layer, but it will work slightly worse - the end is quickly frayed and the amount of solder absorbed is small. It is distributed on the surface less evenly.
The copper part of the tinplate is about 6 ... 7 cm long, while 1.5 ... 2 cm, for mounting on a stick.
Cut off with some margin two pieces of wicker.
One of them should be expanded. To do this, gently squeeze it to the middle, from the ends, at the same time, its diameter increases significantly. We finally expand it with a sharpened pencil, but without fanaticism, it will not start to unravel.
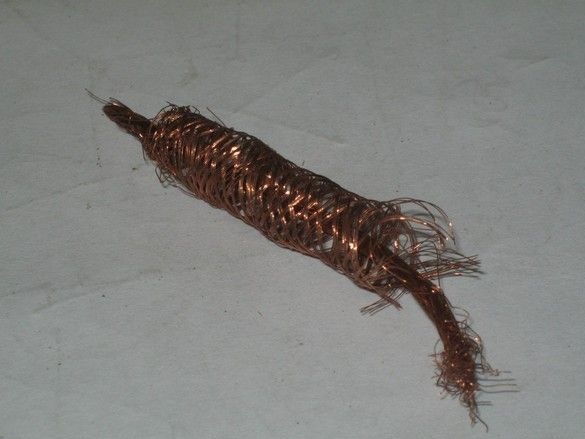
Now gently pull the second piece of wicker. It is possible for density at once two. Then we pull at the ends of the outer braid, it “slides” like a thermotube, tightly covering the contents. We get the workpiece of the desired density. With pliers, we align one edge and again expand it with a sharpened pencil. Now both braids are together.
Not deep, in length, a little over 20 mm. This we form the seat for the stick-stick. By the way, now it needs to be made or picked up. The easiest way, of course, is to cut off splinters with a knife or an ax a piece of a straight layer board, but it can be a pen from an old brush and, perhaps, a pencil.
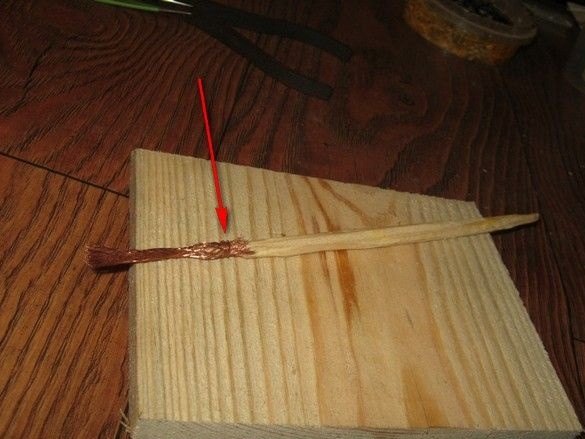
It will not hurt, with a sharp knife, a little stepping away from the edge of the stick to arrange a small annular recess so that our braid does not slip off the handle - during operation it will have to be pulled with some effort. Then we prepare the prepared two-layer braid on the handle and in the place of the recess, we wind it with a thick copper wire. The "knot" can be fixed with a tiny drop of solder, but also as if it was not unwound.
It remains to specify the length and trim the end - the length of the "free" part, for a soft braid of thin wire, is convenient about 5 cm.

We tin the end of the braid with the solder we intend to work with, while the wires at the end are partially untwisted, this is acceptable. It is crowded a few centimeters from the edge, the middle should be flexible. If the solder is not an ordinary pic, it makes sense to fix this fact with a felt-tip pen on the handle.
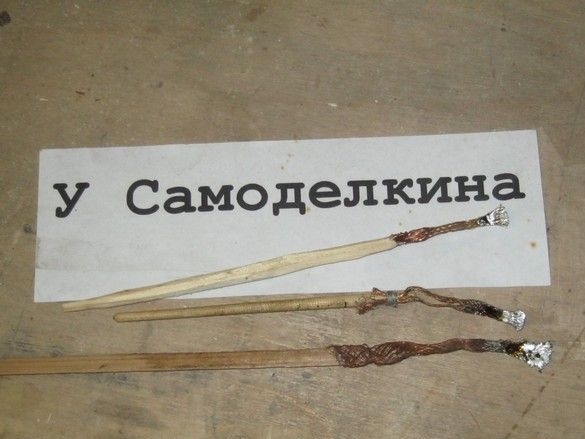
The tool is quite convenient, time does not save much, but provides a significantly more uniform coating. In addition to printed circuit boards, it is used for tinning parts before structural soldering. For metal parts, a flame burner is required.