I continue to model and build robots. I already wrote instructions for creating a remote control models and robots. The remote control is based on the old Sega joystick. This joystick has four arrows and 8 buttons, enough to control a machine or a small robot. Management was carried out by means of an IR LED. Today I will write instructions for the modernization of this remote control, namely the conversion of it into a Bluetooth remote control. Depending on the Bluetooth module used, the remote control will either connect to the pre-programmed device itself or it will be possible to connect to the remote control. I will describe both options. We will need:
- Joystick from Sega
- Arduino Pro Mini 3.3v 8MHz
- USB-TTL
- 2 Ni-Mn batteries 1.2v 1000mA
- Bluetooth module HC-05 or HC-06
- Red LED
- Blue LED
- Resistor 2x75Om, 2x5Om, 1x2Om
- Connector PLSx5 "mother"
- Hot glue
- wires
- 4xAAA battery compartment
- Multi-colored wires
- Soldering iron, solder, rosin
- Straight arms
Step 1 Choosing a Bluetooth Module
Two modules are required for communication. We will insert one into the remote control, and the second we will connect to the typewriter or the robot. There are a huge number of Bluetooth modules. They differ in functions and supported communication protocols. A sample list of modules that are found:
- HC-03, HC-04 (HC-04-M, HC-04-S) on the BC417143 chip;
- HC-05, HC-06 (HC-06-M, HC-06-S) on the BC417143 chip;
- HC-05-D, HC-06-D;
- HC-07 - module with a CSR 41C6 chip;
- HC-08 - module with ultra-low power consumption and Bluetooth 4.0 protocol;
- HC-09 is the newest module designed to replace the HC-06 and HC-07.
I settled on two modules HC-05 and HC-06, as they are optimal in terms of price / functionality. They support the communication protocol - Bluetooth Specification v2.0 + EDR. The range is up to 10 meters (power level 2). Compatible with all Bluetooth adapters that support SPP. The volume of flash-memory (for storing firmware and settings) is 8 Mbit. They operate at a frequency of a radio signal - 2.40 .. 2.48 GHz. The host interface is USB 1.1 / 2.0 or UART. They have low power consumption - the current during communication is 30-40 mA. The average current value is about 25 mA. After the connection is established, the consumed current is 8 mA. These modules are easy to find, they are the most common. The modules are very similar, but the main difference between them is that the HC-05 can work both in master mode and in slave mode.HC-06 can only be a slave. Simply put, the HC-06 cannot detect a paired device and establish a connection with it; it can only obey the master. The modules are sold as two boards soldered together. The smaller one is the factory module. Large - a special breadboard for DIY. It looks like a smaller board with a BC417 chip:
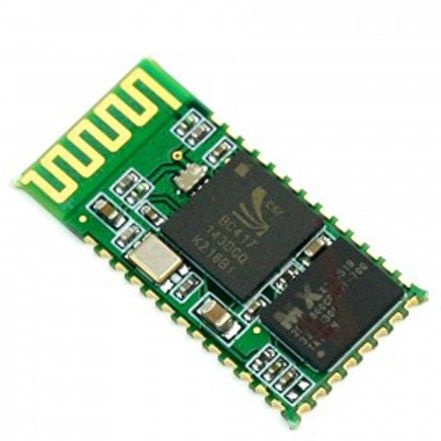
And so the DIY modules HC-05 and HC-06 themselves:

You can purchase a module without a breadboard. It costs a little cheaper, but then you will have to install a 3.3 V voltage regulator for the module. Also, the distance between the contacts is small and you will have to torment yourself by soldering to the wire module.
To establish communication between the remote control and the robot or machine, you need to configure two Bluetooth modules on top of each other. In this case, we will configure the HC-05 module so that it finds and connects to the HC-06.
Step 2 Configure the HC-06.
First you need to connect the HC-06 to the computer. This can be done by connecting the module via a USB-UART adapter. In this case, the connection is as follows:
Bluetooth - USB-UART
TX - RX
RX - TX
VCC - +5
GND - GND
If you don’t have USB-UART at hand, you can write the following sketch to any Arduino board:
Connect as follows:
Bluetooth - Arduino
TX - pin 2
RX - pin 3
VCC - +5
GND - GND
Then we open any terminal program, select the com-port to which the HC-06 is connected, the default speed is 9600, NL and CR are not needed. If a Bluetooth connection is not established with the HC-06, the module is in the mode of entering AT commands. If the module does not respond, try overloading it by disconnecting the positive wire and reconnecting it. And enter the following commands:
"AT" - without quotes, the answer "OK" should come.
“AT + ADDR” - with this command we will find out the unique address of HC-06, write down this address
"AT + BAUD7" - set the speed to 57600
"AT + RESET" - we overload the module
The following commands do not have to be entered, but just in case it is better to know them:
"AT + NAME
“AT + ORGL” - resetting the module to factory settings
This completes the setup of the HC-06.
Step 3 Configure HC-05.
We connect the module similarly to HC-06. Next, open any terminal program, select the com port on which USB-UART or Arduino hangs, the factory default communication speed is 9600, but I also met at a speed of 38400, if you did not change it, select 9600, you can’t connect and change it to 38400. Also It’s worth including the parameters NL and CR. To transfer AT command input mode, you need to press the button on the HC-05 board, then enter the following:
"AT" - entered without quotation marks, the answer "OK" should come. If you come, we continue to enter commands further.
“AT + ROLE = 1” - with this command we set the role of the module with the digit:
0 - slave, 1 - master, 2 - slave in the cycle *. You should get the answer "+ ROLE: 1 \ r \ n" or "OK"
“AT + CMODE = 0” - the module in the role of the master is connected only to that Bluetooth device whose address is indicated by the command “AT + BIND”.
“AT + BIND: 1234,56,123456” - to establish a connection with your HC-06 you need to enter its address here. After entering all the commands, the module is in the role of the master (ROLE = 1) and the connection mode to the fixed address (CMODE = 0) is set, it will connect only to the Bluetooth device whose address is specified by this command. Parts of the address are entered: during installation - separated by a comma, and when answered - through a colon. You will get the answer: "+ BIND: 1234: 56: 789ABC \ r \ n" or "OK"
“AT + UART = 57600,0,0” - set the speed to 57,600 bps, the stop bit is represented by the number: 0 - one, the check is represented by the number: 0 - without verification
If you are confused about the module settings or it stops working correctly, try the following command:
“AT + ORGL” - The module resets the following settings CLASS = 0, IAC = 9e8b33, ROLE = 0, CMODE = 0, UART = 38400,0,0, PSWD = 1234, NAME = hc01.com.
And then re-configure the settings you need.
In this way, we have created a strong link between HC-05 and HC-06. When the HC-05 modules are turned on, it will establish a connection with the HC-06. From personal experience I can say that it is better to turn on the HC-05 first, and then the HC-06. If the connection is lost, you need to overload both modules.
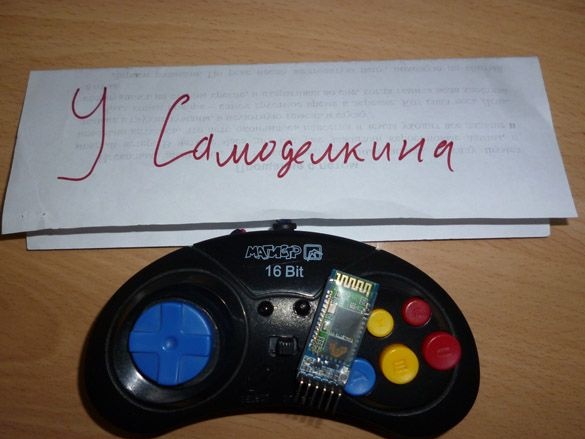
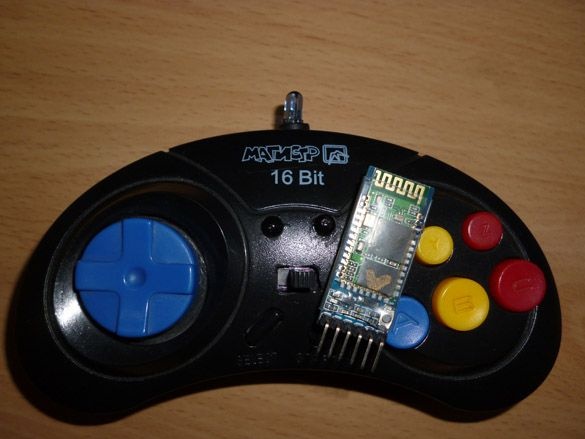
Step 4 Preparing the remote control.
This step is described in detail in the previous instructions at:
https://homediy.washerhouse.com/en/8626-ik-pult-iz-dzhoystika-ot-sega.html
It is necessary to perform steps 1 to 4. Soldering the IR diode is optional, although it will not interfere.
Step 5 Connecting a Bluetooth module.
I advise you to install HC-06 in the remote. Since to change the settings of the module you only need to fill in the corresponding sketch in the Arduino Pro Mini. In the case of the HC-05, you will have to disassemble the console to press the button for switching to AT command mode.We connect everything according to the following scheme
Joystick - Arduino
Up arrow - pin 2
Down arrow - pin 4
Left arrow - pin 5
Right arrow - pin 6
Button A - pin 8
Button B - pin 10
C button - pin 7
X button - pin 12
Y button - pin 11
Z button - pin 9
Start Button - pin 14 (A0)
Reset Button - RST
General - GND
Bluetooth - Arduino
TX - pin 16 (A2)
RX - pin 17 (A3)
VCC - + 5
GND - GND
HC-05 we connect to your typewriter or robot that you are going to control. Connection options and sketches can be found in my other instructions. When writing a robot sketch, you need to set the connection speed to 57600, and use the SoftwareSerial library in the sketch.
Step 6 Preparing the environment and firmware.
The best way to write and edit a sketch is to use the Arduino IDE. The Arduino IDE version must be no lower than 1.8. Download the Arduino IDE from the official website:
https://www.arduino.cc/en/Main/Software
Then you need to add the library to the Arduino IDE. The sketch uses one SoftwareSerial.h library (for communication with the Bluetooth module):
You will need to download and install it. You can install the library by unpacking the archive and moving the unpacked files to the “libraries” folder located in the folder with the Arduino IDE installed. Or you can use the built-in tool for adding libraries - without unpacking the downloaded archive, select the Sketch - Connect Library menu in the Arduino IDE. At the top of the drop-down list, select the "Add .Zip Library" item. And indicate the location of the downloaded archive. After installing the library, you need to restart the Arduino IDE.
Our remote control is flashed in the same way as the previous version of the remote control, connected via USB-TTL via a connector, charging is also through it. When filling in the sketch, click Reset.