

Strange as it may seem, but also in ours, which are oversaturated with goods, it seems that for every taste, time, sometimes it arises, here is the same "differential", according to Arkady Raikin. Basically, of course, from the orientation of the assortment of our provincial stores to consumer goods. Sometimes, the necessary thing somewhere, maybe there is, but to make sure of this, you will have to make a painful promenade in all city shops. Sometimes it’s just a reluctance to go to the city, in a word, sometimes, it’s really beneficial to do the right thing yourself. Like in times of subsistence farming.
The background is this - we live on the outskirts of a small village, on the outskirts. And the problem is to get to the "mainland", to people, sometimes in full growth in winter. In the forest, again, sometimes you need to go, and just go for a drive. Knurled ski slopes, there, here, clearly does not happen. More often, deep, friable snow. For such purposes, wide hunting skis were purchased. To go without sticks is difficult, without knocking out with a kamus, and sticks with large round wheels, so that they do not fall into the loose snow, unfortunately, were not found in stores. More and more, with some patch-misunderstanding at the ends, for heavily trodden snow. The solution, however, was also found very much in my taste. Make from what is at hand.
The material for the stick itself is just a stick, wooden, good, the forest is nearby, you should only take care of this in advance so that the workpieces dry out.
There were two design options for the ring-stop - a wooden, sawn and wire outer ring with tarpaulin-knitting needles. The latest design is borrowed from the factory product. In the end, stopped on a tree.
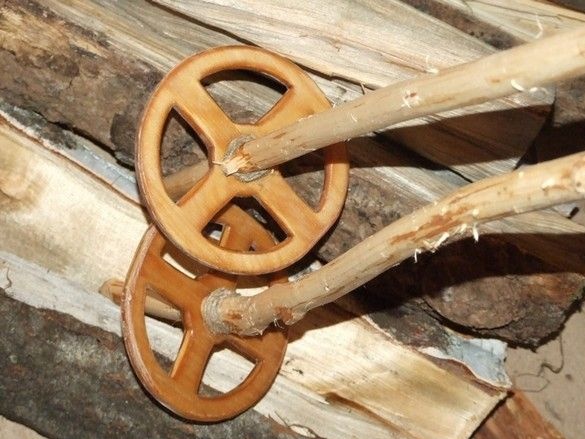
But the simple and fairly reliable design of the lower node - where the emphasis on the snow is attached to the stick, was not given. A movable joint was required, transmitting a fair amount of force. In factory products, this unit is quite simple - other materials (metal) are used there. For a tree, such a construction will not work - it will result in a weakened place, which will probably break at the most inopportune moment. Porakinin brain, received the design depicted in the photo, faithfully, serving more than one year. The rings of eight millimeter plywood (compromise strength-weight) are put on a stick with a hole slightly larger than the "seat", thus, the mobility of the stop relative to the stick is achieved. Practice shows that with ordinary skiing, this is enough.The “freedom” of the emphasis is limited to rope winding impregnated with varnish. It is not wound with a thick twine, a sort of slide, then carefully, in several stages it is impregnated with a thick varnish. After drying, a very strong thickening is obtained, which serves as an emphasis on the ring. So that the force from the skier who has fallen in does not destroy the knot, the stick, it is necessary to pick up in advance with the knot in the lower part and to “lean” the upper winding about it.
Sticks can be cut out, cut down from different types of wood - from the juniper you will get very lightweight, strong cherry from cherry.
What was needed for work.
Instruments.
Ax, hacksaw, comfortable sharp knife. To make a plywood ring, we needed a jigsaw on wood with nail files and accessories - a dovetail saw stand, clamps. Marking tool - ruler, pencil, compass. Awl, no matter what for drilling holes, drills.
Materials
Blanks of sticks from the woods, rope - twine for fixing the stop ring, nylon cord for hand loops. Impregnation of a plywood ring required dishes, a thin wire, a piece of foil, and a suitable varnish. Sandpaper, preferably large.
Here, sticks are cut down from a willow in a nearby ravine. It is only necessary to choose sufficiently long and relatively even. Practice has shown their sufficient strength, in addition, such sticks were very light after drying. The tree itself, or rather a huge bush, in the presence of moisture grows very quickly and is not rare or over valuable, though in the spring - almost the first powerful honey plant. It is recommended to harvest wood in the winter, in the absence of sap flow in the tree.
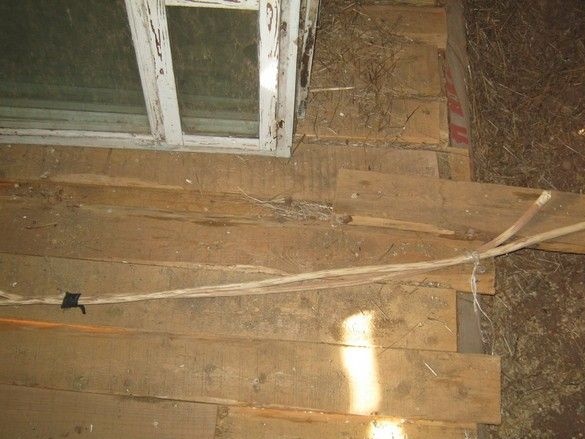
The harvesting of such pieces of wood is always carried out in advance, in fact, in any sortie into the forest, we take with us a small hatchet and a hacksaw - a beautiful snag or something else to bring. At the woods, the pores at the ends overlap (paint, varnish, drying oil, garden var, film) and it would be nice to debark - clean from the bark, this will prevent the carpenter from settling under it. It is better to tie long sticks into a bundle, they will be smoother. We place it anywhere in the attic, in a year or two, you can use it. Yes, when choosing suitable sticks, do not forget about the knot at the end of the branch, this is the future focus, which significantly increases the survivability of the structure. By the way, it was at the willow tree that it was not difficult to select such branches.
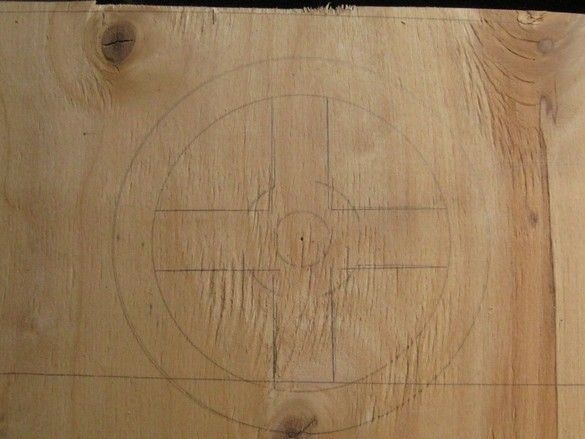
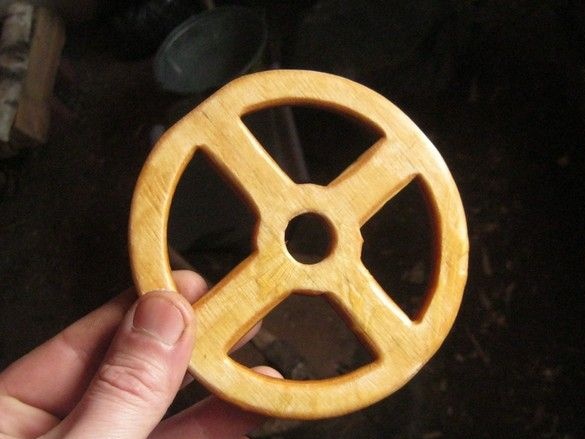
We proceed to the manufacture of the lower support ring. Its outline is drawn on a suitable piece of plywood with a thickness of 8 mm. The dimensions for an adult weighing 90 pounds are chosen as follows: the outer ring is 130 mm in diameter, the next one is 105 mm, the second to last is 40 mm, and finally, the diameter of the stick hole is about 20 mm and directly Depends on the diameter of our stick blank near the bottom knot. The landing diameter on the plywood ring should be made somewhat larger, by several millimeters. The width of each "spoke" is 20mm. Dimensions are a compromise between weight and durability. Yes, for the child he made the support smaller.
I drilled a small hole in the corner of each aperture, cut out all that was unnecessary with a jigsaw on a regular, “pioneer” tree. After sanding, the blank of the support ring was saturated with hot varnish - I picked up a can of jars of canned food that was suitable in diameter, it seemed to fit well from the stew, I wrapped the wooden blanks with thin copper wire so that it was easy to pull out later, put the cloves on the bottom of the can so that the blank was slightly raised above the bottom and the varnish had unimpeded access to each point of the piece of wood, put one blank, another clove, another blank. The varnish was poured - “Yacht”, it is presented as very resistant to any water and in general, to any atmospheric factors. The open throat of the can was covered with aluminum foil, so that the varnish evaporated less and the can was put on the stove in a place that was well warm but not too hot so that it did not boil for a couple of days. After that, blanks for wire tails were hung over the same jar to stack extra varnish. During “boiling”, many volatiles evaporate from the varnish, it becomes much thicker. The layer on the surface can be significant, local flows and smudges are quite acceptable.
Generally speaking, this kind of impregnation is best done under vacuum - a certain porous preform is placed under a layer of liquid impregnation and air is pumped out of the vessel as far as possible, air expands from the pores of the preform and creeps out, fluid flows in its place, it is better heated - less viscosity .
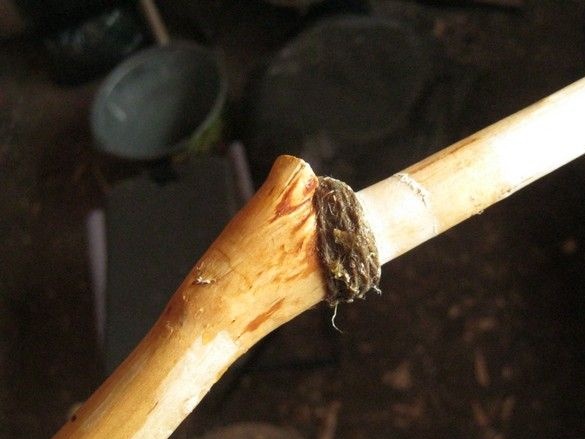
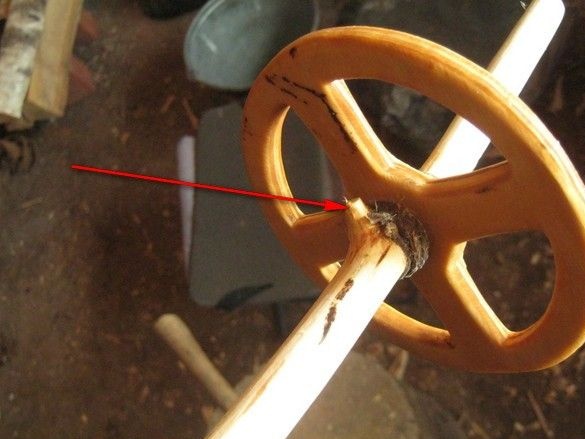
The stick is cut to the desired length, focusing on the knot. By the way, the length of the ski poles is selected based on the height of the skier - minus 25 ... 30cm. This is for the "classic" move, and the other on loose snow and hunting skiing will not work with all desire. Twine is wound under the cut knot (to hold the rope winding, but not interfere with the plywood ring). Trying on the ring-support, at the same time they can and somewhat "tamp" the winding.
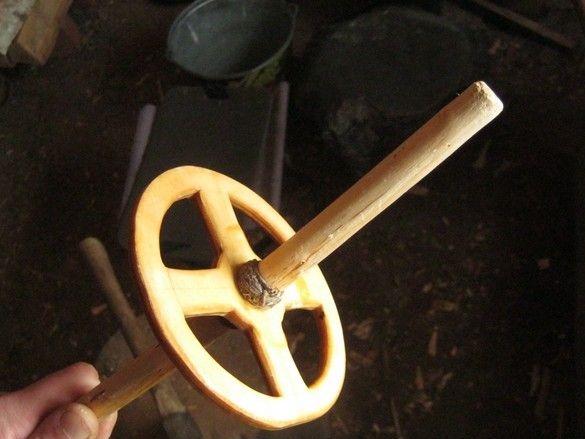
We dress the ring and fix it with another winding of twine, after, in several stages, with intermediate drying, impregnate the windings with varnish. I tried to sharpen the end of the stick, but there wasn’t much point in it - they are designed for relatively loose snow and can handle it perfectly, but we don’t have knurled tracks and slopes. The stick itself was not treated with either impregnation or varnish, four-year operation showed sufficient structural stability, even on wet snow in spring and during thaws. During this time, only one breakdown happened - the plywood ring-emphasis flew off. The rope winding could not stand it - the stick fell through very wet snow very deep and tried to pull it out along with the accumulated wet snow. After a simple repair, the stick "got into operation."
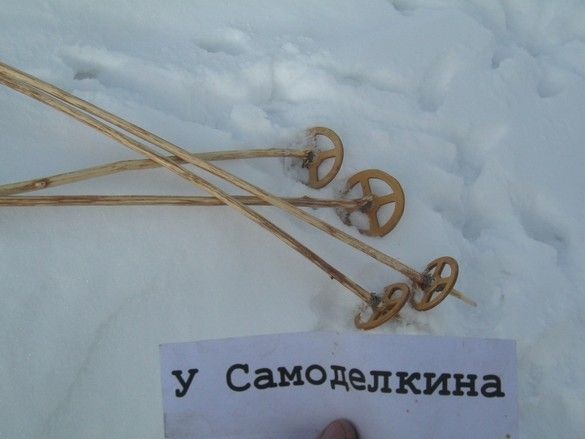
At the upper ends of the sticks, holes were drilled from a nylon cord, and simple hand loops were organized.
A stick of this kind was made in three pairs - for myself, my wife and daughter. The use during four winters (admittedly not particularly intense) did not reveal significant shortcomings. The advantages of the design, in addition to cheapness and accessibility of materials, include maintainability in field and field conditions - you only need a knife and a rope. How to repair a sled.