
Mark the faceplate. Universal scale.
Part 1. Why "universal" scale?
I had a need to divide a round blank into 7 parts. I tried to divide 360 by 7. So what? Not divided without a trace! And immediately the question: how can the scale on the faceplate, marked out in 360 parts, help me? division by one degree? Answer: no way.
Therefore, the idea came to mark the faceplate with the application of a universal scale on it. The idea is to put 4 more scales on the main scale.
The main scale, let's call it that, is the layout of the faceplate at 15 degrees. On the faceplate we make marks "0", "90", "180" and "270". Then on both sides of each of the marks we put risks with different values of divisions. So, on a sector from 330 to 30 degrees (“0” or “360” in the middle) we will place a scale of 60 divisions, i.e. one division will be equal to 6 degrees.
On a sector between 60 and 120 degrees (“90” in the middle), place a scale of 48 divisions, i.e. one division will be equal to 7.5 degrees.
On the faceplate sector, between 150 and 210 degrees (“180” in the middle), we mark the scale by 42 divisions, that is, the price of one division is 8.75 degrees.
On the faceplate sector between 240 and 300 degrees (“270” in the middle), we will place a scale of 36 divisions, i.e. with a division price of 10 degrees.
And now there are few arguments in favor of such a breakdown of the faceplate.
1. Using the scale "42" we can divide the circle into 7 parts, because 42 is divided by 7 without a remainder - this is 6 divisions. Accordingly, with its help, you can divide the circle into 14, 21, 42 parts. A scale of 360 parts will not allow this.
2. When breaking the faceplate into 360 divisions, we can make a breakdown into 2, 3,4,5,6,8,9,10,12,15, 18,20,24,30,36,40,45,60,90,120,180 divisions, and only 21 values.
The universal scale, in addition to these values, will make it possible to break down several more values: 7, 14, 16, 21, 48, 72, 80, 144, 240. That is, at 30 values, at least.
Consequently, the universal scale is more functional than the 360-division scale.
Part 2. A little about the theory of errors.
We have to accept for the axiom that any (!!!) measurement we can do only with an error. Or, otherwise, it is practically impossible to perform any measurement without errors.
Measurement accuracy is influenced by several factors. We list some of them.
1. Any measuring tool is different from the reference.
2. Any stroke has real linear dimensions.For example, the tip of a compass needle has a "thickness" of several microns, well, for example 10. When combining a ruler with such a stroke, we cannot "by eye" determine which part of the stroke the edge of the ruler falls on: one, second or third micron of thickness.
3. The most sharpened pencil also has a thickness of about 0.2 mm, in addition, with each stroke this thickness changes due to abrasion of graphite.
Conclusion: for practical needs in home conditions, we can "rely" on accuracy within a few hundredths of a millimeter.
Based on the above considerations, the most sharp needles, flat rulers, neat hands and a keen eye should be used when marking the faceplate.
Part 3. Markup.
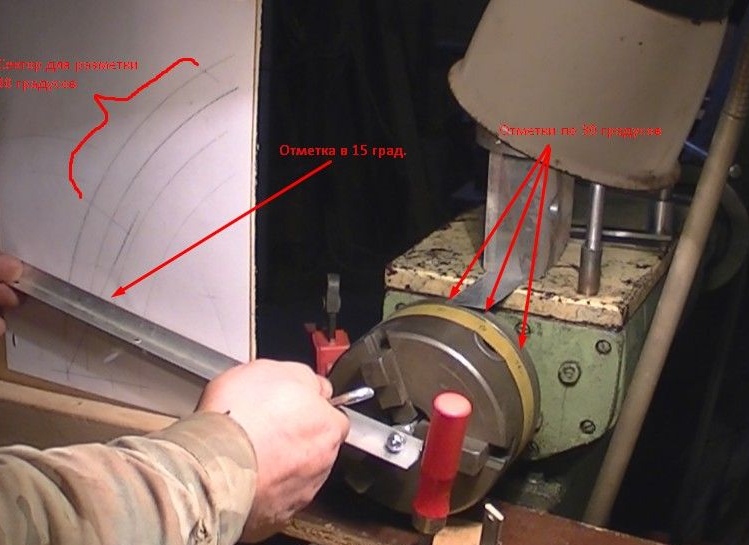
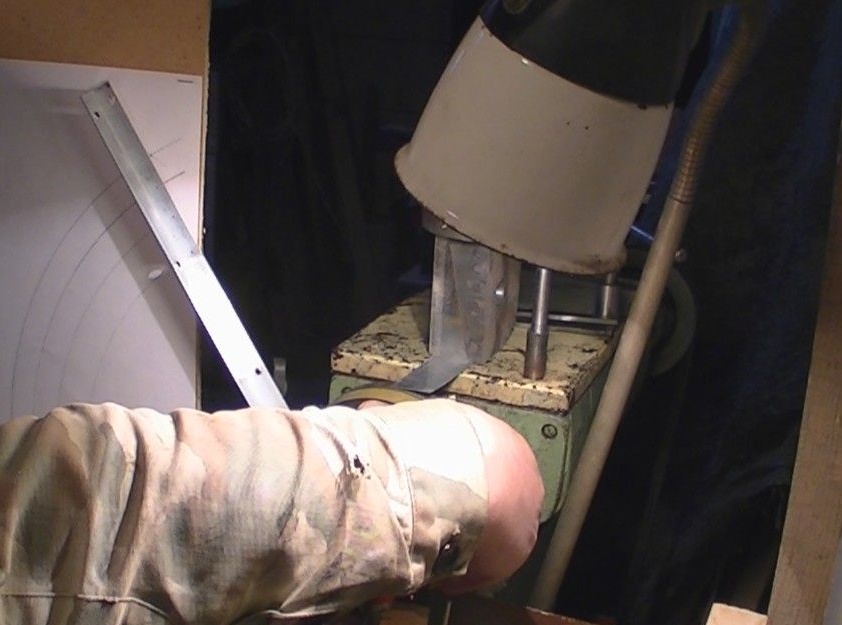
For marking, I made a frame from scraps of bars, a piece of fiberboard. The frame was attached to the machine with clamps, while the plane of the screen (fiberboard sheet with a sheet of paper) should be perpendicular to the guides of the machine. And one more requirement: the screen should be located not only perpendicularly, but also so that the ruler, mounted on an axis in the machine chuck, would slide across the screen without a gap. This arrangement is necessary for the maximum possible elimination of markup errors.
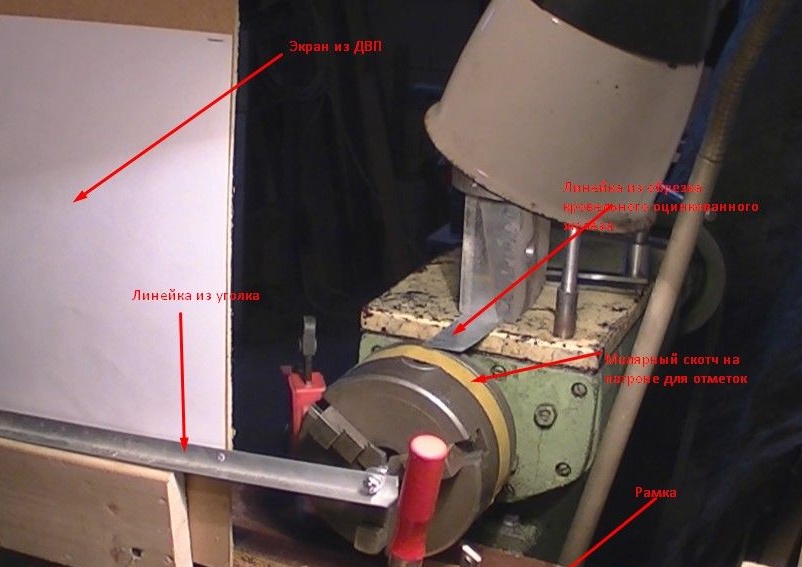
Pay attention to the fact that our impromptu ruler of zinc plated trim also fits snugly on the faceplate, and the "working" part (the part by which we will draw out risks) should be perpendicular to the faceplate plane. Instead of trimming galvanizing, you can, of course, take a metal ruler. But the trim can be easily bent to fit snugly on the faceplate. Secured with a load. I have this metal disc.
The line from the corner has five holes, all located on the same line. One hole with a diameter of 5.8 mm. A 6 mm hairpin is inserted into it, which is fastened with nuts on both sides. The following 4 holes I drilled with a 1 mm drill, and they are located from the axis of the first hole respectively 195 (for 36 divisions), 220 (for 60), 241 (for 42), 260 (for 48 divisions) mm. I will say from experience that the drill should be taken twice as thinner - 0.4 - 0.5 mm. But I didn’t have it at hand. The fact is that we will insert a sharpened pencil into these holes and, turning the ruler, we will draw arcs of the corresponding radius. The tip of a pencil in a hole with a diameter of 1 mm hangs a little, i.e. the radius is drawn with a small error - 2-3 dozens.
The ruler "loosens" on the support when loosening the outer nut. I have this piece of board turned up under my arm. But maybe just a screw.
A bit of geometry.
All the preparations listed above are needed for this. There is such a concept in geometry - an equilateral triangle. This is a geometric figure that has equal sides, and, accordingly, equal angles between them, that is, 60 degrees. In our case, the vertex of the angle will be the axis of the machine spindle, “materialized” in the form of a clamped 6 mm hairpin, on which a ruler from an aluminum corner is fixed. The triangle, therefore, lies on its side. We draw its base on the screen in the form of a chord between serifs on the corresponding arc.
How to do it?
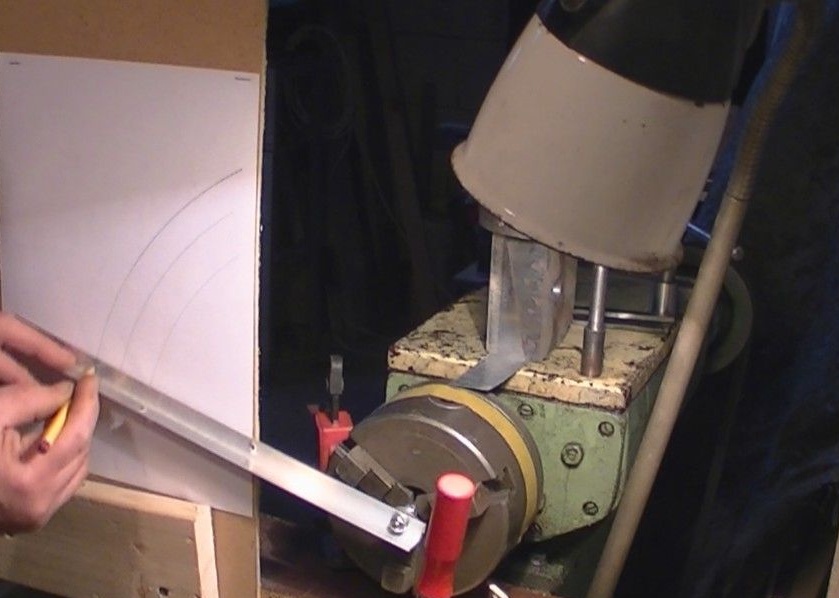
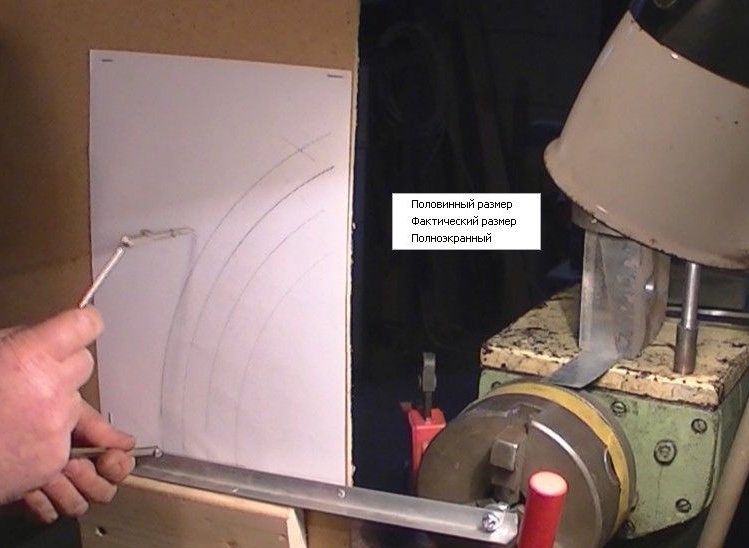
Using a sharpened pencil and the second, third, fourth and fifth holes of the weakened ruler, we draw on an arc paper sheet.
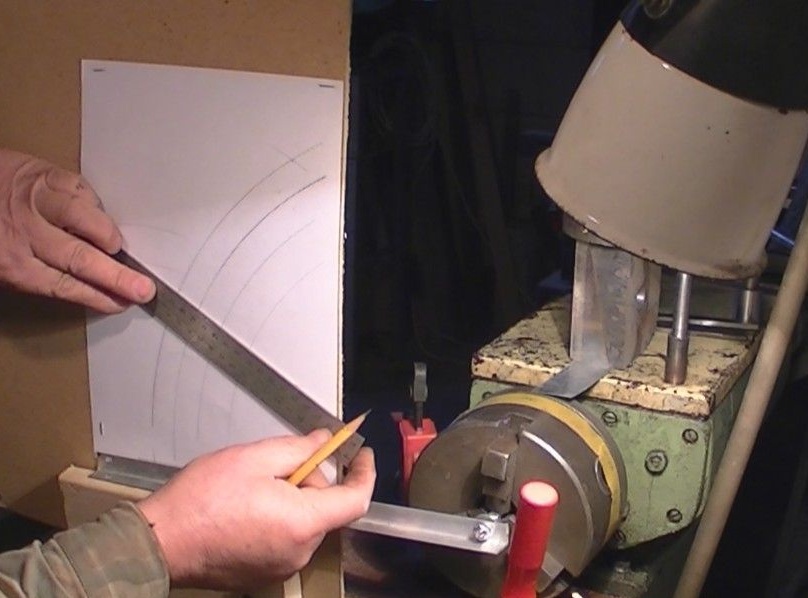
Next, measure 260 mm from the lower point on the outer arc, obtaining the second (upper) point of the base of the equilateral triangle.
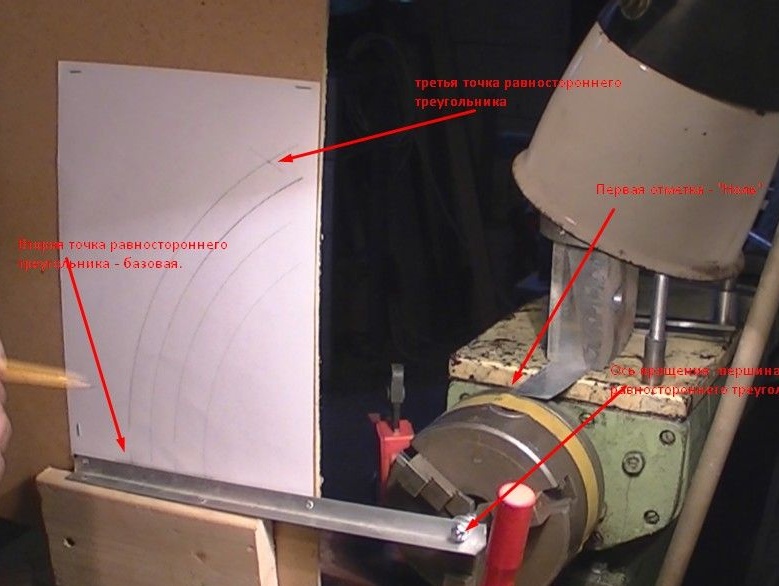
Why on the outer arc? It is possible on any of them, but the larger the radius, the more accurately we can mark and draw a chord - the base of the triangle. As a matter of fact, there is no need to draw a base line: we will only use serifs on the curve, which are the vertices of the side angles of the triangle - the angles at its base.
We can use this property of an equilateral triangle as follows: our ruler from a corner, lowered down to a support, is aligned with one point of the base of the triangle. Then we fix the ruler with the key, tightening the nut. We do the risk on the faceplate, write on the scotch tape the first mark - "O". Turn the cartridge by hand until the ruler is aligned with the second point of the base of the triangle.
Thus, the faceplate was rotated 60 degrees. We make a mark on the faceplate with a needle, and on tape we write that it is "60".
Then weaken the nut securing the ruler, the ruler goes down, "to the base", without touching the cartridge. That is, the ruler is again aligned with the first point of the base of the triangle. Clamp the nut, depriving the ruler of mobility. Turn the chuck by hand until the ruler is aligned with the second (top) point of the base of the triangle. We do the risk on the faceplate, write on tape that it is "120". And so on, using the same algorithm, mark the faceplate with the labels "180", "240" and "300".
As a result, we get the opportunity to divide the circle into 2, 3 and 6 parts.
Moving on. We need to get the risks on the faceplate with a division of 30 degrees. To do this, the base of the triangle must be divided in half. As a result, the angle of rotation of the ruler from the bottom point to a new point in the middle of the base will be 30 degrees. There are two ways to divide the base of a triangle. First. We take a ruler, and from the bottom point of the base we postpone 130 mm, that is, half the length of the base (chords).
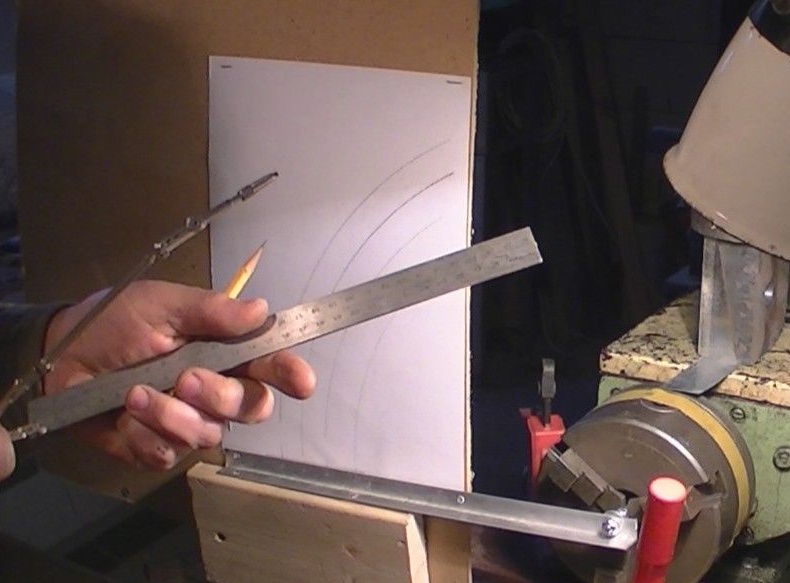
The second is geometric. We take the compass, and with its help, having spread its legs to a length greater than half the length of the base (in my example, about 150-160 mm), we strike on one and the other side of the base overlapping the proposed sector with half the length of the base. Then we rearrange the compass needle to the upper point of the triangle, without changing the distance between the compass legs, and do the same risks that should overlap with the previously drawn ones. We connect the resulting points, and at the intersection of this line with the base line of the triangle will be half the length of this base.
And now, using the same algorithm, we divide the faceplate, causing divisions through 30 degrees. To do this, combine any of the previously applied patterns with the edge of the upper ruler. Weaken the nut, lower the ruler to the bottom point. We fix the nut, turn the lathe chuck to a new mark of 30 degrees. We do the risk, write on the scotch tape the corresponding label. For example, if the risk of “120” was combined, then, turning the cartridge in one direction clockwise, we will get a mark of 150 degrees. And if you turn it counterclockwise, you get 90 degrees. And so on for all previously received risks (marks), until the faceplate is completely filled with marks with divisions of 30 degrees.
As a result, we get the opportunity to divide the circle into several values: into 4, 8 and 12 parts.
Now, to finish the application of the divisions of the main scale, you need to apply the division with a price of 15 degrees. That is, sectors of 30 degrees should be halved in any way. We already went through this, in the sense, we did it for sectors of 60 degrees. So we get marks on the screen with a division of 15 degrees, and with their help we put risks on the faceplate.
So, the main scale is ready, that is, a scale with divisions at a price of 15 degrees.
Now you need to apply 4 more scales to this main scale for dividing into 60, 48, 42 and 36 divisions. Graphically, it looks like this:
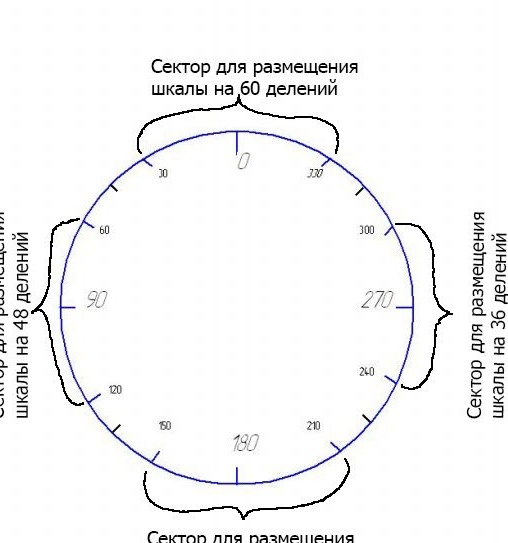
I placed the scales in that order. But you can put any of these scales in any other place at your discretion. I found this placement more convenient. Please note that between the scales remained intact sectors of 30 degrees. You can, of course, expand the sectors of the scales due to the remaining free sectors. I did not do this in order not to overload the scales. For example, for a scale of 42 divisions, 5 notches at 8.57 by risks of 180 in any direction will be “defended” by 42.85 degrees. That is, almost close to marks 135 or 245, which may complicate their use.
Part 4. Drawing a scale of 60 divisions.
To break down this scale, we need to get divisions with a price of 6 degrees. To do this, again a little geometry. In order to get a triangle in a circle with an angle at the apex of 6 degrees, we need to calculate the length of the base of such a triangle. The triangle will be equilateral, and the base of the triangle inscribed in a circle is a chord.
The formula for calculating the chord is: L = 2 * R * sin (A / 2), L is the length of the chord, R is the radius of the circle, A is the angle.
Of all the quantities known to us, we know only the value of the angle - 6 degrees. Finding a half sine from 6 degrees is a matter of technology.
I did so later: I used the "scientific poke" method. Using the Excel program, a table in which I included the lengths of radii with gradation through 1 mm, starting from 130. And according to the formula I got the values of the chord lengths. The table turned out to be long, part of this table after deleting unnecessary values (fractional) looked like this:
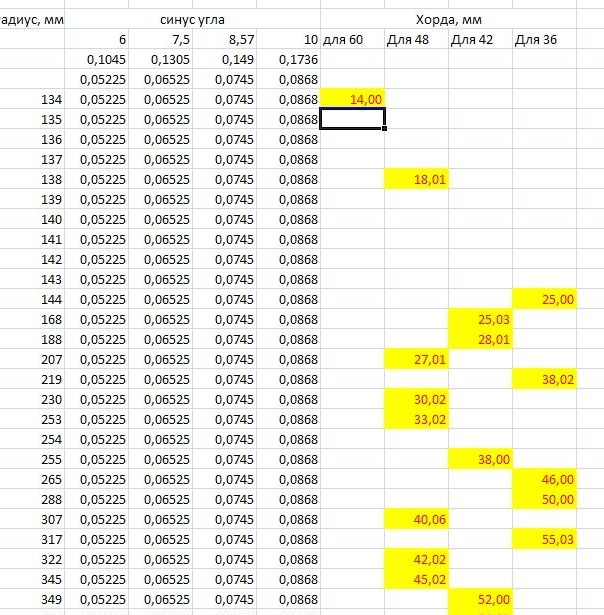
It remains to select the desired values. Since the calculations were made accurate to 0.00001, I chose, firstly, even values that are divisible by 4. Secondly, those that could be rounded if there were no more than 0.03 after the decimal point. This is the question of errors: we can’t "track" three hundredths when using scales. Let me remind you that the thickness of the pencil line is at least 0.2 mm. So hundredths can be safely neglected (we are already used to the fact that there are always errors in measurements).
Why is it necessary to "divide" by 4? But simple. After all, we first divided the base of the triangle by 2, and then again by 2. And as a result we got an integer, not a fractional one.
The selection of values looked like this:
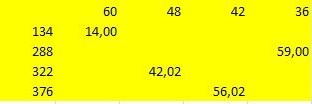
But then I refused this choice, since between 134 and 376 mm the gap is too big. And looked for other meanings. Found. They are no longer in the table, because I cut them out. These values are 195,220,241 and 260 mm. Arcs with such radii are located quite compactly, without interfering with each other. Yes, not everyone is divisible by 4 without a remainder. And we don’t need everything. To create the main scale, I took the arc with the largest radius. To divide in half, I used the graphical method, i.e. using a compass. And if you decide to use a ruler, - a flag in your hands !, - a scale with a radius of 260 mm is divided twice in half without a remainder. The lengths of the chords are 34, 23, 36, and 34 mm, respectively.
So, in the sector for a scale for dividing into 60 divisions, we need to apply risks with a division price of 6 degrees. How to do it? Everything is simple, like a beep of a steam locomotive. Using a ruler or compass, we postpone a 23 mm chord from a lower or any other point on an arc with a radius of 220 mm. The risk on the faceplate with a value of "90" is combined with the edge of the upper ruler. We combine the lower ruler with one end of the obtained chord, fix the nut, clamp the ruler. We turn the cartridge to align the edge of the ruler with the second end of the chord. Got an angle of 6 degrees. With a compass needle we do the risk on the faceplate. To speed up the process (and reduce the number of measurement errors even a little), it is better to use the compass to make serifs not for one chord, but for several. Then it will not be necessary to loosen the nut each time, to align the ruler with the bottom point, but simply after applying the next risks we turn the cartridge until the next risks (end of the next chord).
Part 5. The remaining scales.
The length of the chord for a scale of 36 divisions is 34 mm, which we, as before, mark on the arc, but with a radius of 195 mm. If you “make” 6 such chords, then you can start marking the scale with the value “240” and end with the value “300”. The price of one division is 10 degrees.
And further, according to the proven algorithm, using a 260 mm arc, the scale is divided into 48 divisions (the length of the chord is 34 mm). The division price is 7.5 degrees.
Using an arc of 241 mm, the scale is divided into 42 divisions. The chord length is 36 mm, the division price is 8.57 degrees.
Conclusion
Once again about the question: why does this need to complicate the markup so much? The answer is simple: do not need you, do not. I needed such a breakdown in order to make gears with teeth for 42 and 48 teeth in the future. Still need scales for 29 and 32 teeth. But I will make them already available with the help of a temporary breakdown on tape. But it will be later.
And the last question: how to use it, because each of the scales (except the main one) is short, the whole segment is 1/6 of the faceplate circumference?
Answer: easy to use. I will show a little later the video (when I mount it). In the meantime, briefly tell.
You need to stick tape on the cartridge. Instead of one you need to take the top two rulers. It is better from galvanization so that the ruler can be easily bent.
And now a couple of examples. Let's say we need to mark a circle into 6 parts. To do this, use the main scale, with one top ruler. Consistently combining the risks of 0, 60, 120, 180, 240 and 300 we get a division into 6 parts. The circle, eat-but, is clamped in the cartridge, which we rotate and take risks along the edge of the cutter or by the cutter itself.
Now mark the circle clamped in the cartridge into 5 parts. There are no such divisions on the main scale.Then let's think which of the scales is divisible by 5 without a remainder? True: 60 bar scale. These are 12 divisions. But damn it: we have only 10 divisions on the scale !?
Calmly, without panic. The price of one division of this scale is 6 degrees. Therefore, 12 divisions is 72 degrees. And on the main scale in the previous example, we used sectors of 60 degrees. And what prevents us from combining one top line with the risk of "300", and the other line to combine on the second risk to the left of "0". That is, add 60 times 2 times to 6, we get 72. We position the rulers so that they fit snugly on the faceplate. Does not work? It is true that the radius of the faceplate is too small, the curvature is large, and the rulers either hang in the air, or they will need to be bent so that they fit snugly against the faceplate. Do not do either one or the other. Just turn on the head, and instead of 12 divisions, let's take 6 divisions, i.e. 36 degrees. And we become rulers through 6 divisions.
On tape with a pencil or pen, we will draw dashes on the rulers. On our circle we make the first notch with a cutter. We turn the cartridge by hand, let's say in the course of the clock, until the left stroke on the adhesive tape is aligned to the edge of the right ruler. We turned 36 degrees. On tape on the left ruler we draw a risk, and turn the cartridge to this risk. So we turned 72 degrees. We make a second notch with a cutter. Etc. One subtlety. Dashes with a pen or pencil are “thick” no matter how hard you try. Therefore, the edge of the right ruler when rotating the cartridge should not be combined with the right edge of the left line, but with its left edge. That is, almost completely the line should go under the right ruler. Otherwise, an error of 2-3 dozen will accumulate with each measurement. And in a circle it can be more than a millimeter.
To divide into 14 parts, you need to use a scale of 42 divisions. 42: 14 = 3 divisions.
More interesting is the question of the breakdown, suppose for 144 parts. I don’t know who needs it, but all of a sudden? Here the algorithm is different. We do not have scales that would be divisible by this number. Then we are looking for not the number of notches, with degrees of one division. 360: 144 = 2.5 degrees. Where to get 2.5 degrees? And if on our scale? !! We have a scale with a division price of 10 degrees. And there is a scale with a division price of 7.5 degrees. If 10 - 7.5 = 2.5. Here is the desired result! How to get it real? The scale of 36 is brought to the top, to the rulers. We combine one ruler with one risk of the scale, another with another, with the nearest one. Between the rulers, we have a sector of 10 degrees. Now we turn the cartridge, bringing the scale to 48 to the rulers. The price of its divisions is 7.5 degrees. We combine one risk of the scale, for example, with the left ruler, which we did not touch. Then we move this ruler to the second one until it is aligned with the nearest risk of the scale by 48. That is, we reduce the sector of 10 degrees by 7.5. In the remainder between the rulers we get a 2.5 degree sector. And go! By the same principle as when dividing into 5 parts, we use two rulers.
Okay, another example. Suppose you want to break a circle into 40 parts. Counted: 360: 40 = 9 degrees. Wept - we don’t have such a scale! Turn on the head. We have a scale with a division price of 7.5 degrees. Two divisions on this scale will make up a sector of 15 degrees. Set the rulers at a distance from each other in two divisions on a scale of 48.
And now from 15 you need to subtract 6 to get the desired 9 degrees. Where do we have 6? That's right, on a scale of 60. We already know how to take a few degrees with the help of rulers. We do, mark up.
Using the same principle, a circle can be divided into 80 parts. 360: 80 = 4.5 degrees. Three divisions on a scale of 48 will give 3 x 7.5 = 22.5. Three divisions on a scale of 60 will give 3 x 6 = 18 degrees. 22.5 - 18 = 4.5.
And again to the theory of errors. If you circle a large number of patterns, the error accumulates at each mark. To reduce the error, I recommend making half the marks. And then return to the beginning, and do the marking in the other direction, also to half. When these "half" marks converge (and they almost never converge), then we will see the magnitude of the accumulated error. For example, when dividing into 8 parts, I showed an error in the marking of about 0.1 - 0.2 mm. For threaded connections, this is not critical: the threads on the screws are always always failed by 3-4 tens. But if I went with the markup sequentially, then the magnitude of the error could increase to 0.5 mm, and this is already a lot.The conclusion from the theory of large numbers: the less measurements we make, the less we are mistaken. And vice versa, the more measurements, the more error accumulates. This must be taken into account.