You always liked table lamps and generally local lighting. Especially good are lamps with a horizontal arrangement of the reflector-lampshade, I still can not get myself to do something elegant in this way. This is for residential premises. For workplaces, such a parameter as lighting is more important. And here these are not categories of cosiness, design, Feng Shui and spiritual comfort, but much more severe health issues. Vision first.
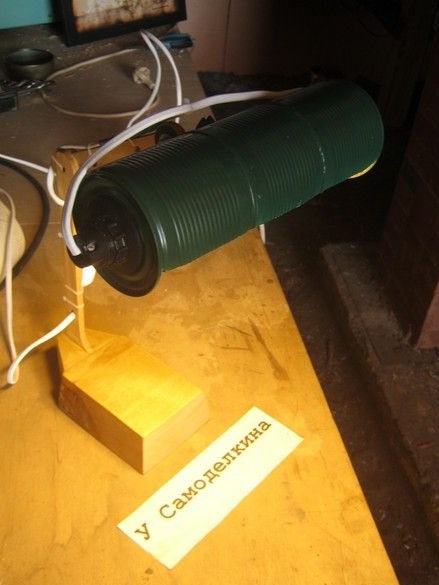
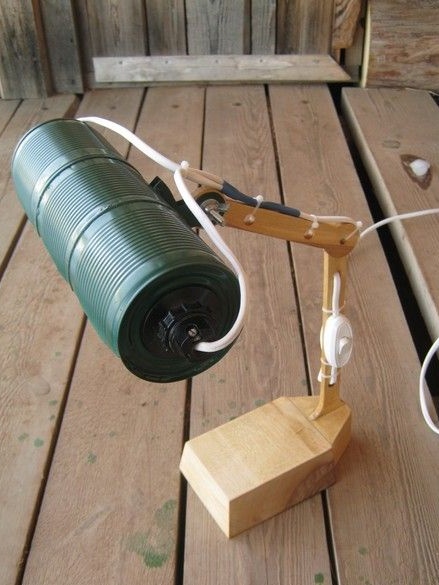
The workshop, in the main places convenient for sedentary work, has its own local stationary lighting, however, sometimes, one has to face the need, for various reasons, of small work in an unusual place. In such cases, local lighting is not provided, but the total is not enough. There are two small table halogen lamps, but there are absolutely not enough 20 W of them, despite the halogen content. After the next such session, I threw everything away, took up lighting - I picked up what could be useful in the boxes and corners of the workshop, and put them together, with the goal of folding the lighting device out of it. In general, I think it turned out pretty well. The lampshade is made of cans, from canned corn or peas. Electric fittings, standard from the store. Lamps, wire, plug, also purchased. The base and “joints” are made of hard wood, as long as the lamp is purely utilitarian, all without equivocations and ceremonies.
So. What was used at work.
Tools, devices, equipment.
For the manufacture of the wooden parts of the lamp, a circular saw, an end pendulum saw, a planer with accessories were used. "Joints" were cut out with a hand jigsaw on a tree, a compass was useful for marking them. The holes in the tree were drilled with wood drills on a drilling machine, when installing large revolutions. To make a lampshade from cans, a screwdriver with a feather drill was useful, for cutting holes for lamp "bullets", a drill with a flexible shaft and small abrasive wheels for cutting an opening, a jewelry jigsaw with accessories for cutting the lampshade mountings from galvanized steel roofing, soldering iron 65. ..100 W with accessories, for soldering. When painting and varnishing, a small brush and dishes were useful.Not damaged the usual set of small tools for wiring, building hair dryer or special for working with heat pipes.
Materials
Electrical fittings, lamps and wires from the hardware store. Tin cans - the contents are eaten, the cans are washed and dried. It also required a flux and solder for soldering. For processing the wooden part of the lamp, a sandpaper of several rooms, table adhesive PVA, LKM, a thin elastic rope for technological fasteners during gluing came in handy. For the manufacture of tin lampshades, a piece of galvanized roofing steel was used for fastening, spray paint in a spray can, of the corresponding color. For electrical installation, including kapron couplers, a thermotube were needed.
Initially, having turned the extracted materials in his hands, he decided on the general concept. Lampshade - horizontal type, in parallel means the surface of the table. The bulbs were found to be relatively low-power, energy-saving with a small E14 base. Fortunately, the corresponding "cartridges" were also selected for them, with thread on the outer surface and a wide carbolite nut - for installing or suspending the lampshade. It was decided to use a pair of lamps, respectively, the design turned out to be symmetrical. It is accepted - the inclusion of both lamps in parallel, in the case of high power lamps, the second can simply not be installed. There is no operational brightness adjustment, for ease of wiring.
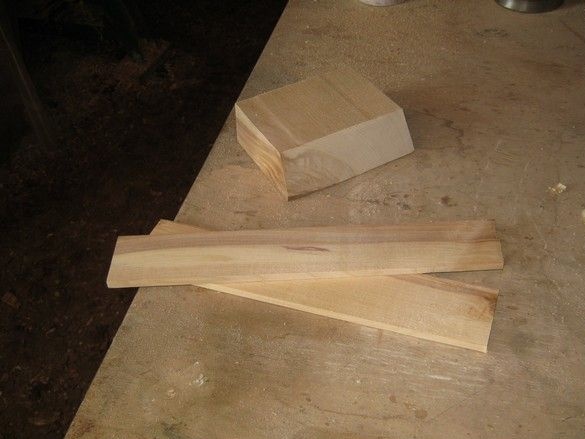
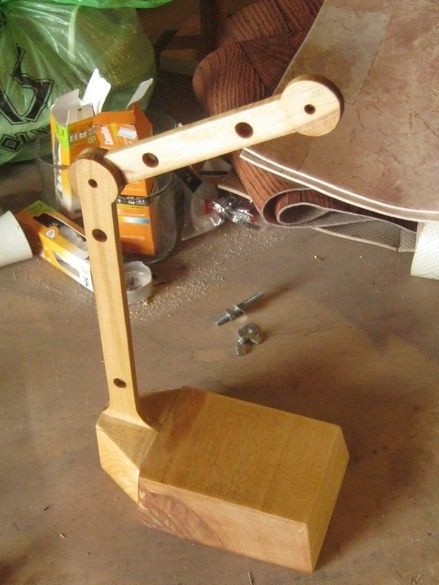
He began to manufacture a wooden part. I picked up a suitable piece of a thick birch board for the sole and sawed thin, relatively wide rails from the same long board on a circular saw. He sawed everything he saw on the machine, setting a shallow depth of planing. I sawed off the edges of the sole at a slight angle to the surface of the future support, more for aesthetics. Sawed off the back at 90 degrees - there relies fastening of the articular "leg". Parts of it, again for some aesthetics, I decided to do a little more elegant - to narrow out by highlighting the joints. The latter should not be too small in diameter, for, to hold a relatively heavy lampshade, the friction force on a small area of contacting surfaces will not be enough.
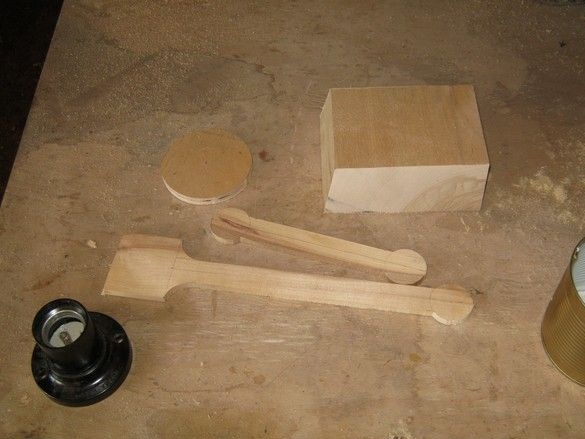
He preliminarily marked out the parts of his legs and sawed them out with a textured manual, “pioneer” jigsaw on a tree, on an equally textured, special dovetail stand mounted on the edge of the table with a clamp. The thickness of the workpiece is small, sawn well. After cutting, all the wood was sanded and glued in the right way. To admit, initially, I began to design a lamp with a single lamp, respectively, the design was not symmetrical, the mount to the sole was on the side. Simple and convenient. In the course of work, the lamp was upgraded to the current version, and had to get out. I didn’t come up with anything better than just sticking my foot to the sole, strengthening the place of gluing with two “scarves”. However, it turned out quite reliably. At the time of gluing, the details are pulled together with a thin elastic rope. Glued with a “moment a carpenter”, the glue that appeared, wiped it off with a wet cloth. Yes, having lost his mind, he decided to eliminate one hinge - he didn’t need it. It is quite enough, the possibility of tilting the lampshade by adjusting its tilt achieves a light spot on the work surface as close to the “operator" as possible, but so that it does not shine in the eyes. That is enough. The hole in the hinge was used to clamp the bonding point and to fasten the wire with a nylon strap.
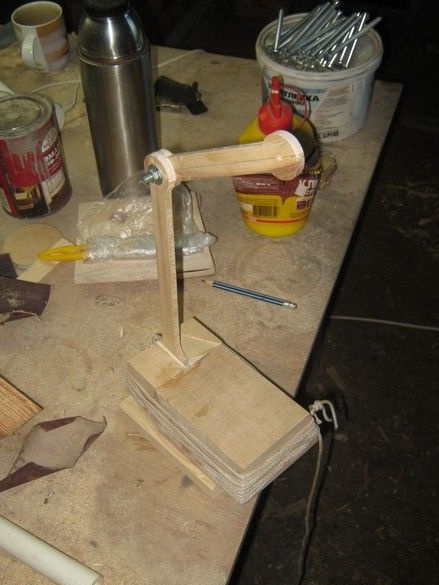
After gluing, having disassembled the technological fasteners, a drill on a tree with a diameter of 10 mm, with a spike in the middle, drilled several holes for wires and ties on his leg. Drilled at high speeds - the edges are smooth. Once again I cleaned the piece of wood with a sandpaper and varnished several times. Finnish "Yalo", I really like it for its beautiful matte surface, very similar to waxing.
Let's proceed to the tin lampshade.Having picked up three identical cans from canned corn, I checked their identity and pre-marked - on the bottom of one of them, with a permanent marker, I noted the sector to be cut. He folded two jars of bottoms, focusing on the seam and moved the marking from one to the second. It is advisable to open all the cans with a special opener with a cutting roller, it does not form nicks and burrs of tin and gives an even crumpled belt, absolutely without sharp edges. In the absence of such a kitchen tool, you will have to use ordinary ones and even out the notches and torn edges of the jar remaining from opening the lid. When leveling with improvised tools, it is quite difficult to maintain a flat side surface of the jar, but cuts with sharp canning edges are an unpleasant thing.
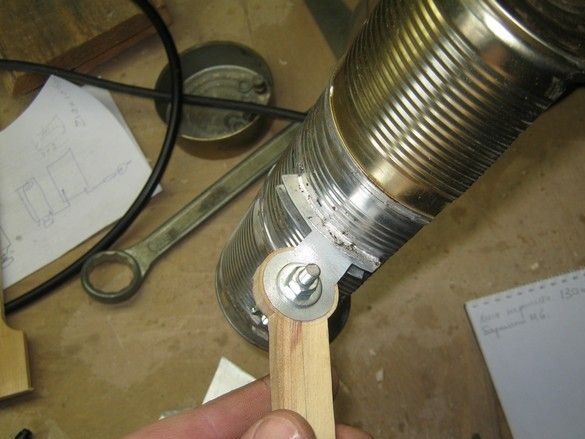
After preliminary marking, I drilled a hole with a feather drill of a suitable diameter for the “lampholders” of the lamps. The drill clamped in the chuck of a screwdriver - this is somewhat safer than when using other drilling tools - when the drill is jammed, the "ratchet" of the screwdriver is triggered. The diameter of the drill was slightly smaller than the required diameter, the hole had to be bored with a semicircular small file, in protective headphones - despite the small size, the can is monstrously resonating and the rumble is pretty good. We managed to select the holes quite successfully - the thread on the outer surface of the cartridge is screwed perfectly into the side tin wall of the lampshade. The fixing of the cartridge occurs with a standard carbolite locknut.
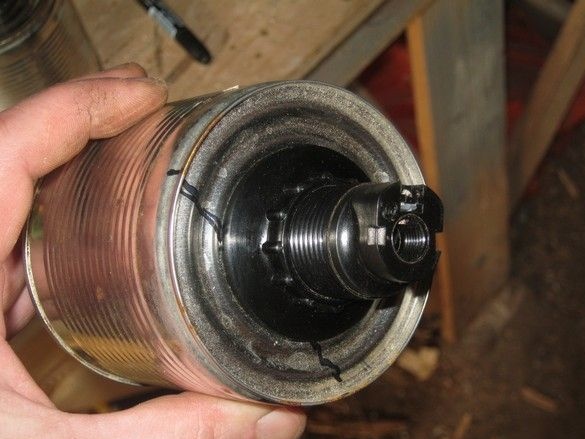
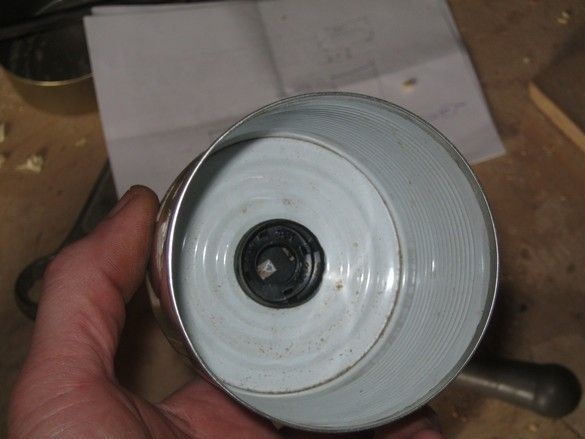
In the middle jar, he removed the bottom, cleaned out the places of future soldering with an average grinding sandpaper, folded all three, focusing on the seam, applied flux (zinc chloride) and soldered. After cooling our future lampshade, I finally marked the opening, focusing on the marks left on the bottoms of the jars-edges. I cut an opening with an engraver with a small abrasive nozzle. He translated as many as three pieces, but it didn’t work out with scissors, and the angle grinder was afraid - it would probably not have worked out very carefully.
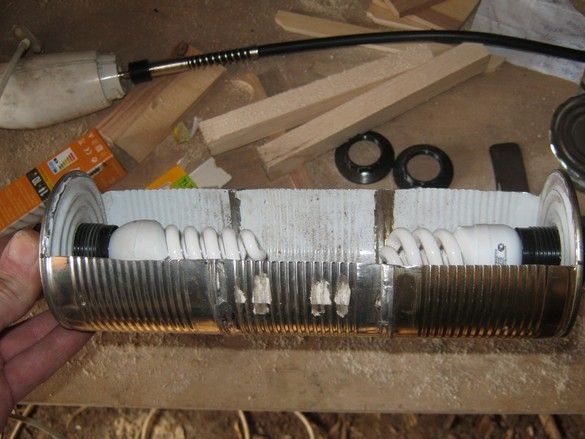
On a piece of galvanized roofing steel, I marked out two fixture shades, sawed it with my favorite tool - a jewelry jigsaw on the same “dovetail”. He dulled the sharp edges with a file, cleaned the surfaces to be soldered, screwed both fasteners to the joint, and so soldered to the lampshade as an assembly. Flux, all the same zinc chloride. The soldering spots were washed with warm water. With the help of acetone, rags and a small plumb bend, I washed the jars from the remnants of the label glue, so as not to get up twice, degreased before painting. He composed a technological hook on which to paint it, a lampshade. In two layers with intermediate drying, popshikal dark green enamel from a spray can.
After the lampshade completely dried up, he proceeded to final assembly of the lamp and wiring - he replaced the lamp cartridges, having tried on, cut off two short pieces of a flexible “network” wire. I found it a little thicker than necessary and it turned out rough - here you can use a much smaller section - small energy-saving or LED lamps will consume very little electricity. The ends of the wire blanks were stripped from insulation, tinned, connected to the screw terminals of the “cartridges”. He collected these same "cartridges", specified the length of the protruding wires in place, cut off the excess, cut the ends, tinned. Prepared a long piece of the same wire - to the outlet, butchered its end, tinned. The prepared ends of the wires were soldered, having fixed each bundle in advance, with a thin tinned wire, copper is understandable. He insulated the places of rations with a thermotube, on top of the outer insulation, set another one, thicker. He secured the cutting with nylon straps to the wooden leg (Say Hams, we will still wag like a Markitan boat ?! I’m tired of the captain, I want to live in his cabin!) ... ahem ... Well, in a word, it's up to switch. I decided that it is most convenient to place it on the lamp itself - it will be nearby, and not on the wire, so as not to stretch. The switch, however, was found precisely on the wire, I had to fasten it to the foot with ties, for the outgoing wires. For installation, everything is as usual - check in place, cut, tin, screw into terminals, assemble the case.So it is with the power plug, do not forget before cutting, put its body on the wire, so as not to groan later - "Oh, where were my eyes!". The wire before being released from the lamp, just in case, was additionally secured with several nylon straps. All. You can put lamps and try.

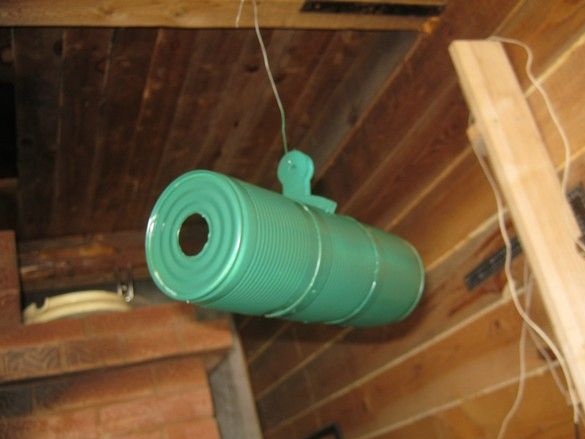
The lamp is very satisfied, there is no light meter, but it feels like a delight, a lot of bright light, but it doesn’t dazzle, it’s very convenient to fiddle with the little things, eyes do not get tired for a long time. The spot of light is quite large, one degree of freedom of the leg is quite enough - it is adjusted once depending on the height of the chair on which you are sitting. The center of gravity also turned out to be quite comfortable, and despite the not so large area of the sole and its weight, the lamp is quite stable. The switch on hand also turned out to be quite good, as expected.