Generally speaking, the veranda is a wonderful thing. In a cost-effective manner, the built room, which is mainly unheated (in operating costs, minus the item of heating costs), is nevertheless a very useful property. First and foremost, it performs the function of a canopy - a sort of airlock, which does not allow the doors to “blow through” and minimizes heat loss from residents moving here and there. The fencing of the veranda keeps the air cushion near the wall (s), thus reducing the heat loss of the building and the infiltration of the walls, which is also very nice - heating costs are reduced. The veranda is a relatively simple way to somewhat expand the economic territory of the house and, in general, the living space under the roof - despite the lack of heating, there is application for its premises all year round. And finally, a purely aesthetic - to keep on a glazed veranda a small table for the domestic version of the tea ceremony, as an option - just sybaritize in a rocking chair, with a cup. At the same time, it would be preferable that the view was not a city dump or a metallurgical plant, but this should be taken into account earlier.
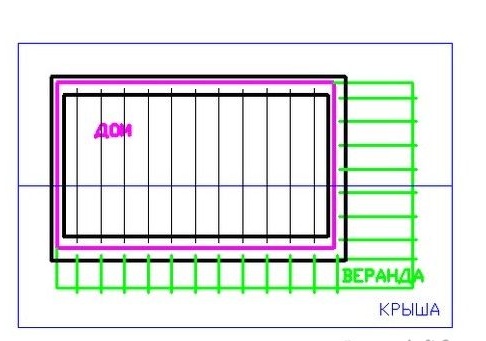
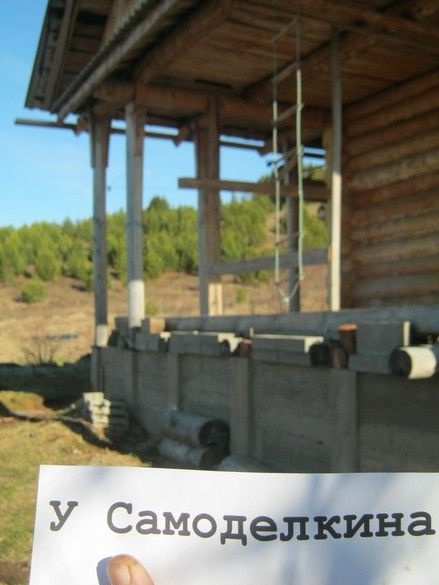
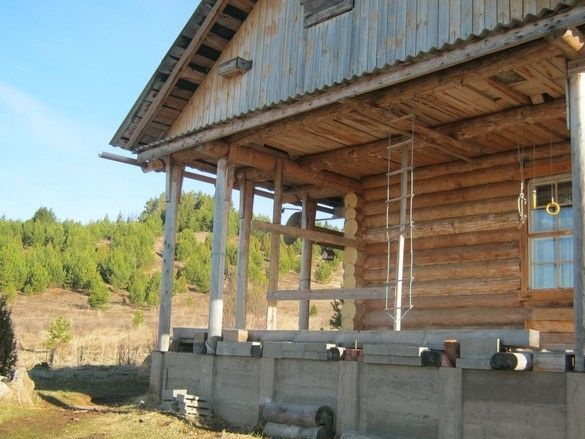
Such a house we had conceived - the veranda in it by default, was originally planned. Moreover, as many as two things - narrow, like a corridor and wide, along a short wall. In the diagram above, all this is green. The roof over all this good is assumed to be general, gable. That is, the walls of the veranda are not only a fence, they are also supports of the protruding parts of the roof - especially from the short side.
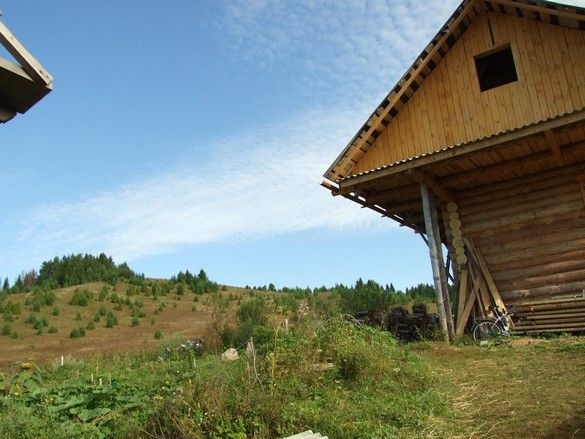
During the construction of the house, technological supports-logs were instituted under the protruding edges, so the house existed for some time. Finally, it's time to do something more solid instead of props. The foundation, which was built only under the log house, had to make a separate foundation for the protruding veranda. Given the low load and significant height of the foundation, it was decided to use a somewhat simplified design that provides low material consumption. So.
What was used in the work.
Tools, equipment.
Standard trench and marking tool for earthworks. A spade was very useful, somewhat more powerful than ordinary bayonets - a bunch of them broke. Cutting machine for cutting reinforcement. Sledgehammer, nowhere without her.A concrete mixer and associated ones were also used - a trough, buckets. Trowel of course. Levels, plumb line.
Materials
Fittings in proper quantity, knitting wire. Of course, the components for the preparation of concrete. Boards for formwork, fasteners. Boards, it is advisable to use which is not a pity - after concrete work they are of little use, even if the formwork is lined with a film or roofing material from the inside.
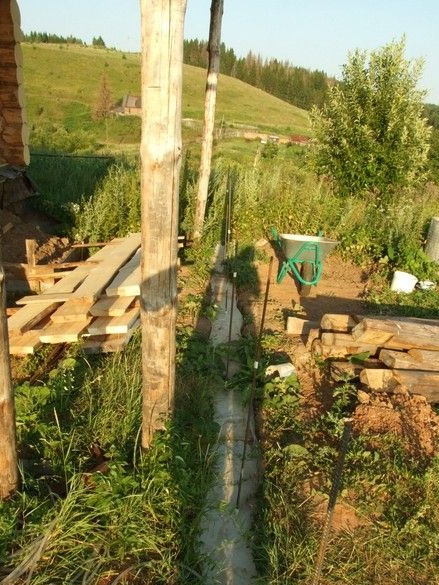
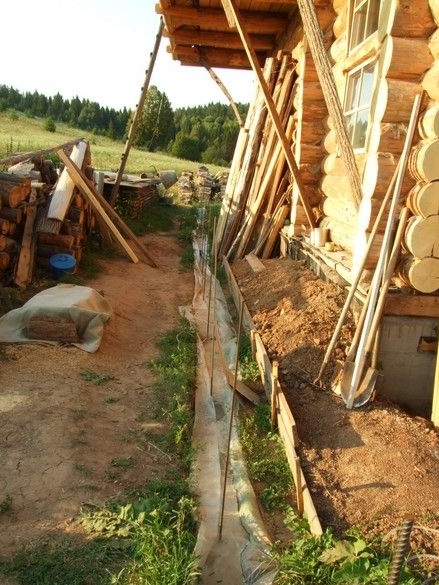
First of all, marking was carried out - the axes of the foundation were marked on the ground, the supports were moved from the logs so as not to interfere. A narrow trench was dug, to a depth of about two bayonet shovels or a little more, the vegetation layer was removed and buried a little in the ground. The width of the trench is also the width of the shovel. After aligning the walls and the bottom, backfilling was made of sand - in thin layers, with wetting from the watering can and ramming with a trimmed log with a horizontal handle. Not a pleasant occupation.
After bringing the sand backfill to the desired level of the trench and leveling it, the bottom and walls of the trench were lined with plastic wrap. Here I used any pieces of film, no matter how large the size - its task (film) is to prevent the absorption of water by dry walls and the sandy bottom of concrete until it hardens. At the bottom, the film can be crushed with stones, fragments of bricks, pieces of iron, a boot, the upper edges, so as not to turn up in the wind, were fastened with the same bricks, with large nails - stuck them through the film into the ground.
I marked out the places for the posts - under each roof log requiring support. I had to climb with a ladder and a plumb line. Weighed the axes of my future columns, noted on the ground with pegs.
In the center of each future column, over its entire height with a margin, stuck 12 mm in the reinforcement. Previously, the end of each was sharpened (sawed off by a “grinder”, at an acute angle), so that the film would not wrinkle at the bottom when stuck - in the right place, with a sharp knife, make small cuts.
He pressed the film onto the stones at the bottom of the trench, laid along a couple more reinforcing bars, fixed them with soft steel wire so that they would not fidget during concreting.
In small portions, preparing concrete, gradually poured the trench flush with the upper edge of the earth. Only vertical armatures remained in place of future columns. I repeated the whole complex of procedures along the long side of the house.
After pouring concrete, you need to take some time to preserve moisture - cover it with a film or roofing material, or compensate for the loss of water several times a day, pouring concrete from a watering can. Procedures should be performed during the initial set of concrete strength - about a week.
After casting the underground part of the foundation, he began to manufacture columns. They were also made of concrete casting, for which several simple formwork forms were made - sort of boxes without bottom and top. Two wider walls were made of several boards in the form of shields, narrow walls of a single board. The walls were fastened in several places with self-tapping screws. Unlike nails, self-tapping screws allow you to very carefully disassemble the form on a barely frozen cast without violating it, which saves time. Moreover, with incomplete solidification of concrete, the walls of the formwork are removed more accurately, not clinging so much to the casting. The inner walls of the mold, it is desirable to finish with roofing material or a thick plastic film, the walls of the castings are smoother and better removed. Fastened roofing material to the boards with a furniture stapler.
The order of work was as follows - after assembling the form of the column, jammed it on the reinforcement and with the help of pegs and spacers secured it in an upright position so that the reinforcement (center of the column) was in the middle of the base of the box. After alignment, the bottom edges of the box did not always fit snugly to the base - it was strengthened and sealed with improvised means - scraps of tin, a brick wrapped in film, and planks. A long rail with a level laid on it, noted on the outside of the box a level - on the foundation of the house.The columns are far removed from the foundation, where no laths can reach, he noted with the help of a water level - a long hose with water. Then, using a screwdriver, a hole in the box wall was made with a thick drill, and a carnation or wire was inserted - it was convenient to navigate them when pouring concrete.
The first batches of liquid concrete had to be laid very carefully - if you plop from the very top of the box, then it would reach such a speed that it would reach the bottom (a portion of concrete) so that all my tricks for sealing, all the tricks and bricks would blow out. After laying the first bucket, it was better to let the concrete solidify a bit so that the liquid column would not burst out and push out the plugs below. For the time of solidification, he passed on to other works. After some hardening of the first portion of concrete at the bottom, it was possible to act much bolder - flooded immediately to the top (to the level mark). Not reaching the top, I drilled holes in the side walls of the formwork and passed a piece of reinforcement through them - it formed the outlets of the reinforcement on the sides of the columns, to which the reinforcement of the piers could be attached.
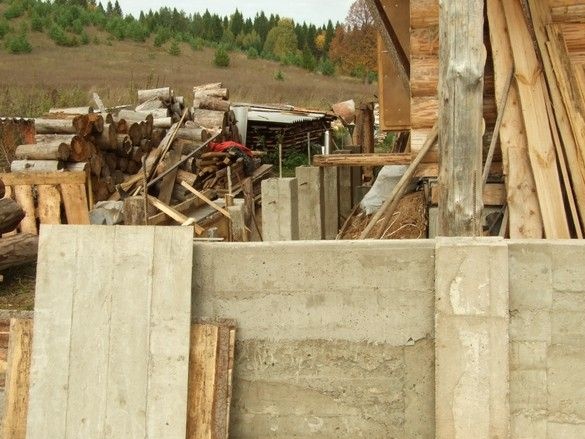
The formwork was usually dismantled and removed the next day, it was removed well, the concrete kept its shape, but was not solid enough - it made it possible to smooth corners, edges with a brick, to align the supporting surface for a wooden pillar. The formwork was assembled, fixed at another place, the cycle was repeated. Initially, the extreme columns were cast on each side, installing the formwork of the others was much easier - visually, “in alignment” or by string.
After removing the formwork from the column, he regularly poured water, after the concrete had hardened enough, he cut the reinforcement in the center of the column, leaving 15 ... 20 cm, then a wooden post would be planted on it.
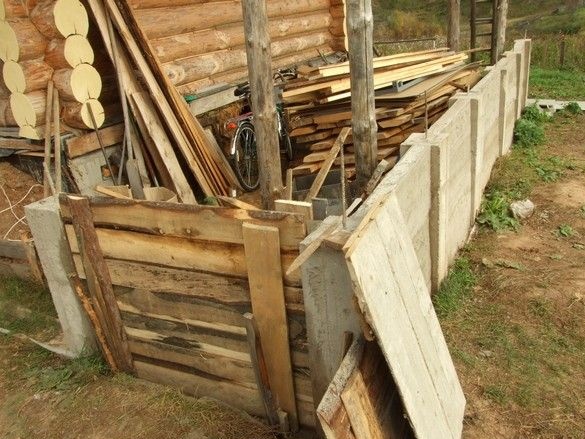
The spaces between the supporting concrete columns were covered with concrete walls. For their casting, two sets of shields were made from scraps of boards trimmed with ruberoid on the working side. When installing the wall formwork, there was no need to use the level - it was possible to focus on the corresponding surface of the columns. Shields were fastened with scraps of boards, propped up with struts clogged into the ground, pegs. The slots were sealed with improvised means. Pouring (laying) of concrete was carried out similarly to columnar. Yes, the important point is that it is better to prepare concrete not with liquid, but with such a consistency at which it has to be laid in the mold. This is somewhat whiter than labor-consuming, but you can save a lot of money on formwork (they do not move so much) and the concrete comes out more durable - sand does not settle in it as in the liquid version.
After making all the posts and piers, a pre-prepared wooden post was put on the pin of each concrete post (rough planed, length specified), before that, a half-rolled piece of roofing material for waterproofing was placed on the concrete. On the piers, sections of the half-beam are laid, the floor of the veranda is laid on them.