

Lamps, have a number of them. On the one hand, a purely utilitarian object - “electric light continues our day” and everything like that, on the other - a spectacular interior detail that involuntarily attracts attention. It is no coincidence that any lamps are a worthy application of forces, so to speak, designers and a grateful ground for the implementation of creative ideas. The naked light bulb on the wire is not very inspiring, except for proponents of interior decoration in the spirit of "bastard repair", a kind of punk, you know - walls of non-plastered brick, partitions made of mesh-netting. In other, more common cases, light bulbs as a light source are somewhat cultured. It is customary to equip them with lampshades - some kind of design that appropriately distributes and directs light, for example, directs it onto a work surface that prevents contact with eyes. Keeping such lamps near you is much more pleasant - there is no sensation of an operating or interrogation room. Yes, in large luminaires of "general lighting", a certain diffuser of light is often used - as a rule, it is a lot of glass elements - the Indian from the Mumba-Yumba tribe is numb. Generally speaking, for lampshades in particular and for designing fixtures in general, which materials are not used, but, perhaps, it is glass that just begs for it, due to some of its properties. Transparency in the first place. Skillfully using him (her), you can create very worthy gizmos.
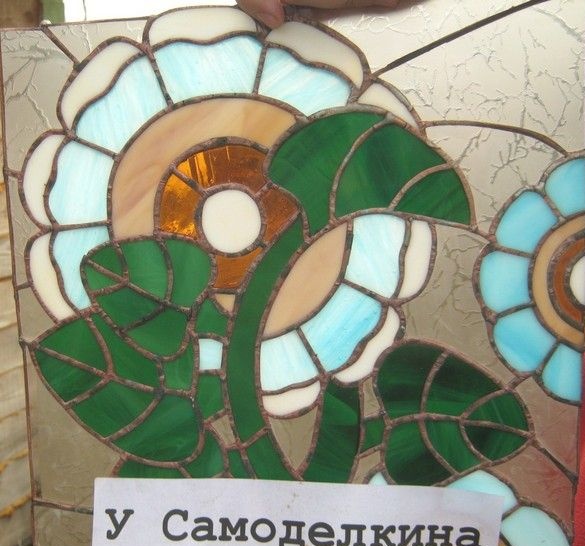
As soon as the glass for the decoration of the lamps was marked, one cannot but recall such an area of life as a stained glass window. There are several techniques for making stained-glass windows, of course we are talking about glass, and not about crafts made from colored sticky films, which are simply the same profanation of the very idea of stained glass. Yes, so there is, including a technique for making stained-glass windows, which is quite suitable for relatively small products with quite complex curvilinear edges for mating glasses. The work can be done in a rather complex form. All this makes it possible to make beautiful lampshades - stained-glass windows. The performance technique itself is called "Tiffany", after the name of the one who invented it and is now very popular.
Generally speaking, the process consists in creating a picture of a stained-glass window - “cardboard”.The contours of the individual elements are transferred to the corresponding glass colors and are relatively roughly cut with a glass cutter. After, the edges of the glasses are ground and adjusted to each other on a special grinding machine with a diamond tool. Then, the edges of the glass are pasted over with a thin copper foil with an adhesive layer, the glass is folded into a pattern and soldered. In essence, everything.
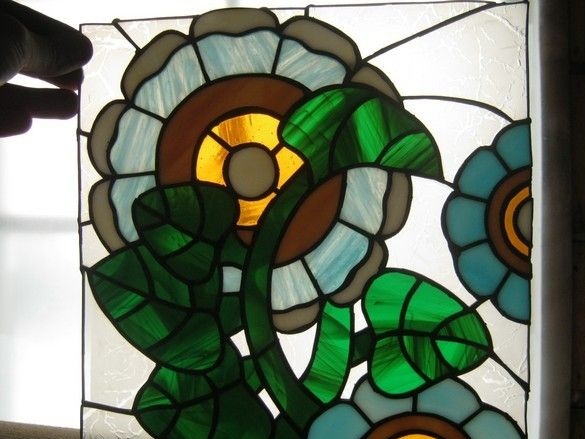
Generally speaking, any stained glass window looks most advantageous precisely in transmitted light - when the light source is behind it and in this sense, to use it (stained glass window) as a lampshade is an excellent idea. When using the Tiffany stained glass technique, the shape of the finished product can be quite bizarre, but to get a hemisphere or a shape close to it of more or less normal sizes, and does not pose any particular difficulties. It’s only necessary to preoccupy a convenient form for work. There are several more common forms of lampshades (lamp designs) of stained glass type, with a somewhat simplified form, which nevertheless allows us to appreciate the merits of the idea. Moreover, such simplified fixtures can have undoubted advantages, for example, the picture lamp is located simply on the wall, occupying a minimum of space, it is very original, finally.
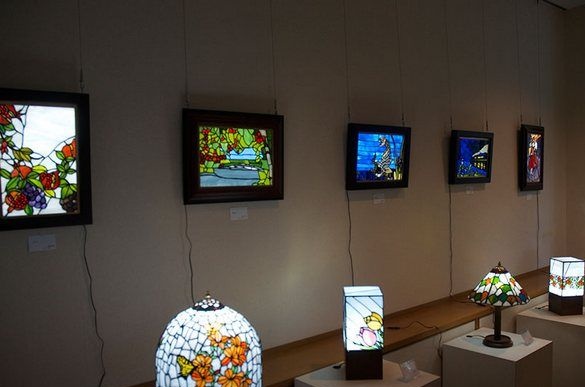
The venerable masters do not disdain such lamps, for example, at the exhibition of the Japanese master Ichiro Tashiro, such lamps occupy a considerable part of the exposition.
The first experiments in stained glass, it is worth starting with a flat design because of its extreme simplicity.
What was used in the work.
Tools, equipment.
In the manufacture of stained glass, you can not do without some special tools - the main and most expensive of which is Sander with accessories. You will also need special tools - glass breaker, special nippers. It is convenient to cut out the elements of the stained-glass window with a special glass-cutter for curved cuts - the head is much narrower, it is more convenient to work with. This also includes a good thin felt-tip pen, drawing on glass with a thin rod, it is important that its trace is not washed off by water (on a grinding machine). Of the usual tools, you will need scissors, for sweeping the glass chips formed during cutting and nibbling the glass, a wide paint brush with a tin box came in handy. I needed access to a computer with a color printer. To fix the finished glass elements, small cloves or tailor pins came in handy. Tiffany's stained glass technique involves a lot of soldering - you need a rather powerful 60 ... 100W soldering iron with accessories, preferably equipped with at least the simplest temperature controller from a dimmer connected in series. Flux brush. It is necessary to take care of good lighting of the workplace - a couple of table lamps will come in handy.
Materials
In addition to the colored glasses themselves, they needed a piece of thick plywood or chipboard - a size slightly larger than the dimensions of the future stained glass window, pieces of linoleum of the same size - a soft base in which it is convenient to stick pins. Thin “sausage” polyethylene came in handy. Adhesive tape, special copper foil with an adhesive layer. Solder, acid flux, chemicals for pointing patina of the desired color, as well as some special for stained glass. Perhaps a solvent, such as acetone or alcohol, "steel wool" is useful. The rags are cotton. Four slats with small cloves, for the "border" of the future stained glass window.
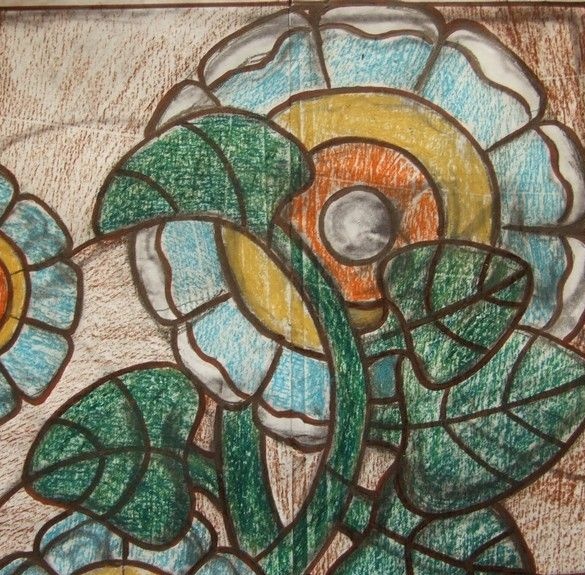
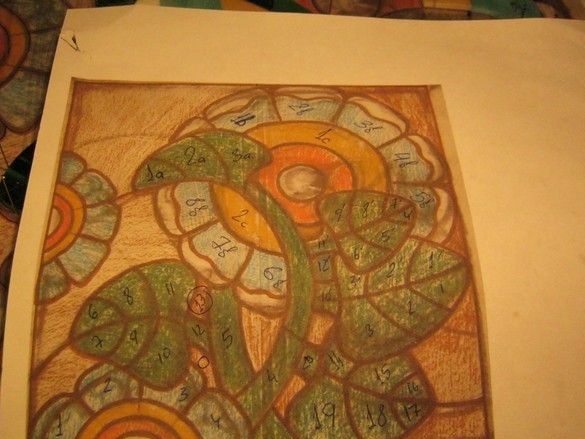
As a matter of fact, it all starts with a sketch of a stained-glass window and looms in “cardboard”. This is a finished sketch, life-size, from which they draw, sculpt or behold, cut glass. For use as a stained-glass window, the figure must meet some specific requirements - parts of it should not be too complex, too thin. Otherwise, it will be difficult to cut and fit. It is better to break large and complex fragments into several simple ones, but without fanaticism.It is difficult to make a stained-glass window drawing with very small elaborate details; here one must either use mixed technique, for example, combine it with glass painting or “fusing” - fusion of colored glass in the stove. In the general case, with a rather crude stylization, you have to put up with it. However, such sketches can also be quite expressive.
I ordered colored stained glass together with some specific stained glass materials (chemicals, copper foil) from special comrades selling such things. As a rule, they sell a battle, fragments of stained glass, for small work, it is more convenient to order them.
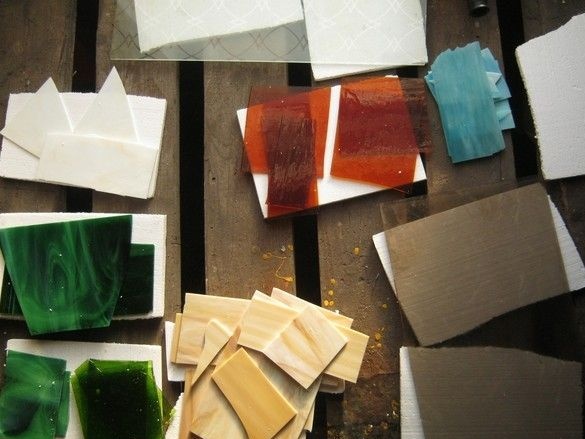
Figure photographed for digitization. Now, if necessary, it can be printed in any quantity and any reasonable size - my printer prints A4 format, so I had to use the "poster" printing mode - the picture is divided into several sheets.
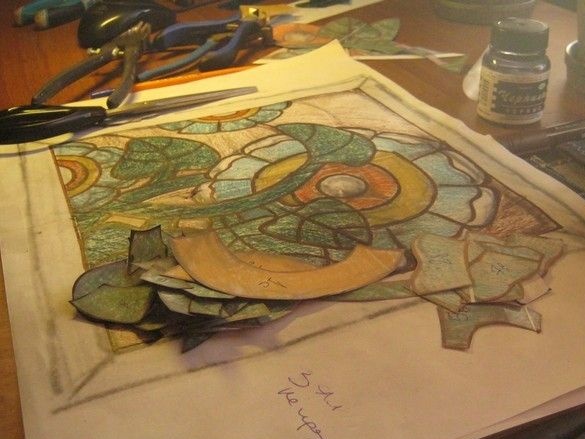
From one of the printed drawings he cut out patterns - the contours of future elements. By the way, the border lines between the elements should be clear, but possibly thinner, this will give a minimum error when marking the elements on the glass and when processing glass already, the edges of the elements will have to be sharpened less.
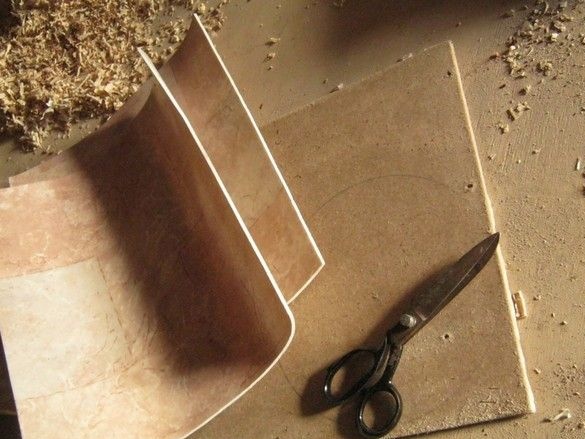
As an even basis, I used a piece of plywood with two layers of linoleum on top of it. With the size of the stained-glass window, however much more substantial, it is better to take the basis evenly and harder - chipboard, for example. Linoleum litter is a miracle how good it is for sticking pins, they hold quite firmly, sticking in is easy enough. They will have to stick a lot, so the moment is important.
On top of linoleum, I put a printed drawing - “cardboard” and, to protect it from water drops, wrapped it with “sausage” polyethylene - when fitting glass elements, they are grinded on a machine with a diamond tool washed with water and wet glasses have to be applied to the drawing - ink from the inkjet printer . By the way, this is why the felt-tip pen for drawing on glass should also be waterproof.
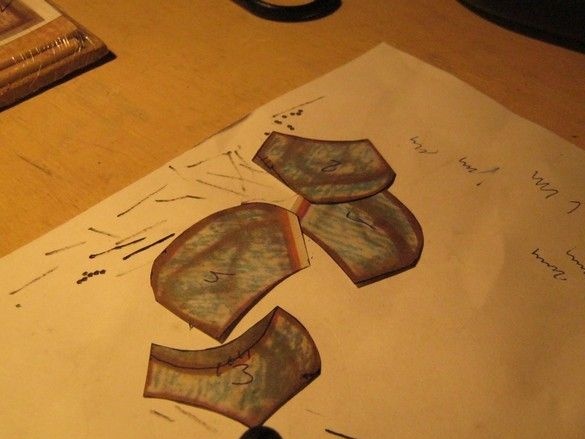

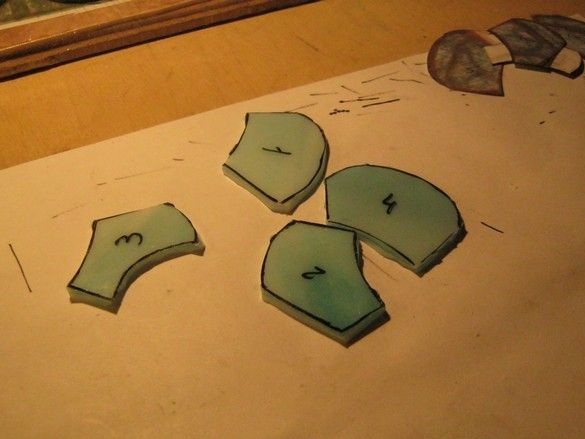
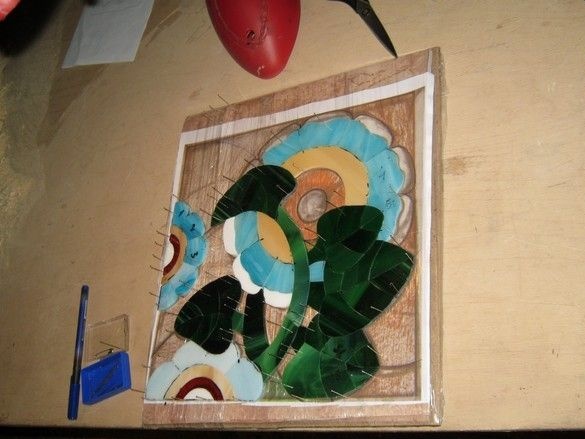
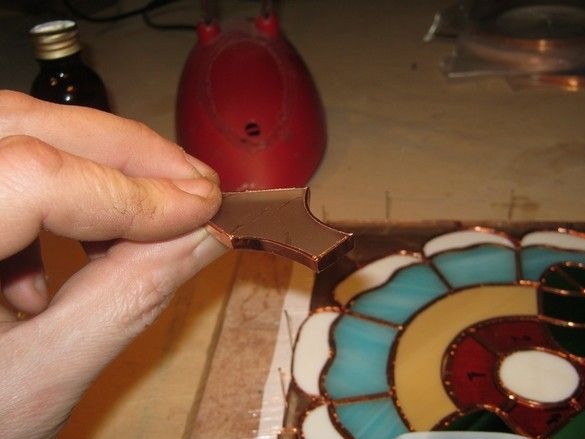
In general, the main process looked like this - I cut out several fragments from the printout of the “cardboard” so as not to get confused, the fragments were logically connected - petals, parts of a leaf, etc. Before cutting, each fragment was numbered and this number was transferred to a common, whole picture. The future stained-glass window is collected from the wrong side, that is, on the colored glass placed facing the "operator", we turn the templates over with the reverse side. We outline the template with an alcohol indelible marker, number, cut out. In the photo, an ordinary roller glass cutter with oil supply. From the hardware store. Cut them curves is not too convenient, but possible. Then a special glass cutter with a narrow head came to me and became more cheerful.
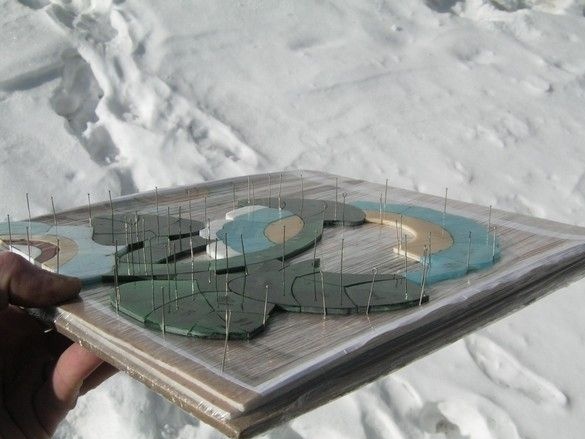
Cut glass is grinded on a grinder and tried on to the picture and to each other, after giving the edges of the glass evenness and fit, the elements are laid on the picture and secured with pins.
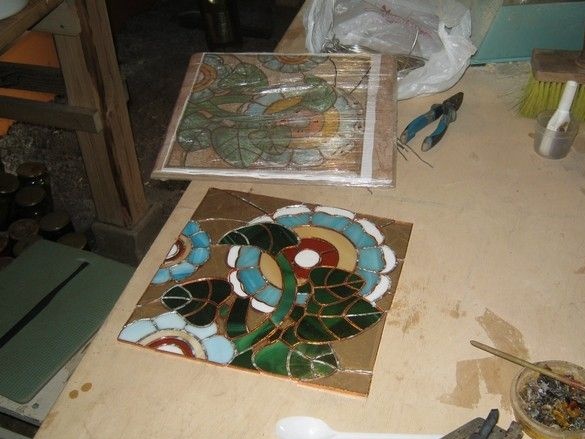
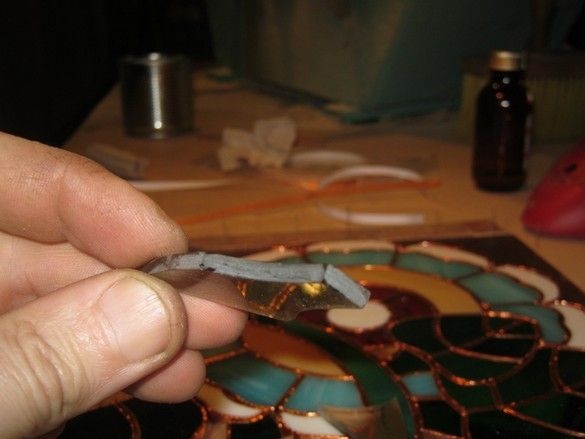
After assembling the whole picture, we proceed to the next step - wrapping with foil. Foil rolls can be purchased in the same place as colored glass, a special foil for the manufacture of stained-glass windows, it is quite possible to replace the similar one used for gluing non-metallic boxes electronic devices for shielding circuits. They work not bad, but they stick slightly worse and the set of sizes is much smaller, without “tenths”. For running stained glass 3 mm thick, a 5.5 mm wide tape is well suited.
After gluing the elements with foil, I fastened the stained glass window along the contour with soldering, so that it would not break up when moving, it was soldered with tin-lead solder, with an acid flux, which allows not to clean the soldering spots. He warmed very carefully so as not to melt the polyethylene substrate.After, when the stained-glass window became more or less transportable, he carefully dragged it onto a flat piece of wood for full soldering.
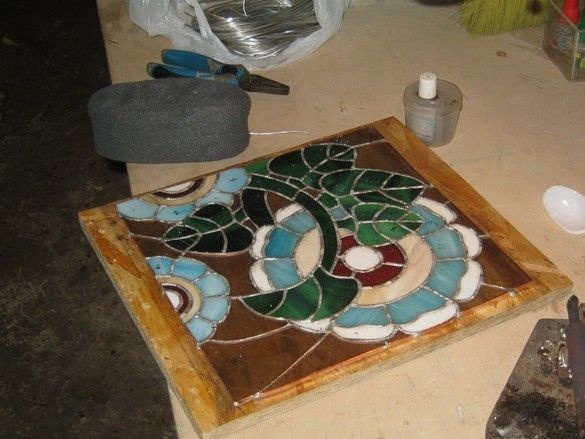
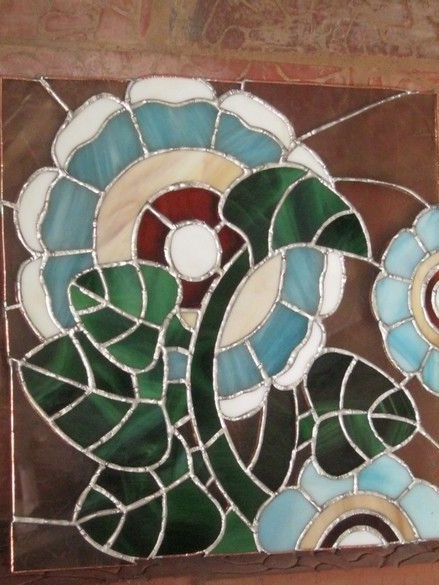
After soldering the reverse side, turn the stained glass window and solder the front one. As soon as we use acid flux, it must be washed with warm water, with a stiff brush. If it is planned to apply patina on the solder joint, washing should be carried out especially carefully, using chemicals to neutralize acid residues. In the end, he washed alcohol with felt-tip pens technological inscriptions. If necessary, the soldered seam can be given black or golden color with special chemicals. Black is recommended for beginners - with this patina based on copper sulfate it is easier to achieve a good result.
The lampshade is ready and awaits installation in a backlit box.