I will be pleased if someone likes this idea.
So, I will present to your attention how you can make a good, or maybe an original TV from an old working matrix.
Such a thing can serve as a highlight in a cozy living room or in the kitchen.
There will be no instructions, just an idea. Description of my vision and workmanship crafts. Each of you will make your own adjustments to the design and appearance.
You will need:
Matrix from a dying monitor or laptop - 1 pc.
Furniture panel 18mm thick - 1-2 pcs.
Pine rail 5x5mm - 2 m.
Fine metal mesh - 1 pc.
Protection of wood with tinting - 100g.
Yacht varnish to taste.
Small 2.1 computer speakers - 1 set.
Power supply 12v, 4A - 1 pc.
As well as the ability to cut wood, paint with a brush and solder wires.
Knowledge of electricity and / or electronics, English at grades 5-6 will be a good plus.
The highlight of the design will be the scaler board with Aliexpress, on the 3663 chipset.
Actually this is a TV board with a tuner, all inputs, a remote control, etc.
Step one:
We take the matrix (I took a 19 inch, with an aspect ratio of 16: 9, bought it on Avito for 700 rubles), and we determine its brand from the sticker.
We go to the website www.panelook.com and look at its technical specifications.
We are interested in Interface (6 or 8 bits, 1 or 2 channels), Resolution (number of screen points, for example 1190x900), and Supply voltage (3, 5, or 12 volts).
In the product description (board) on Ali we find a list of supported permissions.
For example, the designation 1920x1200 DO8L means the resolution 1920x1200 DO - (double) two-channel interface 8L - 8 bits.
Or so 1024x768 SI6L - resolution 1024x768, SI - (single) single-channel interface, 6 bits.
We add the connecting cable that is suitable for your matrix to the order. At the same time, we immediately download the firmware file from Google disk (the link is also published by the seller in the product description).
For matrix backlight, you will also need an inverter board. Everything is much simpler here. They are for 2 or 4 lamps. Connectors with two wires should stick out from your matrix on the sides. 4 connectors - 4 lamps.
Often sold complete sets of scaler (remote control, buttons, inverter, LVDS cable). Just make sure the type of cable and inverter are right for you. Or write to the seller which kit is needed.
You get the package, write the firmware file to the empty USB flash drive.
A small lyrical digression: after reading the reviews, I decided to immediately replace the heatsink of the central chip. I VERY neatly cut with a scalpel (between the radiator and the chip body !!! and not between the radiator and the board !!!) and separated the radiator. I cleaned the chip from the thermally conductive glue, cut out a new radiator with a larger area and developed finning (from the old computer motherboard) and glued it to the thermally conductive glue. According to reviews, from overheating, chips sometimes fail. Half an hour of leisurely fuss - and everything is in order. It’s better to be safe.
Connect the scaler, power, matrix and inverter with cables (without a soldering iron). Insert the flash drive with the firmware into the USB port, baptize three times and turn on the power.
Blinking light bulbs, the board reboots and voila .... The TV is in your hands. At least the working stuffing.
Further, everything is simpler. We make a box.
I didn’t philosophize slyly, took the remnants of a furniture board with a thickness of 18 mm of coniferous species. Remained in the country from furniture crafts.
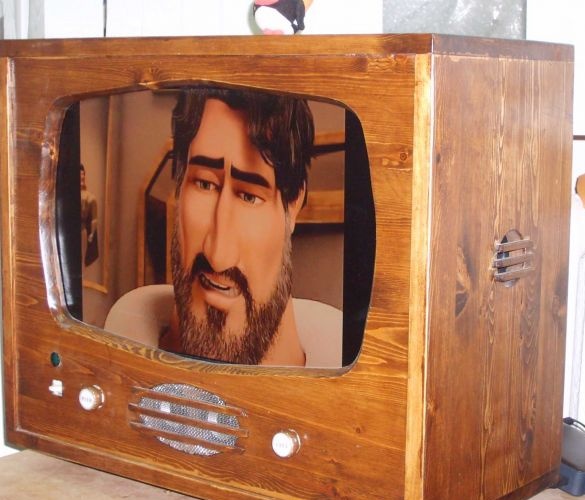
He came up with the layout, looking at pictures of TVs and receivers of the 50-60s of the last century.
There are a couple of nuances. Buttons are not stylish. The TV should not be thin, the sound should be bass and juicy. And no stereo.
Therefore, I considered it the best and most profitable decision to buy ready-made 2.1 speakers for the computer from my hands. The finished subwoofer, amplifier, power, and two satellites turned out to be the Creative Inspire A300 and cost 800 rubles by announcement. A lot of good sound for little money.
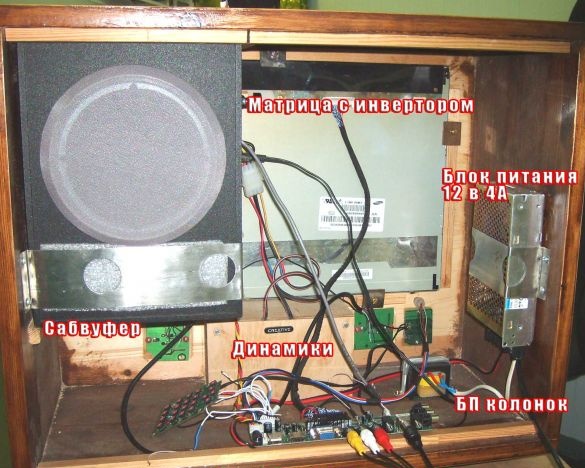
I took apart the satellites, took out the speakers, and placed them next to it, covering it with an oval fine mesh made of stainless steel (it was too lazy to look for acoustic fabric). The subwoofer without tricks, as is, pushed into the body of the TV.
Style dictates its own. Therefore, it was decided to replace the buttons with encoders (rotary knobs with a pressed button) and the power switch should be lever. The infrared port was hidden behind a large round patch of plexiglass along with a standby power lamp.
He sawed the oval with a jigsaw, chamfered it with a large dremel with an emery nozzle, holes for the speakers, and the subwoofer was drilled with pen (50mm) drills. The body assembled end-to-end on an epoxy using furniture dowels. Treated with a grinder, coated with one layer of Pinotex (walnut color) and several layers of yacht polyurethane varnish.
He laid the matrix, glued the centering blocks around the perimeter and pressed it to the panel with screws and steel plates.
I also shoved the rest of the filling inside and screwed it to the walls with screws and strips of tin. From a three-layer plywood, I sawed a case for the speakers of the front panel with a partition inside.
[/ center]
 [/ center]
There is still a question with connecting encoders instead of buttons.
It is too lazy to bother with the firmware and microcontrollers for adaptation, so I asked my friend to find and flash it. Sew - solder and everything will be in chocolate. In the meantime, and so do not suffer. During the years of “evolution,” we have become accustomed to not only flipping the twist, but generally touching the buttons. Remote tokmo. I’ll do twists - this is a matter of honor. But I'm not sure that I will twist them altogether after checking.
I cut out the back wall and leisurely pushing. Of hardboard naturally.

