
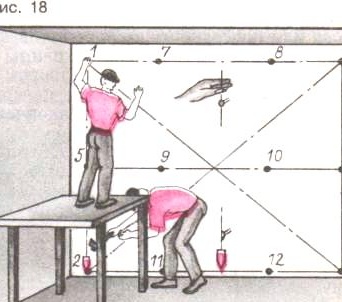
The number 1 nail is driven into the wall so that the protruding part is equal to the thickness of the plaster. The other nails from 2 to 12 are driven upright The nail can not be driven full length. Then the thickness of the plaster should be noted with a file.
You can hammer nails from 1 to 4, put the rest of the beacons on a cord.
Mortar beacons are installed on a lace. Scoop a little mortar with a trowel and throw it on the wall where the lace is stretched. Press the “slap” with a trowel so that its thickness is “flush” with the lace. The more you put such beacons, the easier it will be for you to withstand the required thickness of the plaster coat. When the lighthouse solution is seized, the cord can be removed.
By technology, plaster from top to bottom. In practice, they often do the opposite.
Mortar on the wall is sprayed with a plaster or trowel. The solution is sprayed with a wrist movement of the hand. Honestly,
There is no need to rush with grouting the surface, but it is also impossible to tighten. When the solution turns into stone, it is almost impossible to wipe it. Therefore, do not try to throw the entire wall in one day, you will not have time to wipe it. Only after gaining experience can the scope of work be increased.
The normal thickness of the plaster is 1-2 cm. If the walls are too poor-quality and a thicker layer is required, then in order to avoid spillage of the mortar, the plaster must be made in several layers. With this plaster, do not smooth the lower layers so that the next layer adheres better to the previous one.
The solution used for plastering is divided into types of: cement, cement-lime, lime, gypsum-cement (gypsum is also called alabaster). In my opinion, lime-cement mortar is best suited. This solution is plastic and fits well on the wall. It is stackable and durable. Usually I do this: I consider the required amount of solution (length x width x thickness) and I immediately bring the required amount - often a dump truck right away (2 cubic meters). Lime mortar can lie in the mortar box for two weeks. It dries, of course, but then it is easily diluted with water. Subsequently, cement and water are mixed with the mortar and plaster.
Before mixing the mortar-cement mortar, the mortar and cement must be sieved through a sieve. The fewer stones in the solution, the better to plaster. Cement is added to the solution in a small amount - 2-3 trowel on a solution stretcher. In principle, cement can not be put into lime mortar for plastering at all. The solution on the wall will set and so, but with cement will be stronger. Water is added to the solution to a consistency comparable to thick sour cream (so that the spoon stands).
If it is impossible to bring the finished solution, you can mix cement-sand mortar. The disadvantage of this solution is that it quickly loses its plasticity and becomes unstable. Its plasticity directly depends on the sand on which it is prepared, and the hardness of the water. Plasticity can be improved in several ways:
- increase the rate of cement, which is uneconomical;
- increase the softness of water by adding grated clay or a spoon of washing powder (soap) to it.
The composition of the solution with cement M400 - 1: 8, with M200 - 1: 4.
The plastering of the outer corners (antennae) is carried out using an even edged board.
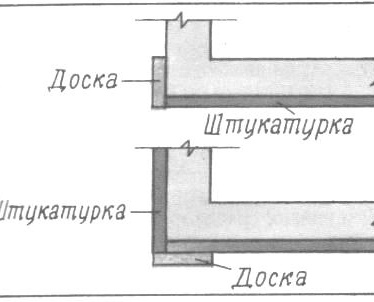
After plastering one wall, the board is rearranged and another is plastered. In this case, the board is not nailed, but strengthened with jibs.
Usenki is done in another way, using angular half-graders (two half-graders, knocked together at right angles). I didn’t like working with such a half-glass.
Sale of paintings, paintings of artists