

Equipping home workshop, it is necessary to place in it a relatively high-current, heating, fire equipment. Workshop heating - wood stove, workshop fencing - timber walls. All this, of course, is not a "hot shop", but the same, however. Of course, the wiring was done with due care, and we do not leave work unattended, stoves and burners. As a matter of fact - leaving, I try not to forget to turn off the general automatic machine on the shield. The brick heating stove is also in good condition. On a carbon dioxide fire extinguisher.
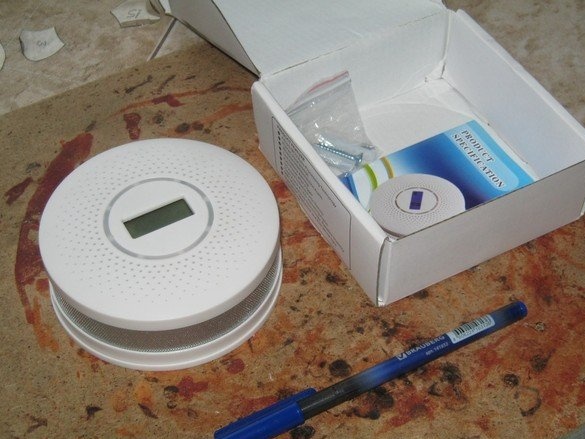
Nevertheless, thoughts about a certain fire alarm, sensitive enough to detect the first signs of fire and give a signal, came repeatedly. Finally got there. In the title photo - he. A compact fire alarm that responds to two factors - smoke and elevated CO levels. It has two sensors - optical - for smoke and a chemical for CO. Battery power, LCD indicator of CO concentration, sound and light alarm. Ali Express, but what about.
My workshop is a separate building about ten meters from the house, and if something happens, you can simply not hear the signal outside on the street or in a house nearby. The sound transducer in the device is piezoelectric. To bring out an acoustic signaling device outside, seems quite reasonable option. Moreover, this, as a whole, is quite a loud signal, it would be nice to further amplify.
There are a number of purely circuit ways to increase the volume of such a device. This is a replacement of the piezo-emitter with a dynamic head with a cascade of matching in various versions. All of them require additional power - often with increased voltage. I did not want to lose battery power and its resource. It was decided - to apply a horn that completely solves both problems - amplifying the sound volume in a passive way, without a power source.
Laudatory ode to the shout.
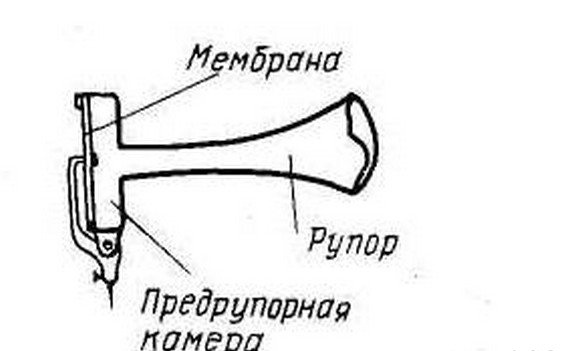
The shout is a wonderful invention! Judge for yourself - an acoustic transformer - coordinating the load of a dynamic head, significantly amplifying the sound, completely without a power source, only due to the special form of the "fence".The horn is used in high fidelity sound reproduction - and gives an extremely “sound picture” that is extremely similar to reality, but it is not widespread in this quality - for the entire audible range of reproduction, the horn has huge dimensions, and given its peculiar shape, it is also very expensive. Much more, the mouthpiece has spread, as chants, sirens, where important, at least a little legible speech, but louder. The same megaphone or textbook horns on poles.


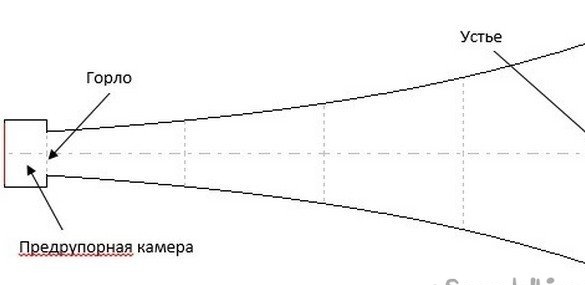
There are several forms of horns, generally speaking, they determine the distortion of the amplified sound. The most “qualitative” form of a horn is exponential, but not simple - in different places it is different - closer to the "throat", has a small slope, then - it expands much faster. A full-fledged horn is a very long construction; it is often “rolled up” into rounded or rectangular cases. Such a solution greatly saves space, however, the characteristics of the resulting loudspeaker are difficult to predict.
To visualize the amplification of the horn, you can recall the gramophone - insignificant needle vibrations, amplified to an acceptable volume. With a speaker, for example, loud-speaking reception of a radio station to a detector receiver can be carried out.
In our case, the task is significantly simplified - the amplification is not so great (acceptable dimensions are much smaller), the frequency response of the loudspeaker does not matter, and if so, you can choose the shape, material and design that is most convenient and technological. A “conical” horn is used here, with a linear dependence of the diameter on the distance to the emitter. The characteristic “pre-chamber chamber” is also omitted.
The material for the horn is sheet metal (galvanized steel), the method of installation is soldering.
What was required for the manufacture.
Instruments.
A set of bench tools, a marking tool, a powerful (65 ... 100 W) soldering iron with accessories, a jewelry jigsaw, a screwdriver, a set of tools for electrical installation, brushes, and containers for painting.
Materials
In addition to the factory fire alarm, a flexible “network” cord was needed in double insulation, in the required amount, heat pipes, a little fastener, paintwork materials, 0.5 mm thick galvanized steel, nylon ties.
So. Dismantling the emitter.
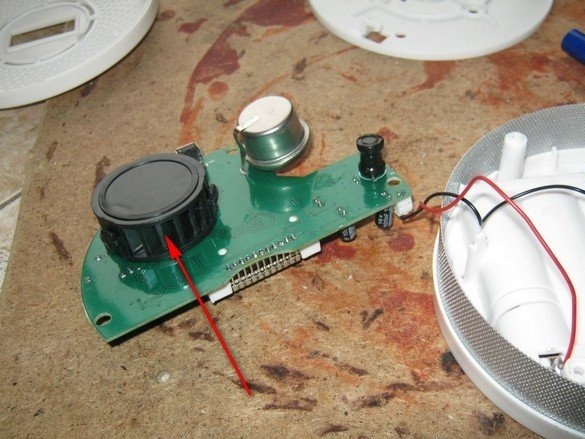
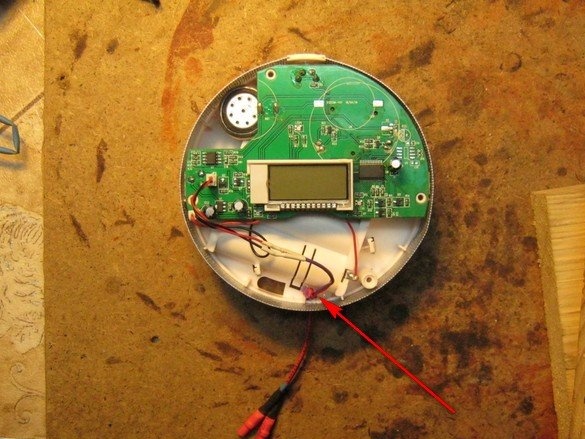
After removing the top cover of the alarm, we get access to the printed circuit board and large elements attached to the case. The arrow shows the piezo emitter in a plastic mandrel.

The mandrel for two ears is fixed with latches, connected to emit short wires with a connector - not bad, not bad. The short arrow shows the CO sensor.
Since the device has been picked up, it is interesting to take a look at what's inside - for a fee.
Taak - a battery compartment is made together with the case, on the back side of the board there is a smoke chamber with an optocoupler (arrow), the same chemical CO sensor, and a large choke on a ferrite coil.
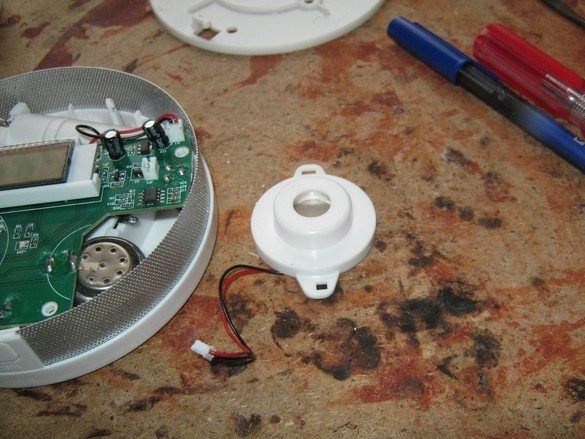
The emitter is easily disconnected, the rest, while in the box.
Tin works.
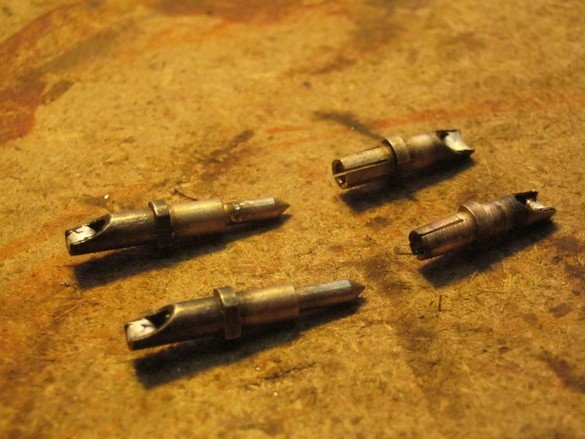
My horn looks like a truncated cone with a camera for installing a piezo emitter. Its dimensions are as follows.
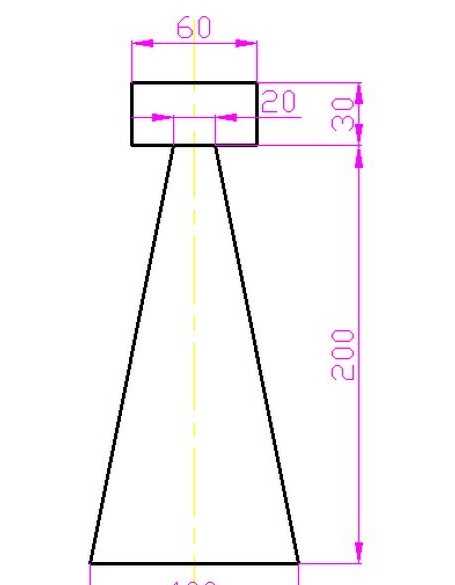

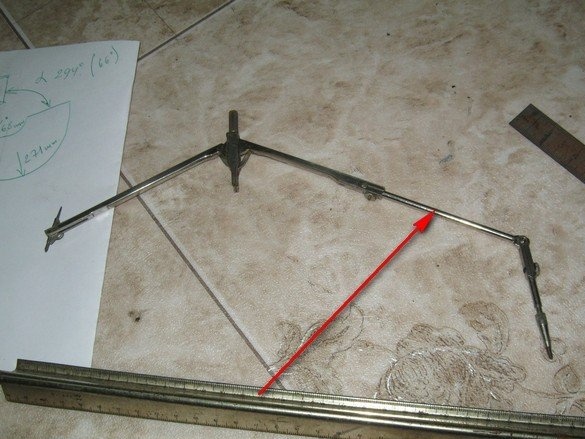
To mark such a large radius, a special extension cord had to be added to the compass. Before drawing the arcs, it would be good to determine the center and gently tilt it, otherwise the compass needle will “ride” along the smooth piece of iron. Again, you will not lose the desired point.
I cut out even cuts and the outer arc with scissors for metal, the inner arc - sawed with a jewelry jigsaw - a great tool!
The cone rolled up and soldered. It is better to fold on a certain mandrel. My wood lathe was somewhat disassembled, I had to bend on a hammer handle - it turned out a little steps. Tinning the edges is more convenient before bending, on a flat workpiece. Previously, carefully scrubbing medium-sized sandpaper. Flux - "soldering acid" (zinc chloride). The solder is ordinary, tin-lead. Soldered end-to-end - not particularly, I will report to you, it’s convenient, it’s better to foresee 10 ... 15 mm overlap.

After the horn itself, I cut and soldered the camera for the emitter. The lid, of course, is not soldered yet.The bottom with the connecting hole for the horn is cut out with the same jewelry jigsaw. The rest is obvious.
Pre-painting, installation of the emitter.
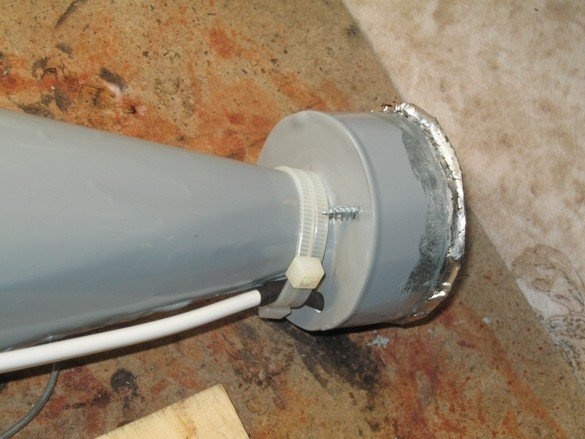
Before installing the emitter, the mouthpiece painted. All, except for the place of soldering the lid. This is done so that the wire, fixed on the outside with plastic ties to the loudspeaker body, is not blotted with paint, but clean, pulled to a painted horn. It looks much neater.
I cut off regular wires from the emitter, leaving 15 ... 20 mm - so as not to solder to the delicate parts. Under a plastic mandrel, a little silicone sealant flopped and pulled two screws with two screws for the existing ears. A screwdriver so as not to break. The end of the wire was cut out, at the place of passage through the tin case, put two layers of thermotube on the wire, pulled it with ties to the case and soldered to the radiator leads. The soldering point was isolated with a thinner thermotube, and the lead-in point was also coated with sealant. Galvanized steel is painted, therefore, allowed the use of acidic sealant. Otherwise, it is better to use neutral.
Covered and soldered the lid, on it - mount. After washing the flux and drying, the final painting.
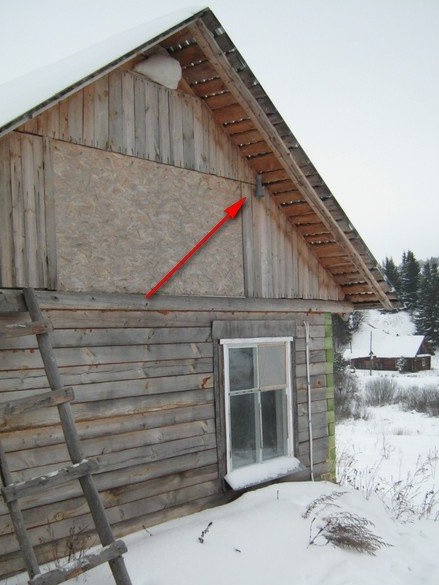
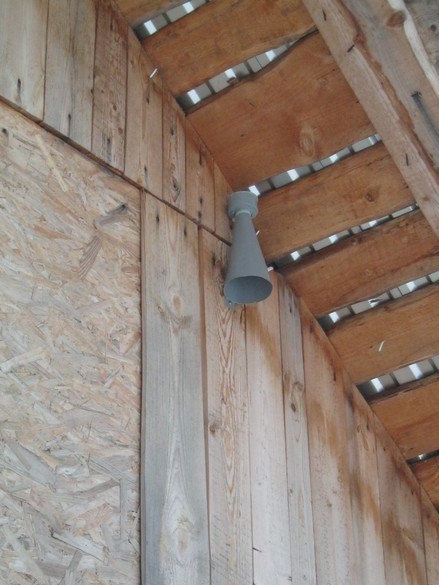
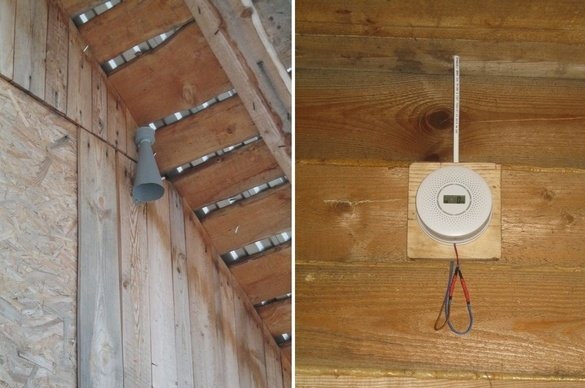
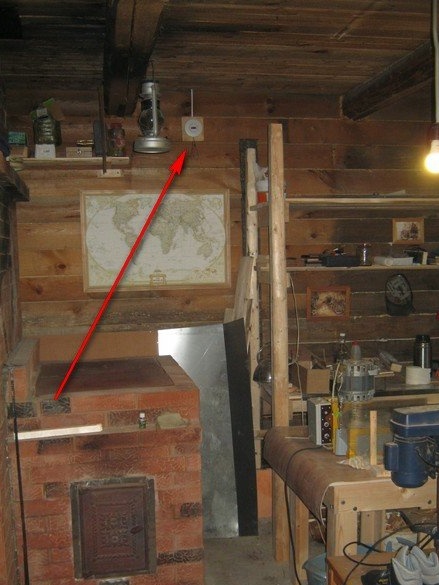
Having picked up the weather not too windy and frosty, he secured the mouthpiece with two self-tapping screws under the end overhang of the roof so that precipitation fell less, the wire led into the attic space and led along the wooden elements of the roof, securing it with tin clamps from the same roofing steel. A wooden ceiling was drilled in the right place and brought the wire into the room.
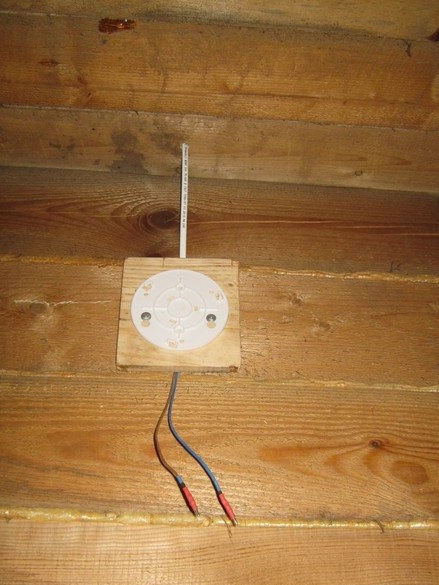
On a wooden board raised by two slats for the passage of the wire, he fixed the sole of the device. Connections are made detachable - two pairs of contacts from a multi-pin powerful connector are used.
From the device, two soft wires are led out through an opening in the plastic shell, tied in a knot from the inside and fixed with a drop of hot-melt adhesive. At the free ends, the nests are soldered and insulated with a thermotube.
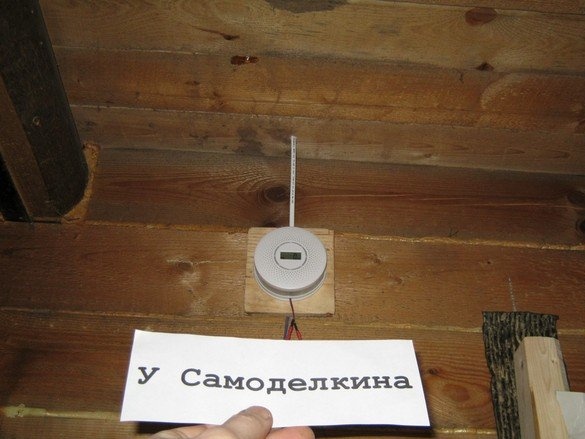
The device is installed in place, tested and put on combat duty.
Conclusions, work on the bugs.
In general, it turned out quite well - an alarm, an intermittent annoying squeak, is clearly audible inside the workshop, in a house nearby and, of course, on the street. However, this is not a Jericho trumpet, and if a very high volume is required, the size of the speaker should be taken larger.
A few words should be said about the placement of the sensor in the room. The device is multitasking - it reacts to two factors (smoke and CO), and the placement of these sensors contradicts - the smoke sensor should be placed under the ceiling, CO, - "... at a height of 150-180 cm relative to the floor in the personnel access area." Response to smoke was considered a priority and the instrument placed high. Yes, you should not place sensors near corners and in places of air flow. In especially critical cases, experts recommend “full-scale” tests - to set on fire an improvised smoke bomb (say, a roll of loose toilet paper) and sitting on the floor to monitor the spread of smoke near the ceiling. Concentrate smoke sensors in places of its greatest concentration.
Equip the device with a small tin visor, this will reduce the ingress of dust on it.
Babay Mazay, December 2018