
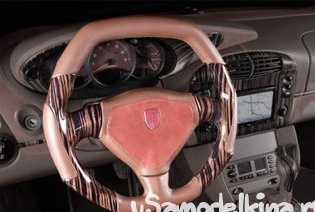
The right wheel is never round. And he is not thin. And even more so without wooden or carbon pads and anatomical cones covered in perforated leather. So many owners of tuned cars believe. And from myself I’ll add that it is useful for a good steering wheel to have a certified design with an airbag. So, the right wheel can be obtained by tuning the factory steering wheel.
Different experts practice different methods of manufacturing inserts and anatomy on the steering wheel. I suggest using matrix technology based on the clay model. The advantage of plasticine in the efficiency of searching for the shape of the model. The advantage of the matrix is the possibility of reuse in the manufacture of the same rudder or fragments of crusts for rudders of other sizes.
The middle part of the steering wheel does not require the intervention of a tuner; the airbag should work properly. Only the rim and partially the needles may be upgraded.
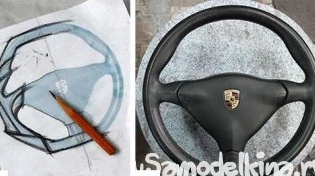
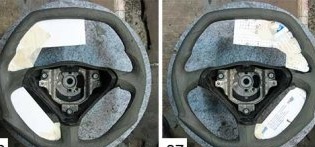
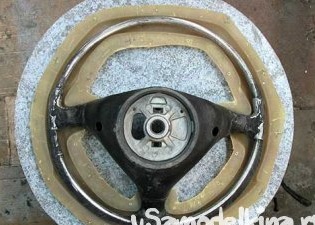
01. The design of the rim, you can try to simply copy from an existing steering wheel, but you can dream up with the form itself. The easiest way to imagine the coveted steering wheel is to paint your contours on the image of the donor rudder. But, in my opinion, you should not linger on paper for a long time, because the ergonomic requirements and the design of the steering wheel can destroy your unbridled fantasies.
02. It is especially nice to improve the expensive steering wheel of a prestigious car, although trying your hand is worth something simpler.
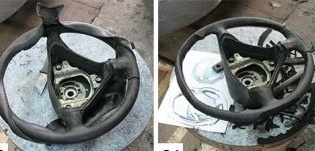
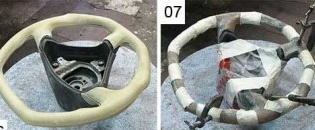
03. Most of the steering wheels of modern cars are covered with leather, which I shoot first. A soft rubber rim shell opens under the skin.
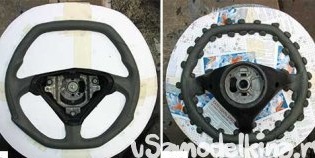
04. If we decided to change the outer contour of the steering wheel, then we will have to cut off the excess rubber from the rim frame. But do not get involved in cleaning the frame from rubber, it is better to leave it in places where it does not interfere with the change in shape.
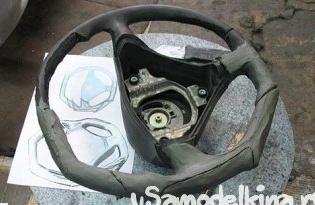
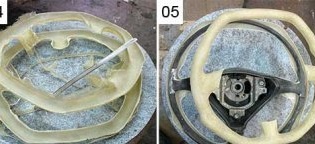
05. And now, in a free manner, we are trying to look for the correct proportions and hand-comfortable shape shapes on the steering wheel made of plasticine. Compare the ergonomic hand cast obtained from plasticine with the original rudder pattern. We transfer characteristic bumps, dents and sockets from the drawing to plasticine and again “pump” the convenience of the steering wheel along the arm.
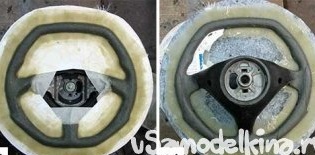
06. We begin to work out the approximately stuck-together form of the steering wheel on one side. At the same time, the eternal dispute is that the main thing is plasticine or putty I resolve in favor of putty.This means that I will not polish the plasticine to a mirror finish to remove an almost finished matrix, but will modify the irregularities left on the plasticine on the finished steering wheel with puttying. But on plasticine, we need to mark the lines with slots for patching the skin, and the fractures of the plastic form with pointed ribs. From the finished plasticine of one half of the steering wheel, remove the templates from thick cardboard.
07. We transfer the contours, lines of cracks and edges of the form through the templates to the clay on the other side of the steering wheel. The lateral thickness of the bagel can be controlled with a caliper, comparing the corresponding places on the right and left.
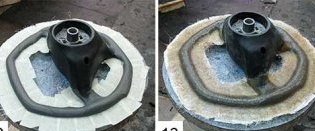
08. And now the form is built up, but do not rush to throw out the contour templates. With their help, we need to make a formwork for forming the flanges of the connector of the matrix half-forms.
Like any enclosed volume, a solid steering wheel can be obtained by gluing together the upper and lower crusts of the mold. To make these fiberglass halves, we must first make a mold mold from a plasticine model. A connector along the flanges will divide the steering wheel matrix into two separate halves, in which it is easy to make the upper and lower crusts of the steering parts themselves.
09. The formwork of the flanges must be installed strictly in the plane of the widest longitudinal section of the steering wheel. I usually fix the cardboard formwork plate with plasticine pieces on the back side.
10. Work with fiberglass, and in particular the contact molding of fiberglass impregnated with polyester resin, presents practically unlimited possibilities for the manufacture of three-dimensional forms. Material in a liquid state freely envelops surfaces of any curvature and configuration. A hardened composite can be fully used for its intended purpose. When forming rough matrices, I usually do not use gelcoats (a special thick resin for the work surface) and expensive matrix resins. But I admit that sometimes I “abuse” the thickener-aerosil (glass powder). My relatively thick resin clogs model irregularities well and fills sharp corners on the mold. But the molding quality is also affected by the reinforcing material. The first couple of layers, especially on a complex surface, I cover with 150 or 300 glass fiber mat. I don’t recommend applying many layers at once - this will inevitably lead to fiberglass deformations. After an hour or a half, the resin becomes solid, but the polymerization process is still ongoing.
11. In the meantime, the first molding will polymerize, I turn the steering wheel and remove the cardboard formwork. In order to prevent the resin from sticking to the formwork, I previously coated it with a wax-based separating compound (Teflon auto polish).
12. When there is no separator at hand, and time does not tolerate, I seal the contact surface with masking tape. It is easily removable from hardened polyester. So this time I closed the flange.
13. The lower side of the model is also covered with one layer of fiberglass. After the resin has “risen”, that is, first it turned from a liquid to a jelly-like, and then to a solid state, I turn the steering wheel again. I apply a layer of thick glass mat of grade 600 on the front side of the model, having previously cleaned the previous plastic layer with sandpaper. So, alternately applying layers, I increase the thickness of the matrix peel to 2-2.5 mm (which corresponds to 1 layer of glass mat 300 and 2 layers of 600).
14. The fully glued matrix is aged for about a day, although in the conditions of constant haste in the evening, the formed matrix already goes to work the next morning.
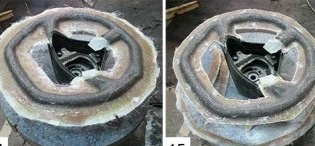
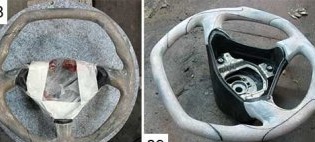
15. Ductile and soft in the liquid state fiberglass, hardening shows its cunning. Looking at its lollipop surface, I want to hold it by hand. But invisible, protruding glass needles can seriously injure your hand. Therefore, first of all, I lightly clean the surface of the matrix with sandpaper. The shaggy, prickly edge of the matrix must be cut, leaving a flange 25-30 mm wide. At a distance of 10 mm from the edge of the model, it is necessary to drill mounting holes for the screws in the flanges. In this form, the matrix is ready for removal.

16.With a knife blade or a thin steel ruler, we disconnect the flanges around the entire contour. Then we expand the gap formed between the flanges and separate the half-forms of the matrix. A thin layer of plasticine model during the removal of the matrix is destroyed, partially remaining in half-forms.
17. Plasticine residues are easily removed from the matrix. Then the inner surface can be wiped with kerosene. I clean the contours of the flanges with sandpaper. On the working surface of the cleaned matrix, defects in defects of the plasticine model are clearly visible, which I correct with the same sandpaper.
Even with this rough matrix you can make several dozen rudders. But who will give you so many identical steering wheels for tuning? But exclusive work with plasticine and fiberglass are in great demand.
Part two:
The rough matrix made using ordinary polyester resin (unlike the final matrix resin) has significant shrinkage and shrinkage, leading to distortion of the original shape. Moreover, the smaller and more complex the part, the more noticeable is the deformation. Especially strong withdrawals occur in the corners, as in our case along the entire arc of the half-mold section. So, by the time of their complete polymerization, visible mismatches of one half-form relative to another along the contour accumulate in the steering wheel parts themselves. But, for that, it is also a rough matrix, just to help us transfer the plasticine idea into a fiberglass blank of the future form, or serve as a temporary (inexpensive) tool for studying the demand for a new product.
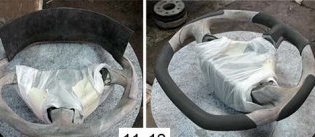
01. Before you start making halves of the steering wheel, I prepare the steering wheel for pasting. Gradually cutting off the excess rubber from the rim and spokes, I put the steering wheel into the matrix half-form. At the same time I try to leave as little space as possible between the rim and the surface of the matrix for gluing.
02. You can glue the steering wheel crusts in one go, immediately laying two layers of 300 mm glass mat. The main thing is to try to form “dry”, that is, remove excess resin with a squeezed brush.
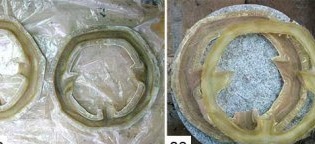
03. An item with a thickness of two layers of thin glass mat turns out to be brittle, therefore it is necessary to remove it from the matrix with caution. I click on the edges of the fiberglass protruding along the edges of the matrix towards each other and gently pull out the crust.
04. The uneven edges of the removed parts must be cut according to the print left on the part by the edges of the matrix. For trimming, you can use a power tool, or you can saw off with a hacksaw blade for metal.
05. I try on the crusts to the steering wheel, while trimming, if necessary, the steering wheel rubber. For a better fit of parts, the inner surface of fiberglass should be cleaned with coarse sandpaper, removing sticking out fiberglass needles and resin flows.
06. Gradually modifying the edges of the parts and the rim, I fit the halves to each other on the steering wheel. Well combined and freely sitting on the steering wheel crusts are ready for gluing.
07. There are two ways to glue half-molds. Usually, the parts to be glued are inserted into the matrix, which in the assembled state combines them and presses against the rim. But I decided to assemble the steering wheel without using a matrix. I wanted to check the accuracy of the combination of parts and the quality of filling with adhesive material the entire space inside the steering wheel and at the seams. As a gluing, I use a mixture of polyester resin, aerosil (glass powder) and fiberglass. It turns out porridge similar to a glass-filled putty, only the curing time is much longer. With this composition, I fill the steering wheel halves and squeeze them on the rim. I remove the excess porridge squeezed out of the seams and fix the half-forms with masking tape. Correctly deformed places of crusts are corrected with clamps.
08. Heating of a part indicates an intensively proceeding polymerization reaction. One and a half to two hours after the start of gluing, I remove the adhesive tape and remove the remaining resin. After that, the surface of the steering wheel can be processed.
09. On any part removed from the matrix there are traces of the separation layer. Therefore, the first thing I clean with sandpaper is all fiberglass from the remnants of the separator.
10.Traditionally, a tuned steering wheel is faced with carbon fiber (carbon fiber), wood veneer and genuine leather. Solid materials with a varnished surface are placed on the upper and lower sectors of the rim, and the steering-framed side parts are covered with leather. So we planned at first to do on our steering wheel. But after holding an almost finished bagel in our hands, it became clear to us that the extreme design of the form required an unusual finish. And it was decided to do everything the other way around, that is, the skin above and below, with veneer on the sides.
11. For greater comfort, a thin layer of porous rubber can be glued under the skin (which greatly increases the cost of work). An approximate piece of slightly larger size than necessary is glued to the fiberglass steering wheel rim.
12. Rubber tightly fits the rim. In places of leather inserts, palms of rubber cut out according to one pattern are also glued under the palms. All fragments of rubber are smoothed out with sandpaper, and defects are repaired with rubber crumb mixed with glue. Contours are cropped according to patterns.
13. When we plan to finish the steering wheel, you must set the correct ratio of the size of the rim at the joints of different materials. So, for example, the thickness of veneer with varnish (up to 2 mm) is equal to the thickness of the skin with glue. This means that the rim of our steering wheel should have the same cross section at the joints. A rubber glued under the skin formed a step 2 mm high on the rim. Therefore, you will have to align the rim at the joints with putty. In order not to spoil the edges of the rubber stickers with putty, they must be masked with masking tape. For the same purpose, I stick a thin plasticine strip along the rubber contour, which will become a gap for sealing the skin.
14. “Hairy” putty is an indispensable material in the work of the breadboard maker. This putty is made on the basis of polyester resin and mixes well with our polyester fiberglass. I also know that many craftsmen make the steering wheel entirely from putty. Gradually applying and sanding putty, the steering wheel is attached desired shape.
15. On the final surface of the steering wheel, I mark the lines of cracks to seal the skin. The cuts on the rim are most conveniently done with a metal hacksaw blade. The depth of the gap should be at least 3-4 mm, and a width of up to 2 mm. I cut the cuts made with a cloth with sandpaper. Slots of inserts under the palms were marked with plasticine stripes. After removing the plasticine, the grooves are aligned with putty and sandpaper. It is very convenient to lay gaps "boron machine".
16. The final touch is the installation and fitting of the airbag cover. The main thing is to correctly calculate the gaps. The fact is that the movable cover should not rub against the edges of the spokes. In addition, you need to leave room for the thickness of the skin or Alcantara, which will cover the airbag cover.
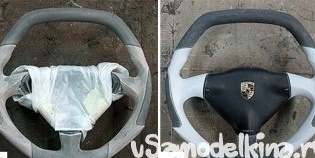
For the accuracy of the fit, I insert the pieces of leather into the gap and “pump” the right place. To fit the gaps, all the same means are used — putty and sandpaper. I finish the fiberglass with a primer so that the whole form appears, because it’s hard to see the spotty surface from the putty defects.
This ends the work of the prototype, and the product is sent to other specialists. First, one master will paste the veneer and varnish it, then another master will cover it with leather. The final result will depend on the qualifications of the finishers, but the layout master with its ergonomics, plasticity, and proportions will lay the master of layout. That is why the basic specialization in the manufacture of non-standard products has always been breadboard production.