
We need, first of all, a round box, ideally with a lid. Use a metal box, for example, from under any boot cream. An iron box needs to be annealed - red-hot in the stove and let cool slowly. Next, remove the scale from it and paint it with nitro paint. Through the entire inner diameter of this box with a compass, draw the very bottom on the cardboard. Cut it and make a hole with a diameter of two millimeters with absolutely even edges, into which you should fasten a regular linen button so that the existing blind hole of the button's nipple is at the top.

According to the drawing, the compass card itself should be made of very thick paper; paint it with watercolors and cut it out. The card should be glued to the prepared bottom, and the bottom itself should be installed in a box. The side is also made of cardboard and, having lubricated it previously with glue, tightly installed in a jar, pressing the card itself to the bottom of the existing can.
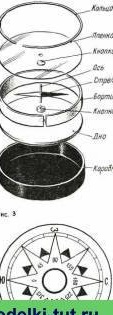
The side must be below the top edge of the can or corolla by five to six millimeters. Further, according to the diameter of the jar, it is necessary to cut out a small circle from the thinnest plexiglass - glazing of the compass itself; it is necessary to make the hole in the center of the circle and fasten the second linen button to it so that the existing blind hole of the button itself is at the bottom. Instead of plexiglass, you can use any transparent film or use film with a pre-washed emulsion.
Having installed the glazing itself on the received side, it is necessary to fix it from above using a spring ring made of ordinary steel wire. The laundry buttons, which are installed on the bottom, as well as the glazing, are thrust bearings in which the axis will rotate together with the arrow of your compass.
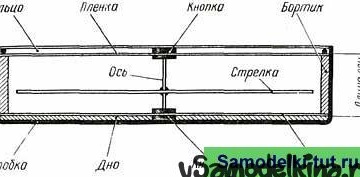
The assembly of all the details of the homemade compass is shown in Figure 5. In accordance with the existing box height, you should determine the height of the axis of the arrow itself.The axis can be made of wire, which can rotate freely in conventional thrust bearings. The ends of the resulting axis must be carefully filed with a file and sanded with a block for sharpening knives.
The arrow must be transferred to the tin, cut it out, put on the board, set the awl in the center of the arrow and, striking the awl with a hammer, punch a hole under the axis itself so that this axis can fit tightly into the arrow hole. Next, you need to take the axis with the arrow in your fingers and, holding it a little, check whether the arrow itself is balanced.
If any end of the arrow will outweigh, then you should file it with a file. When the arrow is balanced, it will need to be removed and then magnetized. First, at one end of the arrow, you need to scratch the letter N with an awl, then take a magnet (Figure 2) and draw its south pole (it will be painted in red) several times from the middle of the arrow to the end of it with your mark. Then the north pole (it will be painted in blue) do the same with the other end. And so it should be repeated several times.
To carry out magnetization, it is possible to use magnets from the speakers of radios, televisions or tape recorders. They have the shape of a ring, so this ring must first be broken carefully with a hammer and chisel into several separate parts.
Now you need to install the arrow directly on the axis, and holding the axis vertically in your fingers, you can see how it will immediately take some position. No matter how you change the position of this arrow, it will take only one direction. The one end of the arrow, which will be marked with the letter N, will always go north, and the other end - south. And now you need to install the axis in the bearings - and the home-made compass will be ready.