


Hello tank friends! I want to offer you my version of the most famous Soviet tank, I'm not afraid of this word, legend, T-34. The advantages of this model are the availability of all materials, ease of manufacture, and excellent driving performance under these conditions. Of course, one can speak about copying purely conditionally, but he is still recognizable at first sight. So we need:
Materials
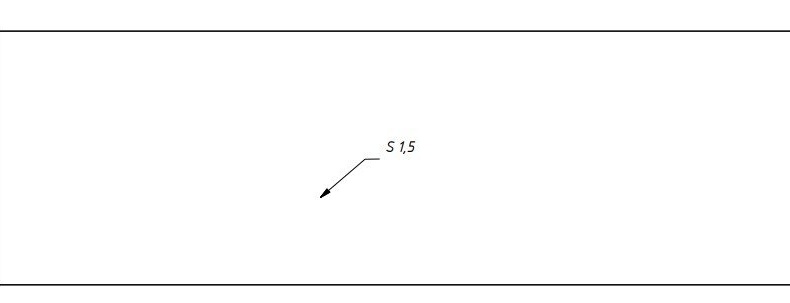
1. PVC plastic. Obtained from a rectangular ventilation pipe
2. Tin from cans with drinks
3. Tin 0.3-0.5mm thick
4. Linoleum 2mm
5. PVC bath mat
6. Crosses for ceramic tiles
7. Bicycle spokes
8. Two yellow Chinese gears
9. Various fasteners. Mostly m3
10. A set of equipment. Which one, we will clarify later.
Instruments
1. Scissors. Various. Including metal
2. Ruler, pencil or marker for marking
3. The screwdriver with a set verified
4. Files or files
5. Glue gun
6. Screwdrivers
7. Joiner's knife
8. Pliers
I will focus on the manufacture of the hull and chassis, because you can manage this economy without changing the design with any equipment. We will talk about it last. Let's start with the body.
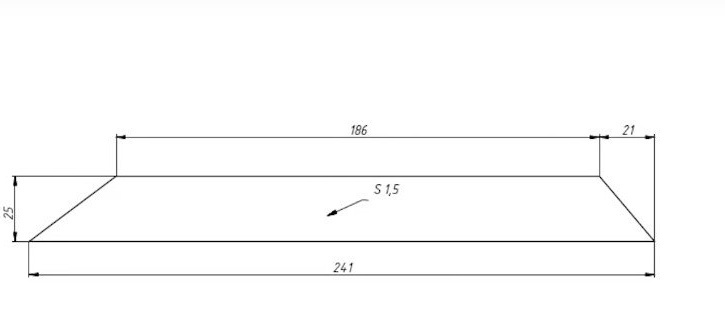
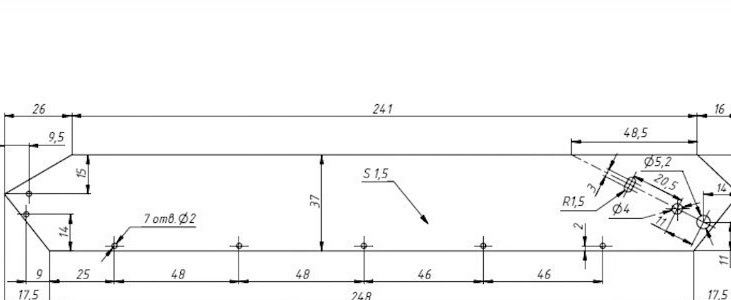
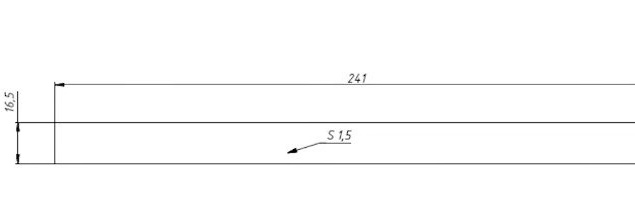
We take the stored pipe and cut it into sheets.
On the obtained sheets we mark the details of the case according to the drawings and carefully cut out with scissors for metal.
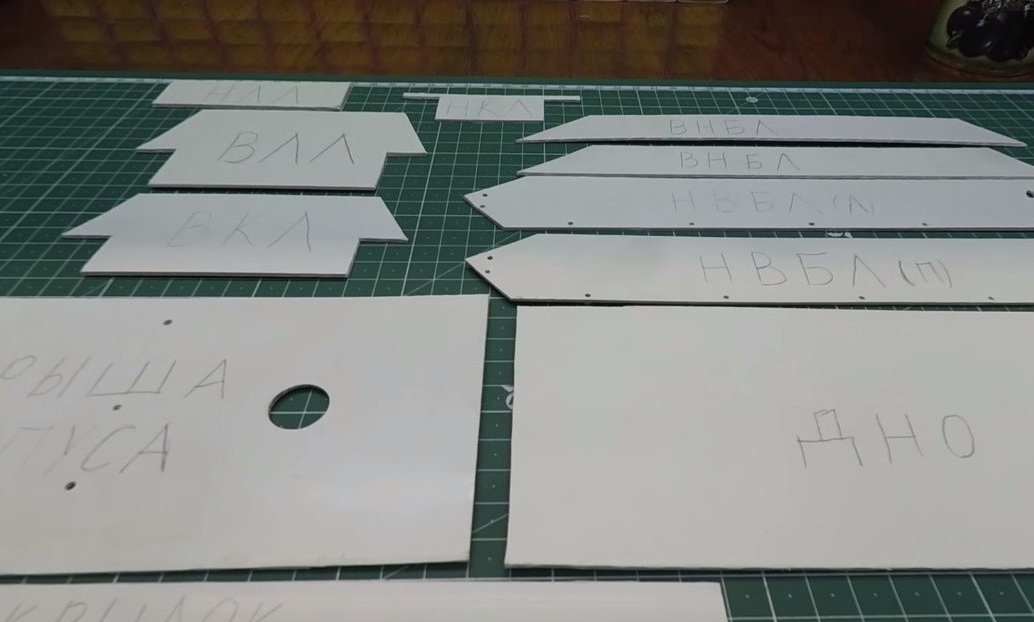
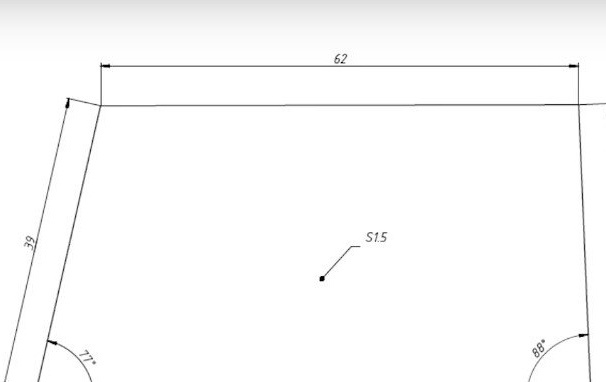
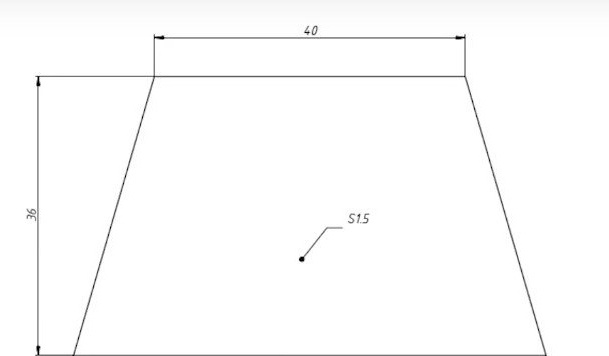
Upper and lower aft armor plates

Upper and lower frontal armor plate
Bottom and roof

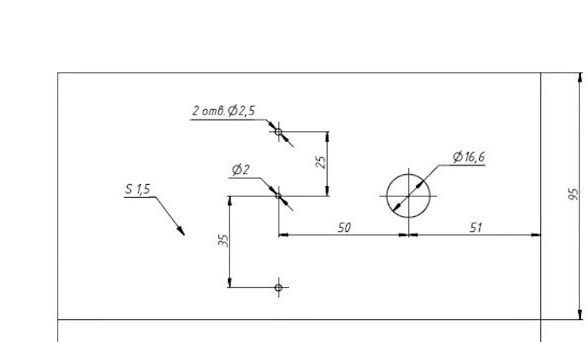
Further, the upper and lower side sheets and fenders
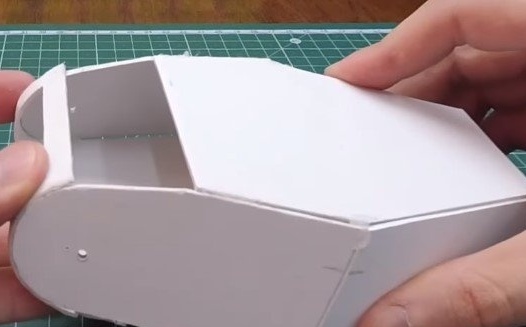
As a result, we get a set of cases
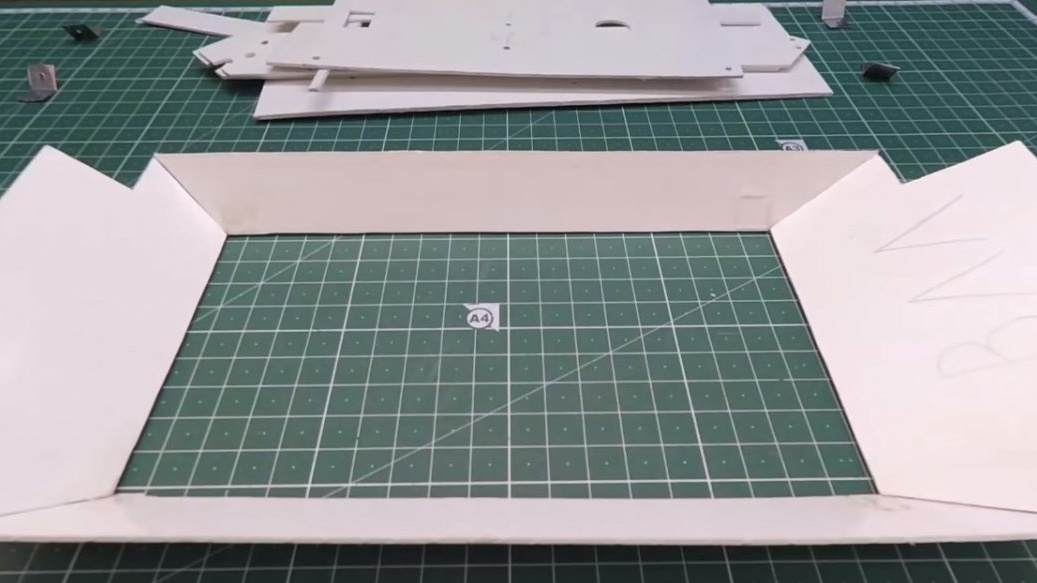
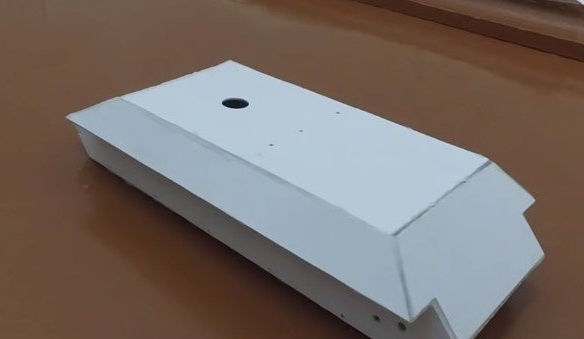
We begin to glue with the upper armor plates. First, just grab them pointwise at key points. Edges do not need to be filed. The joints will be filled with glue, which will only improve the strength. We get this picture:
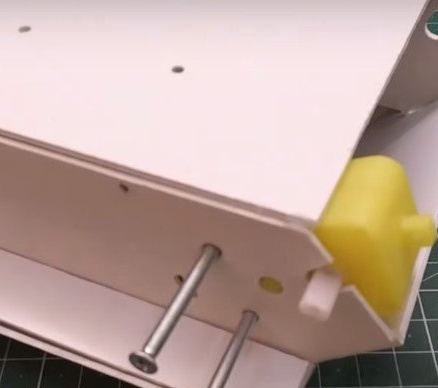
We will make the roof removable, for this we glue in the right places fixing corners of tin, with drilled holes for screws:
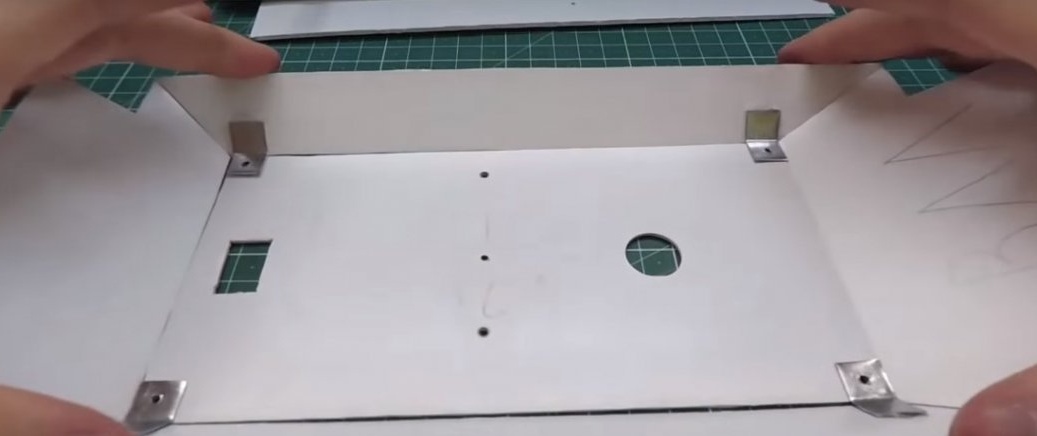
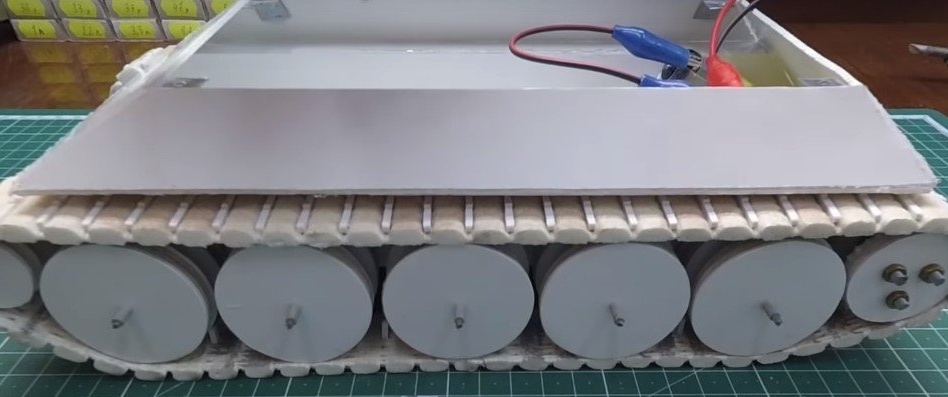
Well, we continue to glue the rest of the parts into place, trying to do it without distortions. The last armor plate is glued last, but before that you need to put the gearboxes in their places:
After complete assembly of the case, we spill all joints and seams with hot-melt adhesive. Excess glue is carefully cut with a knife. It turns out a fairly strong case.
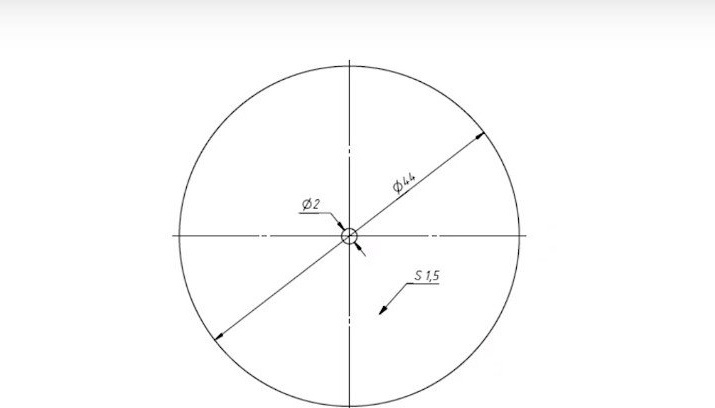
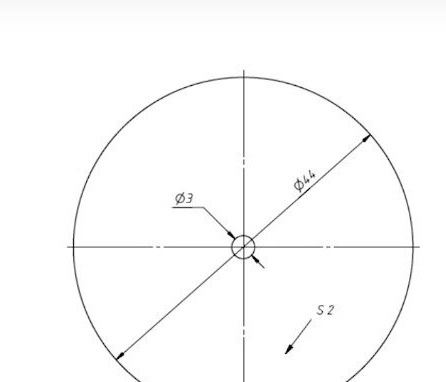
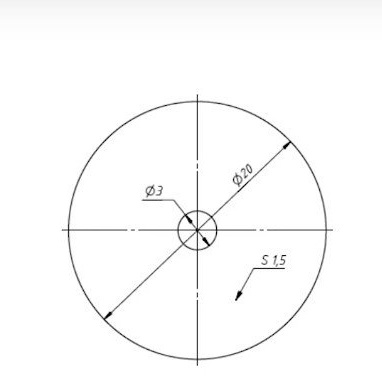
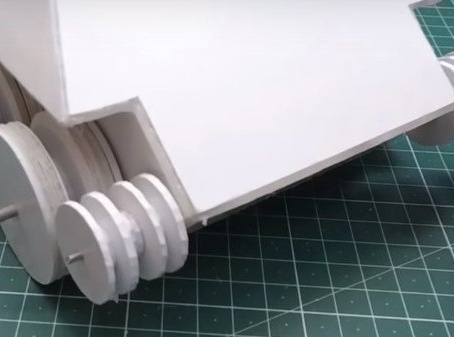
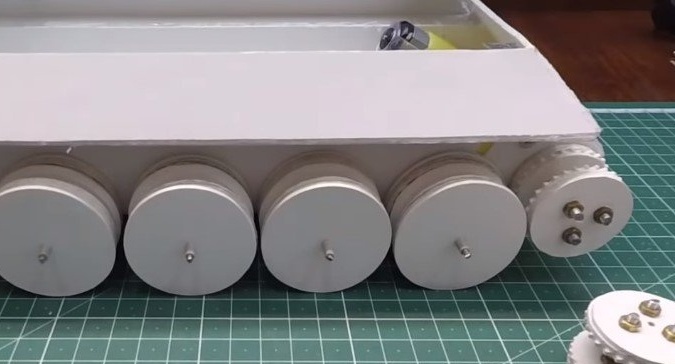
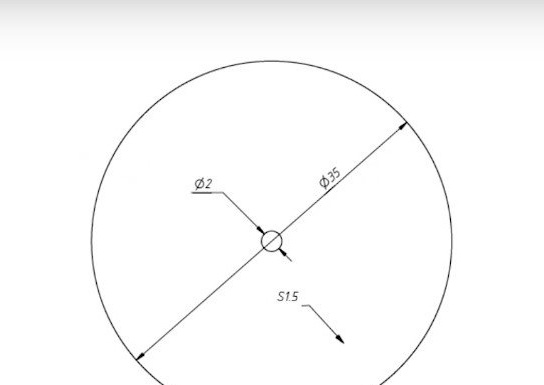
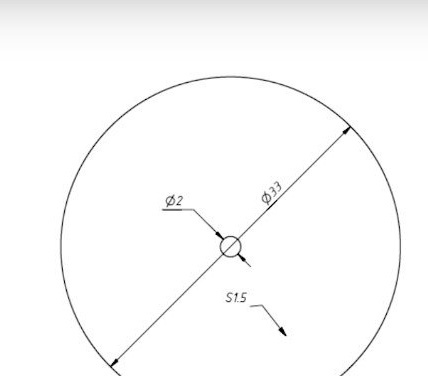
It was the turn of the chassis. Let's start with the road wheels. For them, you need to cut 4 pieces of plastic disks, four of linoleum and three intermediate disks.To reduce the friction of the roller on the axis, only in the extreme disks we drill holes of 2 mm, in the remaining 3 mm. To facilitate the entry of ridges into the ice rink, grind the edge on the internal disks. We use bicycle spokes as axles. In total, 40 plastic discs are needed for road wheels, the same number of linoleum and 30 intermediate. That is still a job! ) drive drawings here:

We glue all the details of the rollers with superglue. After drying with a file or sandpaper, we smooth the edges and remove blemishes. We get this:
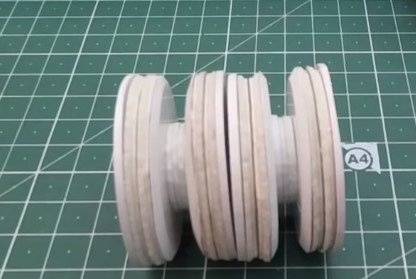
And so ten times! )
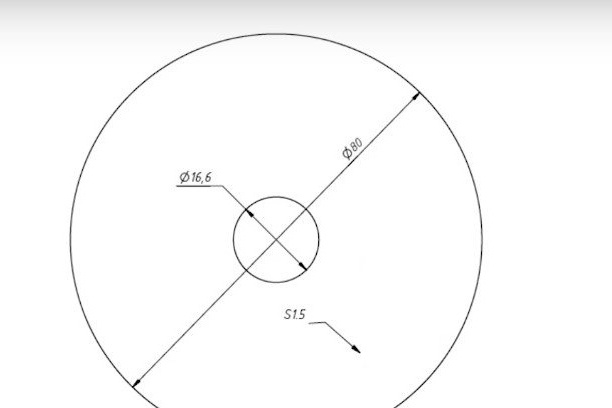
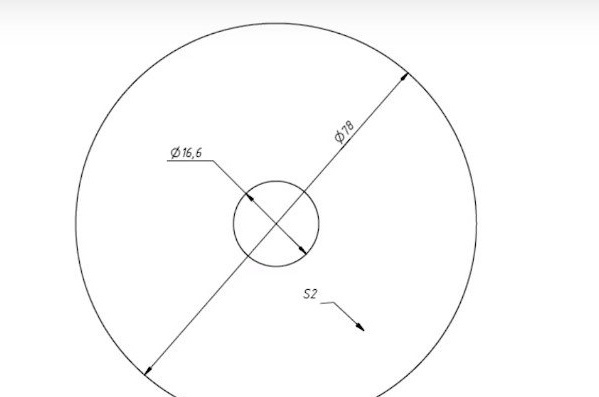
In the same way, with the turning of the inner discs, steering wheels are made. With the difference that instead of linoleum there will be intermediate disks. Blueprints:
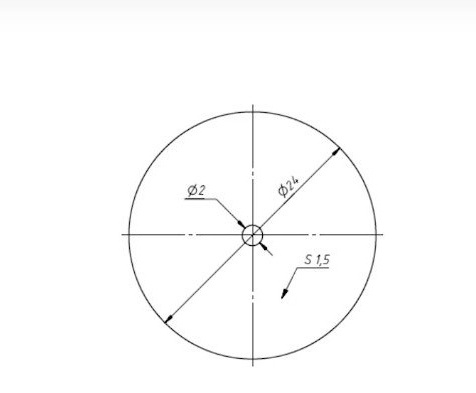
On one wheel you will need 8 large and 7 small disks. To prevent the rollers from rubbing against the side sheets, we put small washers on the axis. In order to prevent the rollers from flying off the axes, we put on the cambrices of the appropriate diameter on the edges and cut off the extra length of the spoke.
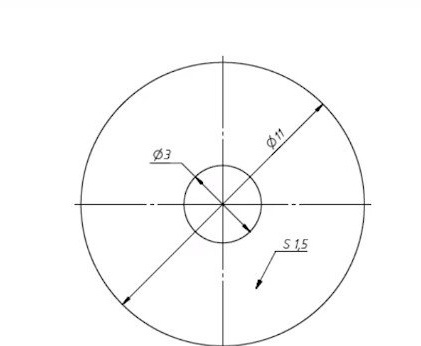
Further driving wheels. Let's start with the ring gear. Here is his drawing:
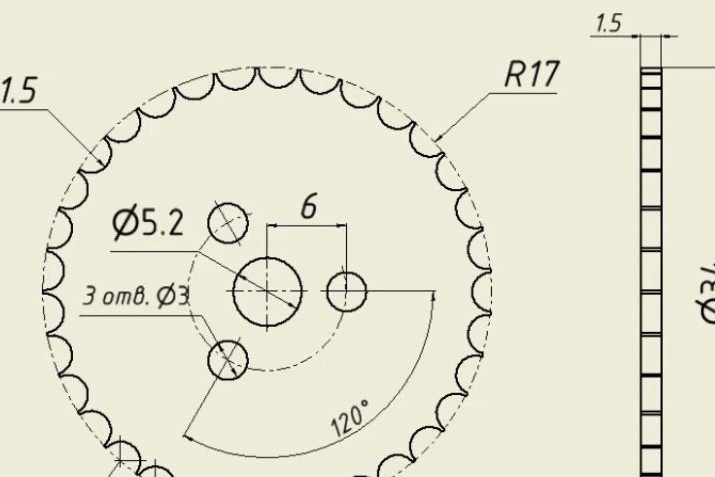
The centers of the holes on the outer diameter are marked with a pair of compasses and drilled before cutting the wheel. Naturally with internal holes. Next, carefully cut the outer edge according to the marking. Get the gear. File the burrs. In addition to them, we cut out the internal disks according to the drawing:
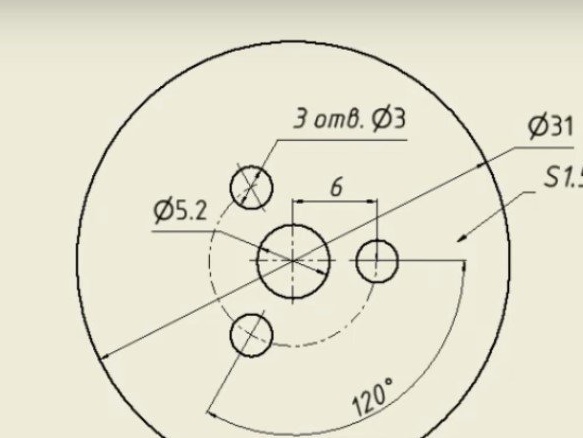
Their number will depend on the width of the track. The whole structure is assembled on three screws. On discs facing the gearbox, be sure to make a blind hole for the screw heads. Instead of intermediate discs there will be nuts. The excess length of the screws can be sawed off or bitten off with nippers.
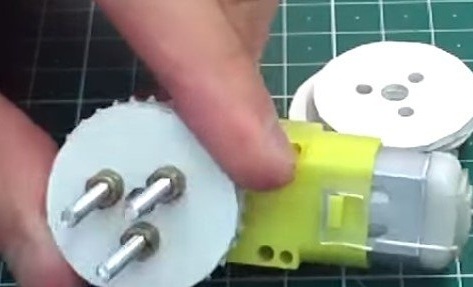
Put the wheels in place:
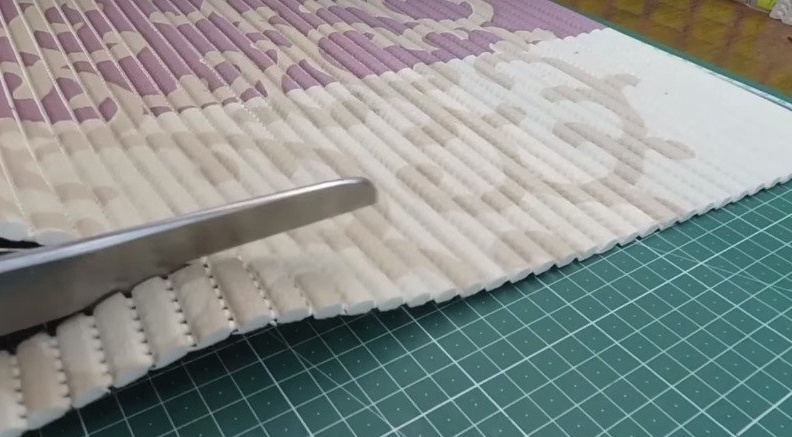
Getting to the caterpillars. From the PVC bath mat, cut off the strip of the desired width.
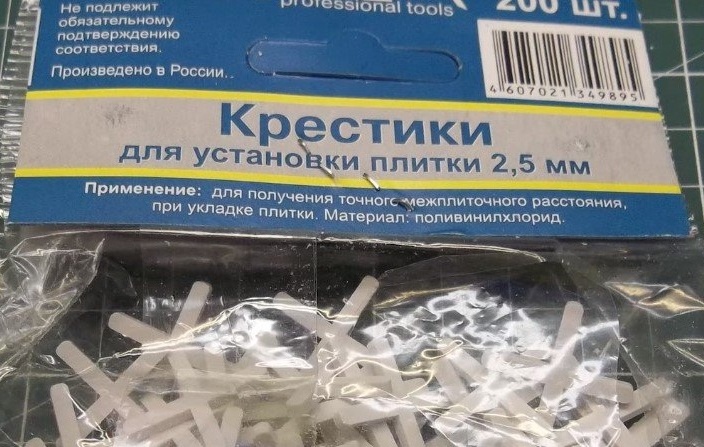
For the crests we will use crosses for laying tiles
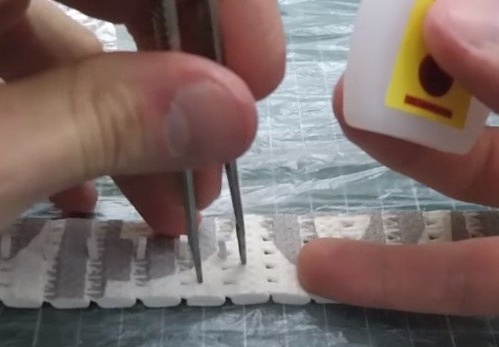
Cut one leg and insert into the caterpillar. On a plastic bag we glue the inserted cross with superglue:
The edges of the caterpillar can be glued end-to-end with superglue, the strength of this joint is quite enough.
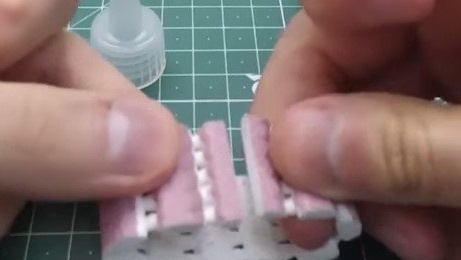
So, we collect the caterpillar, put it on the rollers and glue the edges.
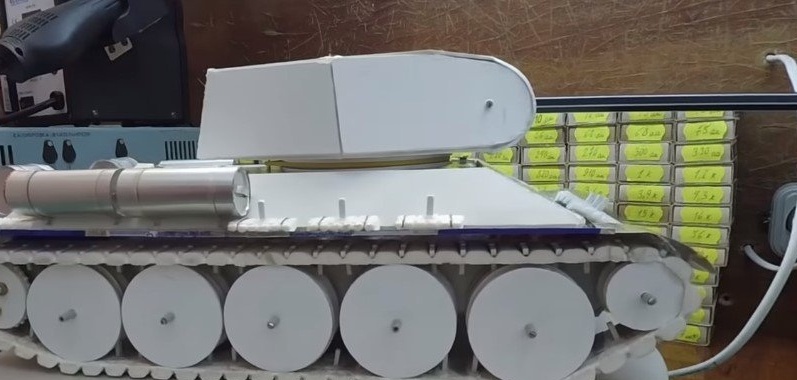
At this stage, we have already received a structure capable of moving. But what is a tank without a tower? No! Therefore, we proceed to it. And we will make it turning and with a moving gun. Let's get started!
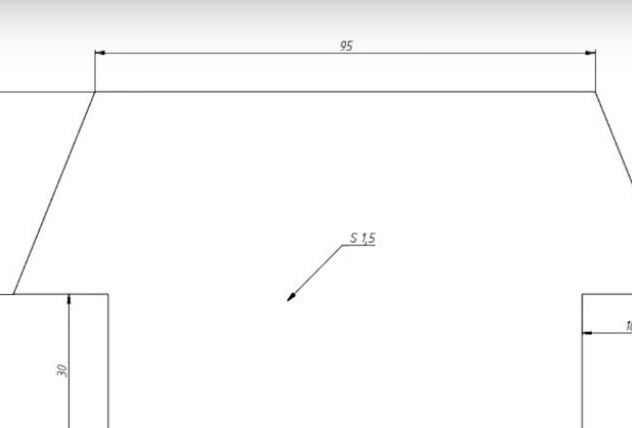
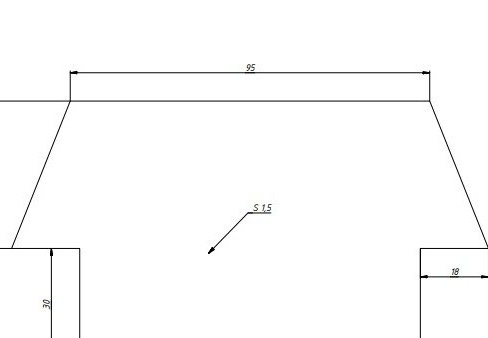
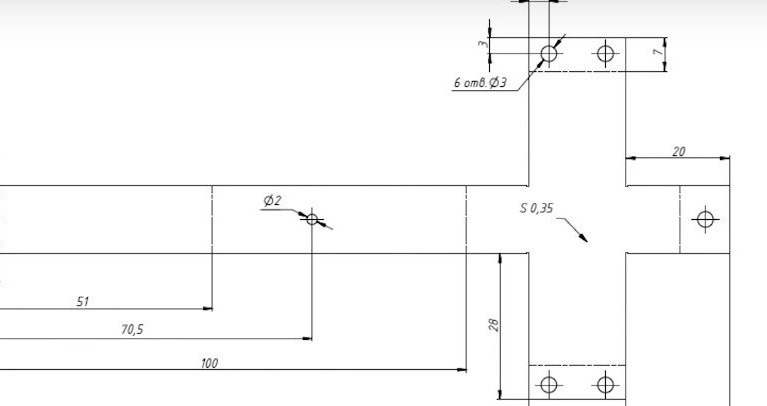
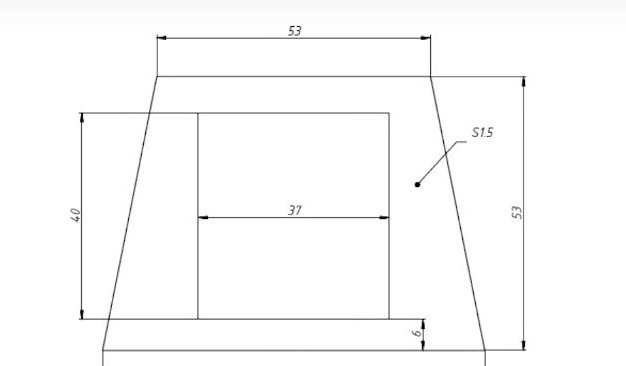
Let's start with the manufacture of staples made of tin according to this drawing.
Having cut and drilled in the right places, bend it so that the following happens:
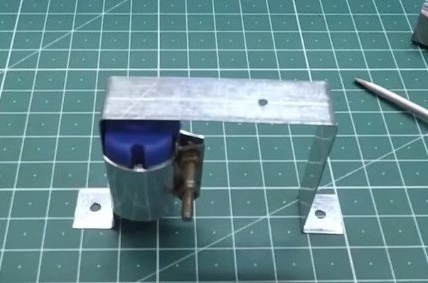
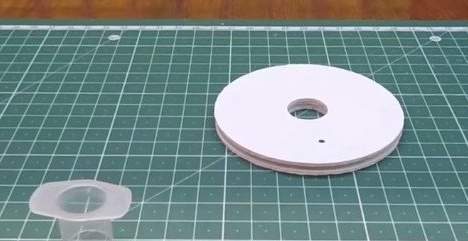
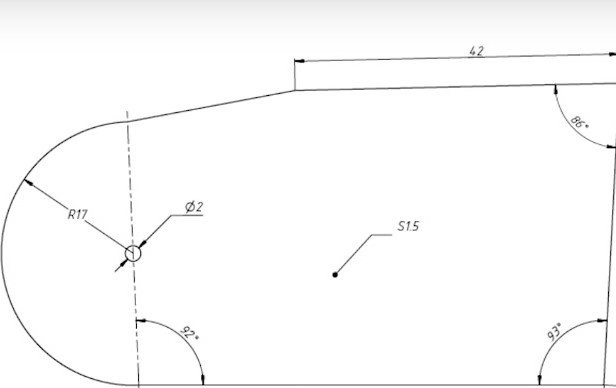
We put a small pulley on the motor axis (130th series). We make a driven pulley from plastic according to the drawings:
We use the same spoke as the axis and screw the M3 screws to the lid from the inside. Yes, and don’t forget to wear a gum strap

Second stage driven disc made of two plastic discs
As an axis for this pulley we use a trimmed syringe. In addition, wires for the gun mechanism will pass through it.
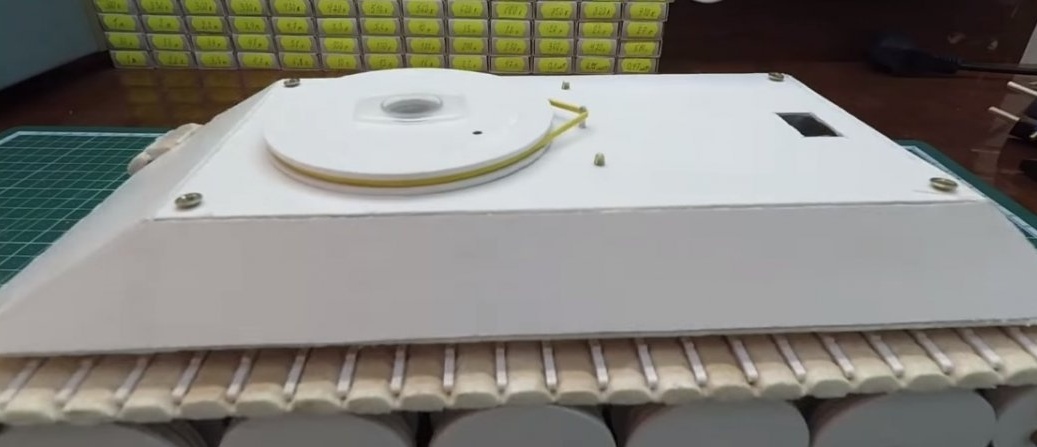
We insert it into the roof of the case, put on an elastic band and the turret turning mechanism is ready. If the turning speed is too high, you can remove one or both small pulleys from the axles and put the elastic directly on the axis.

It remains only to put the cover in place.
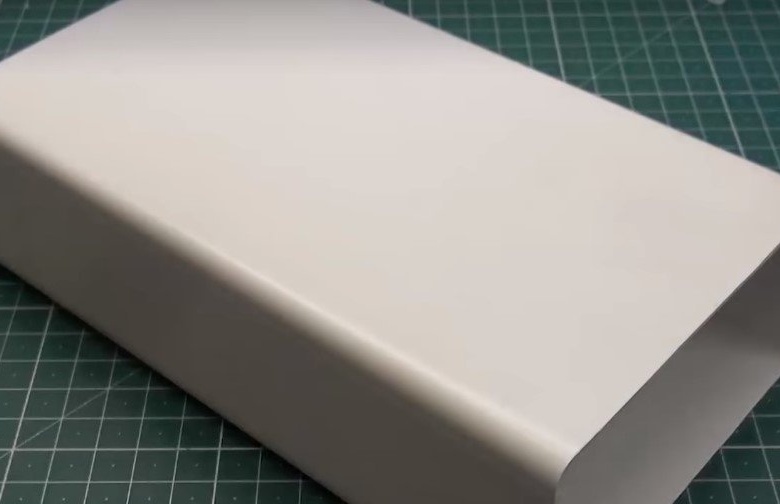
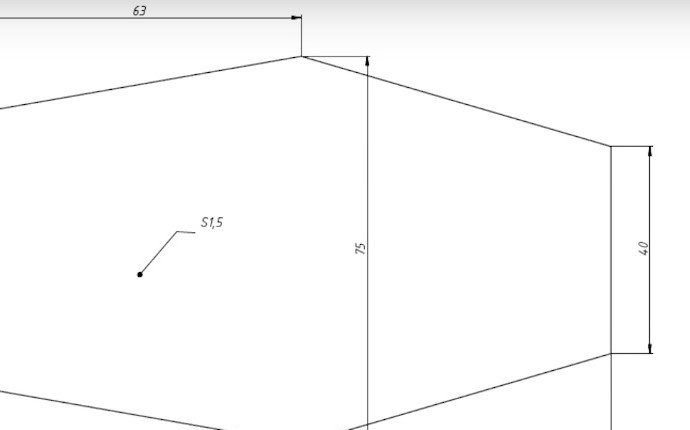
There was a tower. As with the case, we will prepare its parts from plastic.
Gun mask
Sidewalls
Rear end
Tower bottom
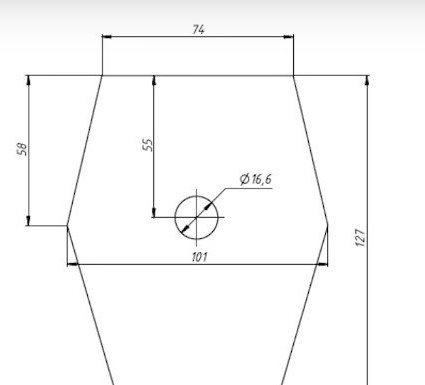
And the roof of the tower
Glue the bottom of the tower to the pulley and insert the axis from the syringe through them.
Then, using the same technology as the case, we glue the tower and align the joints and edges.
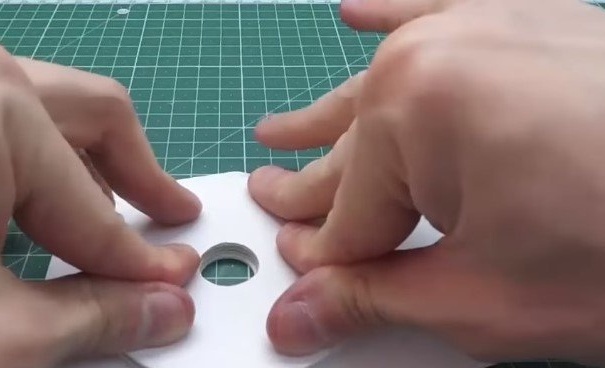
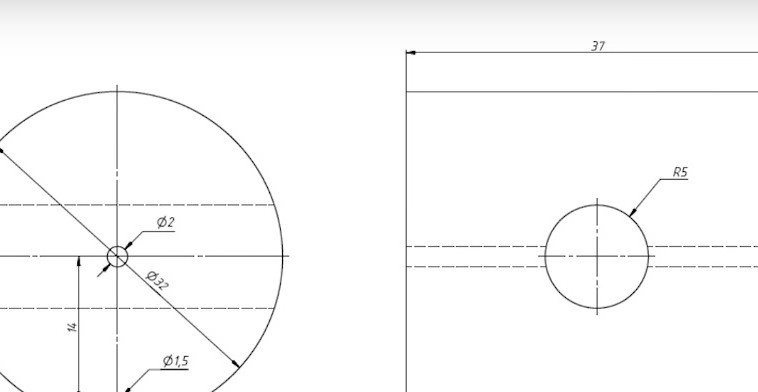
From a piece of PVC pipe with a diameter of 32 mm we make a gun cradle. At the edges we close it with plastic discs and drill holes according to the drawing.
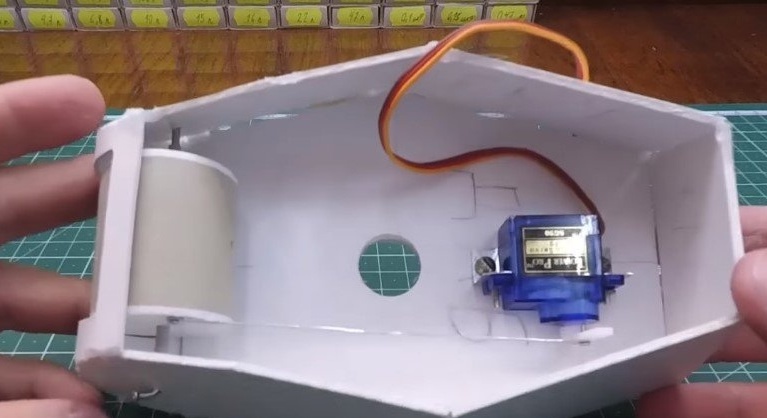
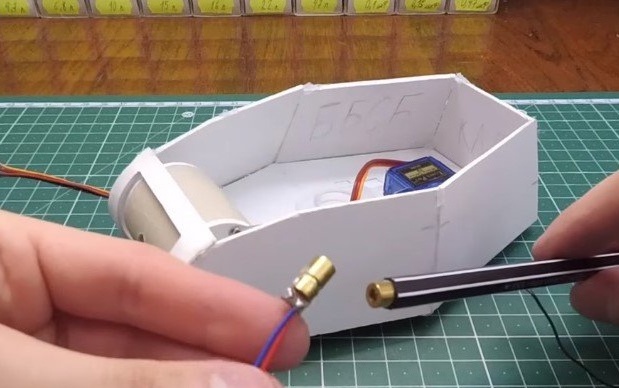
The hole in the side is made on the basis of what will be used as the trunk. We put it in place, insert the axis from the knitting needle and connect the rod with a servo drive, which in turn we fasten the corners from sheet metal to the bottom of the tower.
As a barrel, I used a pen with an inserted cheap Chinese laser.Of course, everyone is free to show imagination and put their own version.
Well, we set the tower in place.

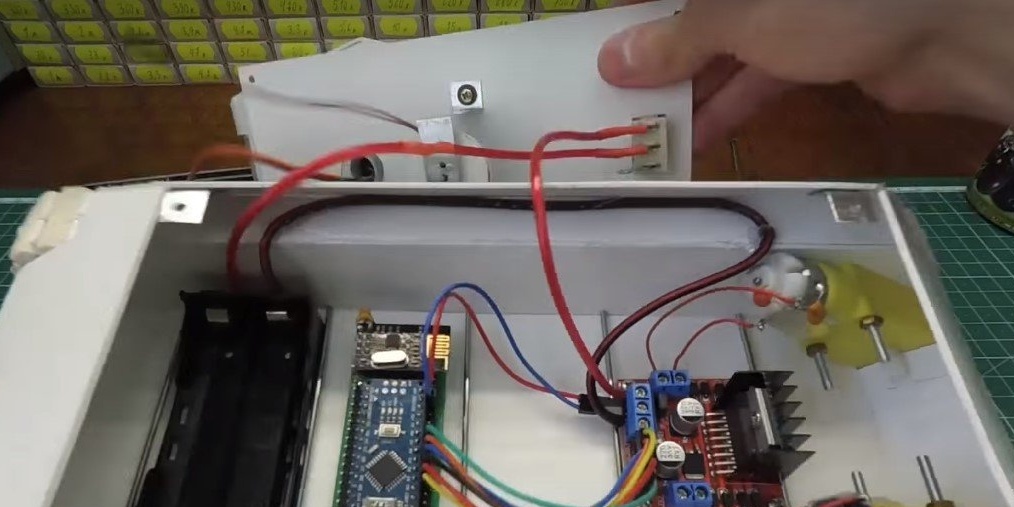
This completes the mechanical part of our tank. It remains to install electronics and hang external elements such as tanks, exhaust pipes, spare tracks and more. Electronics in this model is a homemade CCU unit and a driver unit on the Arduino platform.
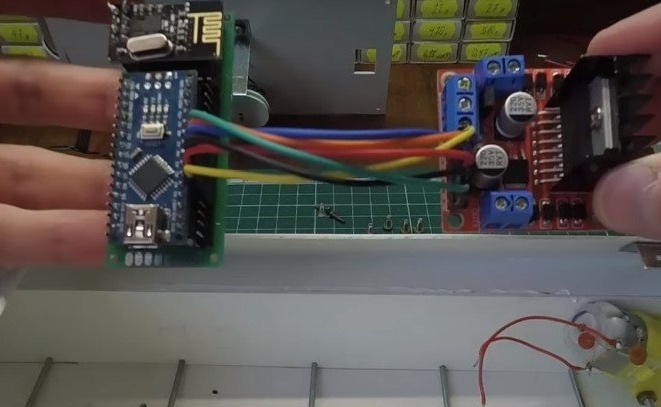
For power, two 18650 batteries are used in a special box. To which is connected the switch located aft. Connect all this economy for those who are versed in arduino, it will not be difficult.
Another option is to buy and install a set of discrete equipment with at least eight channels. For example, like this.
Connecting it is even easier than arduino. Everything is clear intuitively.
The canopy can be made of tin from cans, fastened with superglue. Well, well, our tank is ready and can go on sea trials!
That's how they went.
This model with some help and under the wise guidance of an adult, a middle-aged schoolchild will fully master it. Good luck if you decide to repeat!