
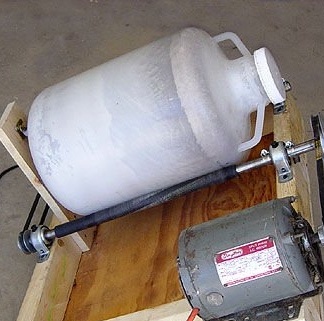
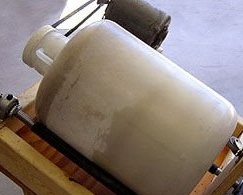
The finished product should look something like this:
Step 1: Materials and Tools Required
Materials:
- Motor - the master pulled out of the old dryer, which is designed for 1600 revolutions per minute;
- Pulleys (4) and belts (2) - dimensions may vary. The master also pulled them out of the old washing machine;
- Ball bearings (4) - can be obtained from old junk or cheap to buy;
- Switch (1) - a standard light switch is used;
- Nuts and electrical tape - bought at a hardware store. Nuts can also be borrowed from somewhere;
- Container - size may vary;
- Ball bearings;
- Two shafts. You must make sure that they are installed inside the ball bearings or install yourself;
- Self-tapping screws;
- Furniture wheel;
Instruments:
- screwdriver;
- screwdriver;
- spanners;
- soldering iron, solder, flux;
Step 2: Removing the motor
Find an old dryer / washer. The author had one in the barn. He took it apart. There are no step-by-step images.
Step by Step Actions:
1) Turn the machine over and find the screws at the bottom. (may be side or back for different models.)
2) Unscrew the screws, unscrew the motor from the bottom panel and remove the panel.
3) When the engine is unscrewed, find all the wires going to the engine. Remove all connectors on the engine to remove the motor.
4) Find the power cord going to the machine and cut it off (need
later).
Step 3: preparing the base
Now it's time to evaluate the future car. Consider the following options when choosing a product size;
1) Will you use the machine for small batches of chemicals or large batches.
2) Storage and use of the machine.
3) Cost (Cost depends on size. Usually, the bigger the car, the more it costs).
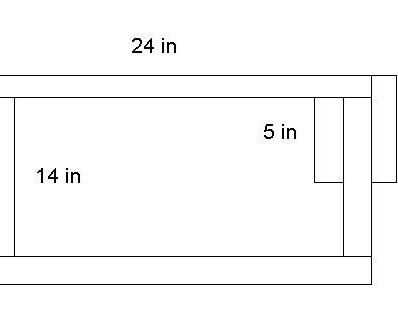
For this homemade The following bed dimensions are used: 60 cm long and 45 cm wide.
1) Cut two bars 60 cm long and 50 mm wide. Also cut two bars 35 cm long and 50 mm wide.
2) Cut two bars 12 and 17 cm long.
3) Twist them using self-tapping screws using the instructions shown.
Step 4: Install the motor
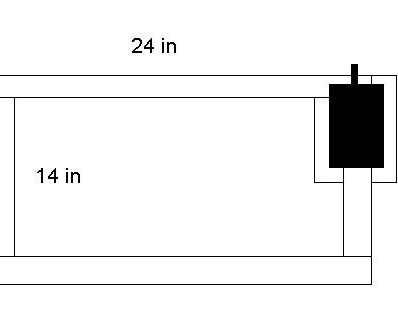
If possible, install the engine using the previously installed mounting plate (as was installed in the dryer / washer). If this is not possible, for example, the plate is at the bottom, then another method can be found. The author will share his experience in this step.
A wizard motor needs a different mounting method because its mounting plate is not available. He uses metal belts to pull the motor down to the bed. Set it in the shaded area shown in the figure.
The pulley system will be different depending on your engine, so if possible, use what is already there.
Step 5: Install Shafts and Bearings
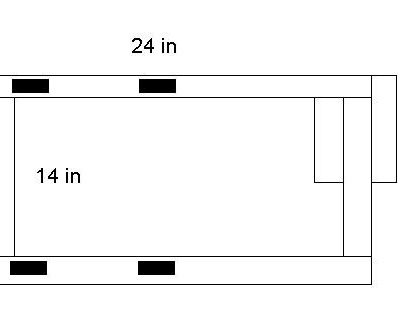
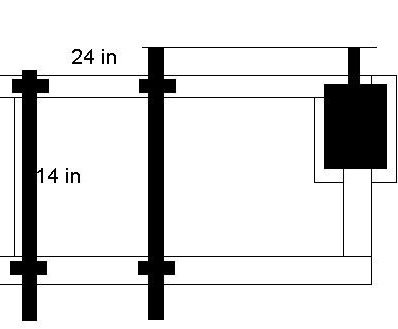
Further, for the manufacture of this homemade product, it is necessary to install bearings. For this, the author uses metal clamps and a pair of screws to hold them in place. There are many ways to install them, so be creative. The main thing is that you need to mount them in the shaded area in the first figure. The distance between the bearing sets and the engine will depend on the length of the belts you have, so be sure to compare them before installing.
After the bearings are installed, insert your shafts through the bearings so that they extend, as shown in the second figure. Before installing the pulley on the shaft closest to the engine, align it, otherwise the belt may slip.
Step 6: Adding Pulleys to the Shafts
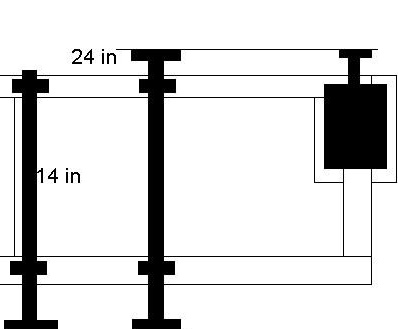
Take the pulleys and mount them at the ends of the shafts as shown. Then put on the belts between them and make sure that the belts are straight and not warped. You must adjust them before moving on.
Step 7: Wiring Connection
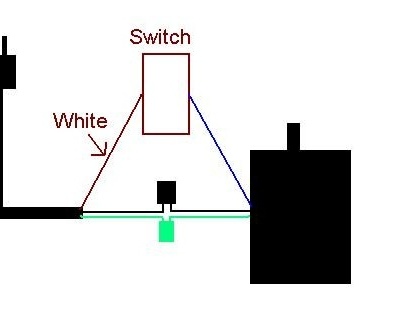
The engine has a connector with three wires. On the author’s engine - black, green, blue (black = zero, blue = phase, green = earth). Now the author cuts off the plug and strips all three wires. Then it strips the plug wire, which he also previously saved. The three plug wires were in the following colors: black, white, and green. They also need to be cleaned. Then these wires are soldered to the motor wires. Black to zero, green to ground, and white to one of the switch terminals. Then connect the wire from the other terminal to the motor phase wire. If necessary, use electrical tape. Install the switch where it is more convenient.
Step 8: Coupling the Shafts with a Rotating Container
In order for the shaft to rotate the container correctly, it must have grip with it. For example, metal for metal or plastic for metal. In this case, this is not so. Therefore, grip should be added by gluing any rubber material around the shafts and the container.
Step 9: Making the legs for the bed
In order for the mill to work properly, chemicals and grinding particles must be collected in one area. Therefore, the entire installation should be at an angle of 30 degrees. To achieve this, you need to add two legs to the base.
This needs no explanation. Just lift the front (the front is the direction of rotation of the engine) and measure an angle of 30 degrees. Then make the required foot sizes and screw them, one on each side.
Step 10: Backstop
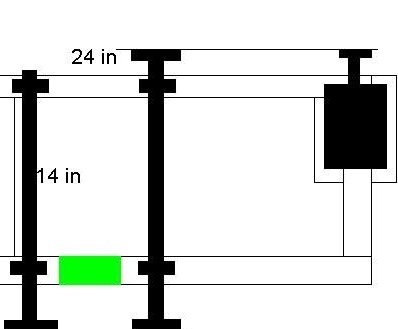
This is optional, but highly recommended, as this emphasis allows the container to rotate much smoother. Cut a piece of wood, which is 3/4 of the diameter of your container, and set it as shown in the figure (a green rectangle where you need to install it), pointing upwards, forming an angle of 90 degrees with the base. Using self-tapping screws, fasten the furniture wheel at the top of the thrust board so that the container abuts against it.
Step 11: the rotary mixer is ready
Just place the container on the shafts, add the chemicals in the right proportions and start the mixer.If you find that the agitator is moving too fast, then replace the pulley at the end of the shaft that connects to the motor with a larger pulley. If it slows down, then use a pulley of a smaller diameter to increase the speed of rotation.
Note: do not use heavy weights more than the motor can support.