» Electronics » Power supplies »Charger from a computer power supply

Charger from a computer power supply


It took charging for the car battery. After going through several options, I settled on reworking the computer's power supply. I decided to redo it in a simple way. The charger will not have adjustments, I do not have such a task. In principle, you can do everything in a couple of hours.

For homemade we will need:

- ATX power supply;
- wires;
- clips like "crocodile";
- network switch;
- foil fiberglass;
- plastic plexiglas;
- radio components;
- instruments.

About accessories.

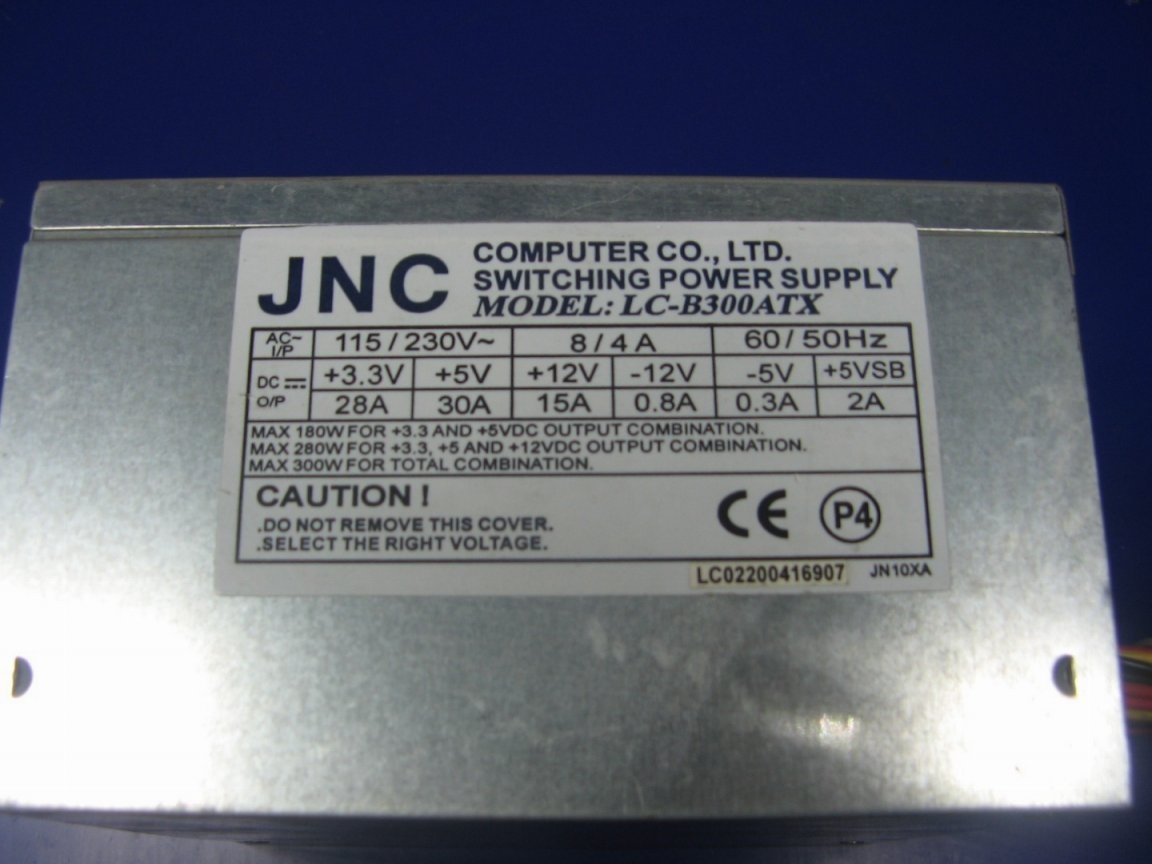
We will redo the ATX block. JNC company, model LC-D300ATX.


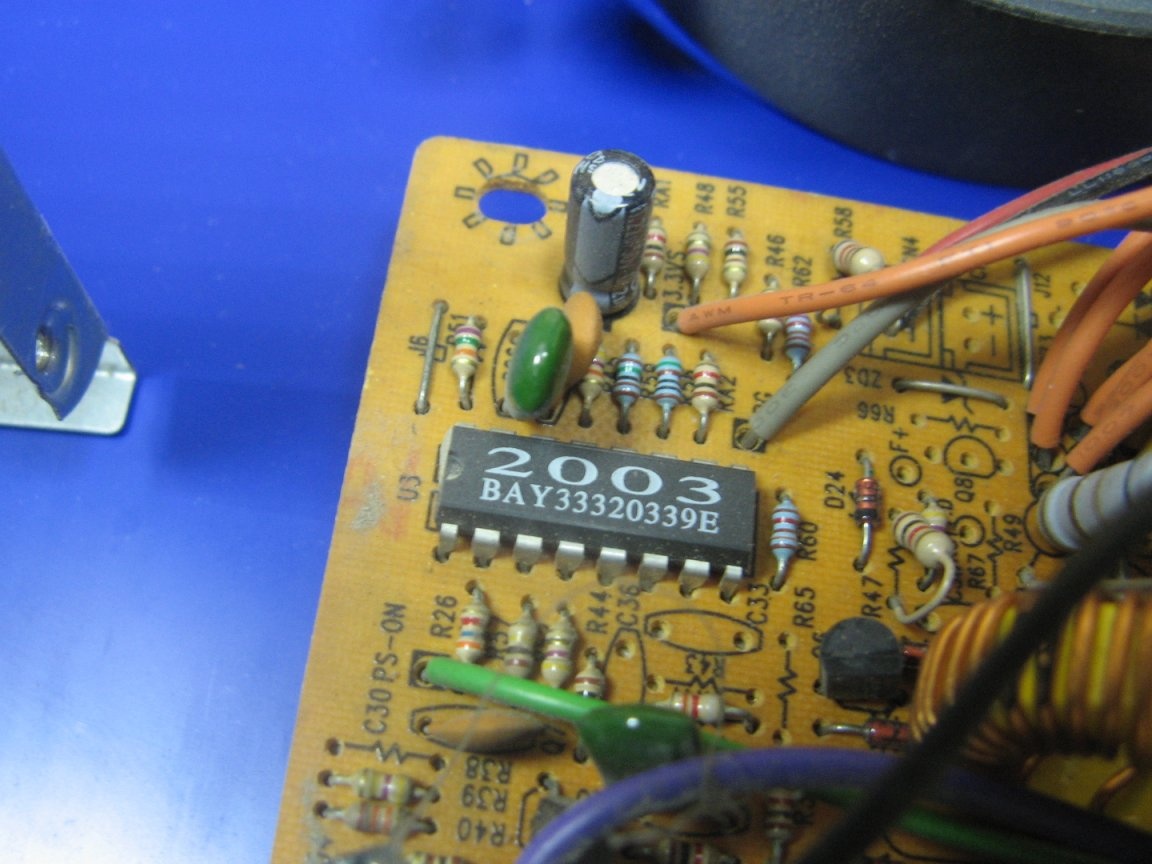
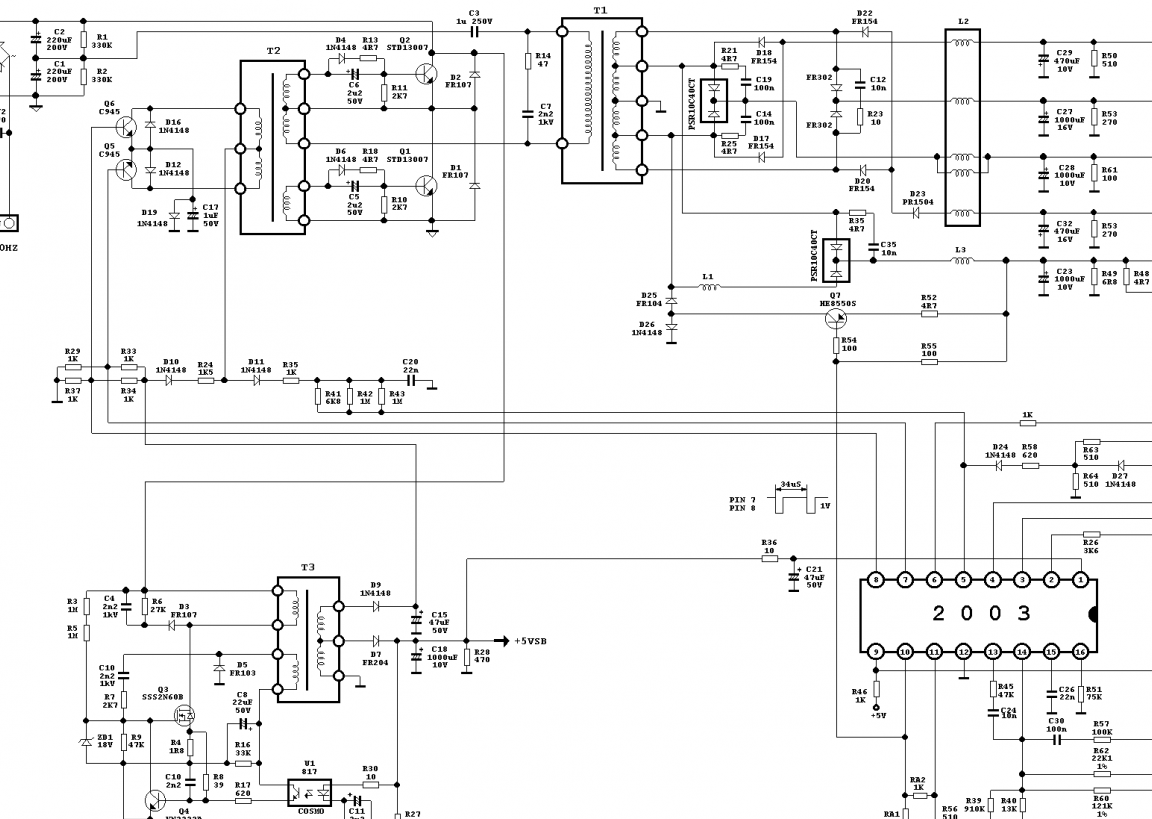
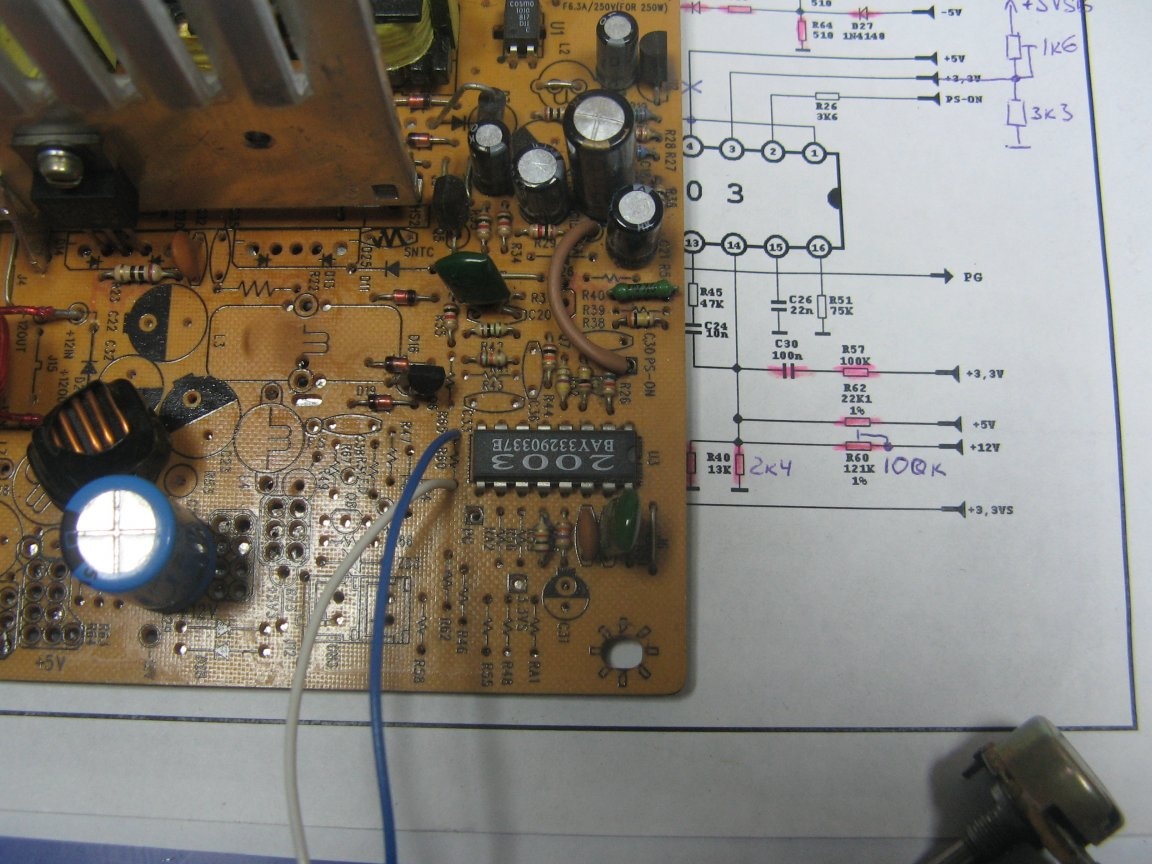
This power supply has a little-known on board chip 2003. There is little information on this chip. It seems like it's a PWM controller with a multivisor. We will understand the scheme, about the scheme below.


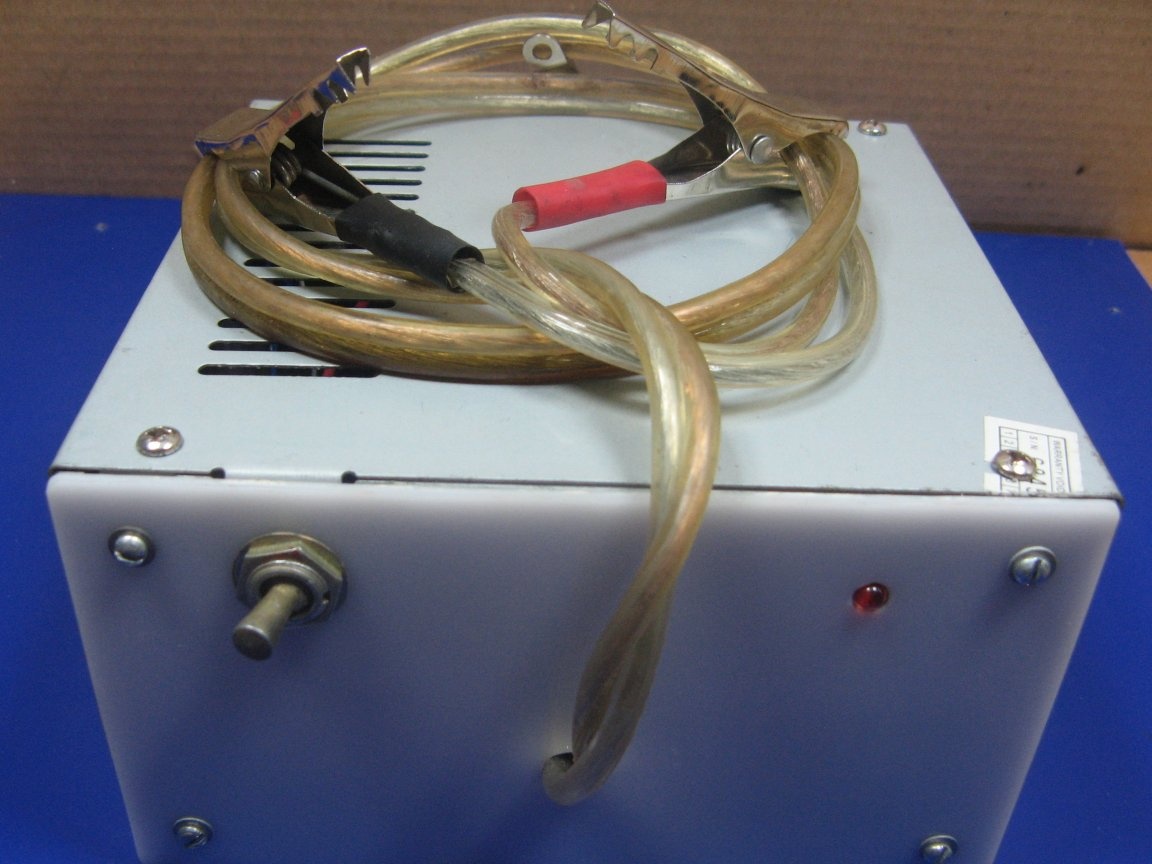
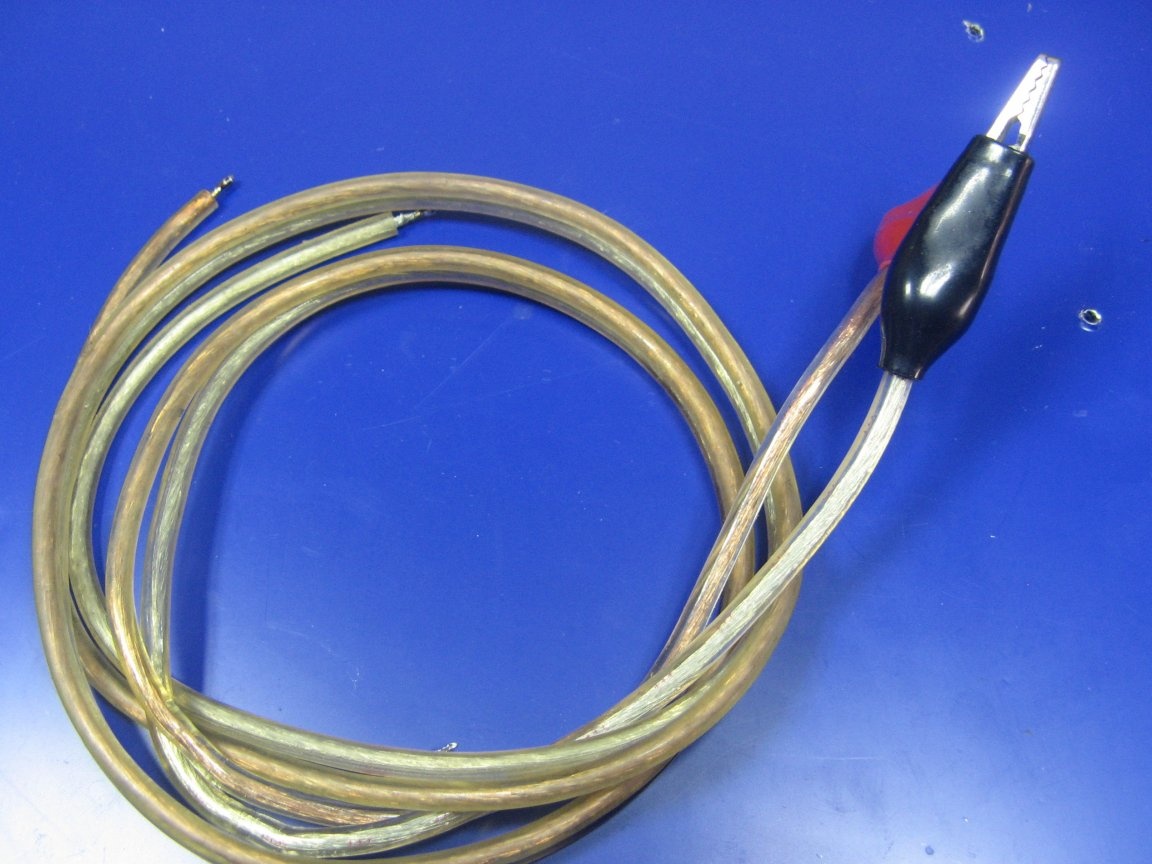
I will be connected to the battery using wires with crocodiles. I already had soldered.


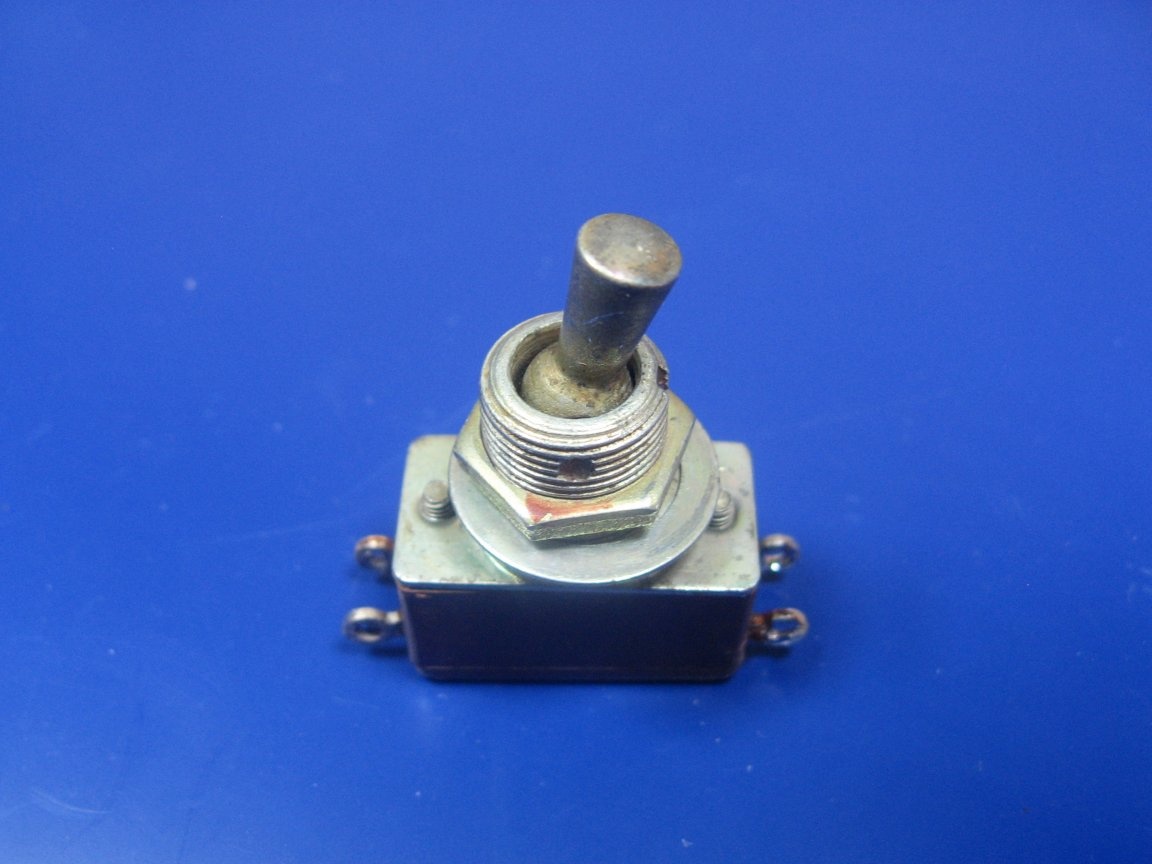
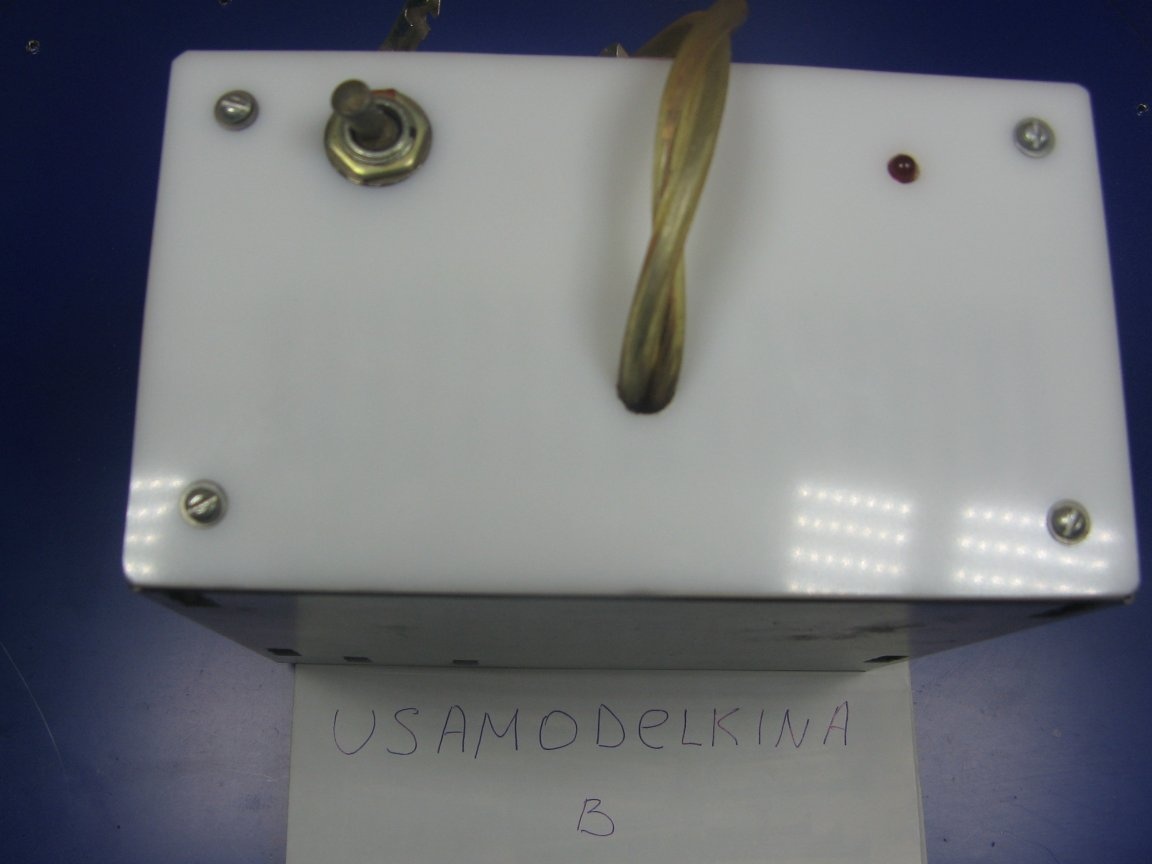
As a network switch, I have a TV2-1 toggle switch. Pulled out from the old TV.


The power supply circuit is quite simple. We have a 300-watt block, a 250-watt circuit. The circuit may differ in the ratings of some components.


Assembly.

You need to remove all unnecessary components. Red indicates that it is necessary to evaporate. A yellow 13kΩ resistor is marked in yellow; replace it with a 2.4kΩ resistor. Instead of the resistor marked in blue, temporarily set a 200 kΩ variable resistor. A variable resistor, it is desirable to put on 100 kOhm, but I did not have this. I had to adjust the desired voltage for a long time.

The main thing is to set the maximum resistance. There are also green labels that I’ll tell you later what to connect to them.


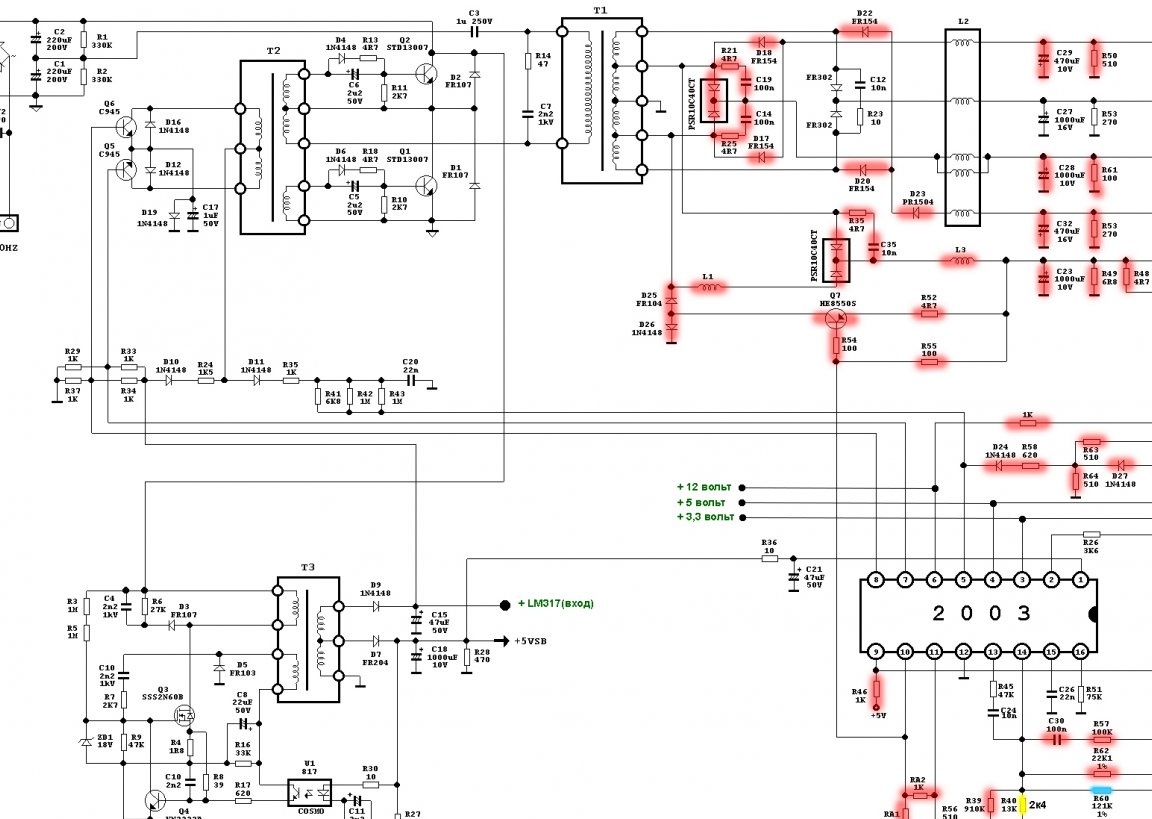
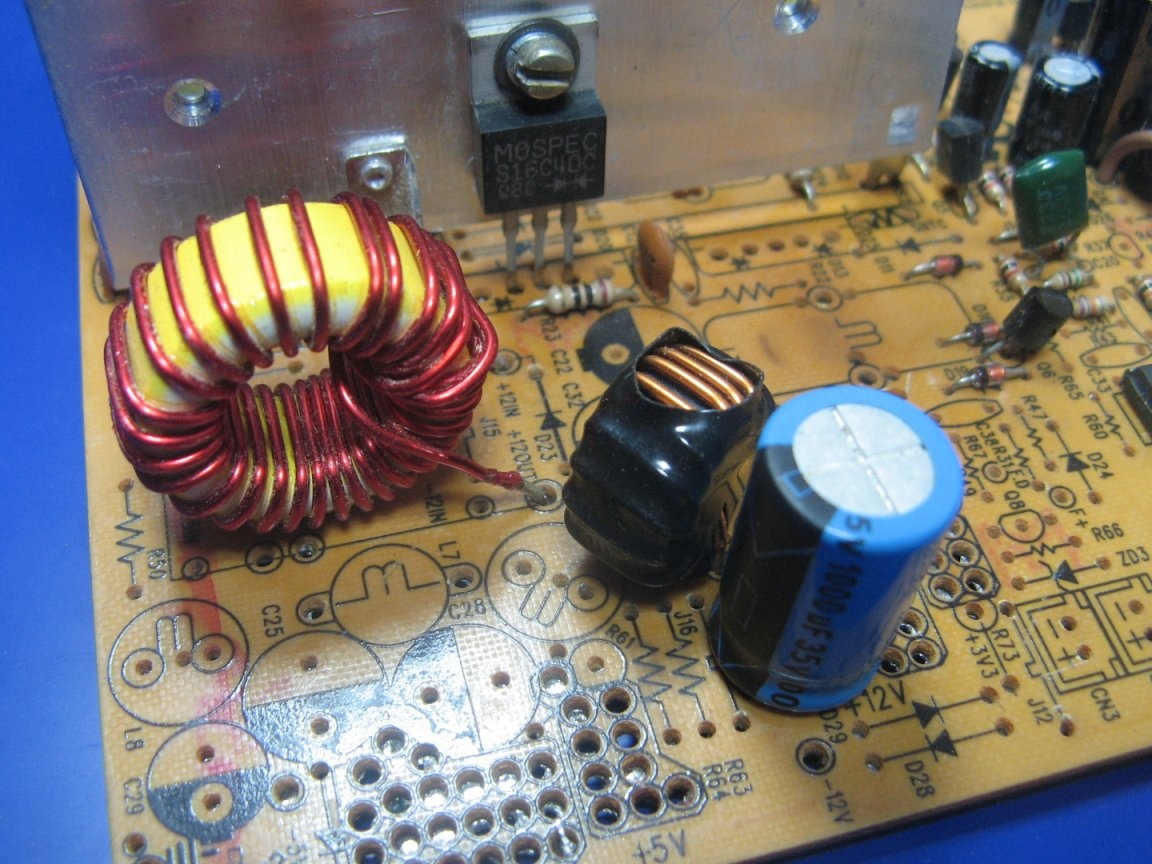
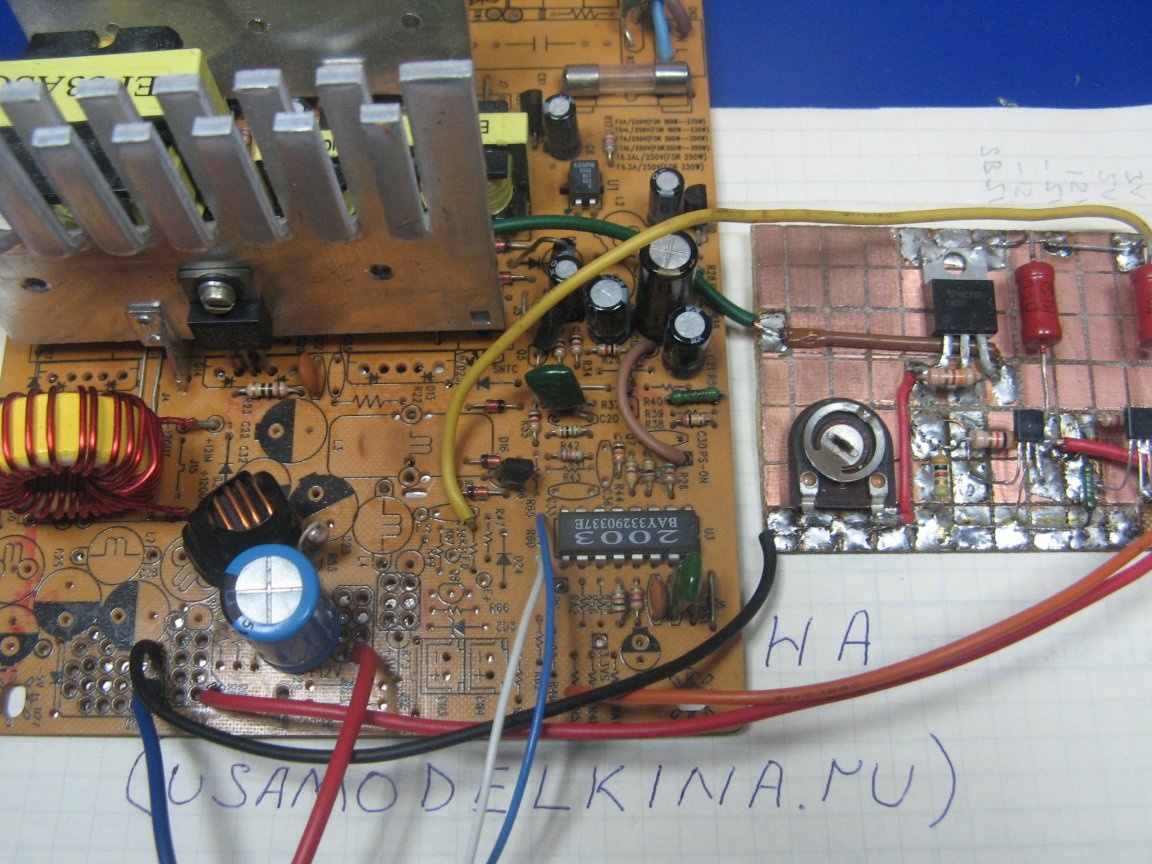
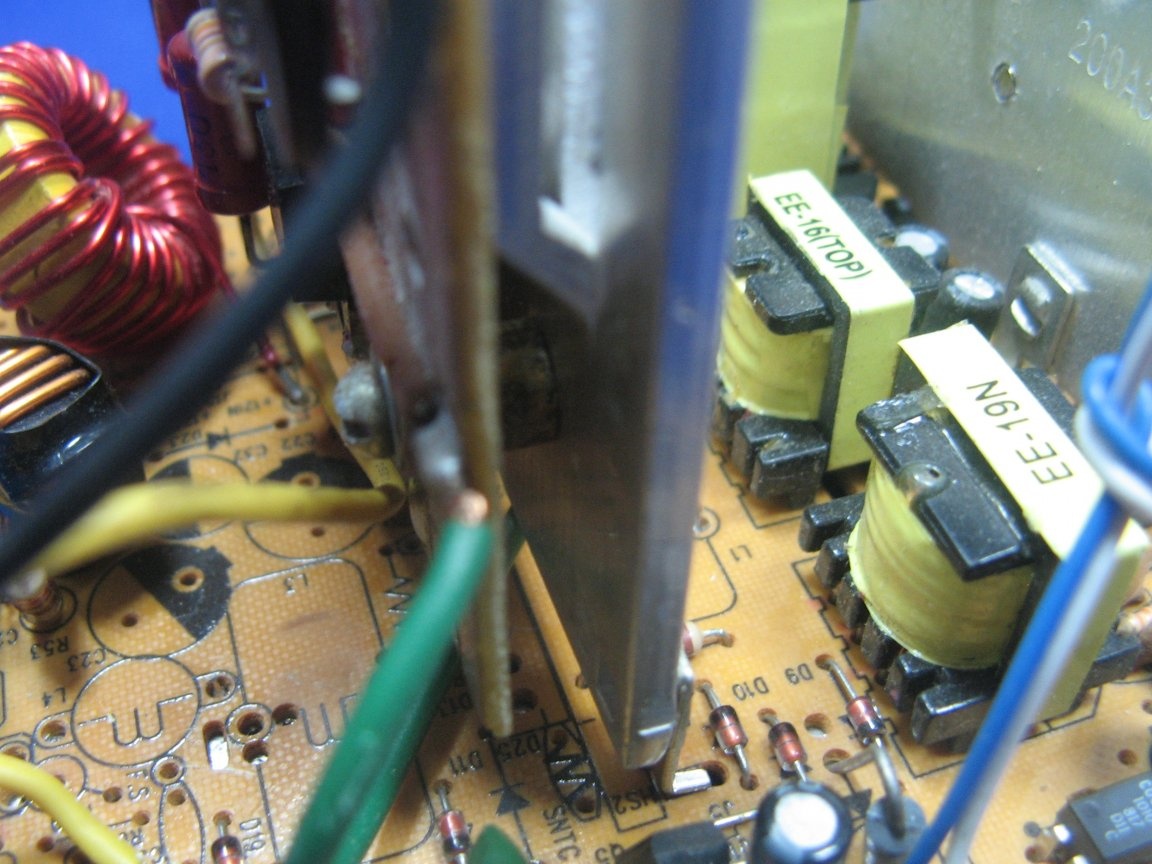
Solder the excess components. Everything is legible in the diagram. It turns out the board is like this. Temporarily dropped power diodes. Just throttle throttle group stabilization, I will rewind it. A brown jumper closed the spots from the ground and PS-ON, it is necessary to run.


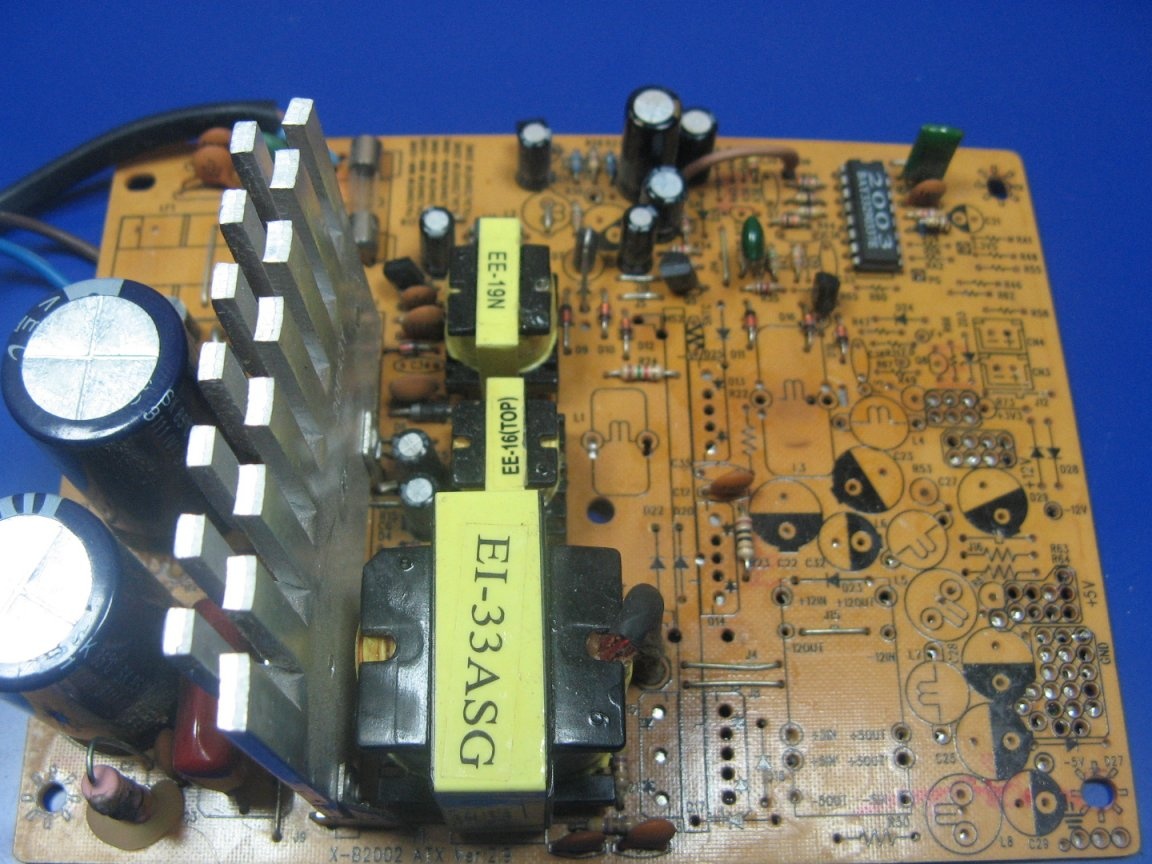
We are interested in the +12 volt line. We put in place the power diode, I took the diode from the 5 volt line. The diode installed without laying. The legs of the radiator mount are not connected to the circuit, which eliminates the circuit. I installed an additional choke, in its place there was a jumper. I wound all the windings from the old group stabilization inductor, leaving the old 12 volt winding. Installed an electrolytic capacitor at 1000 microfarads, voltage of 35 volts.


A variable resistor is carried on the wires outside the board.


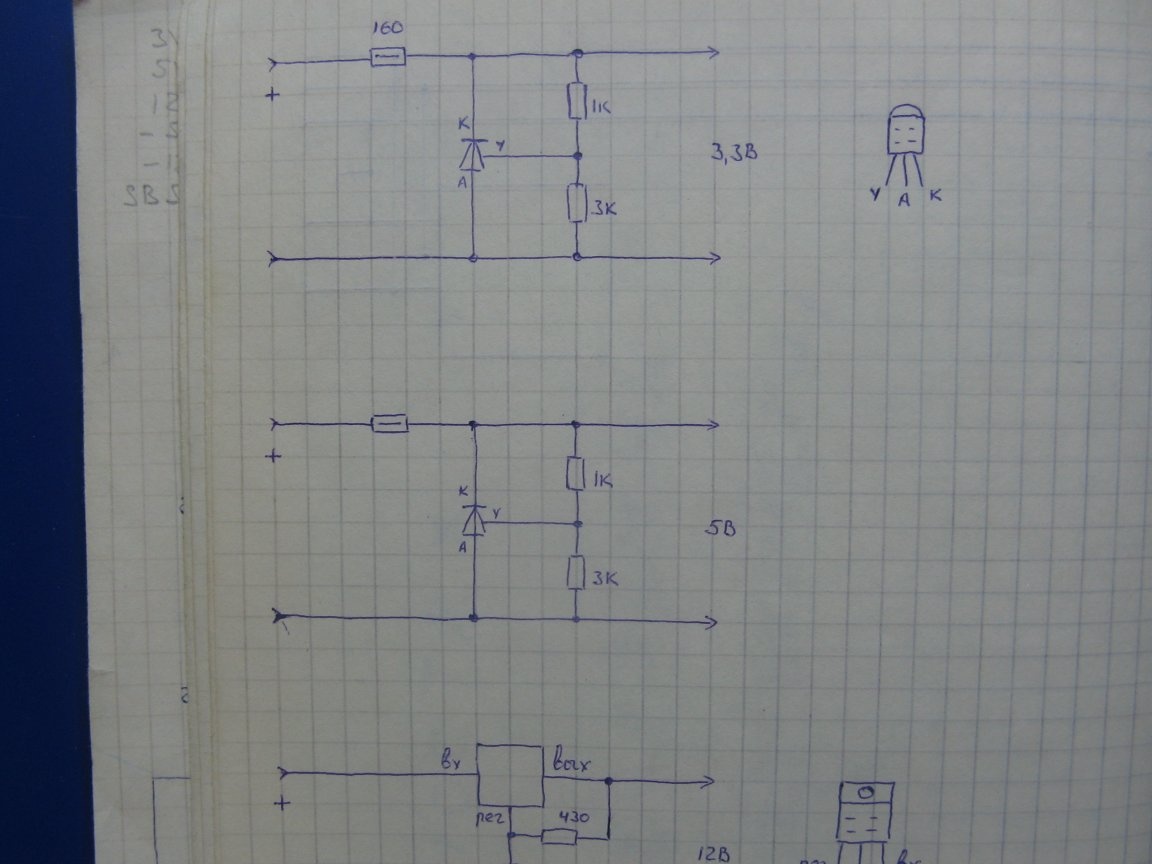
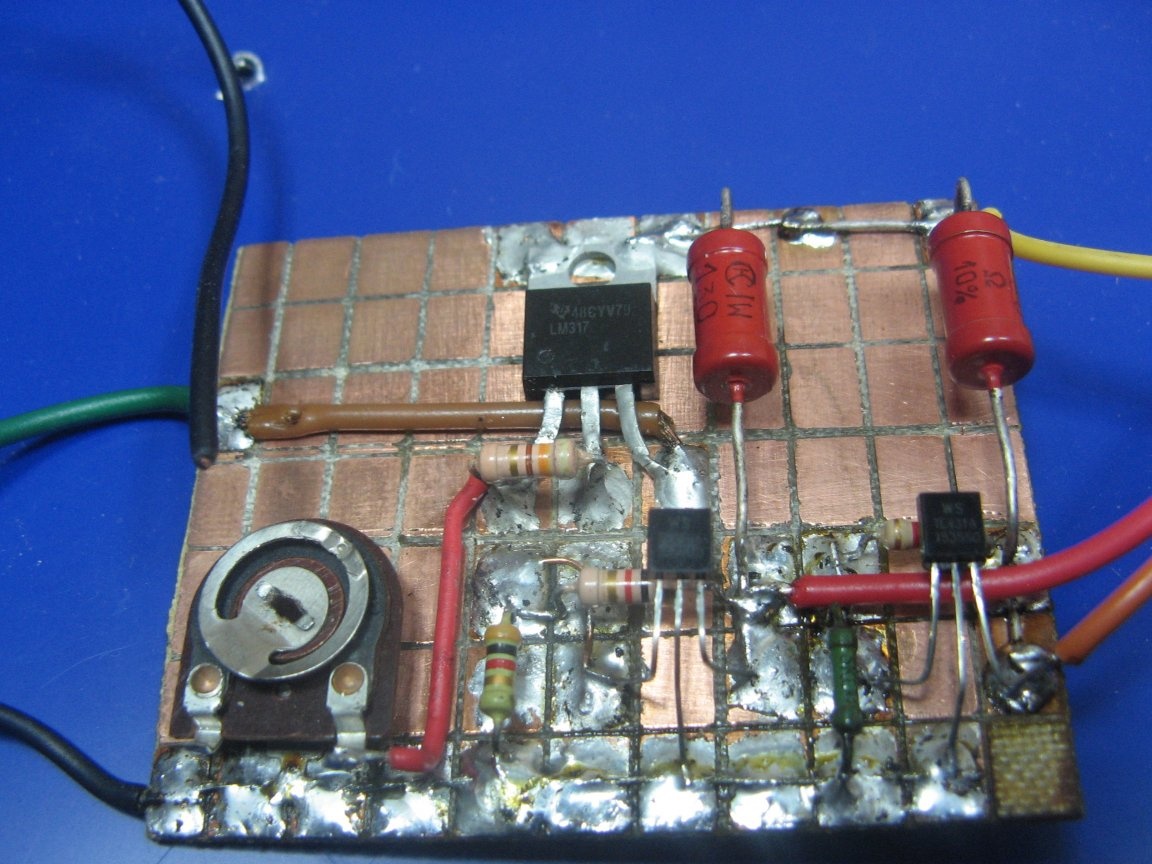
Now you need to make a board - a trick for our chip 2003.The bait consists of three stabilizers at »3.3; 5; 12 volts. Unsoldered according to a simple scheme. The upper two segments are assembled on TL431, the lower on LM317.


The upper two segments of the circuit are connected to the lower segment by 12 V. The scarf is made using the “scratching” technology. Done in about 30 minutes.


On the diagram, points were indicated for connecting the “snag” board. Solder in accordance with the scheme. The diagram is marked with green dots, respectively. The “snag” board has colors according to the voltage. It turned out something like that.


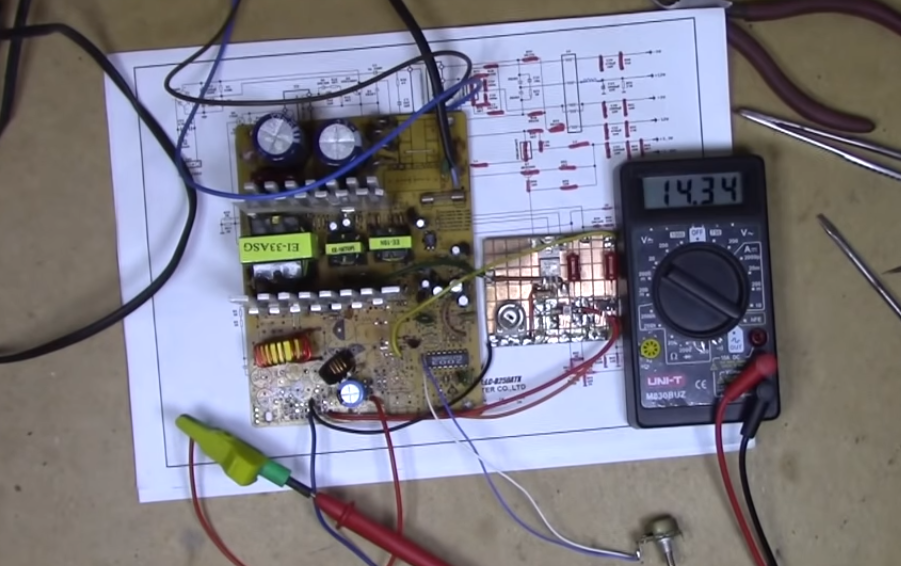
We set the desired voltage at the output with a variable resistor (forgot to take a picture). Leave a freeze frame. I measure the resistance of the resistor is about 11.7 kOhm. I assemble from two resistors of 10 and 1.8 kOhm. The voltage has changed a little, but not significantly.


The “snag” board was screwed to the radiator, through the sleeve and the M3 screw. Also in the photo on the left you can see that I installed the load resistor R53 back.


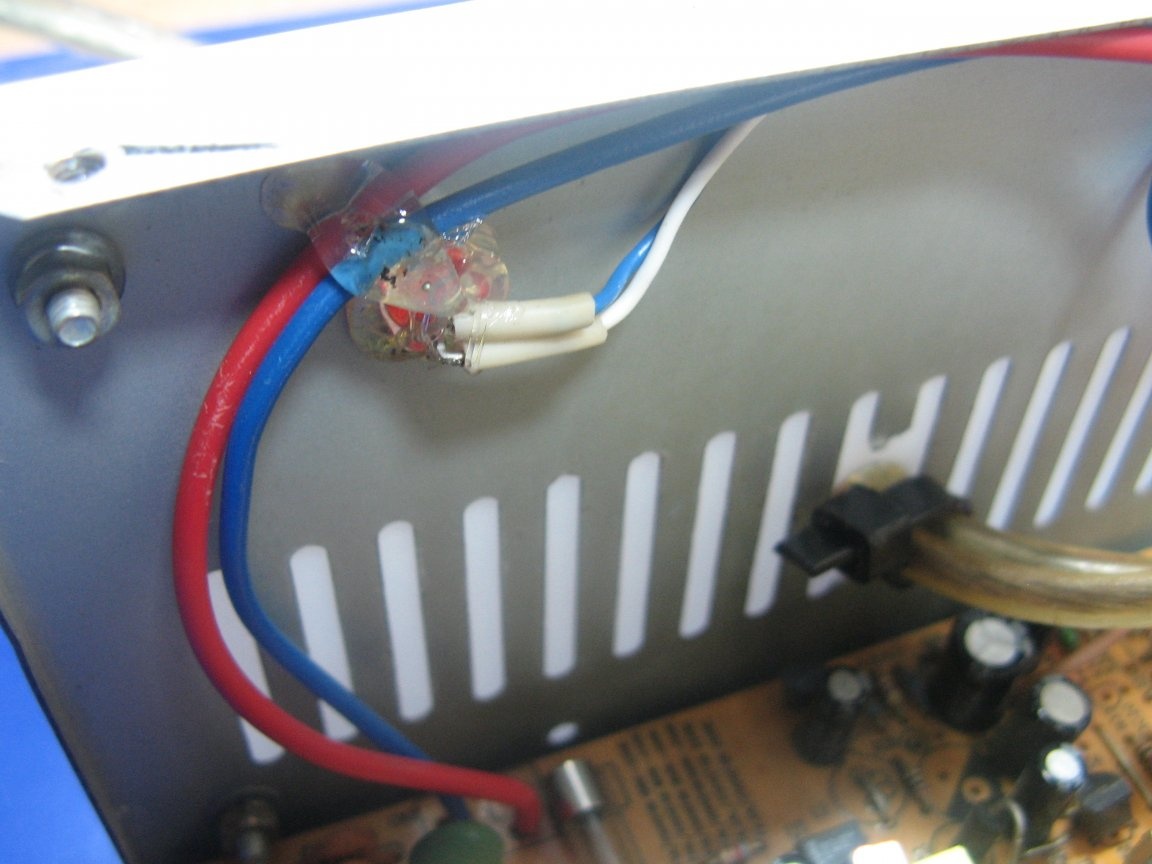
Connected wires with clips "crocodiles." Set the LED to indicate the inclusion. All fixed thermo glue. The network cable was released into the gap through the toggle switch.


Initially, I did not think of putting the plate on the front panel, but screwed it on. It looks decent. Such a garage charger turned out. The only thing that is not in this device is protection against short circuit and polarity reversal. Later, perhaps I will add.


The detailed assembly is displayed on the video:

6.9
6.8
6.9

Add a comment

    • smilesmilesxaxaokdontknowyahoonea
      bossscratchfoolyesyes-yesaggressivesecret
      sorrydancedance2dance3pardonhelpdrinks
      stopfriendsgoodgoodgoodwhistleswoontongue
      smokeclappingcraydeclarederisivedon-t_mentiondownload
      heatirefullaugh1mdameetingmoskingnegative
      not_ipopcornpunishreadscarescaressearch
      tauntthank_youthisto_clueumnikacuteagree
      badbeeeblack_eyeblum3blushboastboredom
      censoredpleasantrysecret2threatenvictoryyusun_bespectacled
      shokrespektlolprevedwelcomekrutoyya_za
      ya_dobryihelperne_huliganne_othodifludbanclose
25 comments
I sculpt these for sale on request. The output current is also limited upon request. (6-20 Amps). The upper voltage limits 14.45 Volts. (For 12 Volt battery). And since this is still essentially a current stabilizer , then he does not care KZ and the battery in zeros.
And there’s nothing much to burn there if you turn your head on when designing and assembling. A half-bridge (ATX topology) and 100 amperes will easily give up to the load. Only recalculation / alteration of the power part is required. And the board is done from scratch, immediately with all the bells and whistles. And I prefer not TL494, but SG3525. More predictable and less tender. Although more expensive by an order of magnitude (30/300 rubles).
mig
the idea is class, and if in place of 2003, having assembled it, assemble the PWM at 494 and give control to transistors at 494, you can adjust both U and I
Author
These modules lack protection against reverse polarity, you need to be careful.
I believe that in this charger you just need to add a 10A boosting module (it has protection against short-circuit, smooth adjustment of current and voltage) and a volt-ammeter, with Aliexpress. I did so myself. As a result, the charger has restrictions on current and voltage, protection against short circuit, the PSU has all the protection.
Author
Ahah)
I took apart a small AGM. Then I sensed a burning sensation in my elbow, and there ... a hole already.
Author
Well, in fact, AGM is also lead acid. Only the electrolyte is there in fiberglass mats.
Automotive is also AGM, for example.
pay money and service!
Yeah, he served once (refilled, measured density, charged), and without washing his hands he ran to the toilet! Men smoking right away were crazy when they heard a selected mat from the booth, and when they saw what I wash in the washbasin (not hands) ... xaxa
I talked exclusively about automotive (starting) lead acid batteries! Even the so-called traction batteries (boats, loaders, stackers, etc.) already behave differently and are not afraid of a deep discharge. (They have a different plate structure, and the graph of their discharge is more like a straight line).
How other types of batteries behave, I don’t know.I know that deep discharge is harmful to everyone, but I don’t know how critical it is ...
Author
The voltage is possible and krutilochkoy. Option to make an external current regulator. To raise the batteries from a lower (from 10.5 V), I use Imax charging.
Sulfation is a bad thing.
I am recharging the AGM battery. Bringing to a "deep discharge" is an atrocity.
They bring oops with a dead, but new battery (Internet shops slip it). We are raising. He bastard still runs and runs afterwards. Sometimes tenacious AGM come across.
buy ready, with adjustable current and voltage, with a digital indicator, ready-made wires, case?

What for???
It’s better to just go to the battery man, pay money and service! ))))
Author
They love lead very much)
After a collapse into a deep discharge, not a single “starter” battery will return to its full capacity .. Only if it is immediately, literally in a matter of minutes, put it on charge ... Otherwise, the sulfates on the plates harden and no longer dissolve back. If you take it out slowly, and "feed it in a spoon", and then "drive" it to charge-discharge, you can save 80 percent, or even more ...
Your charger is great for preventative charging of a "live" battery. He will not draw more current, "than he is harmless"))))
At our place, people don’t know about this, therefore, they consider the five-year battery “very old”.
When they drove cars in the 90s from Germany, they rarely took them under 10 years old. And in all the batteries were "native". And this was not explained at all by the fact that they are "branded", but by the fact that the Germans regularly undergo planned maintenance. Therefore, their batteries are charged up to one hundred percent twice a year.
Current control will not work in this embodiment

And here it is impossible to make step-by-step voltage regulation - from 14 volts and above? (I'm not good at electronics).
If possible, then according to the vile law of Grandpa Ohm in this section of the circuit, and the current can be regulated! After all, the battery does not care how many volts!)))) The main thing is the current ...))) It happened to me that when I "raised the dead", in order to achieve a value of 0.2 A, I had to supply 22 Volts to the terminals! And not at all 14 with a little.
Such a voltage is installed in the car simply because with it there can be no current excess from the generator (10% of capacity). And the current, as you know, the battery in the process of charging "regulates" itself, increasing its internal resistance.
(I repeat: for acid-lead starting (starter) batteries, there are two types of “harmless” charging - constant current value, or constant voltage value! The first is difficult to achieve for the reason stated above (change in resistance during charging).
Author
No no. In the "zero", many understand directly. Current regulation will not work in this embodiment. If you are afraid, then install the light bulb in the gap. I do not bring the batteries to a strong discharge, I do not lower them even below 12 volts.
A man comes to us. He says that he began to hold the battery weakly. He decided to "train" him and discharged him to zero. How did he manage to do so, I did not understand, the first time I saw a zero battery from a motik. Charging accordingly did not begin to charge it. It turned out to be corny, the generator junk and did not charge the battery properly.
I am planning an ammeter. The Chinese fail, it takes a long time.
Author
The current is big. I tried on KZ, by chance, a diode at 16 amp flew out. If it is as low as 10.5 volts, then the current will be very large. A strong discharge cannot be allowed.
Author
Here business is essentially a couple of hours. Yes, and the price. Working BP can be for 100-200 rubles. buy.
Author
Without the addition, the current will not work. This chip is very interesting, but alas, the current does not work with it. Well, I did not find options.
Men in Black
Well done, the head is thinking.
But isn’t it easier to buy a ready-made one, with adjustment for current and voltage, with a digital indicator, ready-made wires, a case?
Passerby
Well, I have a comp PSU. but with visualization, if I don’t want to follow, I set up 14 volts and left, nothing burns and does not gobble up, everything is the same in a car and the battery lasts for years. At the end of charging, the current drops. 14-16 hours for 55Ah and you're done.
Oh, how many batteries have already been killed by such chargers, and how many chargers have been killed by dead batteries)))).
They put the stamper landed "to zero", for example ... He happily "throws himself on the bucket" and tries to stretch out an ampere of twenty-five to thirty !!! (And no one sees this !!! Well, if they notice that the wires are hot, but this is not immediately)))) Charger Khan.
And, given that the "hungry" acceptor (which fell into the "deep") is fed not by a teaspoon, as it should, but immediately by high currents, then until the charger burns, the sulfates on the plates will have time to become stiff ....
And here is the result: we have a battery that has lost half of its capacity and a burned out charger ...
And very good - if at the same time without a fire !!!
There was one real comic-tragic, but in the end, happy, case.
Put a man in the garage to charge the battery on a self-made charger. And his garage is upholstered with lining. And he made the shelf low specialist for the charger. Under it on the floor I put a battery. Stuck and left ....
Fortunately, an expired car fire extinguisher hung on the carnation right above it all !!! Gomel production - in a plastic case. When the shelf and lining on the wall caught fire, the fire extinguisher melted and a fire fell asleep with powder!))))
A guy just came in the morning, he saw all this ...))))
By the way, after this incident, out of harm's way, I made a metal table for the charger with a roof over it from a “sandwich” (tin with glass wool.) If I put it for several days, I roll it out of the walls and turn it on through the differential machine ...

In short, if you do not want to ruin the batteries, then you need to use an ammeter and adjust the current / voltage (You can regulate the current with voltage - the battery does not care what voltage you feed it! It is important for him that the current does not exceed 10% of the capacity, and that one of the parameters (or current, or a cramp) was unchanged throughout.
By the way, what current can this thing deliver? Suddenly you have to charge for a week, a dead battery
Probably fed the reptiles well.))
It seems that there is not enough, at least, visualization of the magnitude of the charging current. smile
Such an idea in itself is not new. In this circuit, for some reason I did not see the current regulation / limitation.
Author
They grew up during the assembly))
An inner voice tells me that in photo No. 4, the crocodiles are somewhat different from what they really are. )))

We advise you to read:

Hand it for the smartphone ...