

In the work of any master there comes a moment when you need to tell others about yourself. This is a difficult and difficult job, slightly different from the usual one, which is better if you do not intend to create a transnational corporation. do it yourself. Practice shows that live participation is preferable to a faceless Internet. For a master working in the field of arts and crafts, this can be a series of events. Exhibitions, fairs, live master classes and seminars are precisely the places where connoisseurs of your creativity can get to know him and the author.
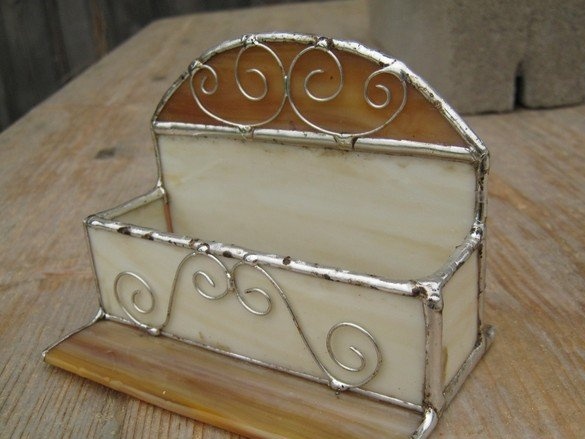
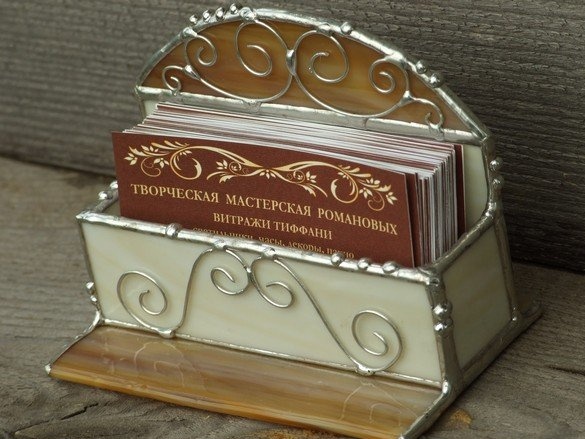
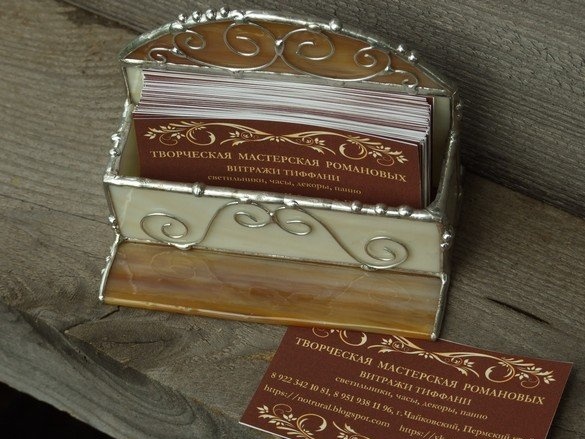
In order to troublesomely make the visitor happy with brief information about you, there is a common practice - presenting a business card. It is very good if among your creativity, say at an exhibition or fair, they will be present. It is customary to store them in special stands or boxes, from which the card can be easily removed if desired. Actually, it is much more correct, humane and simply elegant - not to lose face by foiling information about yourself by force, but to achieve such a level of skill that the viewer after restoring his breath, picks up his jaw and returns to his normal size immediately rushed to look for the author to express love him. In a word, you need a stand for cards, but more elegant than ordinary office-faceless transparent acrylic.
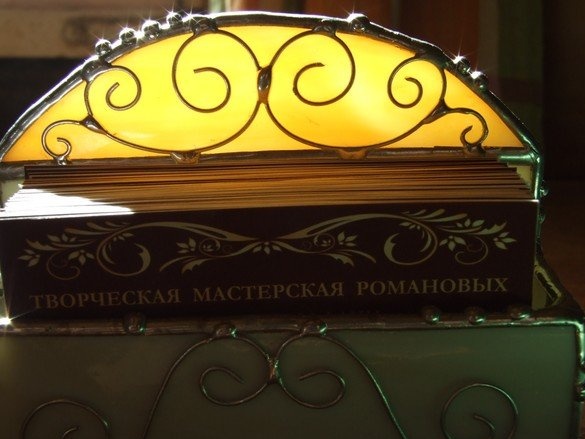
Of course, it is very good if the business card holder is authentic - in a single, with an exposition spirit, in the same or related technique, using the same or similar materials. Since we are engaged in glass art, there is nothing to think about here. It should be said that a business card holder made of decorative glass will perfectly harmonize with other gizmos or furnishings in a classic or retro style.
For our version of a business card holder, we used Tiffany's stained glass technique, complementing it with wire curls and decorative soldering. In general, a small volume stained-glass window is obtained, a simple version of which (like ours) can be done without completely using special tools and chemicals.
What we used to work. Tools, equipment, materials, chemicals.
For marking glass parts, an alcohol felt-tip pen with a thin writing rod is required. It is very good if it is waterproof.
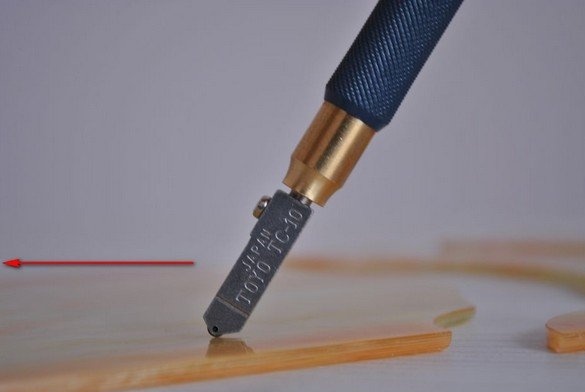
For cutting and processing the edges of the glass will require a glass cutter.For straight and simple cut curves, an inexpensive oil glass cutter from the nearest hardware store is quite suitable. The edges of the cut glass will require some alignment. A grinding machine with a diamond tool washed with water, for simple and fairly large parts, it is quite possible to replace an abrasive block (a grinding sandpaper on a rag base, pinned to a wooden block) wetted with water.
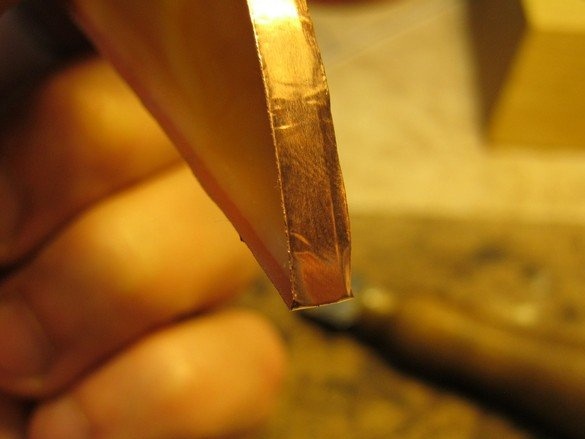
To connect glass parts by soldering, their edges need to be copper-plated. It uses copper foil with a sticky layer. There is a special foil for stained glass, but inexpensive and suitable for shielding sensitive electronic schemes, however, when Comrade Tiffany was at his time, he cut copper ribbons with scissors and glued them with wax. For glass with a thickness of 3 mm, a convenient foil width is 5.5 ... 6 mm.
For soldering and working with wire, you need a regular set of tools for wiring. The soldering iron should be 60 ... 150 W, equipped with at least the simplest (from a dimmer for incandescent lamps) temperature controller.
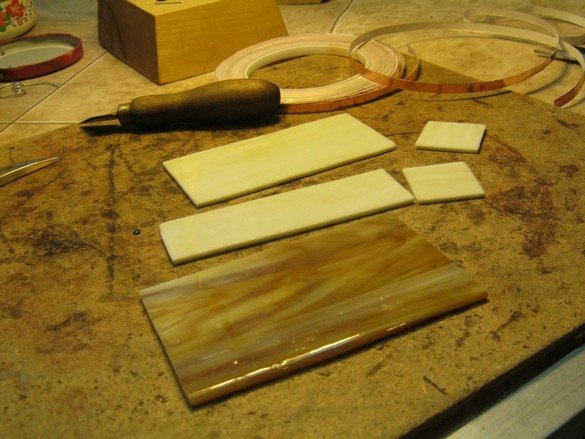
Where to get a beautiful glass.
Stained-glass colored glass in small quantities (large debris) can be purchased at many online stores specializing in decorative glass and chemical tools for processing it. It is sold by weight, when buying, you can ask to choose the right color scheme. The wreckage is transferred with polystyrene foam and packed in a simple cardboard box (we save on a special wooden box). Delivery by transport company.
Markup.
We were limited in time and did not invent too complex a design. We relied on the beauty of glasses. In essence, we got a glass box of the right size with a back and without a lid. There is room for imagination. It should only be understood that manual processing of the edges of very small parts will be difficult.
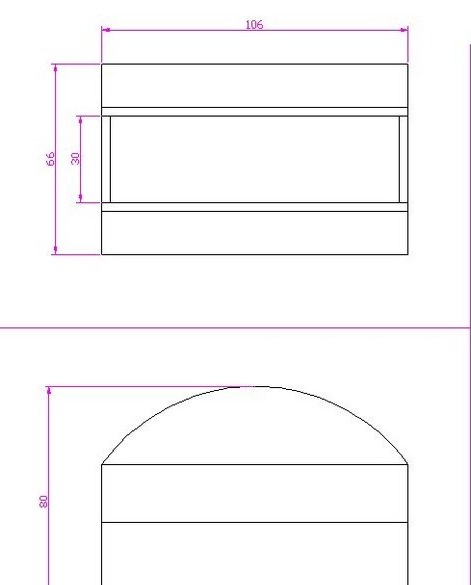
I recommend using sketch in AutoCAD. Here are the parts drawn and arranged for printing. They should be printed on a scale of 1: 1 (preferably on film), cut out and used as templates.
Glass cutting.
Here everything is as usual - all even cuts can be done in the traditional way under the ruler. The curves are cut out somewhat unusual - the glass cutter is driven “on its own” to see the marker pens on the glass.
After breaking the glass into parts, the edges of the parts are turned (the edge is aligned, the size is precisely adjusted). The aligned edge of the glass will allow you to glue it with foil gently and without distortions and get an even soldered seam on it as on the basis. Accurate adjustment of the parts to each other, will avoid large gaps and get the same seam of equal width.
Processing the edges of the glass is done on a special grinding machine for stained glass. Work on it conveniently and quickly. As a manual alternative when processing parts of a simple form - an abrasive block and manual work. It is much longer, less accurate and more laborious, but for a test or a single operation it is quite acceptable. A somewhat more mechanized method is to pick up a small round diamond tool (15 ... 50 mm in diameter) and fix it in the drill chuck. The machine is tuned to the maximum speed (about 3000 rpm is needed), on the back side of the tool (during operation) a piece of sponge moistened with water is slightly pressed.
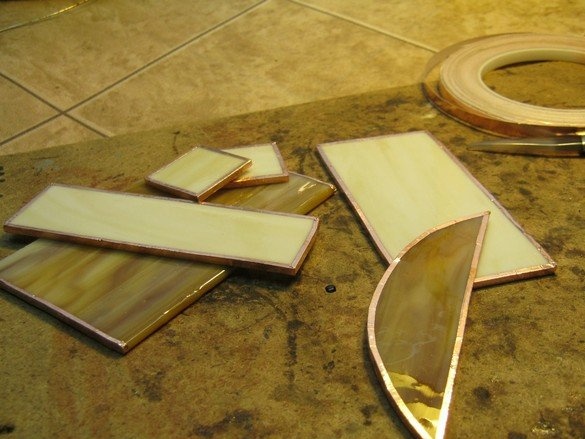
After processing the edges of the glass parts, they are dried (if necessary, a hairdryer, ladies' or construction) and proceed to glued with copper foil.
Copper foil with a sticky layer from an electric store. I also tried foil (brass) without an adhesive layer. Even wax was not needed. With significant thickness (stiffness, foil without an adhesive layer) it can be annealed.
The tape with the sticky layer is released from the wax protective paper and glued to the end of the glass so that the same edge protrudes on both sides. We glue the entire contour of the part, glue the edge with an overlap about a centimeter.
We protrude the protruding edges of the foil with our fingers to the glass, smooth it. For one-time work, you can use the plastic stack to work with clay or clay, an old felt-tip pen or a disposable lighter.The tool must not scratch the glass and tear the foil. Smoothing will allow the glass part to stay tight in the seams, to avoid cracks.
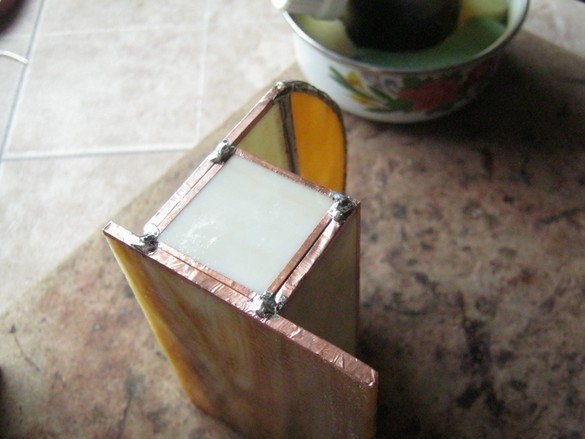
We fold our parts and connect them “on a live thread” by soldering. Soldered solder without lead (tin-copper). Strongly warm one place is not worth it - the glass material is not too thermally conductive, may burst from a temperature difference.
After complete assembly of the product, we completely solder the seams. The task is to deposit a smooth bead of solder. Here you have to tinker with soldering, even having the skills of radio installation. You have to choose the temperature, the position of the surface and the soldering iron, the amount of solder. As a rule, it turns out not on the move - you will have to spend some time to acquire the skill.
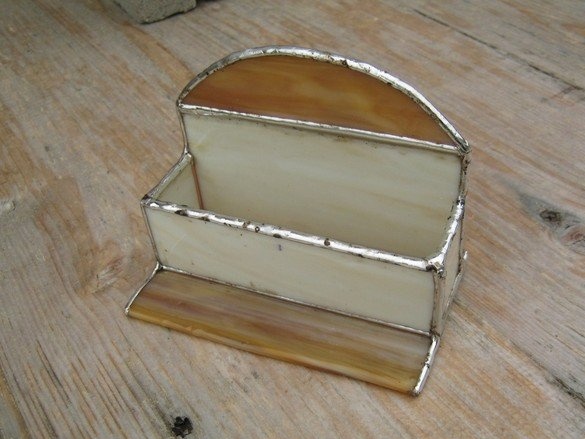
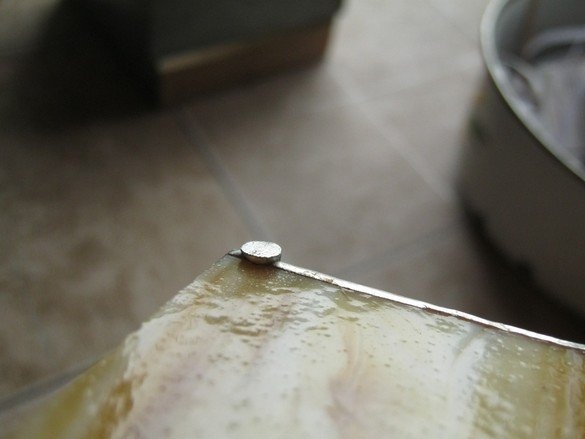
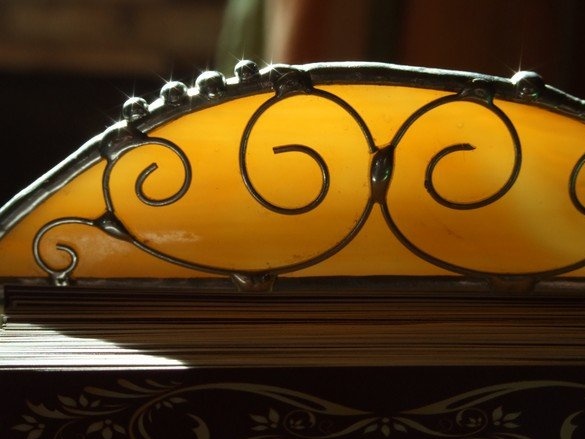
Please note - the front and back of the sole are not finished with copper and not soldered. This will show the beautiful fused edge of the glass sheet. After drinking all the available places, we proceed to the "little thing". Here we will decorate our glass with wire curls and droplets of solder at the seams.
Wire - a copper winding wire in a varnish isolation, suitable section. A piece of wire is passed several times through a double folded piece of sanding paper with medium grain size. After removing the varnish insulation, the wire is torn with the appropriate solder.
Curls are made in almost one motion, while the tool is convenient in the manner of pliers but with narrow lips - pliers, platypuses. The end of a piece of wire is clamped by them and twisted. Finished curls are soldered into place, trying not to damage the weld bead.
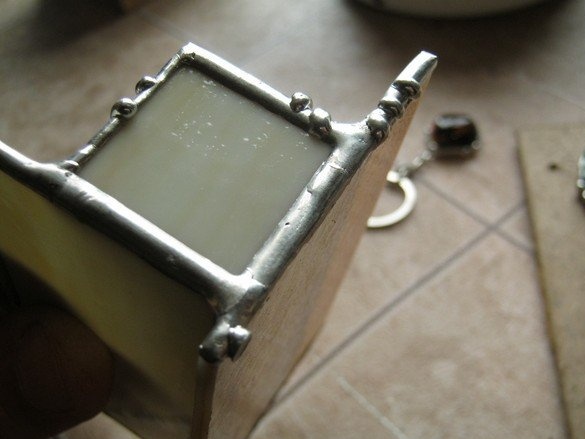
Drops of solder is another simple but quite effective technique for decorating soldering. It turns out not immediately, as with the main soldering, you will have to experiment. It is done something like this - the finished seam is horizontal, a flux is applied to the drop. A drop of solder is collected with a soldering iron and transferred to the seam with a short touch. You have to choose the temperature of the sting and the duration of the touch. Especially expressive droplets look in the presence of patina.
The photo above shows a drop-leg on the underside of the sole. Putting it in the right corner, and then cutting off the file, you can achieve a complete absence of swinging the card holder on a flat surface.
Removing flux residues, washing glass.
The stained-glass windows should be washed quite carefully - in addition to the absence of dirt, many fluxes used are more or less active (contain acid), their residues will oxidize metals over time. The difficulty of washing is understandable, depending on the type of flux used. Water-based fluxes are successfully washed with dishwashing liquid with hot water (several times). Use with a hard brush, for small gizmos, you can use old toothbrushes with a molded (building hair dryer) handle. Rinse with plenty of water (especially with subsequent patina application) of water.
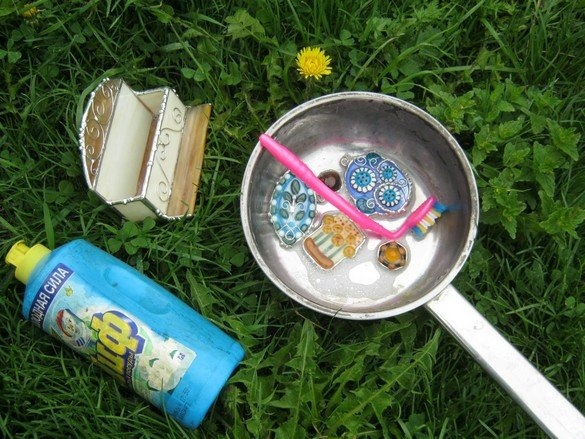
A separate story is lead-free solders. Generally speaking, it is more convenient to use solders in the form of a wire of considerable thickness 2.5 - 3 mm (high consumption) and without a core made of solid flux. Such fluxes leave hard to wash glassy smudges on the solder. The lead-free wire solders that we come across (tin-copper or tin-copper-silver alloys) always contain such a flux, it is necessary to deal with it with acetone and a stiff brush. Only then hot water and detergent.
PHOTOSESSION.
Babay Mazay, May, 2019