
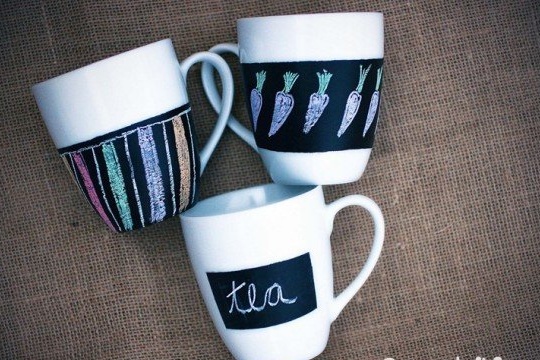
There is an easy way to decorate your favorite mug. To do this, you will need special paints for blackboards, the surface of which perfectly adheres to ordinary chalk. Also, you can not do without chalk and construction adhesive tape. To begin with, wash and degrease the cup well. Then glue the surface that remains intact. Now gently apply the paint to the surface of the cup, and after it dries, remove the tape. As a result, you will get a mug on which you can draw a new drawing with crayons every evening, so that the next morning it will delight you. How can you still decorate cups in an original way? You can find out from the article “DIY cup decorating»
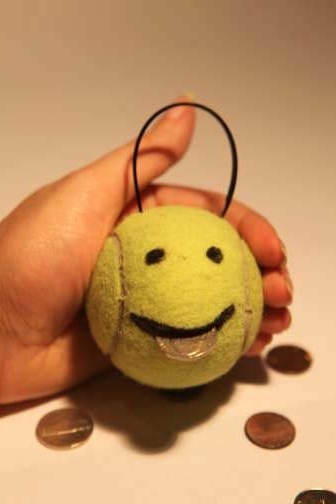
So, in order to make a piggy bank out of an ordinary tennis ball, you need a marker, a drawstring and a sharp knife. Draw two eyes and a smile on the ball. Sounds like a smiley face? It should be so. Now make an incision exactly on the painted smile of your future piggy bank. Then you need to make two holes in the upper part of the ball (it already has the upper part when you draw your eyes and mouth). Pass the lace through them and tie it in a bundle. In order to put money in such a piggy bank, you just need to squeeze the ball from the sides. In the opening formed at the place of the smile and coins are put. To find out how else you can save your savings, you can read the article “DIY piggy banks».
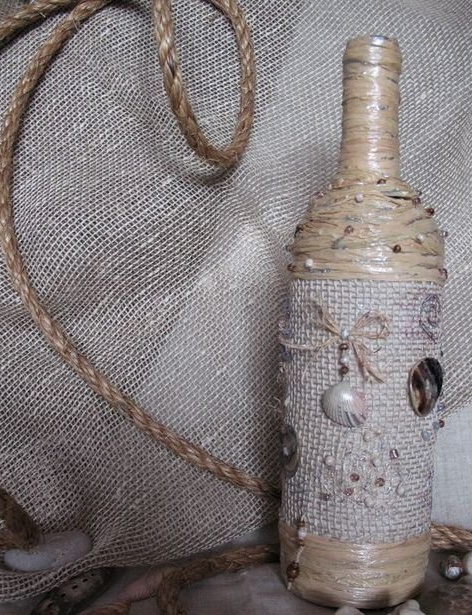
We move to a new level and manufacture do it yourself a vase from a bottle in a marine style. For this you will need: one glass bottle, white paint, glue, net, shells, beads and rope. At the beginning of the work, the whole bottle is covered with white paint so that there is not a single missed place where the glass could be seen.Then, after the paint dries, the central part of the bottle is wrapped with a mesh that adheres to the surface with glue. The grid is also painted white. (you can even color it beforehand). The remaining upper and lower parts of the bottle are decorated with a rope, which is fixed on the glass with super-glue. If the rope is initially similar in tone to the rest of the craft, then no painting operations should be done. Now you have to start the decor. Glue the crayons beads to the rope, and decorate the net with shells and beautiful buttons. Agree, what happened originally? Need more options? See here: "DIY vases»

Despite the apparent complexity of the design, making a watch from an old hard drive is not so difficult. It is enough just to drill a hole for the axis on which the arrows will be located, clean the “screw” from the parts interfering with the arrows and firmly install them on the surface using, for example, an old network board. Computer parts are an excellent material for making DIY crafts. Do not believe? Make sure of this by reading the article “Computer Crafts»
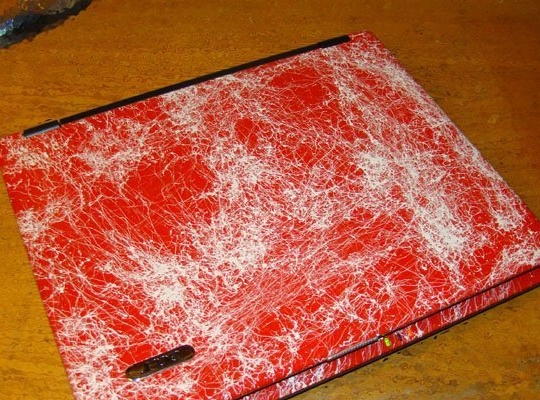
You can decorate your laptop with ordinary spray paint. You just need to know a few key points so that your homemade product acquires a decent look. First you need to disassemble the laptop completely and separate the parts that will be painted. Remember to also separate the logo from the cover, if there is one. Now you need to lightly sand the surface with fine sandpaper to remove the factory varnish. After this, you need to apply the soil and wait for it to dry. Then, for greater effect, decorate the coating with marbled paint. Then it remains only to apply several layers of varnish and wait for it to dry. Did not like? Then try decorating your laptops as described in the article “DIY laptop decor»
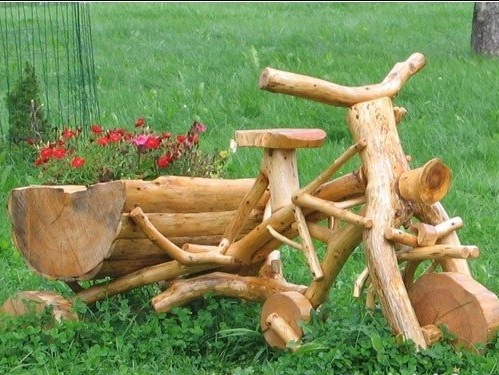
To make motorcycle with a cart of knots, branches and logs you need patience and rich imagination, but the result will certainly exceed all your expectations. Harvest in advance several logs of various diameters, one large log, branches of various sizes and lengths. Now the hardest part is getting started. First you need to make a bench for the cart. To do this, cut the log in half, as shown in the photo - this will be the bench. Then saw off a few round logs from the logs and process them. I must say that all the elements wooden constructions, before being installed, are carefully processed with sandpaper to exclude the possibility of injuries and splintering. Join the round timber together with a pre-processed branch and place it under the bench. To the axis of the cart (this is what we will call the design of two round logs and a longitudinal branch) with the help of nails or self-tapping screws, attach two more branches that will act as a frame. Place a chair on it - a piece of log with a round nailed on top of it. For the front and auxiliary wheels, which is located in the middle, also saw off the round timber. But in order to make a frame for the drive wheel you will have to try - you need to find a thick U-shaped branch and place a round timber in it. All other connections, small details and even tuning can be performed from processed knots and branches to your taste. After all model assembled it is necessary to process all the details several times with varnish, for greater safety of your crafts. And even if you don’t get far on such a motorcycle, it will certainly bring a lot of joy and good mood to everyone who sees it. About other crafts for cottages You can learn from "THIS" articles.
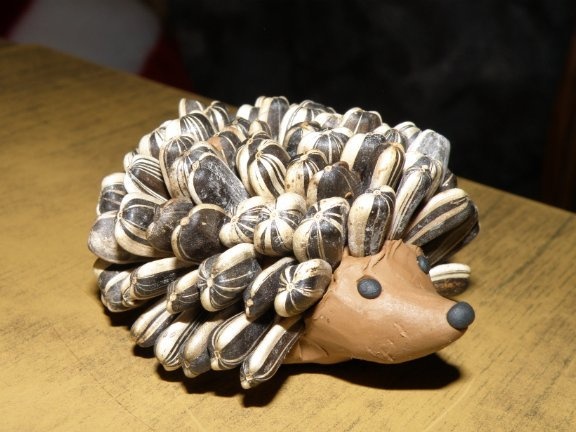
There were crafts in my work and simpler. Even a preschooler can make a funny hedgehog from seeds and plasticine. You will need a small piece of brown plasticine and a handful of unpeeled seeds. Roll up (or entrust this to your child) a plasticine sausage, one side of which is pulled out and pointed - this will be the muzzle of the future craft.Place a black ball of the same material on the hedgehog’s nose, and make eyes from dark pieces of plasticine. Now it is necessary to fix one little thing on the back of the hedgehog seeds - needles. This craft, for sure, will please your baby. Your kid may be interested in other crafts from the article "Crafts for children»
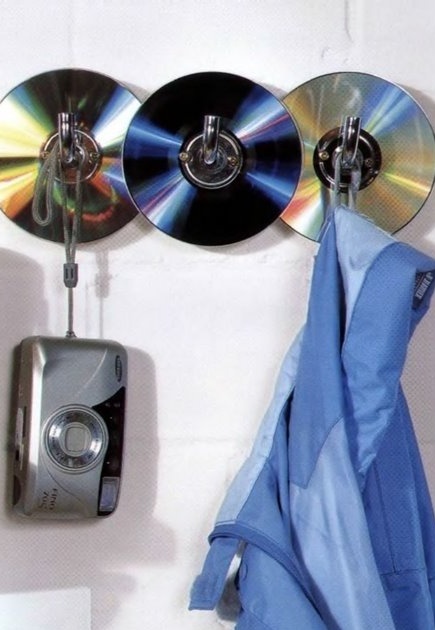
Want to give your room a modern look? Then you can decorate ordinary hooks for clothes with the help of CD discs. Just pick up the hooks so that they freely pass through the holes in the CD. The best option would be if the discs fit tightly onto the protruding hanger parts. An undeniable plus that this kind of decor carries in itself is that the wallpaper behind the hooks will not constantly be overwritten by touching things. Disks are generally great for making crafts. You can see this by looking at the article “Crafts from CD discs»
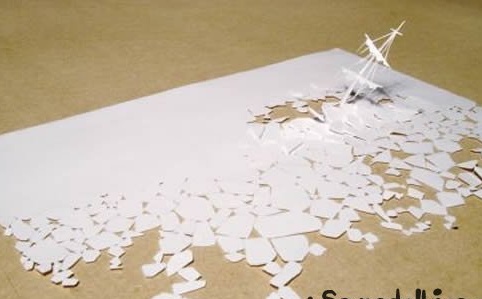
We turn to the craft, which with all confidence can be called a work of art. The original composition of paper will decorate any desktop or wall. To make a paper ship sinking in ice, you only need scissors, glue, imagination and patience. To begin with, cut out ice sheets from a sheet of paper that will be in one part of the composition. In order to make a sinking ship, you don’t need to repeat all its details to the smallest detail - you just need to make a mast and torn sails with glue and scissors. The boundaries of the composition are limited only by your imagination and the amount of paper. Still paper left? Then apply it for homemade articles from the article "Origami»
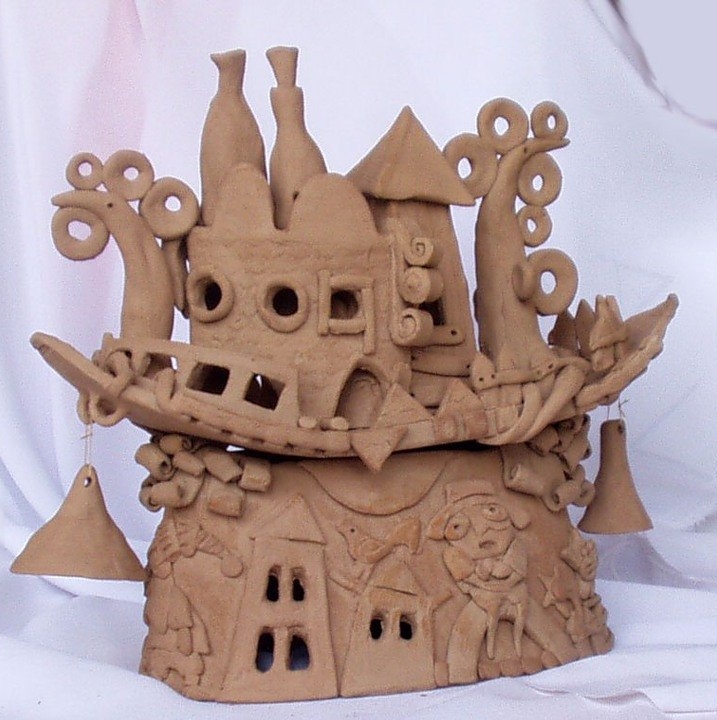
And, of course, where to go from such amazing material as clay. You can make a house for your aquarium from clay with your own hands, and not buy it in a special store. To do this, you need a large piece of clay, a sharp knife and several strings. First you need to make a frame on which the rest of the house will be glued. It can be done simply by folding a rectangular canvas into a cylinder, which is then slightly deformed to give a fabulous look to the house. Then, on the future shelter for your fish you need to attach pre-cut parts that will decorate it in a special way. It can be windows, funny faces, benches, shelves, etc. Do not be lazy to make many different holes in the underwater house: doors, windows, hatches - this design will be much more interesting to look in your aquarium than an ordinary monolithic piece of clay. You can burn the finished product according to the above technology, picking up cans of the appropriate size. After firing, it is necessary to cover the house with several layers of varnish or drying oil to protect the clay from destruction.
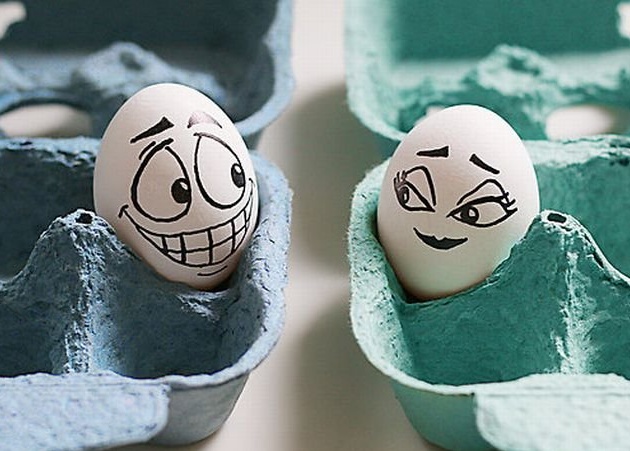
And now the classics of the genre - the image of funny faces on raw eggs. An ordinary marker or felt-tip pen and a little imagination will allow you to turn ordinary chicken eggs into practically living characters. Draw eyes, eyebrows, a smile and a hairstyle on a snow-white surface to give each product its own character. Just don’t choose a too “vigorous” marker and do not make bold lines so that the paint does not get inside the egg, saturated with protein. I think that numerous studies will soon confirm that even ordinary fried eggs from such original decorated eggs will be much tastier. And from the articles from the article "Product Crafts»Food in general is twice as appetizing - this is almost a proven fact.
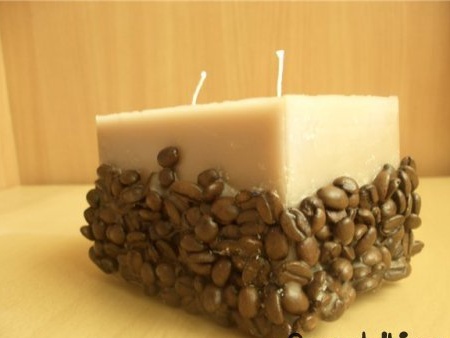
A candle decorated with coffee beans will look good on any table or shelf. There are two decor options - choosing one of them depends on how the candle will be used. First - the candle will be used for its intended purpose. Then the coffee grains are glued to it using molten wax. To do this, you can slightly heat the surface of the candle, or you can take wax from another product. The second - the candle will be used as a decoration or decoration. Then the coffee grains can be glued with ordinary super-glue. You can get to know better the work of coffee in the article "All of the coffee beans" or "Crafts made from coffee beans» .
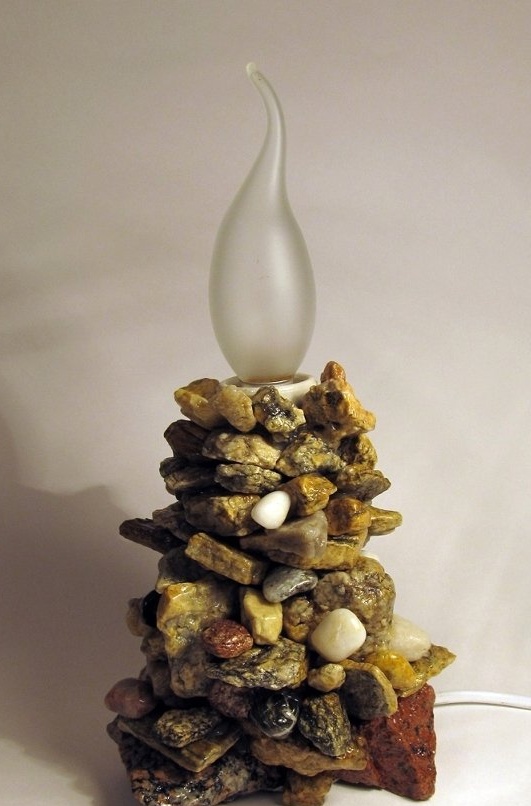
Diverse stones it is possible to decorate an unusual lamp, for example, in the form of a candle. You will need some stones of various sizes, super-glue or liquid nails and colorless varnish. Start wrapping the candle layer by layer from the bottom. First, larger stones are laid, and then all the rest, sticking together, to each other and to the lamp housing. After you have erected the entire structure, you should cover it with varnish in order to give the stones a special shine. Article "Crafts made of stone»Will tell you about several original options for decorating various things with stones.
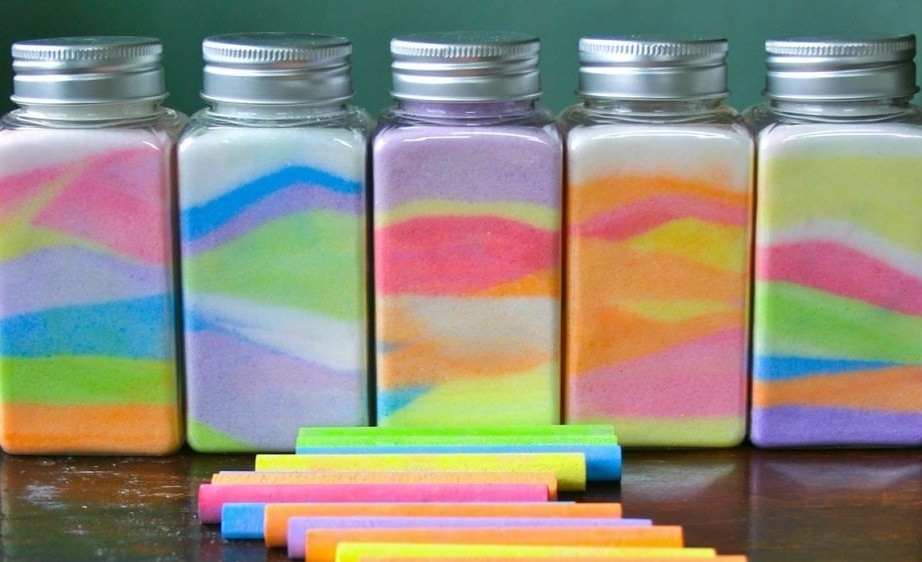
To make beautiful jars with patterns of colored sand, you need a little effort. You can buy ready-made sand in the store, or you can, for the manufacture of crafts, paint the cleaned river. This can be done using ordinary chalk. Roll small grains of sand on the table, do this until you get the required number of colored grains. If you do not find sand, then you can use fine salt as it. Pour colored sand (or salt) in a pre-prepared jar should be evenly, trying to make the transitions smoother. To make a “wave” effect, simply tilt the jar at the desired angle. Pour the container to the very top, so that the own weight of the sand does not allow the picture, which you will lay out with such diligence, to collapse. See what you can do with your own hands with the help of sand - “Sand crafts»
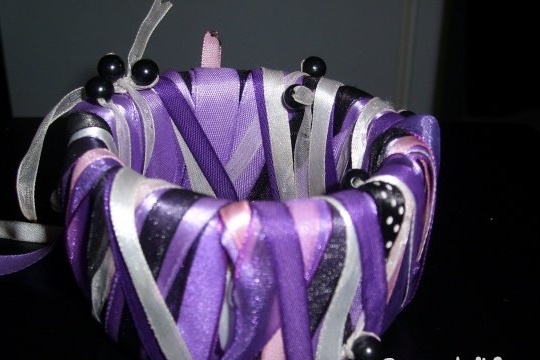
I must say that for the manufacture of crafts not only the tape itself is suitable, but also the cardboard frame on which it is wound. If you have a ring from scotch tape, from it you can make a bracelet. You will need a small amount of multi-colored ribbon to decorate the craft. The frame is already ready, ribbons of different colors are wound on it in any sequence. Leave the small ends at the strips so that you can then tie them into a knot. You can also wear beads and other jewelry on ribbons, the main thing is that your hand can be conveniently threaded through the bracelet ring. And to find out what crafts you can make from the tape itself, you just need to read the article “Crafts from Scotch»
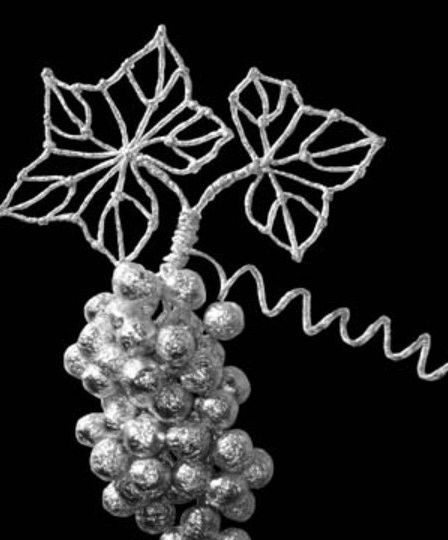
To make a bunch of grape foil you need to eat at least twenty chocolates. Well, or at least open them. You can also purchase ready-made sets for the manufacture of various decorations made of foil, but it will be much more interesting and pleasant to do the work yourself and not according to standard instructions. First you need to prepare two types of basic patterns: stems and grapes. To make grapes just roll foil the ball, leaving a tail of 2-3 cm to it. And in order to make a different shape of the blanks, simply twist the foil sheet into a tube 10-13 cm long. Harvest 20 elements of each template. Now you need to tie 4-5 grapes together, combining them around one common stem in a small bunch. Make small clusters of all the available balls and tie them, in turn, with each other so that you get one big one. In order to make leaves, fold a five-pointed star from the foil tubes, the rays of which also follow from pre-prepared elements, as shown in the figure. Sheets can be made in any shape - the main thing is that they should be at least a bit like real ones. Combine all the parts of the craft - now a beautiful bunch of grapes is ready to decorate your room. Thus, you can even make a whole vine from foil, under which it will be easy to hide, for example, from the scorching heat. "Foil Crafts»- learn more about the application of this wonderful material.
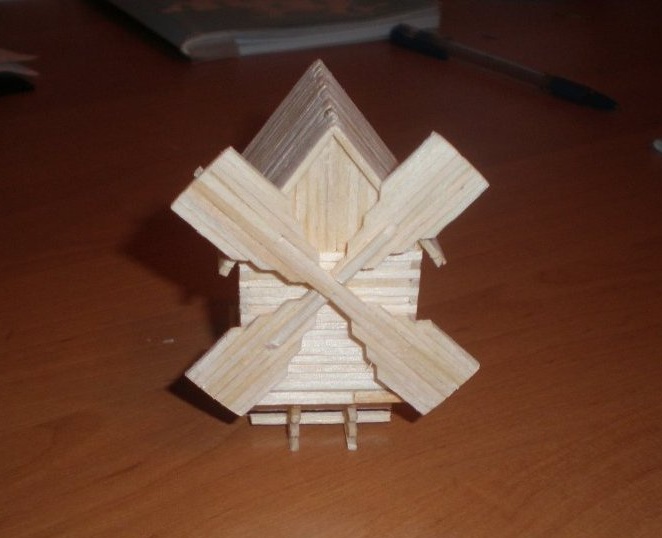
DIY a mill. To do this, it is necessary to separate the sulfur heads from all the matches with nippers or a sharp knife. Scraps must be carefully collected and discarded - still a highly flammable material. The work must be performed in several stages:
- for starters, you need to glue four blades, sequentially interconnecting matchesdiffering in their length as shown in the photograph. The wood is perfectly glued with super-glue - just a few drops are needed, which must be evenly distributed over the surface of the match. The crosspiece, which connects all four blades, can be made both overhead and flush (this is how the presented craft is done)
- Now you need to make the house itself. Please note that for the manufacture of walls you will need matches of different lengths (two sizes). They are stacked so that each corner develops in the form of teeth.
- If you folded the wall box, then to make a roof in this way for you will not be difficult.
- it remains only to "sew up" the gables. Therefore, you will have to cut the matches diagonally several times.
Unfortunately, such a mill made by hand from matches does not have spinning blades. But, I think that the real inhabitants of our site will be able to come up with something :)
Any matches left? Then the article “Crafts from matches»Will tell you a lot of interesting things.
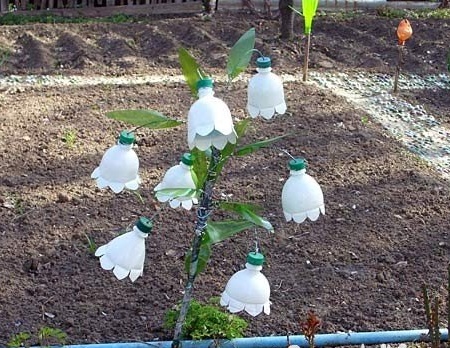
If you have no real flowers in the country, then the bells from plastic bottles are fine. First, cut off the tops of the plastic bottles (the leftovers from the trunk of the palm tree, which we made in the last article, painted in white, are quite suitable). In each cork, it is necessary to make holes in which to wire the wire, tying it inside the color so that it does not come off our stem. After you have made several bells, you need to fix their stems on any base that can support their weight.
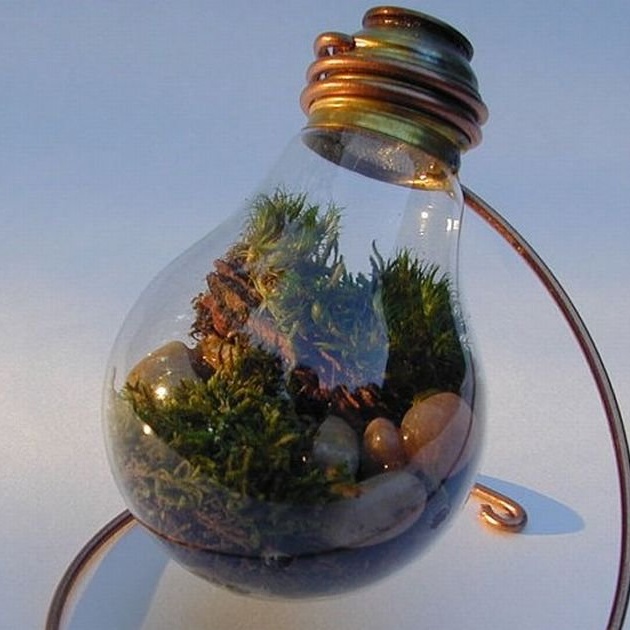
Decorative ornaments from old light bulbs - this is not uncommon. To make such a craft, you need to be able to take out the middle of the bulb and use maximum imagination to fill it. You can fill the transparent container with earth, small pebbles, moss, shells, twigs or toys - all to your taste. It, like a vase, can either be suspended on a wire structure or simply mounted on a reliable support. In the case of wire thick copper is best suited, this is due to its appearance and flexibility. As a stand, you can use silicone Velcro, which can be bought at any furniture store.
More than 20 of the best original and interesting home-made products were presented to your attention. I think that among them you can find the one that will appeal to you.