» Construction » Plumbing and plumbing »Water heater connection diagram

Water heater connection diagram

A modern water heater is very simple and convenient to operate, allowing you to constantly maintain the temperature of the water in the tank at a specified level. You can install it on your own, but for this you will need a competently developed scheme for connecting a water heater to the water supply system of a house or apartment.
Water heater connection diagram


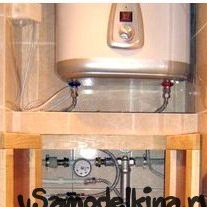
It is worth noting that electric water heaters not only heat water efficiently, but are also quite easy to install, without requiring a plumber. The most competent connection diagram for a water heater necessarily includes a connection to a pipe with cold water, while the shut-off valve must be located on it.

The electric water heater connection diagram includes a drain valve directly connected to this device to drain heated water from the tank during your long absence or replacement of parts. A safety valve, designed to perform the same functions, is also installed near this pipe.

As you can see, connecting a water heater do it yourself is a very real task, requiring only patience and special tools.

Connecting a water heater to the water supply system
As it was written above, in the presence of a well-designed diagram, connecting a water heater is a fairly simple task, which even a novice with no relevant experience can do.

In the online store You will find a huge selection of water heaters that meet international quality standards. All of them are represented by the famous Electrolux brand, known around the world.

How should the water heater be connected in order to provide residents of the house with hot water in a short time? Be sure to connect it correctly to the main pipe to allow for the supply of cold water for subsequent heating.

It is also important to correctly connect the water heater to the mains - the switch must be in a place inaccessible to moisture. This will avoid short circuits and other malfunctions in the device.

It is better to connect the water heater to the water supply using metalwork tools and other elements designed to facilitate your task and significantly increase the speed of installing valves and connecting to the required number of pipes.
0
0
0

Add a comment

    • smilesmilesxaxaokdontknowyahoonea
      bossscratchfoolyesyes-yesaggressivesecret
      sorrydancedance2dance3pardonhelpdrinks
      stopfriendsgoodgoodgoodwhistleswoontongue
      smokeclappingcraydeclarederisivedon-t_mentiondownload
      heatirefullaugh1mdameetingmoskingnegative
      not_ipopcornpunishreadscarescaressearch
      tauntthank_youthisto_clueumnikacuteagree
      badbeeeblack_eyeblum3blushboastboredom
      censoredpleasantrysecret2threatenvictoryyusun_bespectacled
      shokrespektlolprevedwelcomekrutoyya_za
      ya_dobryihelperne_huliganne_othodifludbanclose
2 commentary
If you are interested in how to merge, I will write in detail to anyone interested. I can also make a connection diagram or take a photo on an already connected water heater.
I looked at your circuit and I can tell you a few points that are not in the photo .. If you do not want to emit a water heater for a long and painful time, then the best water heater connection scheme is:
1) the best option is to avoid connecting through a flexible leash and lead the pipe directly BEFORE the water heater.
2) connection of the water heater from the cold water side: we screw a tee with one internal and two external threaded leads onto the cold water pipe (blue) of the water heater. that is, on the axis we get an internal thread on one side, an external thread on the other side of the tee, and one external thread on the branch (to the side) you have two external threads. Next, screw a safety valve on the external thread on the axis, on a side ordinary ball valve (it is better if it has internal and external threads so that it is easy to connect the inlet when draining the water), then we screw the sleeve onto the valve to connect the American-type shut-off valve into which we screw the removable part of the valve.
All connected cold.
3) With hot everything is simple to disgrace. We screw the coupling onto the water heater pipe, and into it the removable part of the tap of the American.
4) bring the pipe directly to the "American"
Materials: American ball valve 2 pcs., Coupling DN 15 - 2 pcs., Tee Inside-Out-Out - 1 pc. If this tee is not on sale or could not be found, you can take the Inside-Out-Inside tee and an adapter with external threads to it (but this is an additional threaded connection that I personally prefer to avoid); cr.on ball inside-out Du 15 -1 pc.
In this case, of course it turns out more expensive BUT:
1) when you directly connect the pipe to the taps and attach the latter to the water heater, you avoid such a common hemorrhoids as a rupture of the inner tube at the eyeliner, and he likes to tear at the most inopportune moment and unpredictable.
Plus, you simply protect yourself as you will never guess which eyeliner will burst. Well, when it's cold, just cheer up ... And if the second, you yourself guess what could be especially with children or people with motor limitations.
2) you get a detachable connection (due to the "American" taps) and if you need to remove the water heater for all or only the heating element.
3) You and property are protected from unnecessary "shower" by any water.

We advise you to read:

Hand it for the smartphone ...