» Construction "Economical strip foundation, economical concreting" in general "

Economical strip foundation, economical concreting “in general”


Concrete work during leisurely construction in private households alone, led to some sorting and grinding of techniques that reduce forces and materials. I offer a description of a simple and economical version of the technology for manufacturing a shallow strip foundation for small light (with log, beam, probably foam concrete walls) buildings.

A foundation of this type is convenient in subsequent operation, economical in terms of materials, erected alone, does not require special (except concrete mixer) equipment. The proposed technology allows you to save a little on earthworks, equipment (formwork), concrete consumption. The fee will serve as a slight increase in "accurate" work, overall accuracy. In addition, we will recycle a fair amount of inorganic garbage, the most convenient is polystyrene, glass, metal containers.

What was used in the construction of the foundation

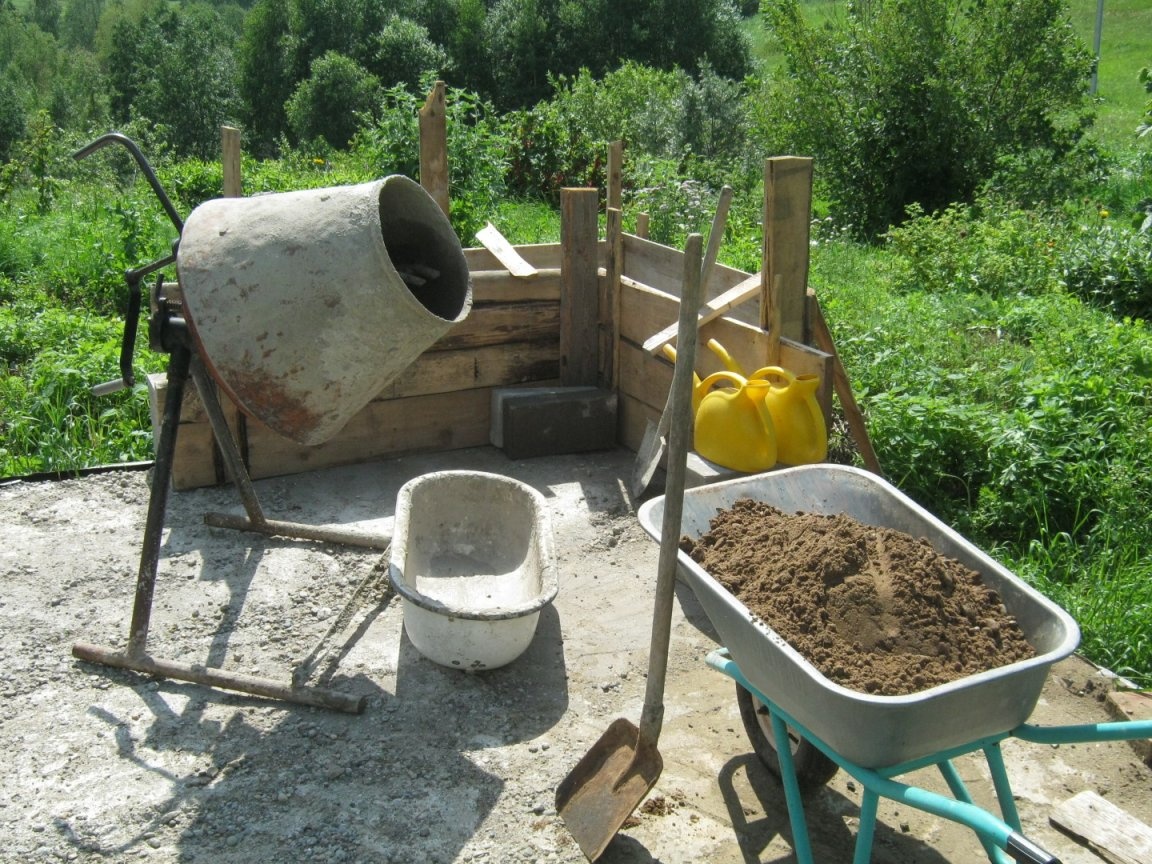
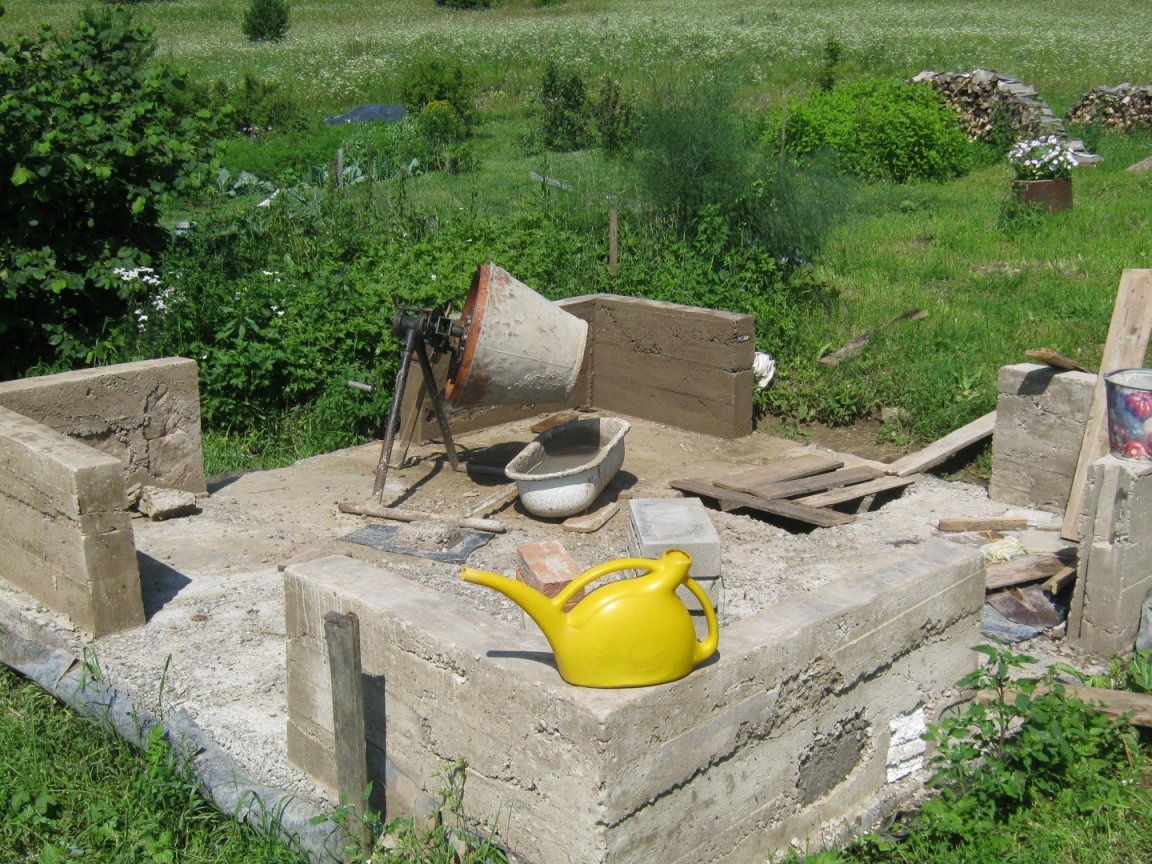
A set of garden-trench tools - a shovel shovel (clean, for dry bulk materials), a bayonet shovel (for concrete), a trowel (trowel) of a convenient shape. Any concrete mixer. In any case, the preparation of the mixture will be an order of magnitude easier than with a shovel in the trough. The author has been working for many years with a small concrete mixer with a manual drive, like a meat grinder. Capacity for dumping the prepared concrete (trough, box). A set of simple carpentry tools for installing wooden formwork, measuring and marking tools. Very useful screwdriver. When delivering bulk components, a conventional garden car is very energy saving. You will also need several buckets. A small garden watering can is convenient for washing the concrete mixer after work.

So let's get started

First of all, designing - choosing a place for construction, orienting it, designing the foundation directly. It can simultaneously be basement walls, the increased width of the foundation will allow floor beams to be placed on it - transfers for the floor inside the building or the veranda outside.

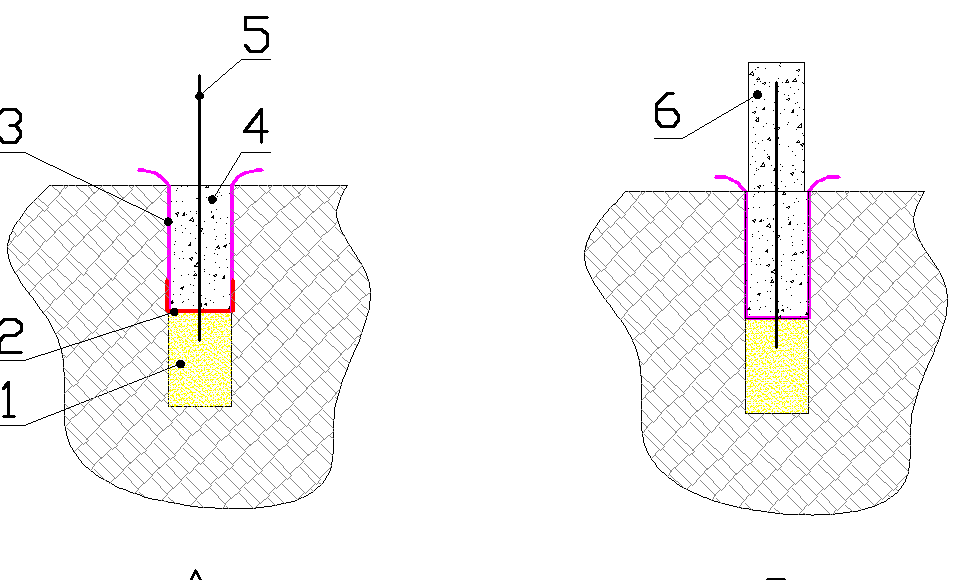
Type of foundation - tape, shallow. The proposed technology involves its two-stage manufacturing - casting into the open trench of the underground part (A) and concreting the upper one in the formwork (B).


The sketch (plan) of our foundation should be transferred to the area, guided by the methods described in [2] or similar.

The underground part of the foundation.

Saving effort, time and money is achieved by using trench walls as formwork. This implies her thoughtful and accurate digging. In most cases, for small wooden buildings, the foundation can be very narrow - along the width of the log or beam. It is difficult to dig a deep trench of such a width (a buried foundation), a shallow type arises from here. It is not difficult to dig a trench along the width of a narrow shovel, 0.7 ... 0.8 m deep. At the same time, it is convenient to stand with one foot in the trench.

The foundation, shallow, involves a sand cushion, about 30 cm thick. It smoothes out soil heaving in the cold season. It is poured in non-thick layers, wetted from a watering can with a shower head and rammed. It’s hard and dreary, but nothing can be done.

A narrow strip of waterproofing is laid on top of the sand cushion (pos. 2 cm sketch). It is designed not to allow water from concrete to soak into sand and soil, this reduces the quality of the casting. Waterproofing can be made of any suitable pieces of plastic film, not necessarily thick, it is needed only for the time of concreting. The edges of the strip are wrapped up on the walls of the trench. A kind of gutter.

Waterproofing on the walls of the trench (pos. 3 cm sketch) is carried out similarly, it is convenient to pin its edges from the outside with large nails. It should be said that the forces of frost heaving in a particularly unfavorable case can pinch the underground concrete part from the sides and tend to push it out. To greatly reduce the effect, it is enough to waterproof the walls from roofing material.

If necessary, fittings are laid, its vertical parts are stuck into the sand cushion through the film. The film before that, in the right place is cut with a knife or reinforcing bars are cut at 45 °.

The aerial part of the foundation.

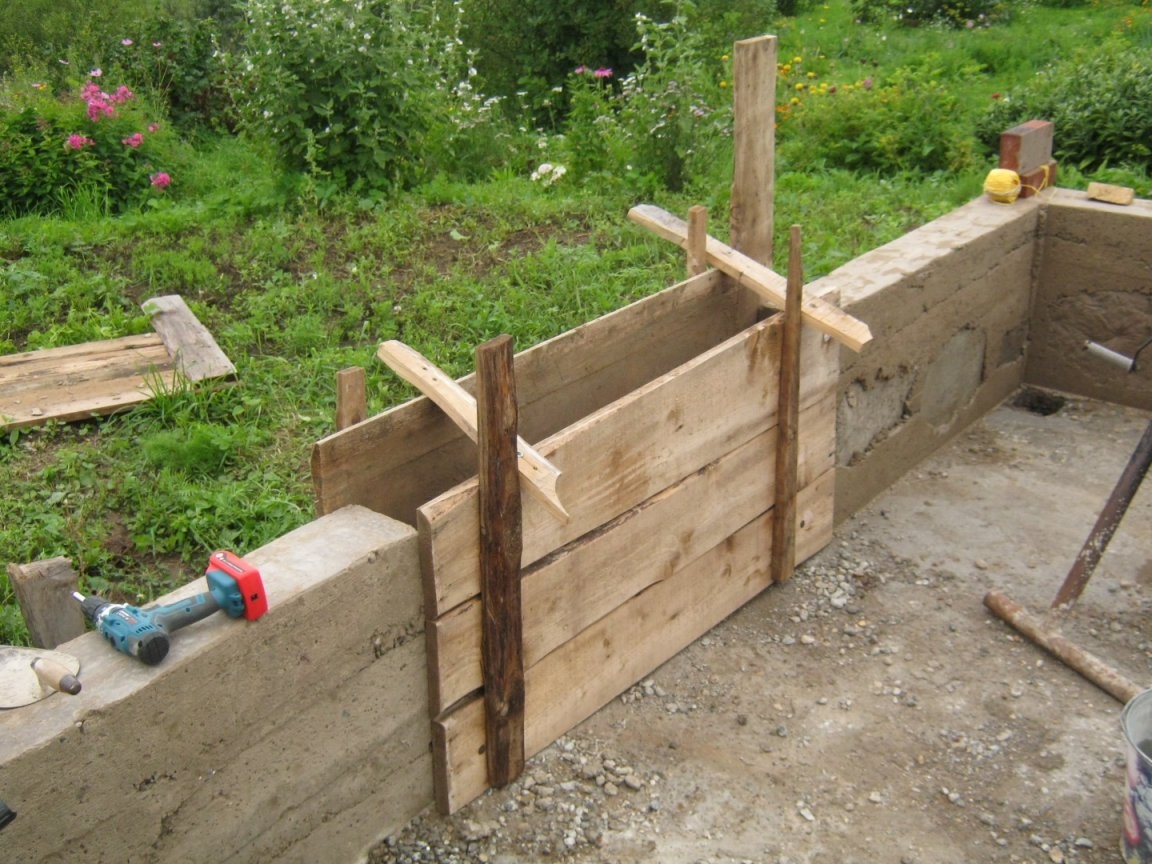
Here you need a formwork. Traditionally, it is collected from boards. Full-size formwork requires a fair amount. In addition, formwork boards are not so easy to use further. Having dirty them with concrete, sand and earth (and this happens even when sheathing wooden boards with roofing material), we lose the opportunity to plan them. In a natural, and even soiled form, such boards have very limited use. Moving formwork allows reducing board consumption, especially since small private concreting is most often carried out in relatively small portions.


We find out the height difference in different corners of our foundation, make a decision about the height of the above-ground part, we get the maximum formwork height - the width of the shield. The cheapest version of the meter is used here - the water level, you can use the level, the laser level. At short distances, a long, even rail or a rectangular tube with a bubble level of 1 m in length is also suitable.


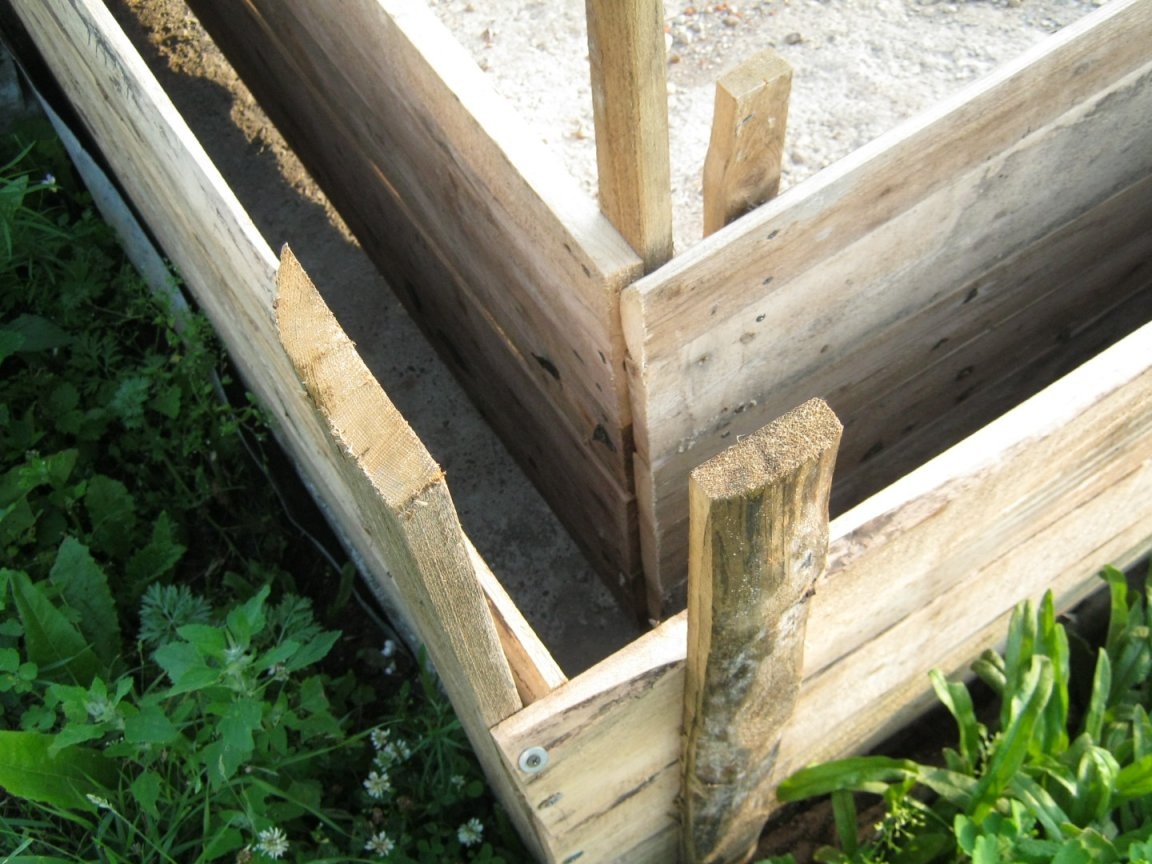
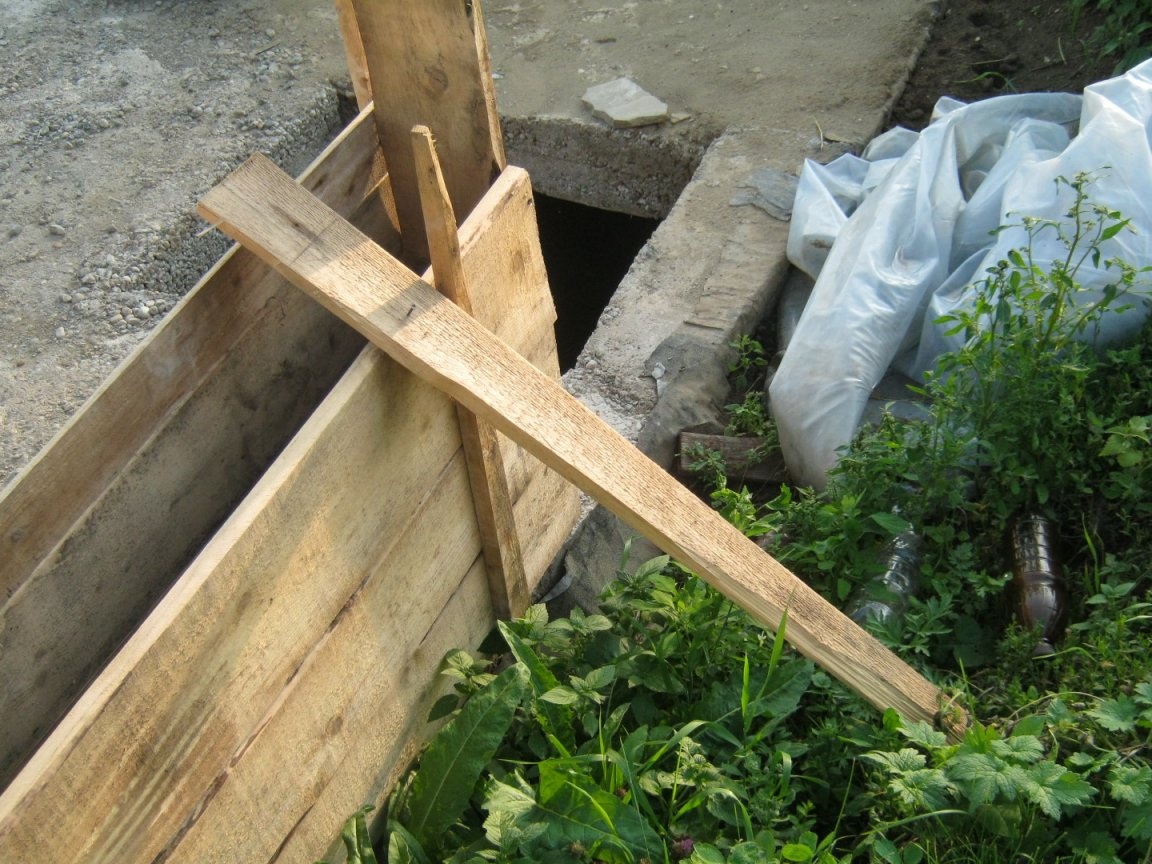
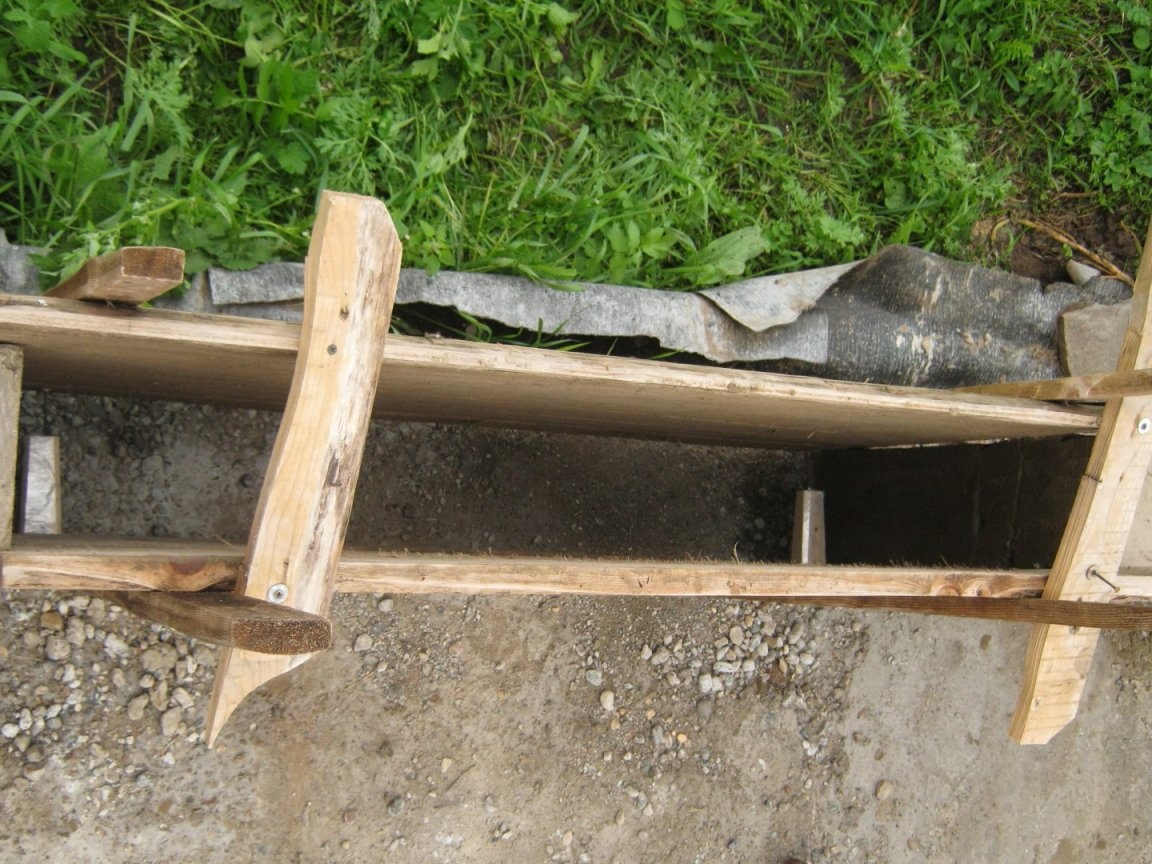
In the photo above, several main nodes of the angular formwork from plank (25 mm - "inch") panels are captured. Here, the length of the longest shield is about 2 m, height is about 60 cm. Of course, the vertical walls of the formwork are installed vertically, in level.

Such shields come out not particularly strong, in addition, it is very difficult to achieve a perfect fit for their lower edge - there are gaps. From here a two-stage mode of concreting was developed, among other things, implying the preparation of concrete with a consistency close to “hard”. Such concrete does not pour, it is thick, it is laid and tamped somewhat. The concrete layer laid to a third of the height is allowed to harden and only then is the casting brought to the desired level. In the morning, the formwork was rearranged, flooded by a third. The next day we continue. This looks like an extraordinary waste of time, however, other related jobs are always found during construction work. Switch to them.

An important point is the organization of voids in the casting, in the first place for convenience and practicality - foam sheet and glass bottles. In the photo there are necks left over from experiments with a bottle cutter.


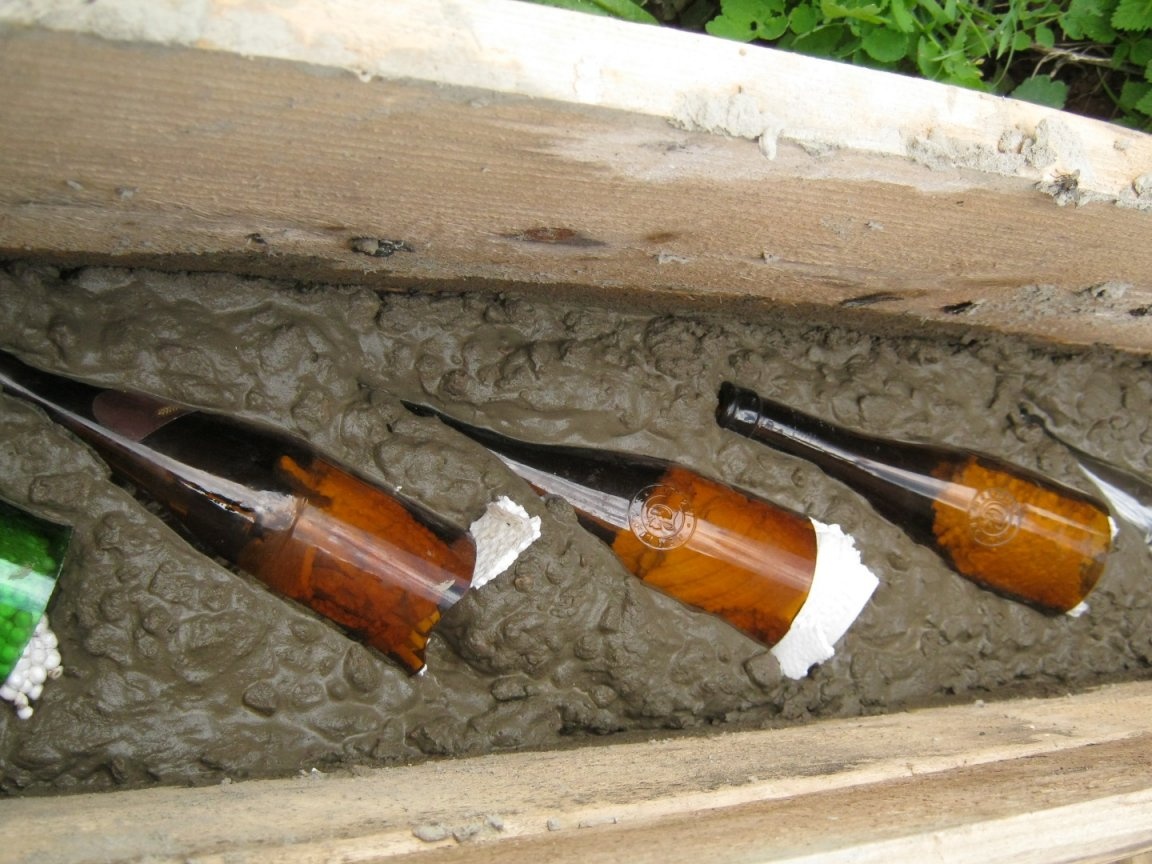
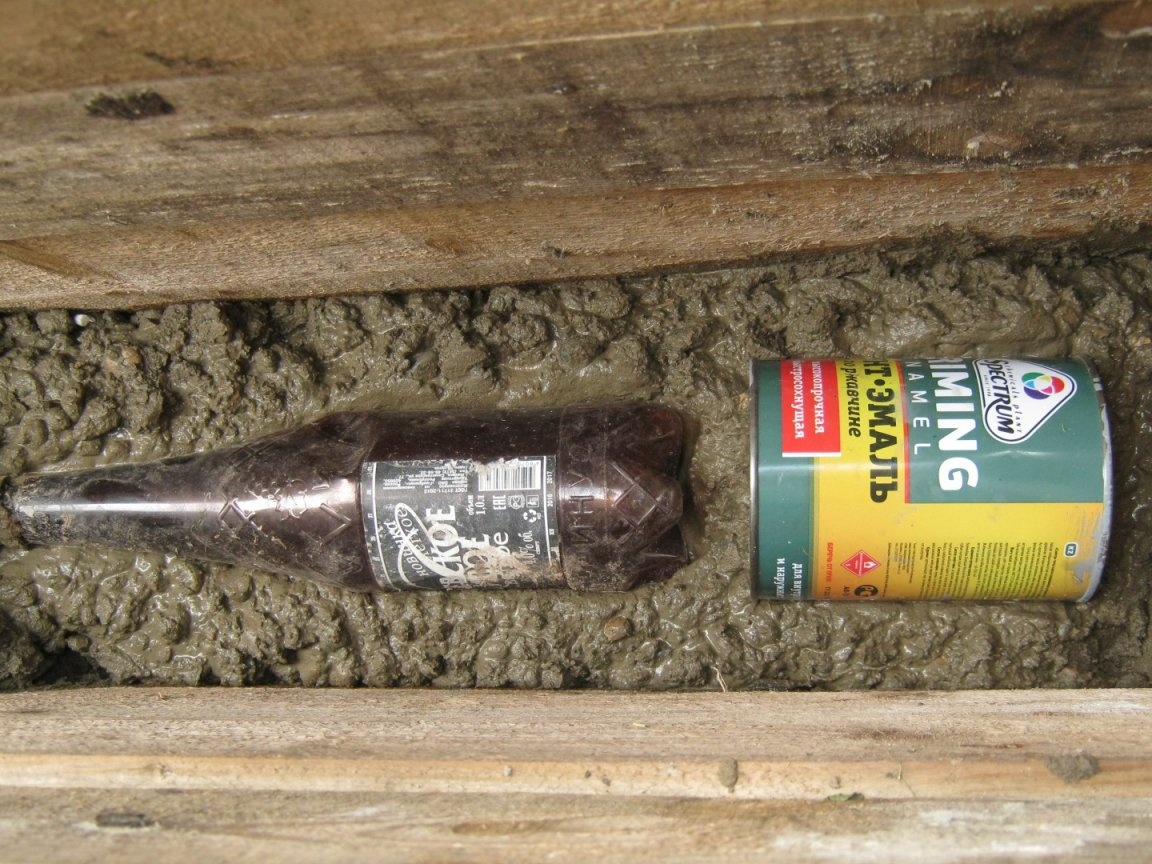
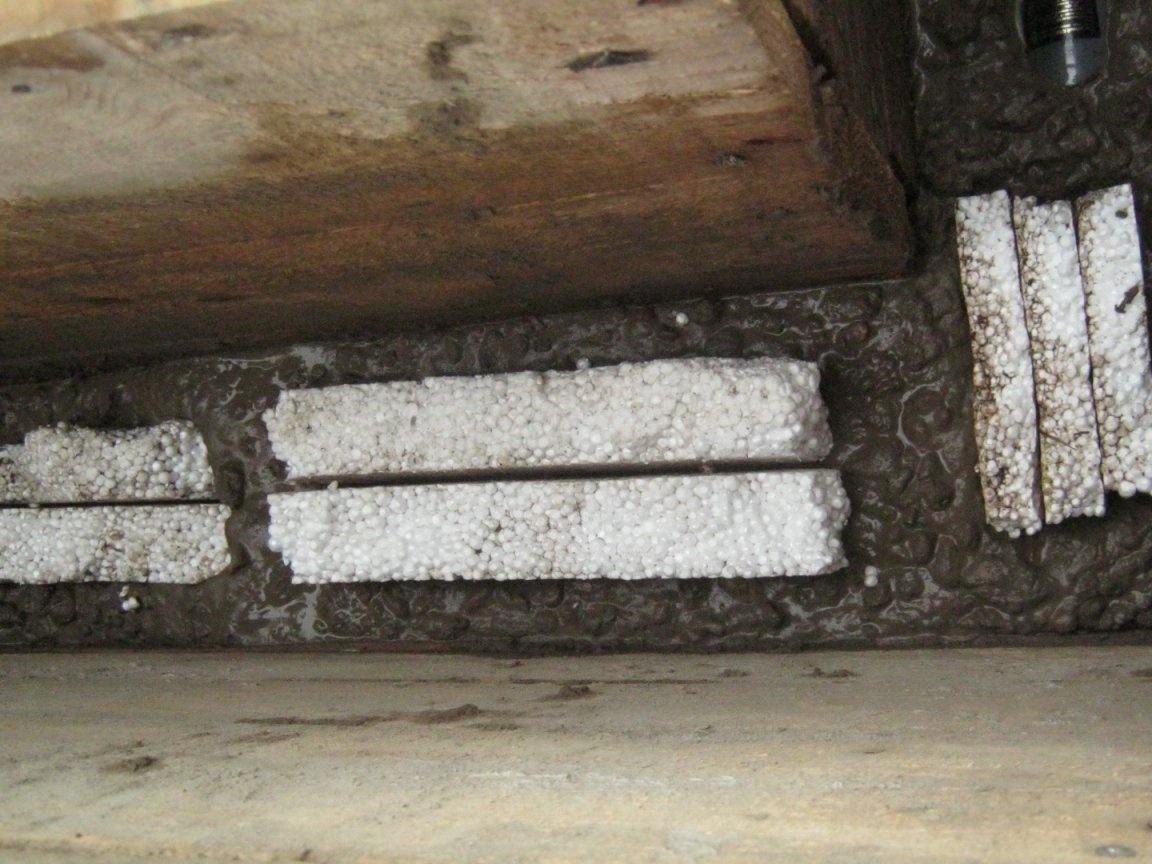
It should be borne in mind that hollow elements - for example bottles, must be either closed (sealed) or positioned so as not to be filled with leaked water. The same applies to any hollow elements. It is not allowed to brick up pieces of wood.
Rigid concrete, among other things, pushes less light hollow elements - in liquid, they simply float.

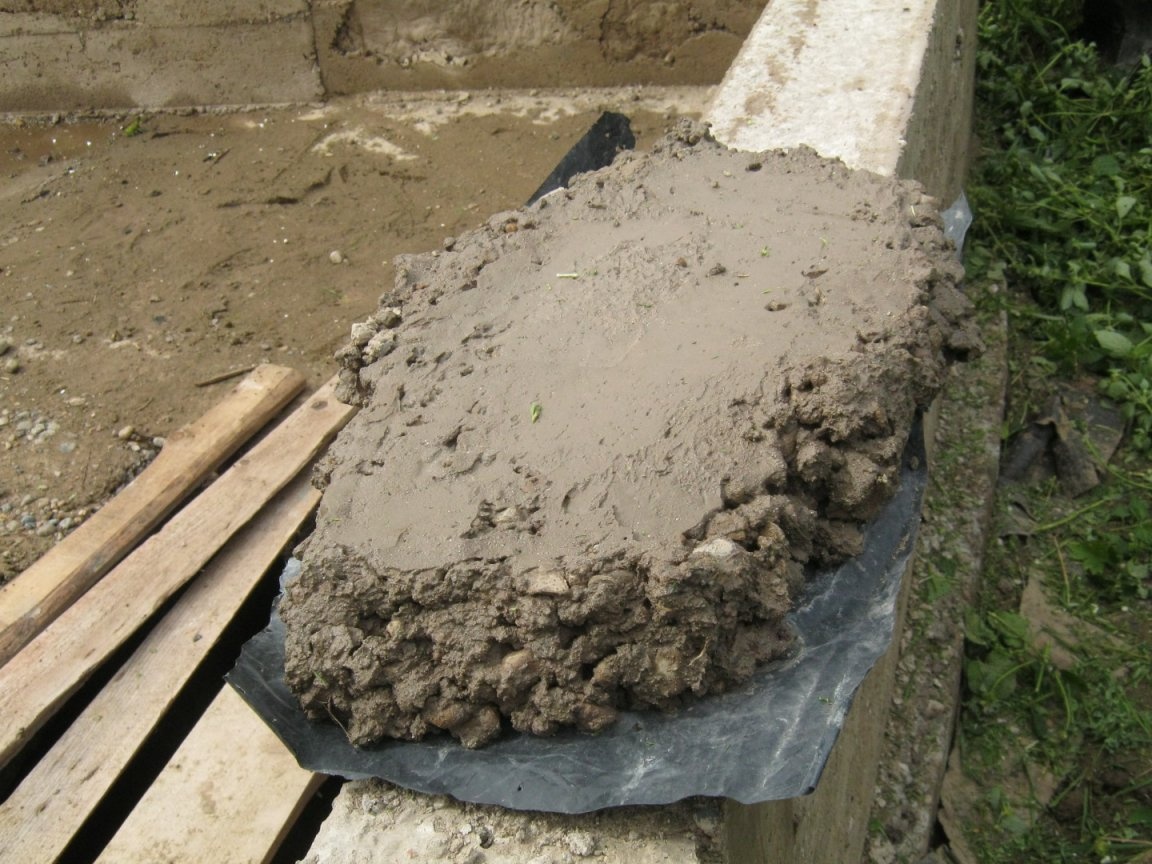
It should be said that thick reinforcement greatly complicates the laying of such elements, but it, especially “thick”, is not often used in rural practice. Here, the ebb tide of the foundation foundation is captured on the concrete lid-plate of the cellar, while reinforcement was not performed at all. The laying of void-forming elements can be used in many massive concrete work - kiln foundations, screed and similar structures.

The rational organization of the process speeds up and facilitates the work. Here, he sought to reduce the intermediate transfer of heavy materials and concrete - to pull the concrete mixer closer to the place of concreting, to organize a track for the delivery of bulk materials in a wheelbarrow.


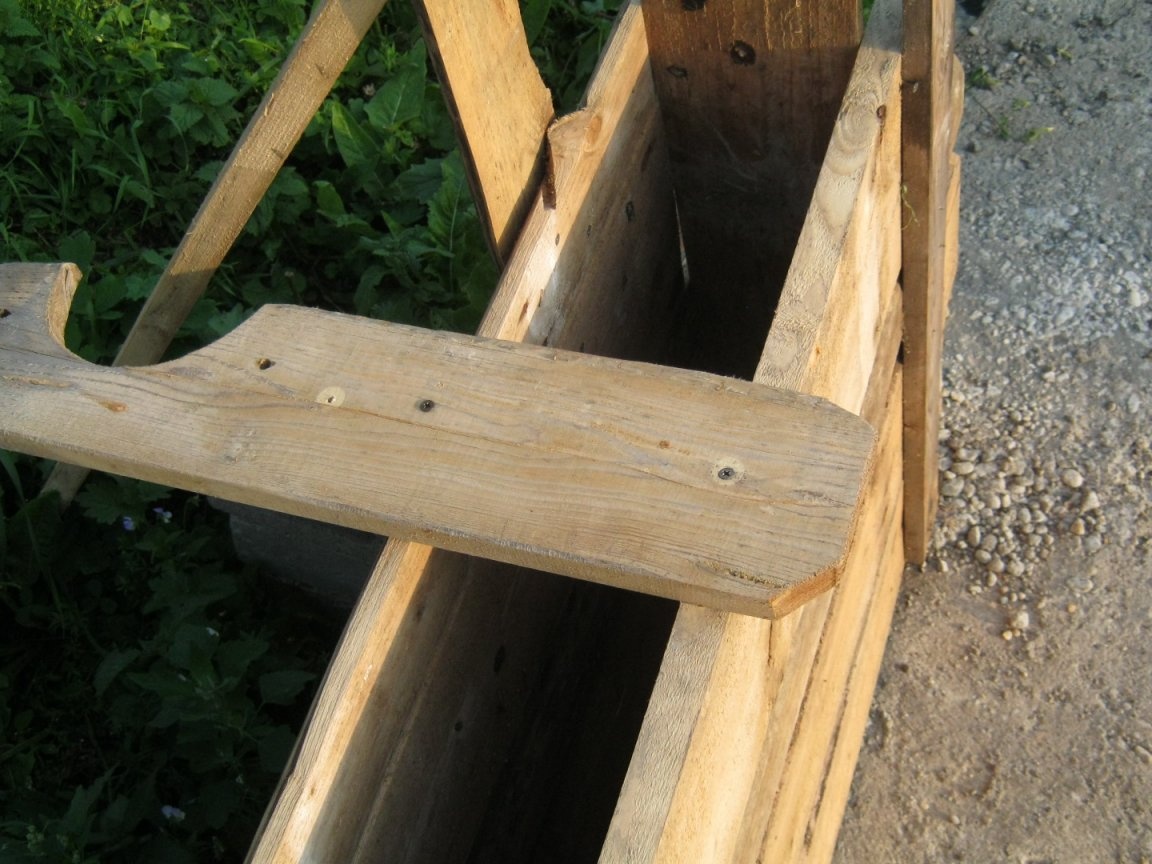
The level of the upper edge of the casting is a fixed cord. It is fixed from the inside of the formwork box and verified against a 1 m long bubble instrument.


Ebb angles, began to close up the holes - casting straight lines connecting the foundation parts. Used the same wooden shields.


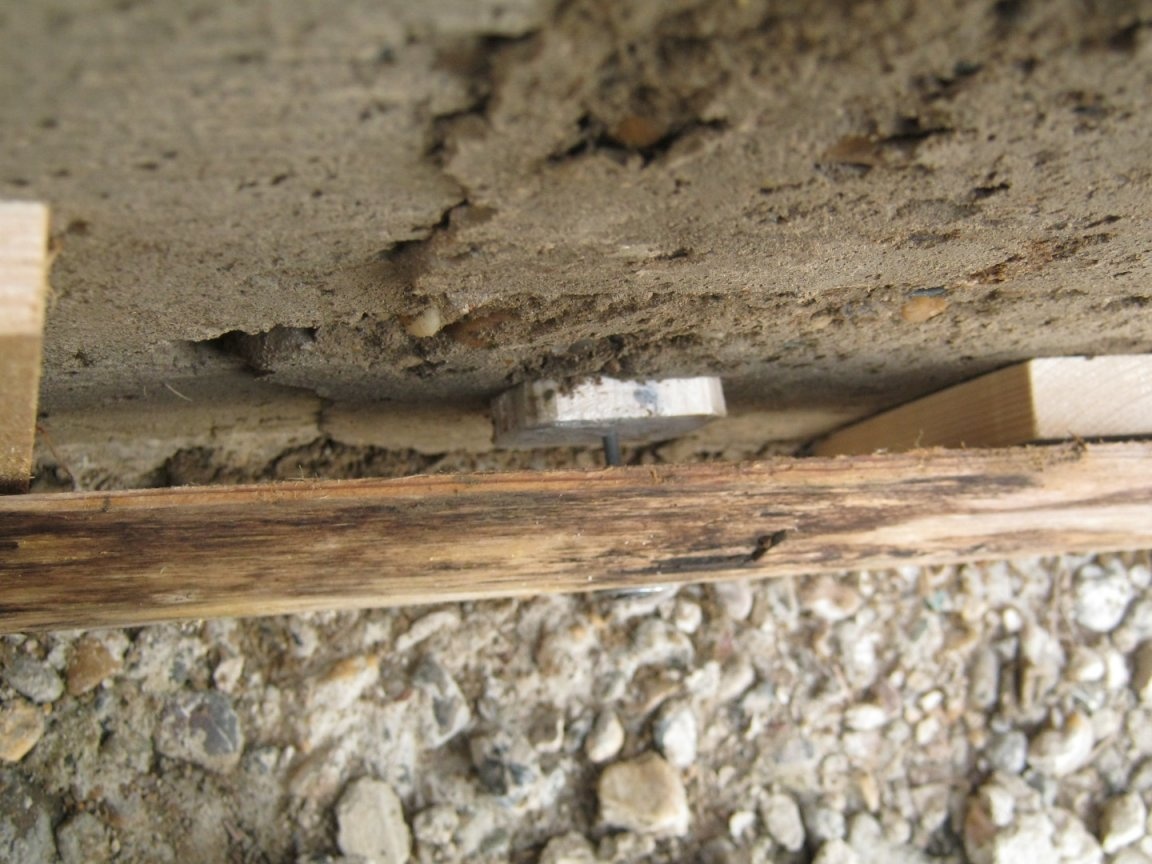
It is very convenient to fasten the lower part of the formwork using wooden conical cork elements. Trees are pre-wrapped with thin "sausage" polyethylene and the next morning after concreting, they are easily gently removed.


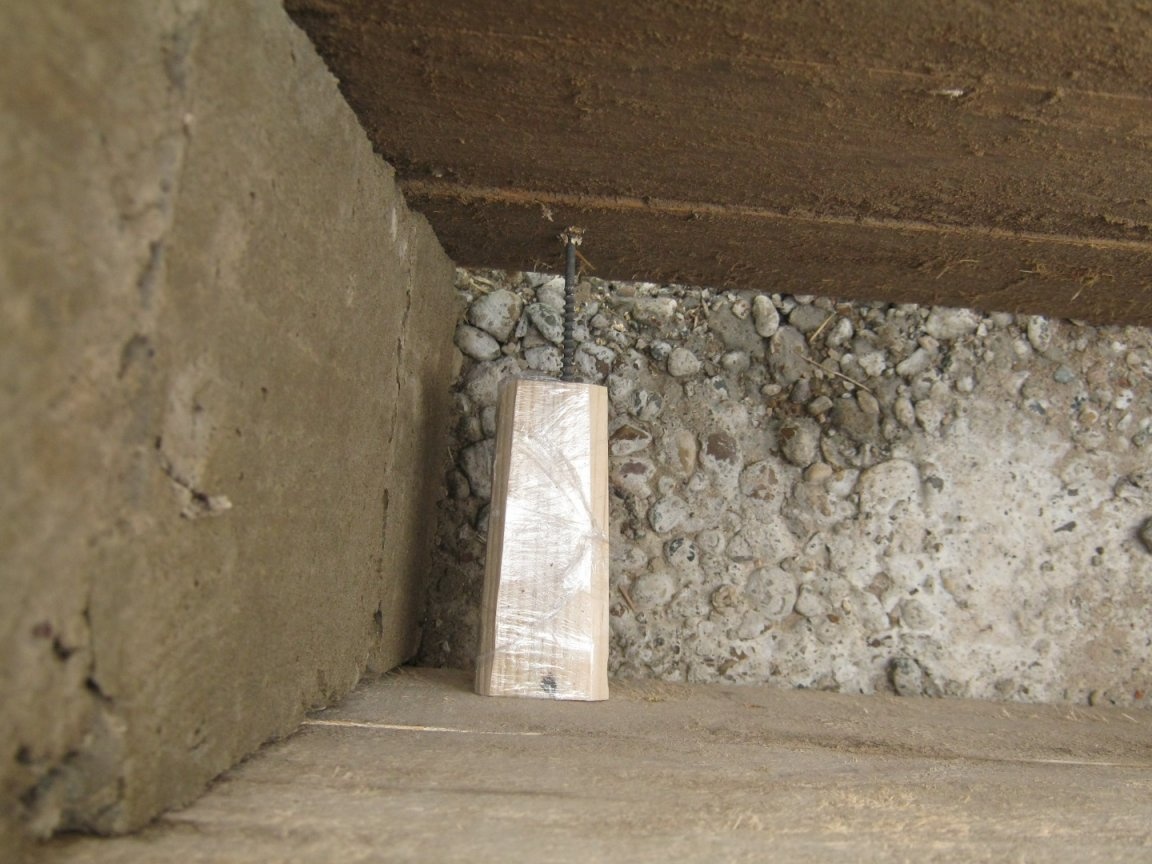
Outside, under the caps of the screws, it is reasonable to put wide “reinforced” or “body” washers M6. This will allow the mount to withstand considerable effort, often in a damp tree.


For accurate extraction of a wooden part, it is convenient to use a kind of impromptu corkscrew from several pieces of wood and a large self-tapping screw.


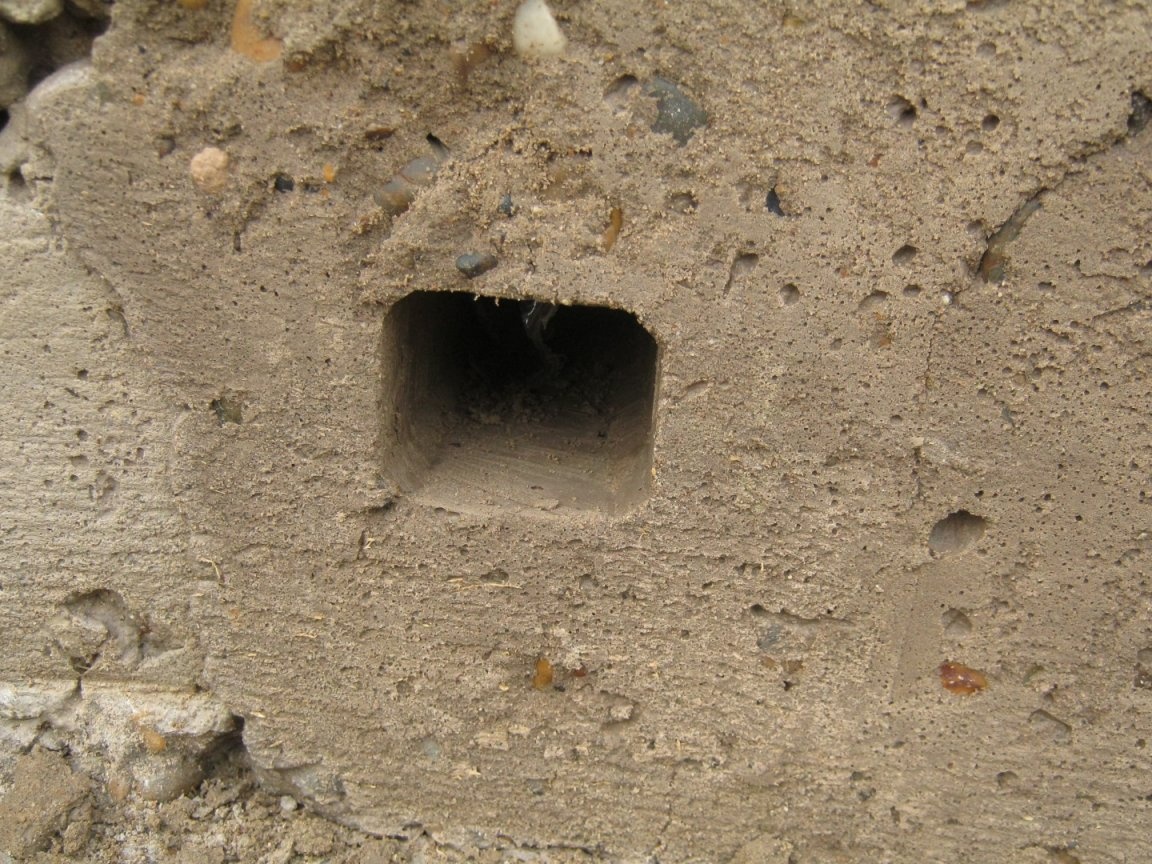
The opening is not through, it is just a cavity from the inside, if necessary, it is easy to seal it with concrete solution, plug it with a piece of polystyrene or leave it as it is.


My foundation is ready. Before subsequent work, do not forget to let it gain its original strength - to withstand several weeks without letting it dry. You will often have to water it, or wrap it in polyethylene. In this sense, I was lucky - the season was extremely rainy, watered endlessly.

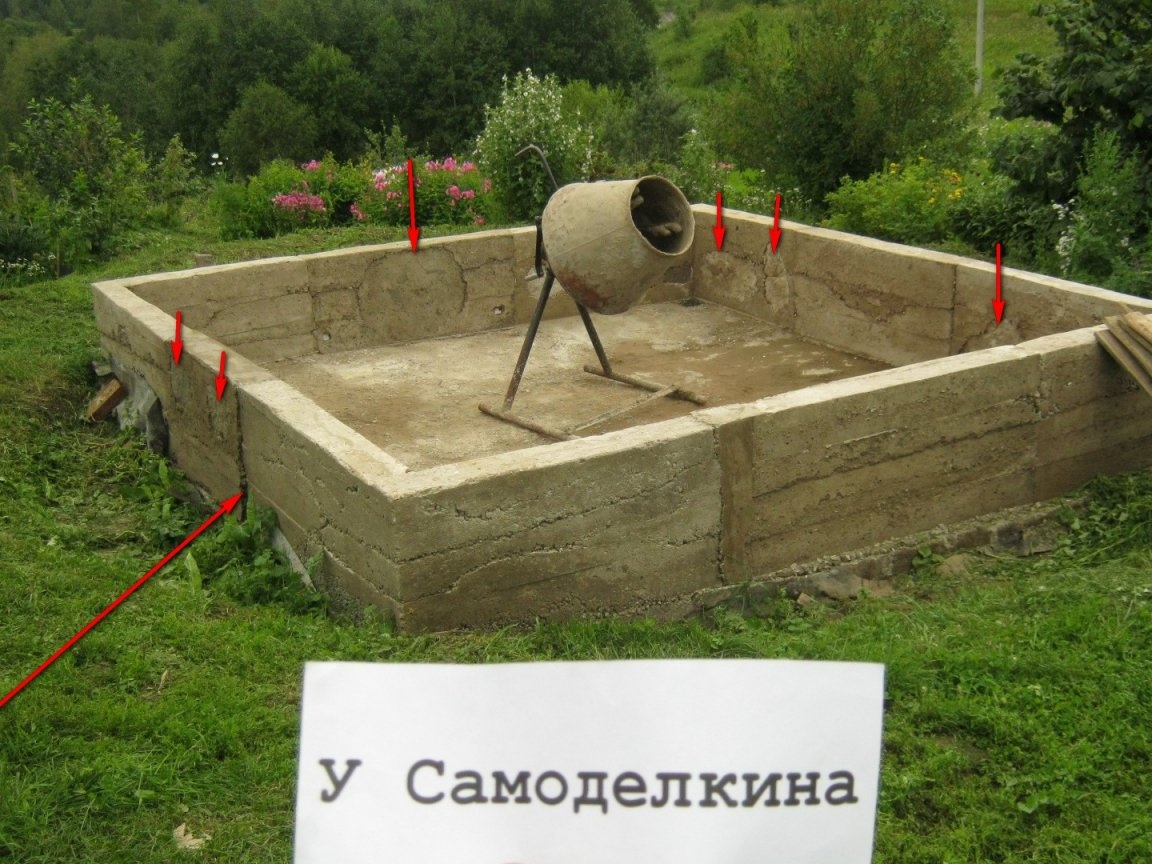
A few flaws of the casting are visible in the photo - a long arrow shows the influx - the formwork that has moved apart below, the result of clarifying the strength limits of the described fastening with a removable wooden cone plug. Here the formwork was flooded right to the top. Short arrows show the traces of the use of flat concrete casting stones described above. These are their backs. Flaws, however, are purely aesthetic.

An obvious moment, which I did not immediately think of.

Stones, especially round ones, when dumping ASG from the truck, strive to slide to the bottom of the heap, leaving mostly sand in the middle and top. Therefore, for a more or less uniform grain size distribution of the mixture, it is better to take ASG from different parts of the heap. A pair of shovels above, a couple from the bottom. Otherwise, it is possible to scoop up one gravel and the concrete will turn out porous with poorly bonded particles, and a composition with a lot of sand mixes poorly in a concrete mixer.


Literature

1. Universal foundation, TISE technology. Yakovlev R.N.

2. Brickwork. D. Collinson. AST, 2015.


Babay Mazay, August, 2019
7
7.5
7

Add a comment

    • smilesmilesxaxaokdontknowyahoonea
      bossscratchfoolyesyes-yesaggressivesecret
      sorrydancedance2dance3pardonhelpdrinks
      stopfriendsgoodgoodgoodwhistleswoontongue
      smokeclappingcraydeclarederisivedon-t_mentiondownload
      heatirefullaugh1mdameetingmoskingnegative
      not_ipopcornpunishreadscarescaressearch
      tauntthank_youthisto_clueumnikacuteagree
      badbeeeblack_eyeblum3blushboastboredom
      censoredpleasantrysecret2threatenvictoryyusun_bespectacled
      shokrespektlolprevedwelcomekrutoyya_za
      ya_dobryihelperne_huliganne_othodifludbanclose
18 comments
I just offered my exactly the same ... (True, not at the wedding, but soberly thinking)))). I wanted an apartment. ...
Perhaps because the house needs to be completed, and in the appendage to the apartment there is a suburban, which is much larger, two-story.)))))
Valery
So in my old age I want to "twist a cozy nest" for life ...
My good friend at the wedding of his daughter, being in good drinking, said that he gives young people the choice of an apartment or a house! He was 100% sure that they would choose an apartment! How wrong he was !!! xaxa
Well ... I have a place to live ...)))) Something, but I have enough living space ... It's just that the house I'm currently renovating is located in the city center. Nearby is a park. On the other hand, there are railway stations. (Railway and car). So in my old age I want to "make a cozy nest" for life ... A large kitchen - a living room (for some reason, we often have a lot of guests)))), a cozy room with a fireplace, a convenient courtyard for cars and so a place for gatherings / barbecue, a large outdoor terrace for a smoke under coffee .... Well, a workshop, like the one where I am now ... To a TV, computer, sofas ... And a workbench with a tool ...)) ))). I will leave my apartment and a country house (half a kilometer from the city line. Three km from the apartment) to my daughter. I remember how hard it was for me to make money (I come from a village and my parents died young.) I do not want her to experience the same ...
So, already calm. She has everything for a normal life - a family, an apartment, a summer house, a new car ... And I’ll finish off my house ... I want to quickly - I need to have time to finish everything and improve the yard in a year or two, because I really want a house grandchildren put in the yard.)))) So that like a real one! With furniture and a TV ...))))) So that they would like to come to grandfather more often!))))
They have not yet been born (not before that daughter ... graduate, etc.), but, you never know ...
About the area I agree 100%. Everyone is trying to build houses of 100m2 and more. But what for such areas? They cost a lot, heating is expensive. Therefore, I saw the project of the house 72m2. Of these, three bedrooms (2 adults and two children), 1 toilet and a kitchen dining room. One story. All areas are minimal. Because even so it is unclear whether someone will need 72m2? True, he already built a small 3x6 house, so that it was where it is comfortable to live while we will build a 72m2 house. True, it turns out the total area of ​​2 houses is 90m2 :) But it seems to me that it will be more convenient for guests and young people to live in a separate house, even if it is a house.
He also observed this and was ironic ...))) One of my "clearly familiar" began to build a huge house in '89. He was then 27.)))) ... At the same time, the layout .... In the center of the hall to the entire height of the house (about 8 meters), illuminated by the "second light." The rooms of the second floor are arranged in a circle, with access to the balcony-path separated by railings.
At the beginning in the two thousandth he had the first floor ... But ..
I had to redo the layout !! Two fifty-kilowatt gas boilers coped with the house and hall, only now ... it was cheap gas in the USSR.))))) The realities have changed ...
Last year he was with him. The first floor is almost ready again! (in one room there is only no ceiling))))))) The second - until I touched after installing the ceilings ... Now I’m thinking about how to change the roof - the slate is there ... already rotten.)))) ... Adult children already ... Scattered ...
And the second one!
Laid the house ten years ago. Huge. Based on children! (Two schoolgirl daughters) ..
The eldest is already married and is unlikely to return to Brest ... The younger graduates from school. The box is already standing! ))))
Nah ... I'm not on these matters.))) The house that I spoke about, though a two-story one, is small. Ground floor - room of 18 squares, kitchen, bathroom, boiler room, corridor.The second floor is larger than the first (I made an open terrace two meters wide for the entire length). There is one room of 19 squares, two bedrooms (12 and 11) and there is a lot of space in the corridor.
It was not built for life !!! For relax! Therefore, on the ground floor in the room there is a fireplace. And the big one on the second - for billiards.))) ... And it is located on a summer cottage, which is half an hour walk from my apartment.)))
Only now ... I do not go to rest there))) There is no time. A daughter and her son-in-law sometimes go ... They will go with the apartment.)))
And now I’m reconstructing an old house in the city center ... I’ve only built a large kitchen .... Now I’m making underfloor heating under the whole house.
Also, many ask why not attached more? Why didn't you make a room in the attic? (There is a pediment of 11 meters wide and a roof of 45 degrees. So you can make a lot of rooms, there is enough space!)
I explain that in order to be comfortable living - many rooms are not needed !!! It is necessary - a large kitchen! Great bathroom! Large pantry !! ... And one room per person !!!! All! Enough !!! .. There are two of us!))) And the stairs and second floors? I already don’t like it at my age! And what will happen in twenty years ???
Author


Yesterday, while I was dragging firewood under the roof, all sorts of thoughts of a philosophical nature were swarming in an empty head, one of which would be appropriate to cite. The thought of futility and mortality. There are many characters calling for "living here and now," however, however, however. It would be nice to think about a general strategy. From time to time, I encountered redundancy in private residential buildings, apparently, people who escaped from the dead-end panel square meters could not cope with the desire for space. Among the slightly familiar, there are such developers - counting on the children, they laid the shit out of colossus, with great work bringing them to the state of "one of the corners of the ground floor has been settled." They realized with surprise that more was not needed. But they spent half the life on the rest, and it also needs to be repaired, heated, cleaned. Not so long ago I was visiting friends-tourists in the private sector of the city. They showed a house nearby and told an instructive story - someone built a rugged all his life (three floors, a huge area, the entire upper floor is a glazed winter garden), and so he got a heart attack. In time. Literally with a hammer in his hand. And the children went to the capitals and sold the house for a pittance, because, no matter how more appropriate the amount, no one bought. Sic transit gloria mundi (this is the glory of the world).
at my second house, in the corners and in the intervals of 2.5 m there were flooded pillars F 35-40 cm 2.5 m deep,

When he built the first house, he made the foundation "floating plate". The reason is soils. In this place, apparently, once there was an ancient riverbed, or something similar. Because, under a layer of chernozem lies fine-dispersed white sand (dusty) with rare inclusions of shells. Digging a trench is almost impossible - collapses! It was not possible to dig a huge pit, put formwork, fill in and dig in (built one). Therefore, I removed the chernozem and poured a reinforced slab measuring 7 by 11 meters and a thickness of 30 cm. I prepared concrete from M500 cement, sand and crushed stone in a ratio of 1: 3: 5. On this stove, a two-story house of foam blocks has been safely "floating" for 15 years.))).
I did not immediately calculate such an important point as a sewage device. And then I had to make a septic tank one and a half meters from the house !!! I was afraid to dig, because of the possible movement of the soil. I got out of the situation as follows ...
Welded a large drill with a diameter of 35 cm with an extension cord. (It seems that his photo is in my publication about another, garden drill). Using it in the evening, after work, I drilled two wells to a depth of 2.5 meters and poured them with concrete, after having inserted three reinforcing bars. I drilled the first pair of wells along the edges of the future foundation pit. I periodically poured some water there to moisten the sand and avoid a collapse. For tomorrow I drilled and poured two more, right next to yesterday. And so - until the wells "met" in the middle.A series of concrete pillars formed in my land, forming a powerful retaining wall !!! After they froze well, I dug a pit in front of her, made a cross cut with a large grinder, put in reinforcing bars, put up a formwork panel, and filled the gaps between the formwork and the posts with liquid grout - got a smooth reinforced septic tank wall. It remains to fill in the rest and waterproof ...
Guest Vladimir
Friends, it was very interesting to read your correspondence. I built two houses (plus one overhaul) and compared my concrete work with yours. Valery did better (more correctly), but my second house had corridors and 35–40 cm columns 2.5 meters deep in the corners and 2.5 m intervals, because it was built on a clay sloping slope
If it weren’t for winter, I just don’t know what I would do.

Yes ... Also planned for this winter "interesting".)))) By the way, and related to this foundation ...
As I already wrote, I came across pure ASG deposits. So, the extension is ready. The floor is flooded. Through the hatch I choose the ground. So much gravel was spent on the device of rough screeds under the whole house that they managed to dig a staircase into the future basement and a full-length corridor inside it !!!. But there are still 10 cubes that need to be extracted. I visited an interesting idea - to build a vibrating table, and, right in the basement in the winter, start making paving slabs! Two hares at once - and the tile is needed on the site, and I will dig the basement! )))))
it took so much gravel that they managed to dig a ladder into the future basement

I re-read my own and remembered a joke:
- What do you know how to do?
- I can dig!
- What else?
- I can not dig !!
- Why are you all "digging"? .. But, let's say, can you make a ladder?
- I can! But for this you have to dig a lot !!!
xaxa
Yes, of course! Write where you want!)))). All that I say is just my “observation” based on my own experience and analysis of processes. There are no secrets in this ... I will be glad if my experience helps someone, and I will also be glad if someone finds errors in my reasoning and points me to them
Author
Colleague, in no case do I regard your comments as attacks and other “instrument comparisons”, on the contrary, the opinion of a thinking practitioner is very valuable.
I’m a little younger, I’m 43, but I understand very well - they tuned in, I just got tired of the continuous hard, bad work. If it weren’t for winter, I just don’t know what I would do. I reduce the planned construction work to a minimum, I really want to do something interesting and enjoyable - decorative glass, stained-glass windows, electronics. Fortunately, the family does not mind. Remained the best controller ...
And by the way - can I bring your comments in this article posted on my blog - https://notrural.blogspot.com? Do not you mind?
Good afternoon. Forgive me ... I did not set the goal of "attacking.))))). Just - the topic is "live" to me. “I consider my last foundation” to be something like a feat, and therefore he took a place in my head commensurate with the subsequent erection of the whole extension (3.5 by 11) and its roof! )))).
When I was thirty and a little, I began to build a two-story house on a summer cottage. In six years, I built it completely (one). For six years I was “interested in living” - I was in a hurry to build after work, sat there until dark at the weekend working from six in the morning .... And now, having bought an old house in the city and decided to reconstruct it, I was sure that it was significantly easier than building a much bigger house from scratch.
But ... I did not take the adjustment for age ...
Although I consider myself so far a young healthy man (I'm 47), but ....
Forces, that is ... There are so many of them ... But now, the time for restoration is already immeasurably greater !!! After work, it’s already significantly more difficult to work at a construction site with the same zeal as then ... And in the morning ....))))))
This foundation was given to me very hard !!! Then I took a vacation in August.I decided to take my family to Turkey for two weeks, and upon arrival use the rest of my vacation to build the foundation - let it stand up until the next season ...)))). As a result, I finished it only by the end of September !!! And then another month (departed)))))
I understand that for your purposes (easy construction) it is normal ... But, as my grandfather used to say, "Try to always do perfectly !!! And" a little worse "- it will work out by itself!)))).
About fittings (not for you! For readers who are "off topic"):
Concrete works great for compression. It is practically not squeezed! But on the contrary, it almost does not work in tension - it bursts immediately. Therefore, reinforcement is most needed where it will tend to stretch! In the case of a screed, floor, or strip foundation - at the very bottom. (Indeed, when you try to "bend it down", the upper part will shrink, the lower part will stretch). In this case, vertical reinforcement will help to avoid cracks when trying to "twist" the foundation - tilting its walls with pressure on it with a horizontal force vector. Therefore, if its height is small - it is simply not needed. With a significant predominance of length over height, the foundation under the influence of such a force will tend to bend in an arc, without changing the geometry of its shape. From this he will be "saved" by the horizontal armored belt, which is located on the side opposite to the applied force. (That is why in high foundations it is needed not only at the bottom.)
And by the way, the reinforcement in the center of the concrete structure never works against cracks! It will only keep from destruction after cracks. The reinforcement should be as close as possible to the edge opposite to the applied force. (Or on both sides. But - on the edges!)
Author
Good afternoon, Valery! What a good fellow you are, that you were not too lazy to go into details, thanks. In some places I am justified.

- the trench with a depth of 70 cm has a sand cushion of 30 cm. Total, we get a completely shallow foundation.

- I see two reasons not to empty: improperly prepared concrete (a lot of water — delamination into fractions, dusty sand, clay impurities in materials, their wrong proportion, etc.) and the inhomogeneous structure of the casting during artisan manufacturing. That is, in principle, weak concrete, which thin walls in places of voids will not benefit. The solid foundation is reinsurance. A box-shaped concrete structure with irregular voids will work no worse. The operation of such foundations has shown that the only identified drawback is hypothetical fasteners to concrete. That is, when you need to (very rarely, but still) attach something massive and apply a standard dowel, according to Murphy's law, the place of attachment falls on a thin wall with a void behind it.

- regarding the waterproofing of the underground part - this meant a strip between a sand cushion and a concrete cast. It is recommended to isolate the walls with roofing material. But in general, accepted, thanks.

- about the joints, the "cutoff" - yes, the problem. In the sense that it cannot be solved in a convenient and economical way. The underground part softens the situation somewhat, it is cast with less compromises. In the case of a very high (and thin) aerial part, additional measures have to be taken. I had to make short releases of reinforcement through holes in the end board of the formwork. After casting the casting, adjacent horizontal reinforcing bars were welded to the outlets. By the way - I tried in the described foundation to make a “castle” similar to pottery demountable forms. It turned out well and quite a simple option. Probably worth making it deeper. Instead of a piece of wood in polyethylene, you can use a piece of foam tape.


- here is the futility of reinforcing in the casting shorter than a meter, as it did not take into account, thanks

In general, colleagues, pay attention - even such a thing, which is quite boring and dull, at first glance, like a concrete foundation, becomes a very intriguing area of ​​life, it is worth looking at the matter from the perspective of analysis and research ...I remember that we walked with a design colleague and his young lady in the park - south, evening, some kind of holiday, music, chestnuts bloom, exciting spicy smells. We approach the bridge (the low sun gives rise to beautiful glare on the water, the midtones are especially deep). And he is so thoughtful - look says how interesting the strut was fixed! (metal bridge).
The author did not mention the composition of concrete. I will share my experience ...
He did, as already written, the id of a “free” ASG. Cement - ordinary M500 D20. The opinion that cement M500 D0 gives greater strength is erroneous !!! Their strength grade is the same (M500). Simply, Portland cement with 20% slag additive is gaining design strength many times slower !!! Concrete from D0 is already a stone in a day! And D20 can be scratched for several days with a dop ... But after the set 28 days, it is already the same "stone". That's all the difference!
If sand is used, the optimum is 1: 3. But in sand and gravel mix, in addition to sand, there is also gravel (filler). Therefore, the proportion can be increased. I did 1: 4.
Few people know that the amount of water also significantly affects the brand of concrete. Optimum - half (by weight) of the mass of cement. But such concrete is very hard. And kneading it is also difficult (sticks in the mixer and turns with one lump)))). Therefore, water is a little more. To make it mobile and fluid - add a plasticizer! (This allows you to reduce the content of excess water and thereby increase the brand). Many, trying to save money, replace it with liquid soap.
Yes! So it is possible!!! ... Only now, saving does not work! to get the same fluidity, you need a lot of soap, and a plasticizer - a scanty!))))
After laying, be sure to cover the concrete with a film - it must not dry !!! Moreover, we immediately dosed the water !!! After setting - you can already water it! He will not take the excess.
As a boot, I used a field stone. (Dumped in advance with a trailer))). Fortunately, we have stones in the fields - it’s a disaster! Just then a glacier stopped and melted here, leaving in the sediment fragments of the demolished ones along the Northern Mountains. Since then, centrifugal force pushes them upward annually if the soil is plowed (loosened). In spring and autumn, stones are harvested in the fields.
He washed the stones from the hose before use. Threw it into concrete, and rammed with a tamper (log with a crossbeam).
Once again I repeat: in the foundation - NO EMPTY !! The foundation is a "power structure", designed primarily to preserve its geometry (and thereby protect it from wall cracks) when changing loads in the ground and not burst !!! Therefore, it is always made as strong as possible !!!!
I’m adding ....
Consider the example of my last foundation - a tape for an extension.
Attached to an existing house at its end (U-shaped, full width). I wanted to make a basement under the whole extension. I scouted the ground when I tried to bring water into the house under the foundation. Failed - the house is very old (mid-19th century), a foundation of granite stones chipped into rectangles. The depth of the foundation is 2 meters relative to the horizon (!!!!) further - a pillow-cushion with rubble stone (cobblestone). But now, the ground .... - op-pa !!! Very lucky!!! About thirty cm. Chernozem, and then - pure ASG (sand-gravel mixture). But, if you dig a pit, it is possible to move the soil (ASG is very mobile) and the house will "slip", breaking ... (The house is very heavy !!! Walls - 90 cm of brickwork. Ceiling height - 3.6.)
But difficult tasks are the most interesting. And I did make a basement.)))) More precisely - until almost done. While in the process.)))
I decided to dig a perimeter under the foundation (it’s the basement wall), pour it, then fill the ceiling, and only then, through the hatch, select the soil !!!
I was digging a trench 30 cm wide to a depth of two meters (!!!!) I was digging at first with an ordinary shovel, and then, when I already went to the ASG - shovel on a handle extended to a meter and a half. I dug one wall for the first time in a day (3.5 meters). I didn’t make a pillow (it is already there)))). Made a film. For tomorrow - flooded. Half - completely, half - "slope".
The rational organization of the process speeds up and facilitates the work.Here, he sought to reduce the intermediate transfer of heavy materials and concrete - to pull the concrete mixer closer to the place of concreting, to organize a track for the delivery of bulk materials in a wheelbarrow.

In my case, everything was optimal. I took the ASG from the dump (What I got out, I filled it back))))). A concrete mixer stood on the edge. For her, from an old sheet of roofing sheet, two boards and a hook from a drain, I made a gutter that hooked onto the lower cross of the concrete mixer with a hook. On it, the finished concrete flowed directly into the trench !!! I took the ASG in front of the concrete mixer - when I poured the area about a meter - rolled it forward to the vacant place.)))) I brought only cement.
A layer of solution fell out to the bottom. When he reached a height of about 20 cm, he lowered there a pre-connected reinforcing "ladder" from the "12". Two-meter verticals were tied to it - for them I lowered it.
The first day was "Stokhanovsky")))). Started at 6 in the morning, finished - in the dark.
Then - slower. I dug up three linear meters of a trench, after which I poured about a meter a day. (as I painted on the diagram, obliquely). The most difficult operation is to tie a new section of the frame to the old one, the ends of which are protruded from already set concrete. Everything would be fine, but you need to do this by lying upside down on a “slope” studded with pieces of reinforcement!)))). Yes, and climb backwards, feet up and down, showing the wonders of equidibristics! (Since the upper “ladder” does not allow to climb on top. And in front everything is already flooded with a layer of fresh concrete, on which the reinforcement is laid.))))
When everything was flooded in the ground, I installed the formwork. He made it in advance from the old floorboard, which he plucked in the house. (By the way, the author is wrong in that there is nowhere to use the board! Then it serves as a roof sheathing perfectly!))) It's not scary that it is dirty and in concrete!))))
The formwork consisted of long (2 meters) boards, 50 cm high (the height of the aboveground part of the basement) shot down across the boards, which protruded from below, acting as stakes. Using the “hammer-hammer method”, driving the stakes into the ground right next to the foundation poured in the ground, set it to the level !!! It is not necessary to fasten the bottom (stakes hold) the top - fastened with transverse bars. Below, since the horizon is not even, it was undermining somewhere, somewhere it was undermining. The film, which was left in advance with a margin, “sprouted” upward, fixed with a stapler and cut exactly along the top edge.
The upper part was poured in the same way - “slopes”, leveling the top with the Rule over the formwork (it also stands at the level).
I also have little experience in creating foundations. (Himself (one) poured the foundation for a two-story house ("floating plate") and a tape for an extension with a basement. In addition, many are small.) Therefore, with the permission of the author, I will express my thoughts.
I’ll start with the mistakes right away.
It is not difficult to dig a trench along the width of a narrow shovel, with a depth of 0.7 ... 0.8 m

The depth of the trench does not depend on the convenience of digging, but on the freezing horizon in a given area !!! It is desirable that it be deeper by 20 cm. If it does not work out, then it is better much higher !!! It is "significantly" !!! Because the foundation is not so afraid of freezing the ground under it, as the uneven freezing of different sections !! In simple words, if one corner is frozen and the other is not, the foundation will burst !!! Therefore, it is better to do higher, so that it would be easier for them to freeze at once to everyone !!! But then it is already necessary to strengthen the reinforcement, the brand of concrete AND NO VOIDS !!!. In the foundations DO NOT make any voids !!!
The author for some reason deliberately greatly weakened the foundation !!! If you wanted to save concrete - you'd better make it smaller! It would be stronger !!!
Waterproofing can be made of any suitable pieces of plastic film, not necessarily thick, it is needed only for the time of concreting.

Not true!!! It is needed not only for the time of concreting !!! Therefore, monitor the integrity of the film !!!
(And why, in your opinion, when they make foundations “according to the rules”, erecting in the formwork that is in the foundation pit, before closing it with soil, it is always waterproofed? And even if it is made of foundation blocks! After all, it is already ready !))))
If necessary, fittings are laid, its vertical parts are stuck into the sand cushion through the film.The film before that, in the right place is cut with a knife or reinforcing bars are cut at 45 °.

The "vertical parts" do not stick into the ground, but are attached to the "horizontal parts" Reinforcing frame is knitted! If the budget - then horizontal reinforcing bars are laid as they are filled with concrete, then verticals are stuck into the concrete and (necessarily) tied with a knitting wire to the lower horizontal ones. There may not be upper horizontal ones (if on a budget), but then there are no verticals either !. Verticals are needed only with a total foundation height of a meter or more. Otherwise, they simply do not work.
Formwork, of course, is best done whole on the entire wall. It’s not necessary to start from the corners. But, you can rearrange the shields ... Only now, it’s not necessary, like the author, to do separate sections with a vertical cut-off. For a better connection, you need to finish the hollow:

And, even so, it is advisable to stumble into the “slope” of scraps of reinforcement (old pipes, any scrap metal).
Casting Top Edge Level - Fixed Cord

The level of the upper casting is the upper edge of the formwork !!!! Therefore, it is always set at the level !!!
P.S. I will add later .....
Have you seen a hollow brick? So here, emptiness is emptiness, there is strife: it is one thing when it is in a responsible building, where it is not provided for by the project, and another is in a lightly loaded foundation, about which the author writes. And one more difference - here all voids from all sides are covered with concrete, and unintentional voids reduce strength when the solution does not penetrate into the buta.
And for what is emptiness? After all, everywhere they write how dangerous they are and that they are a defect.

We advise you to read:

Hand it for the smartphone ...