

When I created this kite, I spent no more than $ 40 on materials.
The whole process of creating this wonderful kite took me 8 hours. Here is the result of this snake:
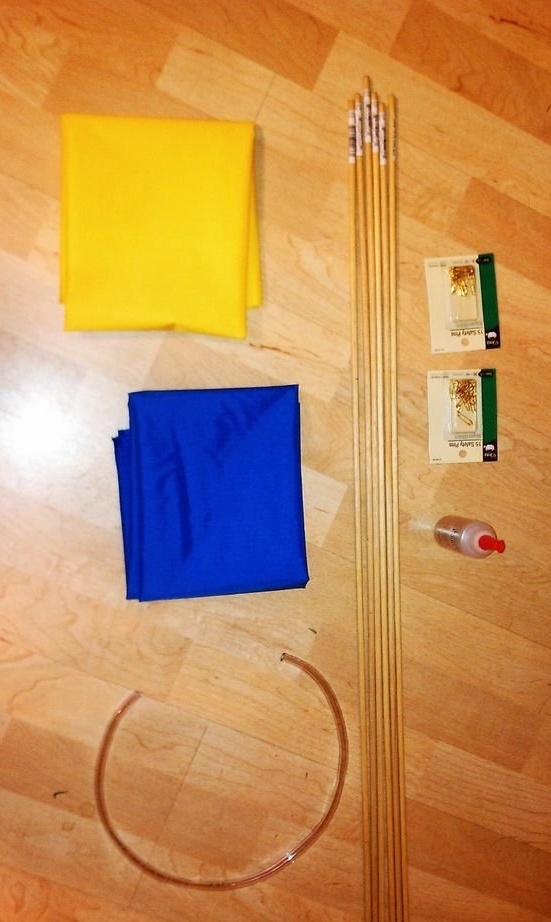
Step 1: Materials and Tools
My goal was to use the most inexpensive and affordable materials for everyone that can be bought at any store. Please note that I did not have to look for many materials, so your snake can cost a larger amount.
1. Durable nylon. I bought a meter of each color. According to my calculations, this amount should be enough for 5 kites.
2. Six wooden dowels (diameter 0.6 cm, length 92 cm)
3. A vinyl tube with a length of 61 cm, with a diameter of 0.6 cm. This tube will hold the keys together.
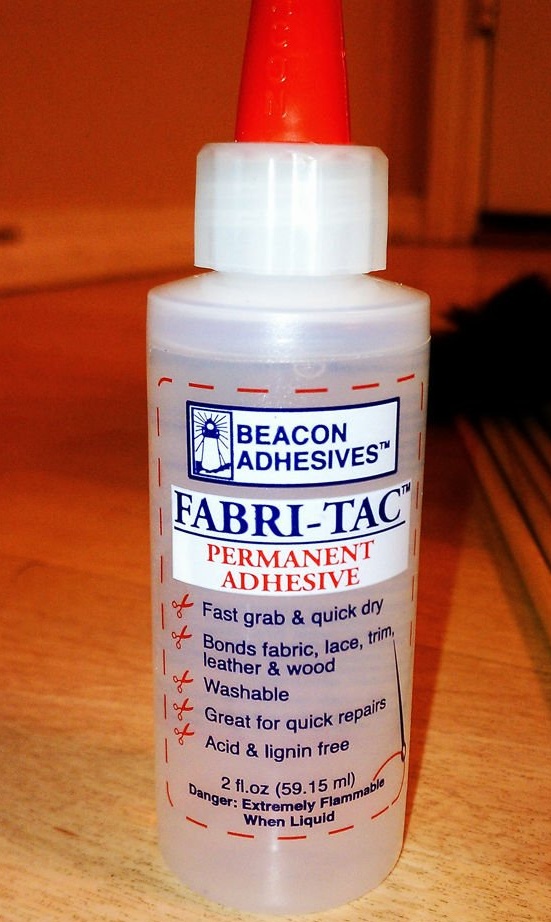
4. Glue for the fabric. You can choose the cheapest in the store.
5. Superglue. It is necessary to firmly adhere the fabric to the vinyl tube.
6. Special fishing line or rope for winding / unwinding and controlling the kite in the air.
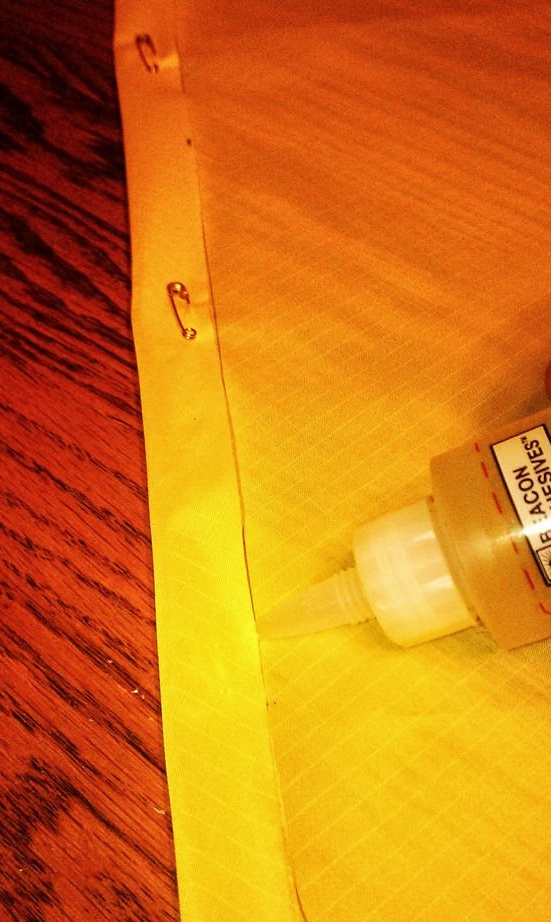
7. Packaging safety pins (optional, can be used to fasten pieces of fabric while gluing it to a wooden base of a snake).
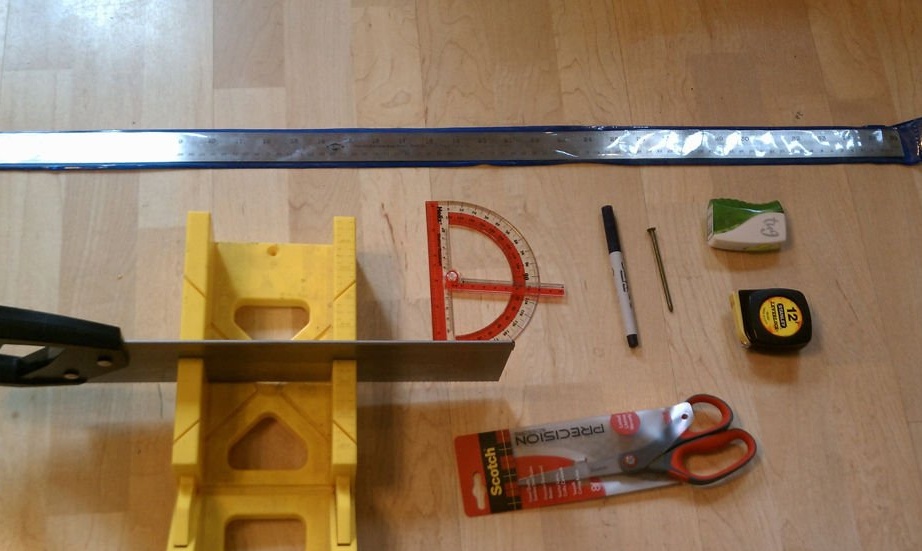
1. Scissors
2. Marker with a thin tip for marking on fabric and dowels.
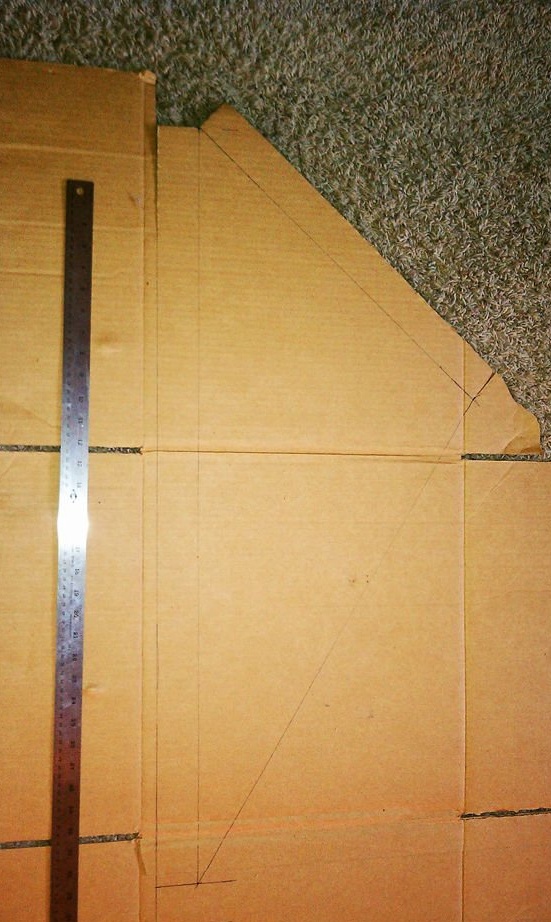
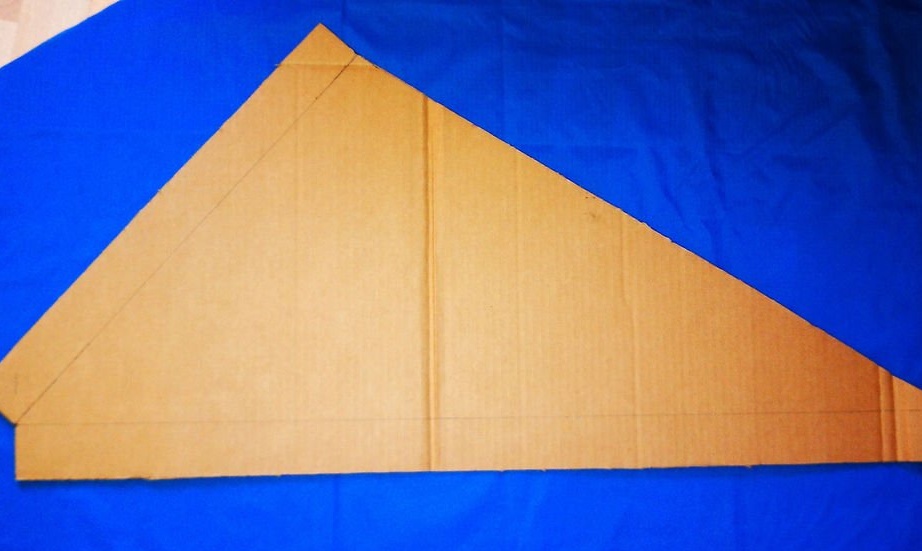
3. Box cardboard to create a layout (optional). It was easier for me to measure a triangular model of a kite on cardboard, so that in the end my kite turned out to be symmetrical.
4. Tape measure and ruler (36 inches long) for calculations.
5. Protractor - for measuring angles in a triangular kite.
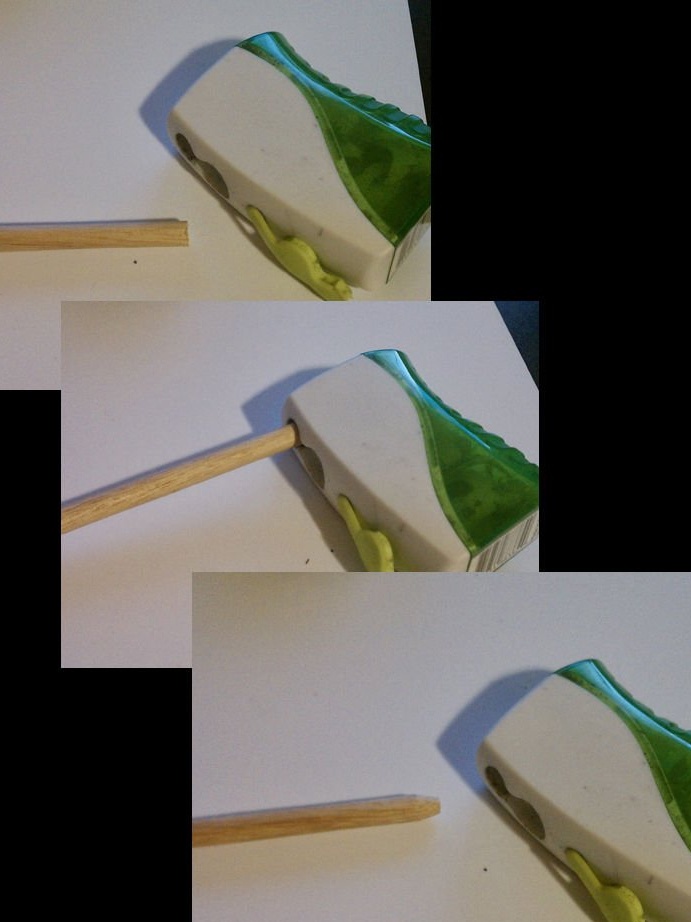
6. Conventional pencil sharpener - we will use it to trim the edges of the keys.
7. Hacksaw and cutter (optional) - in order to cut off part of a wooden key.
8. A large nail - should leave a hole into which a wooden key can pass through.
For work, I advise you to spread the fabric on the floor, so it will be more convenient to do calculations.
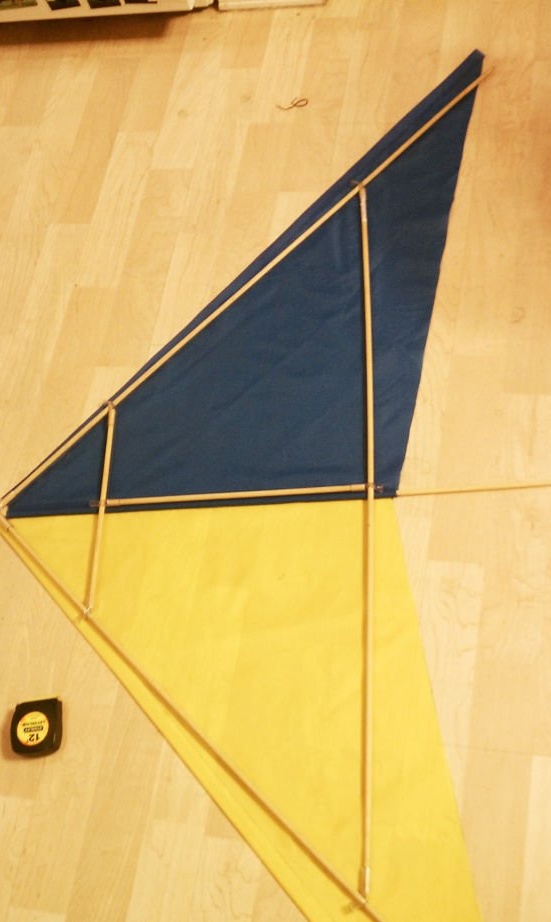
Step 2: Building the basis
wooden dowels (3 pieces 91 cm long, 1 piece 6 cm long, 1 piece 7.2 cm long), vinyl tube, nail, scissors, tape measure, marker.
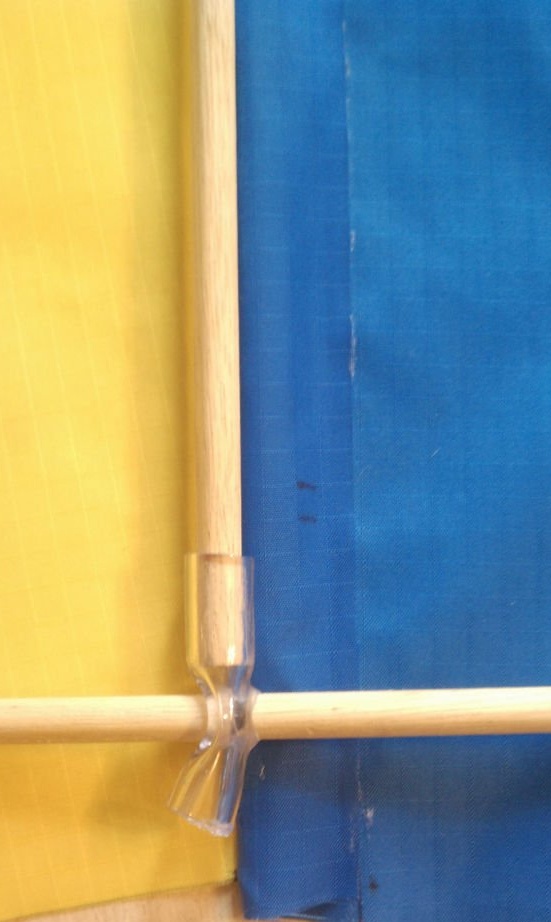
The vinyl tube should be so long that you can fit the wooden dowels into it.
The dowels will need to be placed in the vinyl tube, and later cut it (NOT NOW). Therefore, the length of the tube can be calculated based on the size of the parts:
• 1 tube 7.6 cm long;
• 6 tubes 1 cm long (for connecting the cross members);
• 2 tubes 1.3 cm long (for fixing the outer ends of the “wings” of the snake so that the fabric does not peel off).
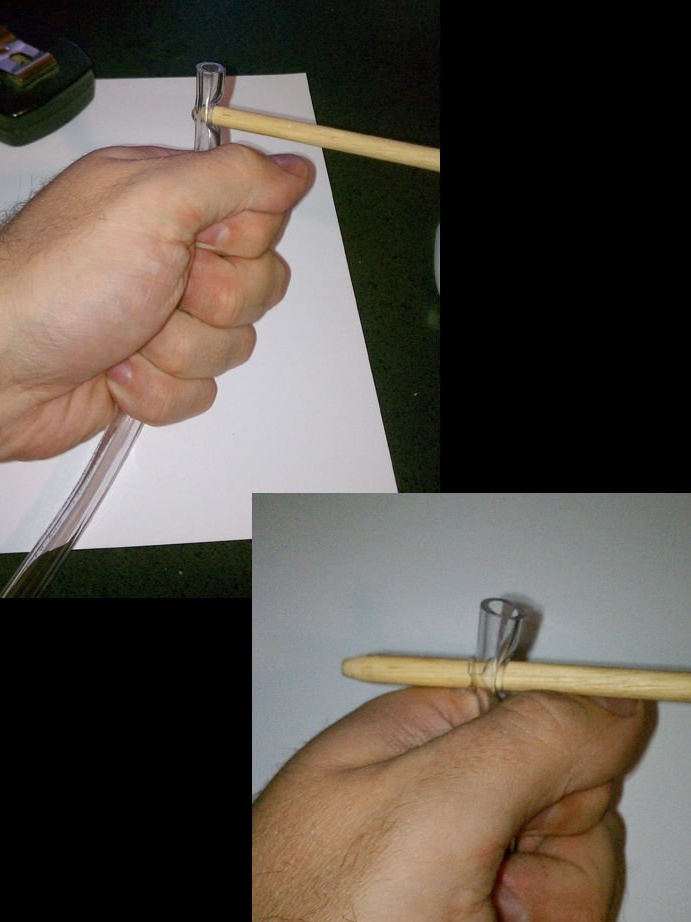
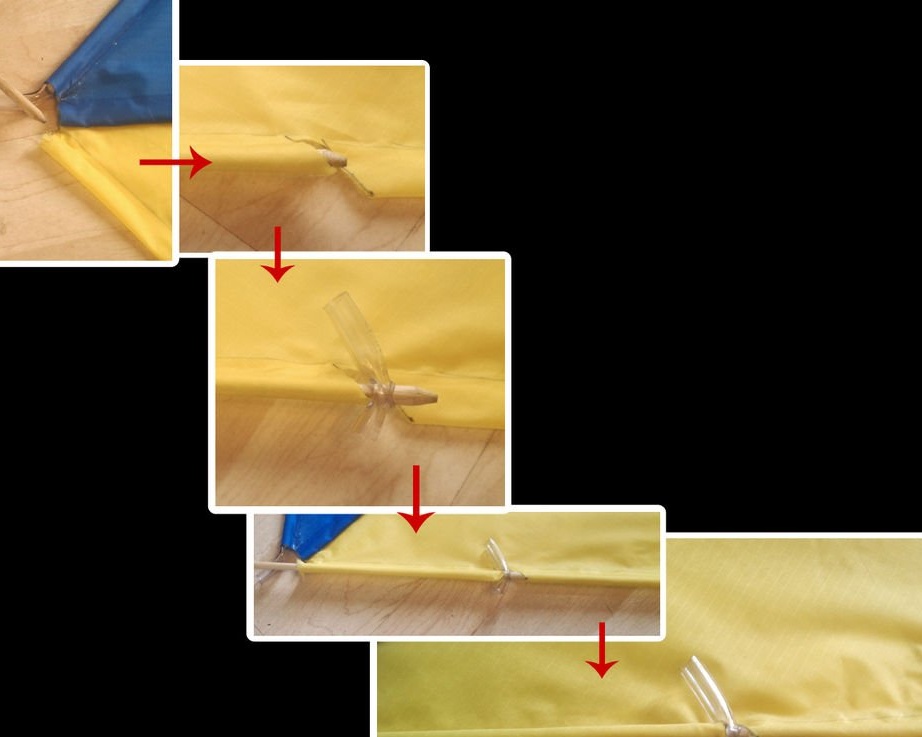
1. Measure the length of each key. 3 keys do not have to be cut at all, while 2 keys can be obtained by cutting one. I used a cutter and a hacksaw to cut the dowels. You can replace these tools with scissors, but then you have to sweat to cut off evenly.
2. Take a pencil sharpener to round the edges of the keys. Sharpening is not necessary, just round off so that the keys can be inserted into the vinyl tube. Look at the photo.
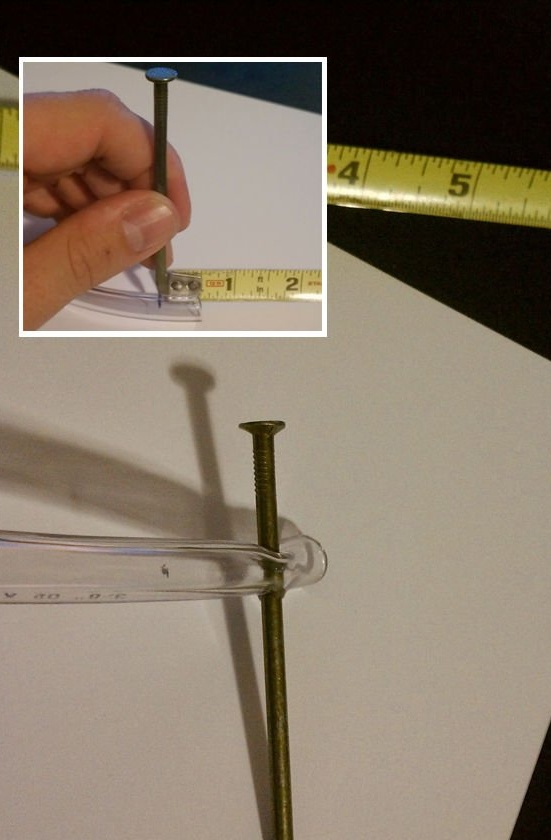
3. Measure one and a half centimeters from the edge of the vinyl tube and mark with a marker. Then, in place of the mark, stick the nail perpendicular to the tube. Look at the photo.
4. Now you need to insert the key into the tube. It will take some time and effort. How to do it - look at the photo.
5. Once the first key has been inserted, you can measure a length of 1 cm and cut it off.
6. Repeat for all keys:
• to fix the tip, the “nose” of the snake, you need a key in the tube 7.6 cm long;
• Two dowels 92 cm long will require 2 vinyl tubes. One key length of 91 cm will need a vinyl tube in its central part. This is quite difficult to explain - follow the step-by-step actions in the photo.

Step 3: Measure and cut the fabric
: nylon, marker, scissors, tape measure, ruler, protractor.
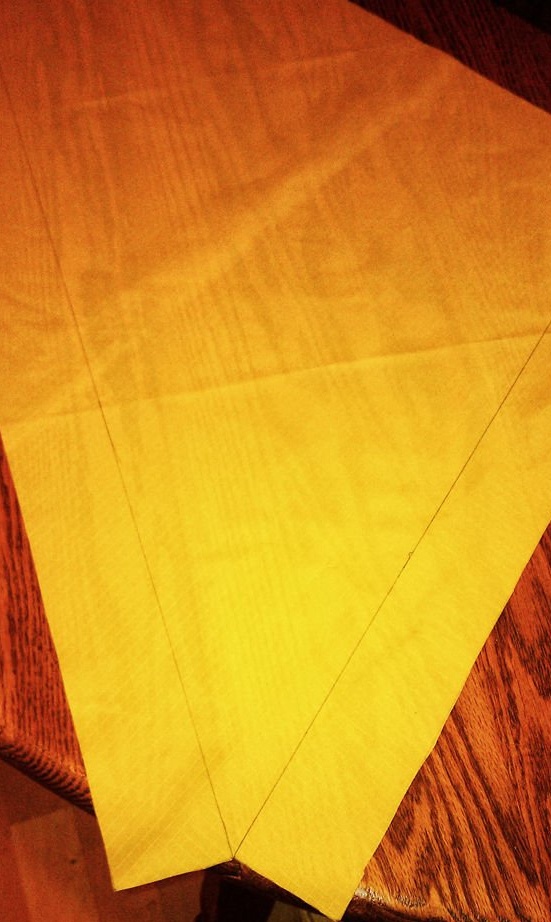
I previously drew a sketch of my snake on cardboard and cut out a layout. Thus, I got a symmetrical layout, which is left to attach to the fabric, circle and cut along the contour.
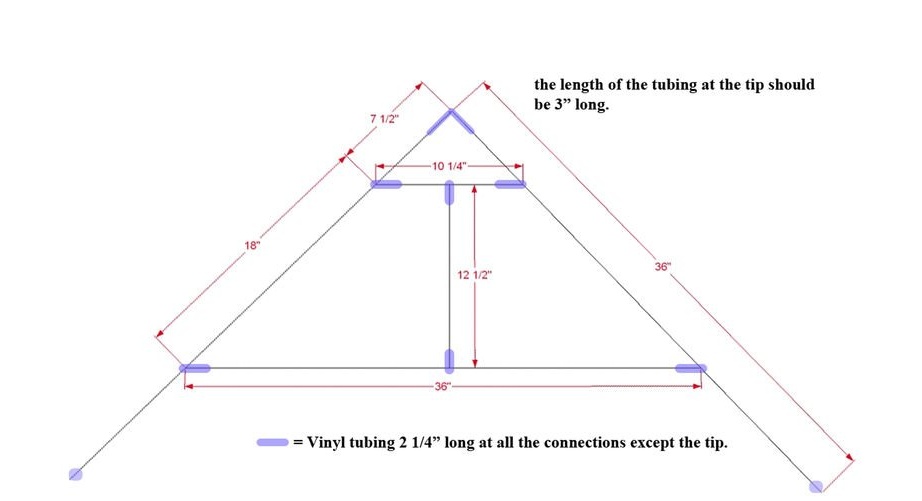
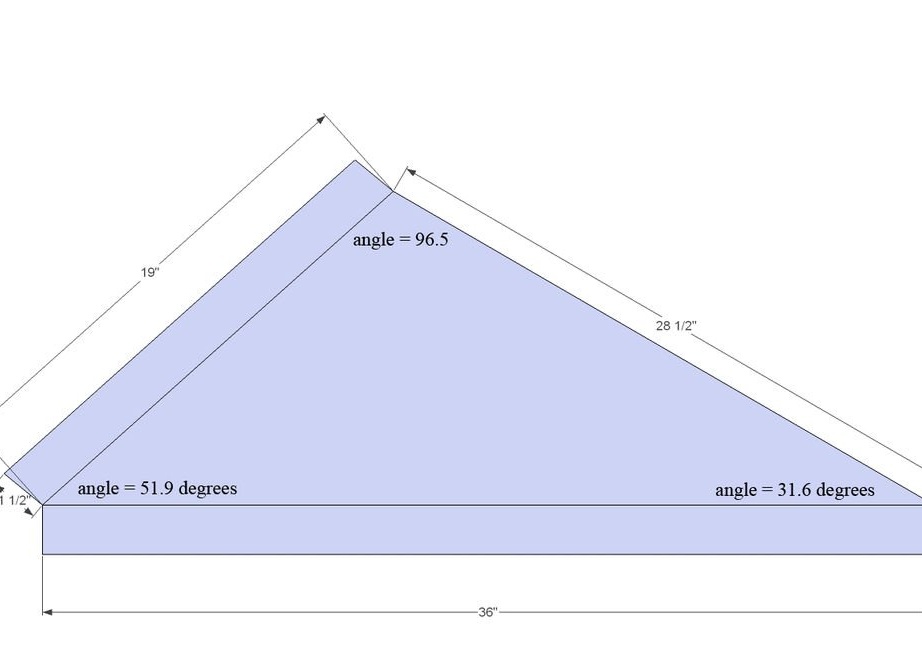
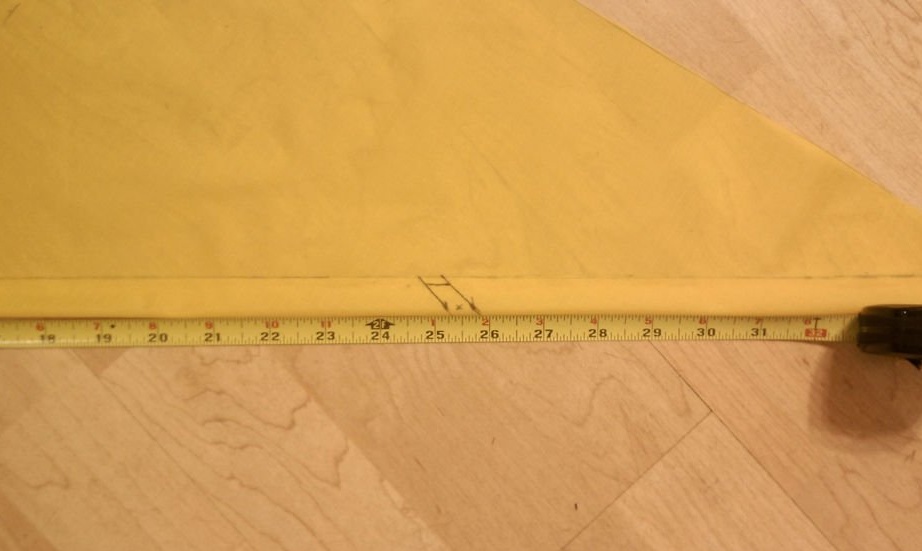
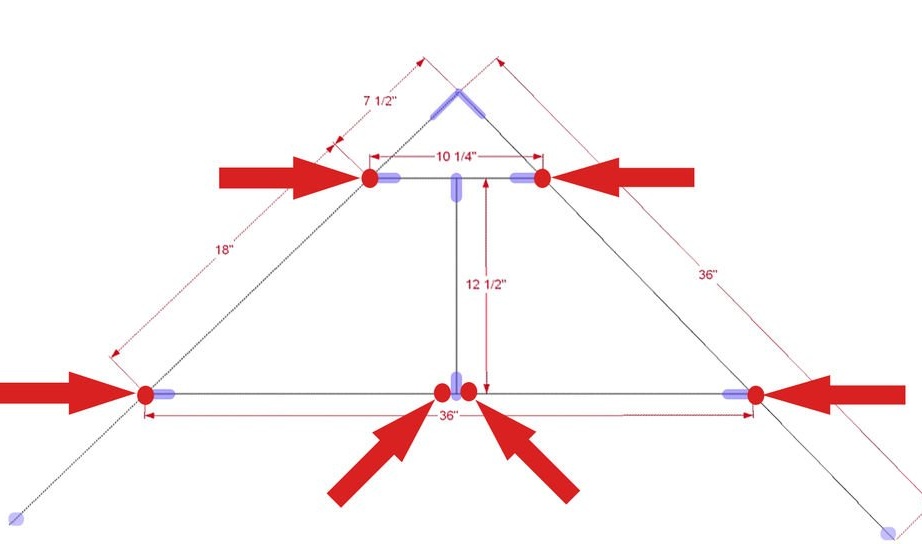
I had to tinker with trigonometric calculations. To make it easier for you, here is a picture with the measurements I used:
Note that 2 edges are 1.5 cm longer. Such a margin is needed to glue together the “sleeves” into which we will insert the key.
Step 4: Glue the pieces of fabric
dowels, fabric glue, pieces of fabric that you just cut, safety pins (optional).
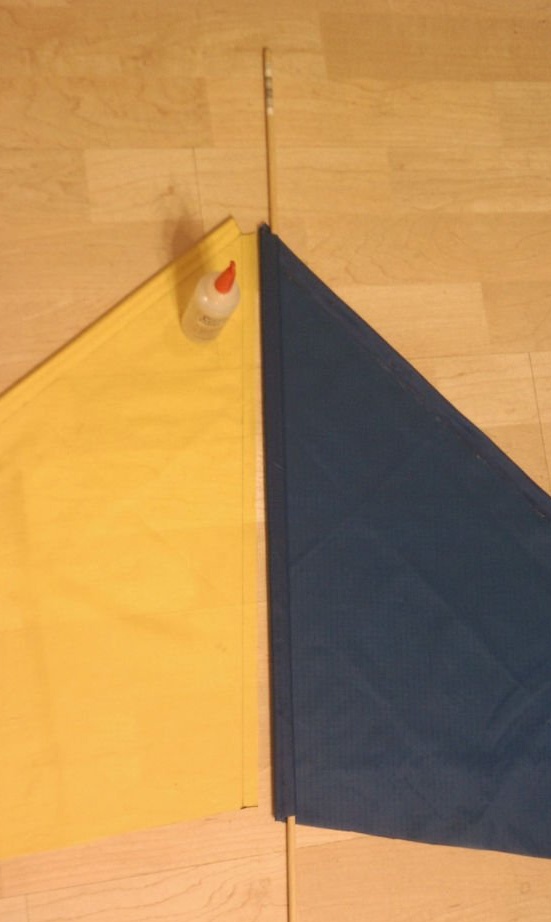
you need to glue one of the 19-inch parts into the sleeve. The other part will be used for gluing two pieces of fabric.
For beginners, a longer piece of fabric will be wrapped around the longest keys. Next, I made a sleeve by gluing nylon along the edge and inserting a key, as shown in the photo.
Now it was the turn to stick one piece of fabric to another. Take one, a piece where there is no sleeve for the key, and cut it to 0.5 cm. Glue, as shown in the photo, do not forget to insert the key into the sleeve before gluing.
Let the glue dry for several hours.
Step 5: Connect the base and fabric
tape measure, the parts of the kite that you have already made - the base and wings of the fabric, superglue, glue for the fabric, an additional key to even out the roughness from the layer of glue on the fabric.
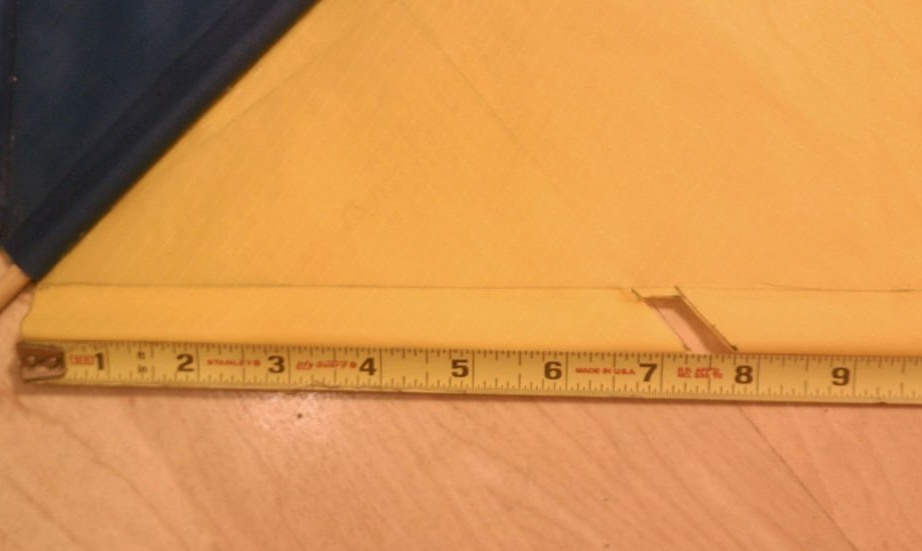
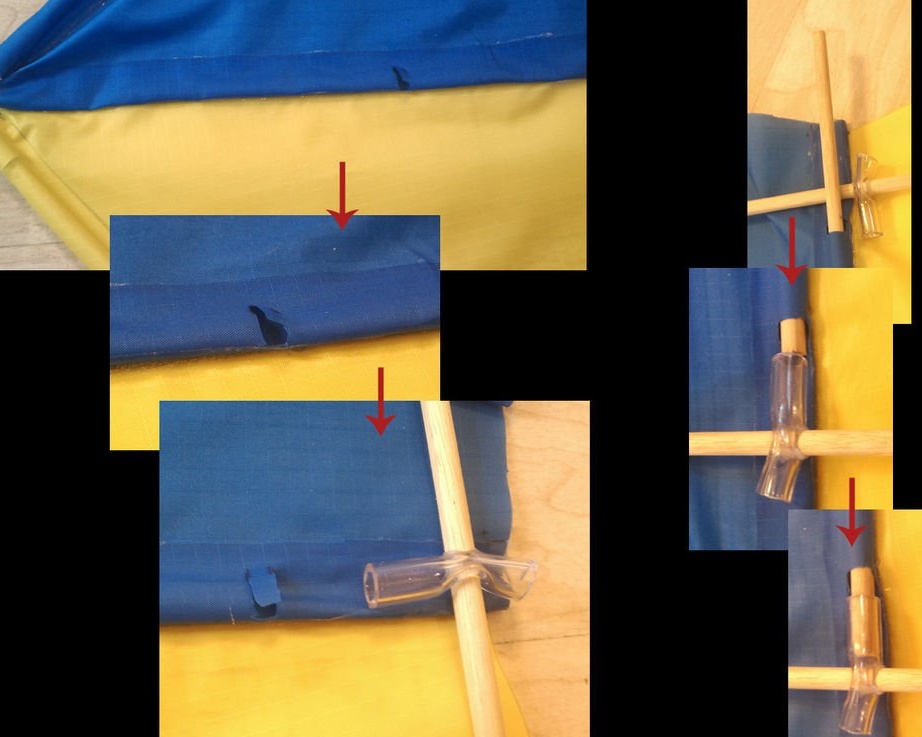
On the edges you need to measure and make cuts to insert vinyl tubes with dowels. The cuts should be at a distance of 9 cm and 32 cm from the "nose". Detailed process in the photo.
To create the outer slats of the kite, take two dowels in the vinyl tubes prepared previously.
1. Starting with the “nose”, carefully thread the key into the fabric sleeve.
2. Once you reach the first notch, put a piece of vinyl on the key, as shown in the photo below.
3. Continue to push the key down the sleeve from the takani, while making sure that the vinyl tube does not move outside.
4. Repeat step 2 for the next vinyl tube when you reach the second notch in the sleeve.
5. Pass the key to the end of the sleeve, and do the same with the other “wing” of your snake.
Putting the central part:
In the 19-inch sleeve, which turned out in the middle after gluing the two halves of the fabric, you also need to make two cuts to slip through the short dowel.
1. The outer trims are now in the sleeves along the edges of the “wings”.
2. The upper layer of the sleeve in the middle must be cut to pass the key, which vinyl pipes should fasten at both ends.
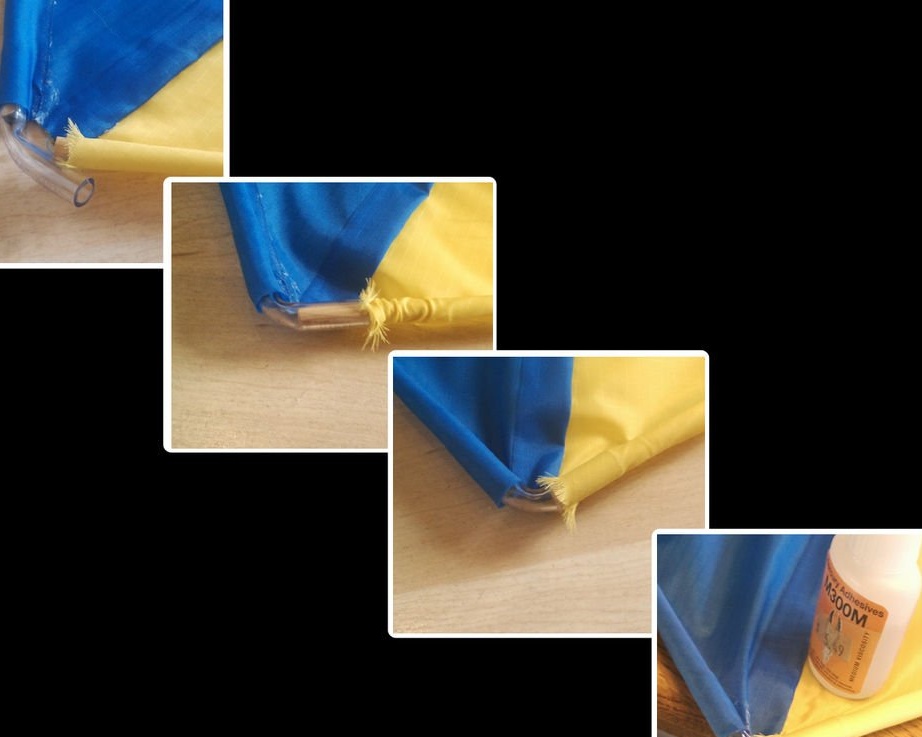
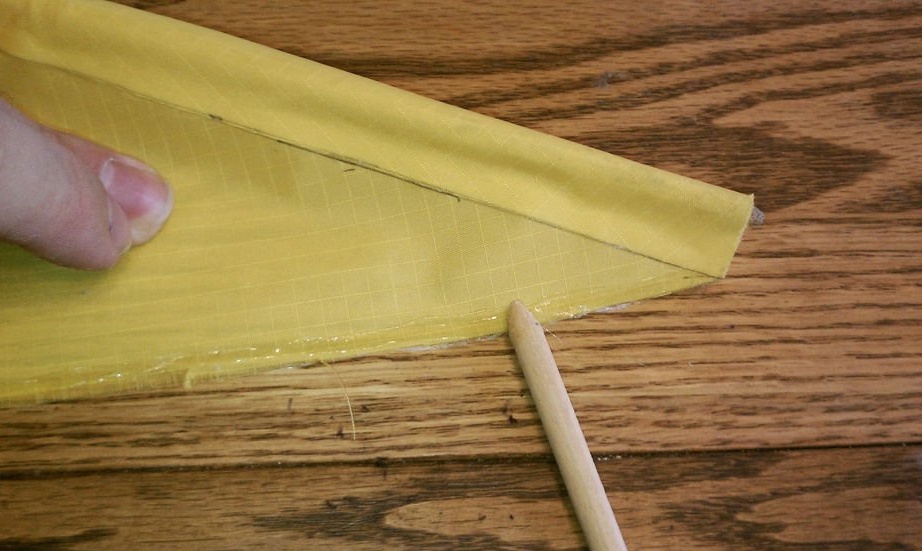
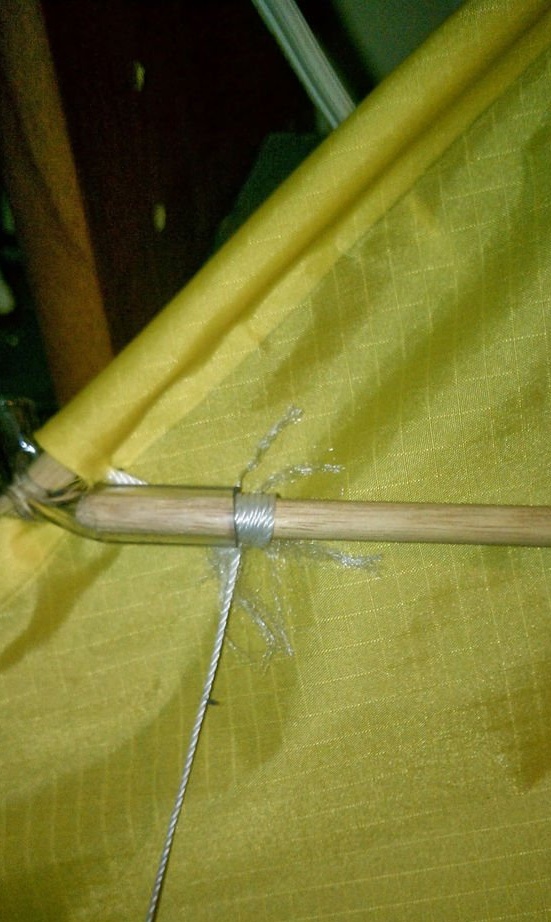
Now we need superglue. It is very important to use superglue to fix the tips of the “wings” of the snake so that they do not stick out and mess up during acrobatic stunts in the air.
1.Use a three-inch vinyl tube to secure the nose. Now use super glue to stick the fabric to the vinyl tube.
2. One and a half inch vinyl tubes from the base of the kite must be attached to the ends of the outer slats. Use super glue to stick the fabric to the tubes.
3. Apply fabric adhesive to the back (the only edge where there is no key). To prevent glue from bubbling, spread the fabric with a key.
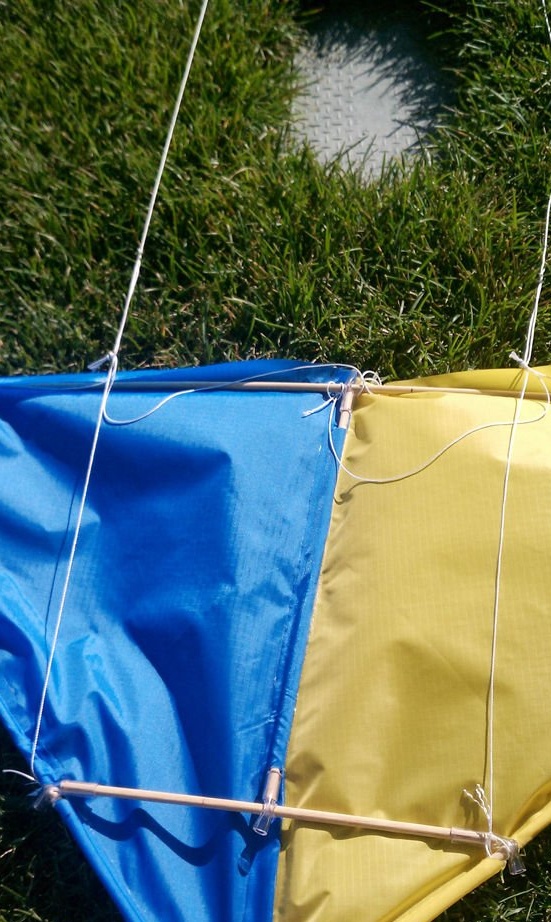
Voila! Finally we got a kite that is capable of performing acrobatic stunts.


Step 6: Attach the rope to control the kite
rope, twine (60 meters), scissors, kite.
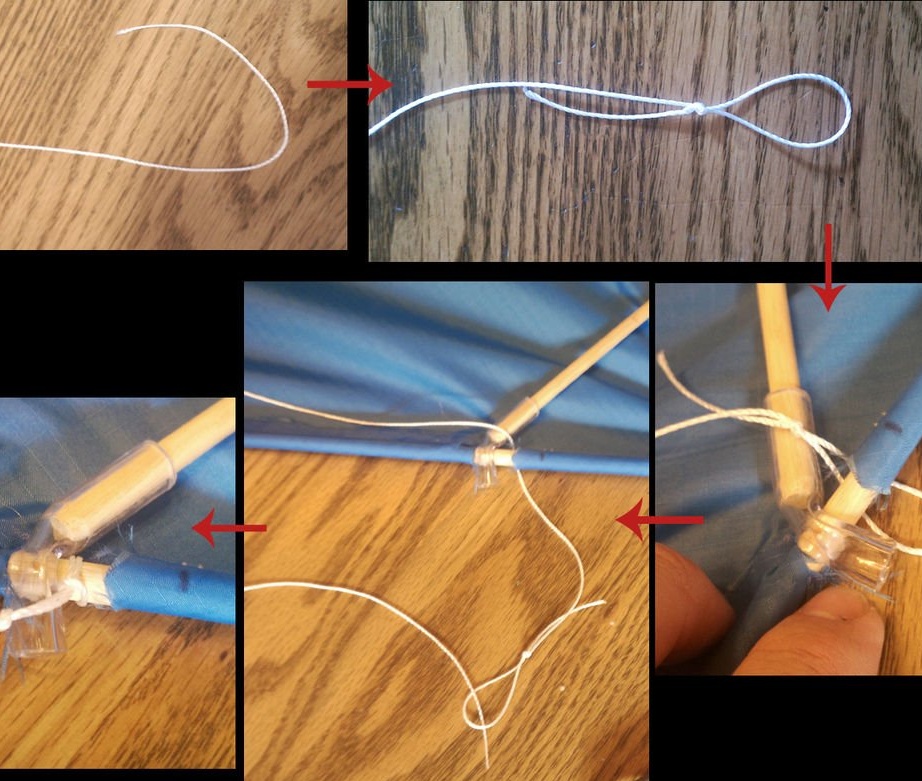
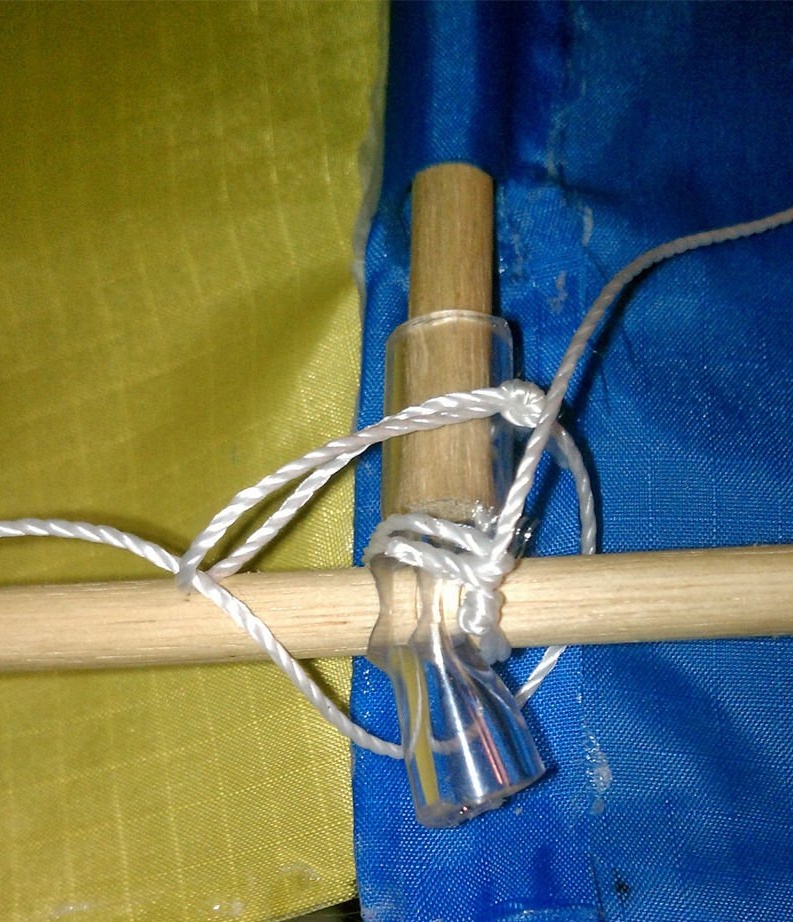
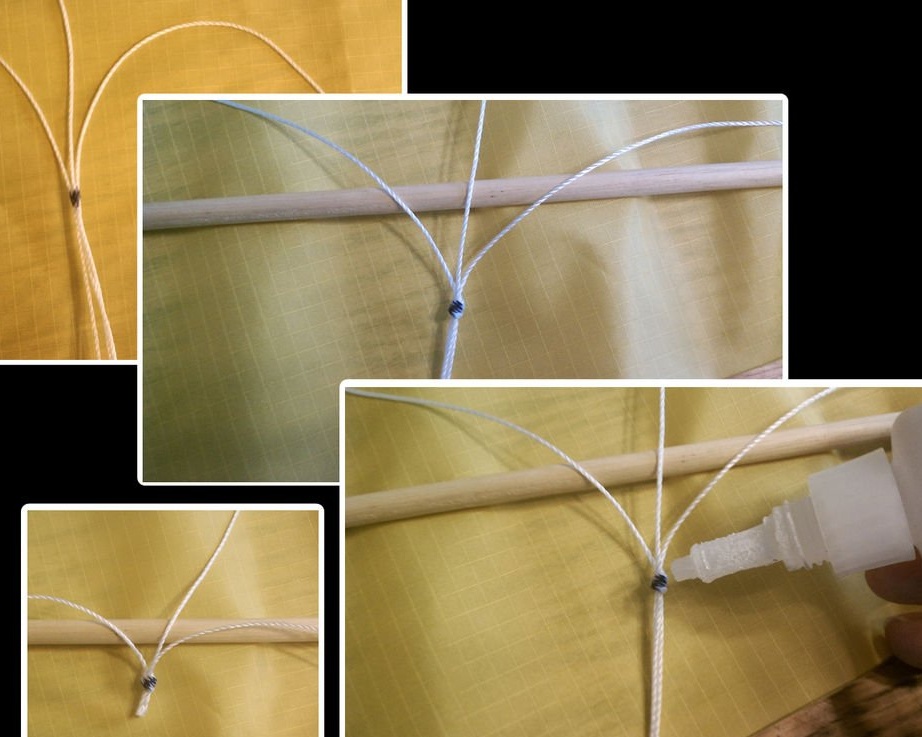
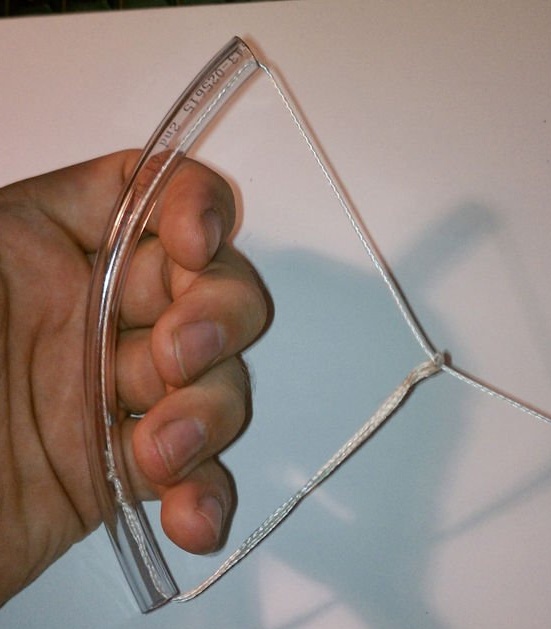
In total, there are 6 connecting points (3 on each side), they should be located, as in the photo.
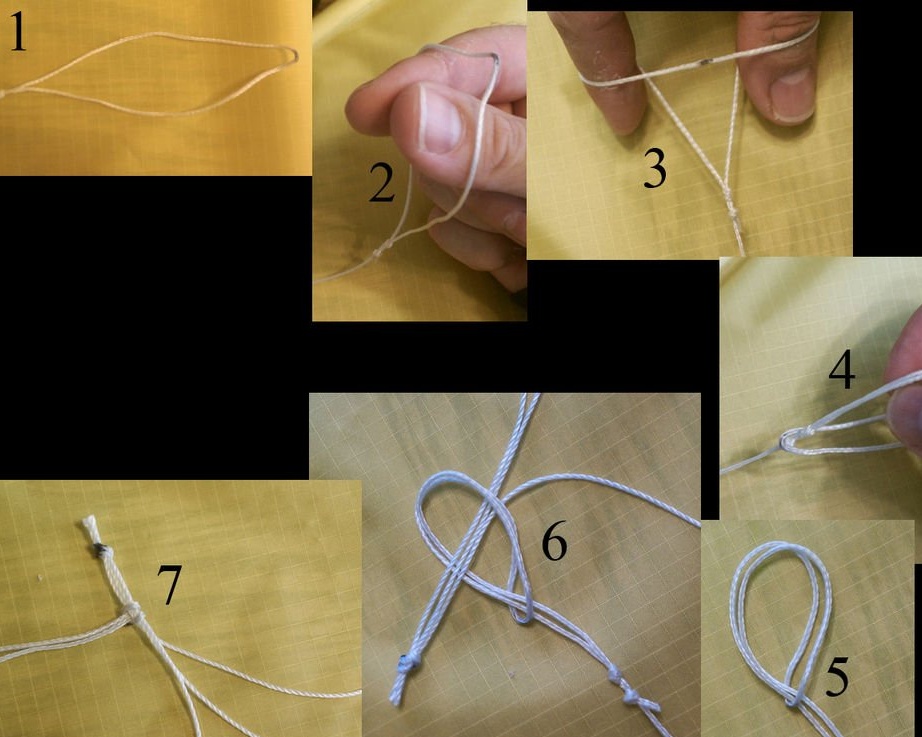
At one end of the loop I made a loop, cut the rope into 6 parts, each 61 cm long. Then I attached each rope to the snake at the connection points. To do this, I wrapped the rope around the key and passed the free end into the loop, thereby tying it around the key.
Measure, without cutting, the length for each tied rope:
• top rope (21 cm);
• lower rope of the outer bar (16.5 cm);
• lower ropes on the inside (14 cm).
1. Measure each rope, make a mark with a marker.
2. Once all the ropes have been marked to the desired length, take 2 ropes on the left side and 1 lower middle rope and line up according to the marks.
3. Apply superglue to all three marks to hold the three ropes together.
4. After the superglue dries, tie a knot on all three ropes. To fix the knot, I put superglue on it.
5. Repeat all these steps for the right side of the snake. Excess pieces of rope can be cut off after the glue dries. Do not forget to check the photo.
Guide ropes.
You will need two ropes to control the kite in the air. One for the right hand, the second for the left. Each of these ropes should be about 25-30 m in length. The photo explains in detail how to connect these lines with the base of the snake. Make a loop at the end of each rope and follow the instructions in the photo!
Step 7: Testing the Kite!
a kite, control ropes, a place where you can “catch” the wind at a speed of 15 miles per hour, another vinyl pipe, scissors.
The length of the 3 ropes used for control can be changed by wrapping them around the dowels.
The upper rope must be adjusted in length, otherwise your kite will simply lie without taking off anywhere, or bounce above the ground. To better control this rope, I wrapped it 6 times around a short horizontal dowel.
Experiment with other ropes until you achieve optimal control of the kite.
To create a pen, grab a vinyl tube to control all the ropes evenly to control the kite. At the end of the rope I made a loop and cut the pipe in half. I passed the end of the rope with the loop into a vinyl tube, and then I passed the tube along the entire length through the loop. It turned out a convenient handle that does not cut into the hand.
It's time for our snake to fly!
To start the snake, stand so that the wind blows in your back and slowly adjust the position of the snake with the ropes until it becomes almost vertical. Pull a little on both ropes, then the snake will lift off the ground and begin flying.
Pull the left rope to turn in the air. Accordingly, to turn to the right, pull the right rope.