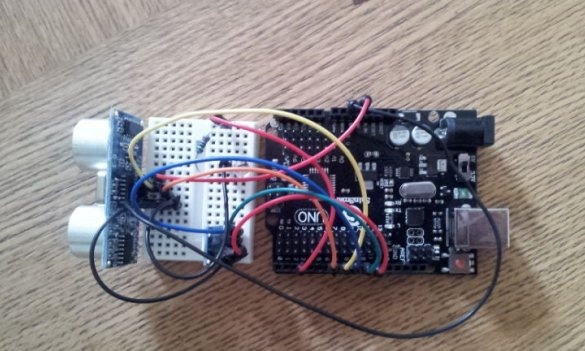
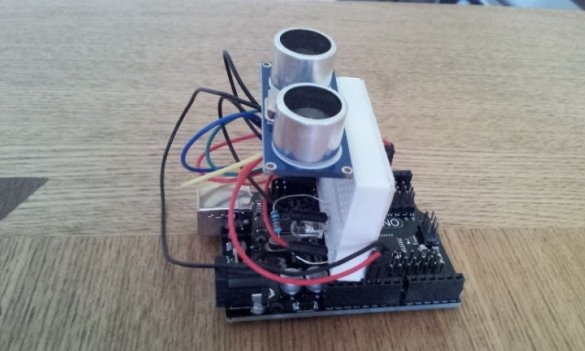
Electronics manufacturers are gradually coming to the conclusion that the best remote control is the user's palm. So in the new column "Yandex.Station Mini" provides such management. Do not stand aside from trends and friends. For example, the author of Instructables under the nickname dan_nicholson came up with a simple device that allows you to control your TV with gestures. By default, it is programmed to work with Sony TVs, but can also be configured to control any other TVs, music centers, etc. As can be seen from KDPV, consists
homemade from the range finder
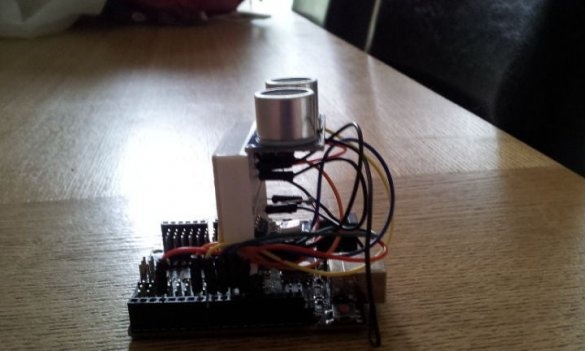
Arduino and several additional components. Can be made even more compact:
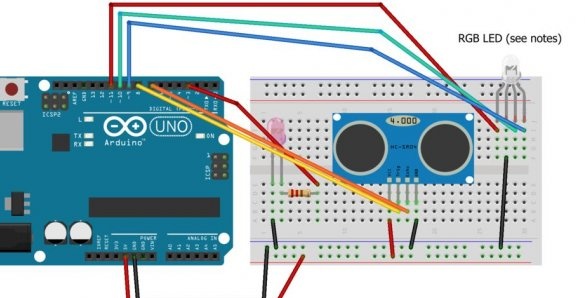
And even more compact if you abandon the breadboard and connect everything by soldering using wires. The master makes a device diagram in the Fritzing program, which not everyone likes, but do not rush to throw slippers, this method of drawing up diagrams can also be convenient. The master connects an infrared LED through a resistor, and all crystals of the RGB LED are directly connected. He writes that resistors are also desirable here, but in fact they are required.
Having assembled the circuit, the master takes the library
here, and the command codes are
herewrites and fills the sketch:
/ * Swipe Remote Control

This sketch uses an ultrasonic rangefinder to determine the user's gesture and outputs an IR signal to a sony TV based on the command given.
- High swipe (> 10in) = Channel Up
- Low swipe = Channel Down
- High hold (> 10in) = Volume Up
- Low hold = Volume Down
- Cover sensor (<3in) = Turn On / Off

Created by Dan Nicholson.

This example code is in the public domain.

This code uses the IRremote library (https://github.com/shirriff/Arduino-IRremote)

* /
#include

// Defines for control functions
#define CONTROL_CH 1 // Channel change
#define CONTROL_VOL 2 // Volume
#define CONTROL_POW 3 // Power

#define CONTROL_UP 1
#define CONTROL_DOWN -1

#define DIST_MAX 20 // Maximum distance in inches, anything above is ignored.
#define DIST_DOWN 10 // Threshold for up / down commands. If higher, command is "up". If lower, "down".
#define DIST_POW 3 // Threshold for power command, lower than = power on / off

// IR PIN
const int irPin = 3; // this is defined in the library, this var is just a reminder. CHANGING THIS WILL NOT CHANGE PIN IN LIBRARY
// 2 Pin Ping Sensor
const int pingPin = 8;
const int echoPin = 7;
// Confirmation LED Pins
const int led = 13; // internal LED for up / down debugging
const int ledR = 11;
const int ledG = 10;
const int ledB = 9;
// LED on timer
unsigned long timer;
// IR transmitter object
IRsend irsend;
// Power confirmation flag (needs two swipes to send signal)
boolean powerConfirmed = false;

void setup () {
  // initialize serial communication and set pins
  Serial.begin (9600);
  pinMode (led, OUTPUT);
  pinMode (ledR, OUTPUT);
  pinMode (ledG, OUTPUT);
  pinMode (ledB, OUTPUT);
  pinMode (pingPin, OUTPUT);
  pinMode (echoPin, INPUT);
  timer = millis ();
}

void loop ()
{

// Serial.println (millis ());
  long duration, inches;
  int value;

  // Check for a reading
  duration = doPing ();

  // Timer to confirm actions (currently only power)
  if (timer && timer <(millis () - 5000) && (millis ()> 5000))
  {
    Serial.println ("timer reset");
    timer = false;
  }

   digitalWrite (led, LOW);
   setColor (0, 0, 0); // off


  // convert the time into a distance
  inches = microsecondsToInches (duration);

  // If less than max inches away, act
  if (inches  DIST_MAX)
      {
        doIR (CONTROL_CH, value); // swipe
      }
      else
      {
        // volume
        int d = 500; // first delay is longer for single volume change
        // repeat until hand is removed
        while (inches  DIST_DOWN)
  {
    digitalWrite (led, HIGH);
    return CONTROL_UP;
  }
  else
  {
    digitalWrite (led, LOW);
    return CONTROL_DOWN;
  }
}

/ *
* Fire off correct IR code
* /
void doIR (int control, int val)
{
  switch (control)
  {
  case CONTROL_POW:
    // power
    Serial.println ("power on / off 0xa90");
    for (int i = 0; i <3; i ++)
    {
      setColor (255, 0, 0);
      irsend.sendSony (0xa90, 12); // Sony TV power code
      delay (40);
    }
    break;
  case CONTROL_CH:
    setColor (0, 255, 0);
    // output 'channel up / down' depending on val
    if (val == CONTROL_UP)
    {
      digitalWrite (led, HIGH);
      for (int i = 0; i <3; i ++)
      {
        irsend.sendSony (0x90, 12);
        delay (40);
      }
      Serial.println ("channel up 0xD00A");
    }
    else // down
    {
      for (int i = 0; i <3; i ++)
      {
        irsend.sendSony (0x890, 12);
        delay (40);
      }
      Serial.println ("channel down 0x3002");
    }
    break;
  case CONTROL_VOL:
    setColor (0, 0, 255);
    // output 'volume up / down' depending on val
    if (val == CONTROL_UP)
    {
      digitalWrite (led, HIGH);
      for (int i = 0; i <3; i ++)
      {
        irsend.sendSony (0x490, 12);
        delay (40);
      }
      Serial.println ("volume up 0x490");
    }
    else // down
    {
      for (int i = 0; i <3; i ++)
      {
        irsend.sendSony (0xC90, 12);
        delay (40);
      }
      Serial.println ("volume down 0xC90");
    }
    break;
  }
}
void setColor (int red, int green, int blue)
{
  analogWrite (ledR, red);
  analogWrite (ledG, green);
  analogWrite (ledB, blue);
}

long doPing ()
{
  digitalWrite (pingPin, LOW);
  delayMicroseconds (2);
  digitalWrite (pingPin, HIGH);
  delayMicroseconds (5);
  digitalWrite (pingPin, LOW);
  return pulseIn (echoPin, HIGH);
}

long microsecondsToInches (long microseconds)
{
  // According to Parallax's datasheet for the PING))), there are
  // 73.746 microseconds per inch (i.e. sound travels at 1130 feet per
  // second). This gives the distance traveled by the ping, outbound
  // and return, so we divide by 2 to get the distance of the obstacle.
  // See: http://www.parallax.com/dl/docs/prod/acc/28015-PING-v1.3.pdf
  return microseconds / 74/2;
}

long microsecondsToCentimeters (long microseconds)
{
  // The speed of sound is 340 m / s or 29 microseconds per centimeter.
  // The ping travels out and back, so to find the distance of the
  // object we take half of the distance traveled.
  return microseconds / 29/2;
}
A feature of the program is sending to the Arduino IDE serial port monitor debugging messages about what is happening at the moment. After making sure that everything works correctly, in the future you can power the device not from the computer, but from the power supply.
The order of sending commands:1. Turn the TV on or off: wave your palm in front of the range finder at a distance of 0 to 75 mm, the RGB LED will light up purple for 5 seconds, while it is lit, wave at the same distance again.
2. Decrease the channel number - swing at a distance from 75 (not inclusive) to 250 mm. Zoom - the same, but at a distance of 250 (not inclusive) to 500 mm.
3. Decrease or increase the volume - the same as with the channels, but do not wave, but hold your palm motionless. While the user is holding his palm, the volume, depending on the distance, decreases or increases according to the same logic as the channel number.
To use other functions (EPG, teletext, low-frequency input, etc.) you should keep a regular remote control next to you. In modern conditions, it is advisable to program the device to control a DVB-T2 standard set-top box. In the case of the music center, everything is different: analog broadcasting is still there, although in the future there will be a transition to the start-up DAB + or DRM +.
Having debugged the structure, it should be placed in the body of any structure - from the manufactured
do it yourself from plexiglass, plywood, to any suitable finished box, for example, soldering. Holes should be provided in the housing for the rangefinder, cable, and both LEDs. It is advisable to direct the rangefinder and the RGB LED in one direction, and the IR diode in the opposite direction.


