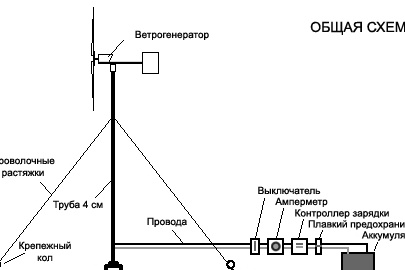
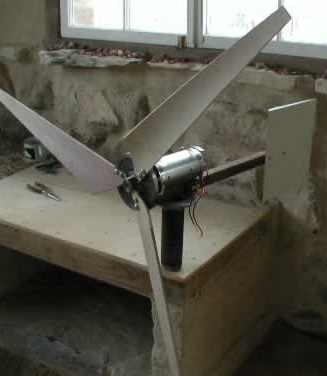
General scheme of a wind generator
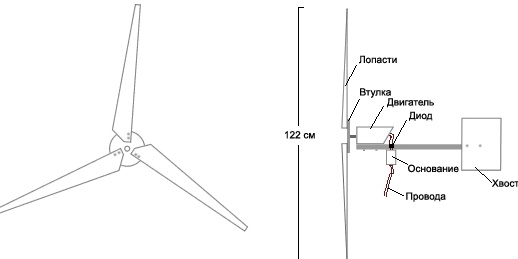
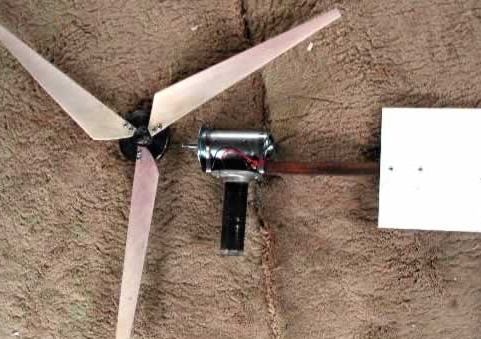
Wind generator assembly
Most of the tools and materials mentioned in this manual can be purchased at hardware stores. We also strongly recommend that you search for the following components from dealers in used goods or at a local landfill.
The issue of security has the highest priority for us. Your life is much more valuable than a cheap source of electricity, so follow all safety instructions associated with building a windmill. Fast rotating parts, electrical discharges, and harsh weather conditions can make a wind generator quite dangerous.
The design of this wind generator for the house is simple and effective, while it is quickly and easily assembled. You can use wind energy without any restrictions.
Wind turbine components
This manual uses a DC motor from the treadmill (power 260V, 5A), with a 15 cm threaded sleeve attached to it. At a wind speed of about 48 km / h, the output current reaches 7 A. This is a small, simple and cheap unit with which You can start harnessing wind power.
You can use any other DC motor that produces at least 1V at 25 rpm and can operate at more than 10 amperes. If necessary, you can change the list of required components (for example, find the sleeve separately from the engine - a circular saw blade with a 1.6 cm shaft adapter is suitable for these purposes).
Tools for assembling a wind generator
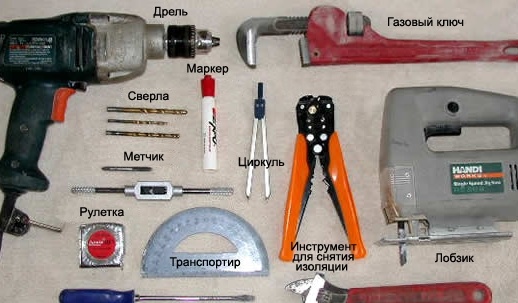
- drill
- Drills (5.5 mm, 6.5 mm, 7.5 mm)
- Electric fret saw
- gas key
- Flat-head screwdriver
- Adjustable wrench
- Vise and / or clamp
- Cable stripping tool
- Roulette
- marker
- Compass
- protractor
- Tap for threading 1/4 "x20
- Assistant
Materials for assembling a wind generator
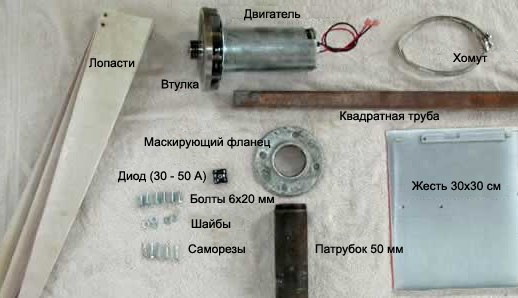
Support bar:
- Square tube 25x25 mm (length 92 cm)
- Masking flange on the pipe 50 mm
- Branch pipe 50 mm (length 15 cm)
- Self-tapping screws 19 mm (3 pcs.)
Engine:
DC motor from a treadmill (power 260V, 5A) with a 15 cm threaded sleeve attached to it
Diode bridge (30 - 50 A)
Bolts for the engine 8x19 mm (2 pcs.)
A piece of PVC pipe 7.5 cm (length 28 cm)
Shank:
Square piece of tin 30x30cm
19 mm screws (2 pcs.)
Blades:
A piece of 20 cm PVC pipe 60 cm long (if it is resistant to ultraviolet radiation, you do not have to paint it)
Bolts 6x20 mm (6 pcs.)
Washers 6 mm (9 pcs.)
A4 sheets of paper (3 pcs.)
Scotch
Wind generator assembly
Cutting the blades - we get three sets of blades (a total of nine pieces) and a thin strip of waste.
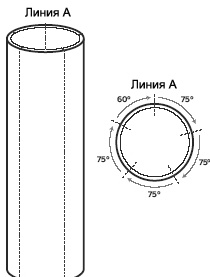
Place our 60 cm long PVC pipe on a flat surface with a piece of square pipe (you can use any other fairly long object with a flat edge). Press them tightly against each other and draw a line on the PVC pipe in the place of their contact along its entire length. This line will be called A.
Make marks at each end of line A, departing from the edge of the pipe 1-1.5 cm.
Glue together three sheets of A4 paper so that they form a long straight piece of paper. You have to wrap a pipe with them, applying in turn to the marks just made on it. Make sure that the short side of the piece of paper fits snugly and evenly on line A, and the long - evenly overlaps in those places where it overlaps with itself. From each end of the pipe, draw a line along the edge of the paper. Call one of these lines B, the other - C.
Take the pipe so that the end of the pipe closest to line B faces up. Start where lines A and B intersect and make marks on line B every 145 mm, moving to the left of line A. The last segment should be about 115 mm long.
Turn the pipe upside down at the end that is closest to line C. Start at the point where lines A and C intersect, and also mark the lines of C every 145 mm, but you need to move to the right of line A.
Using a square tube, connect the lines corresponding to each other at the opposite ends of the PVC pipe.
Cut the pipe along along these lines using a jigsaw, so that you get four strips 145 mm wide and one about 115 mm wide.
Lay out all the strips with the inner surface of the pipe facing down.
Mark on each strip on the narrow side at one end, backing off 115 mm from the left edge.
Repeat the same from the other end, retreating 30 mm from the left edge.
Connect these points with lines, crossing the strips of the cut pipe diagonally. Saw the plastic along these lines with a jigsaw.
The resulting blades put the inner surface of the pipe down.
Make a mark on each line along the diagonal cut line at a distance of 7.5 cm from the wide end of the blade.
Make another mark on the wide end of each blade 2.5 cm from the long straight edge.
Connect these points with a line and cut the resulting corner along it. This will protect the blades from breaking by the side wind.
Wind turbine blade processing
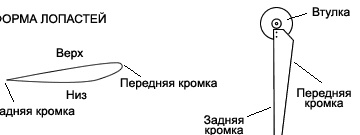
You must skin the blades in order to achieve the desired profile. This will increase their efficiency and, also, make their rotation quieter. The leading edge should be rounded, and the rear should be pointed. To reduce noise, any sharp corners should be rounded.
Shank Cutting
The size of the tail is not critical. You need a piece of lightweight material measuring 30x30 cm, preferably metal (tin). You can give the shank any shape, the main criterion is its rigidity.
Drilling holes in a square tube - use a 7.5 mm drill.
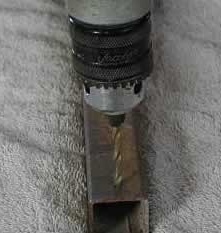
Place the engine on the front end of the square pipe so that the sleeve protrudes beyond the edge of the pipe and the holes for the mounting bolts look down. Mark the position of the holes on the pipe and drill through the pipe at the marked points.
Masking flange holes - this moment will be described later in the installation section of this manual, since these holes determine the balance of the structure.
Drilling holes in the blades - use a drill of 6.5 mm.
Mark two holes at the wide end of each of the three blades along their straight (trailing) edge. The first hole should be 9.5 mm from the straight edge and 13 mm from the bottom edge of the blade. The second - at a distance of 9.5 mm from the straight edge and 32 mm from the lower edge of the blade.
Drill these six holes.
Drilling and cutting holes in the sleeve - Use a 5.5 mm drill and 1/4 "tap.
The motor from the treadmill comes with a sleeve attached to it. To remove it, firmly fix the shaft protruding from the sleeve with pliers and turn the sleeve clockwise. It unscrews clockwise, which is why the blades rotate counterclockwise.
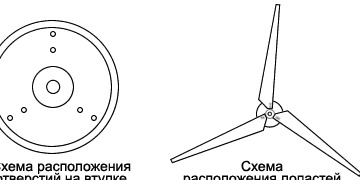
Make a sleeve template on a piece of paper using a pair of compasses and a protractor.
Mark three holes, each of which is 6 cm from the center of the circle and equally spaced.
Place this template on the sleeve and fill in the preliminary holes through the paper in the marked places.
Drill these holes with a 5.5 mm drill.
Apply thread to them with a 1/4 "x20 tap.
Screw the blades to the sleeve with bolts 1/4 "x20 mm. At this moment, external holes close to the boundaries of the sleeve are not yet drilled.
Measure the distance between the straight edges of the ends of each blade. Adjust them so that they are equidistant. Mark and fill each hole on the sleeve through each blade.
Make marks on each blade and sleeve so that you do not confuse the mounting locations of each of them at a later stage of assembly.
Twist the blades from the hub, drill and thread on these three outer holes.

Making a protective sleeve for the engine.
Draw on our piece of PVC pipe with a diameter of 7.5 cm along its length two parallel lines at a distance of 2 cm from each other. Cut the pipe along these lines.
Cut one end of the pipe at an angle of 45 °.
Place pointed pliers in the formed slot and inspect the pipe through it.
Make sure that the bolt holes on the engine are centered in the middle of the slot in the PVC pipe and place the engine in the pipe. With an assistant, this is much easier.
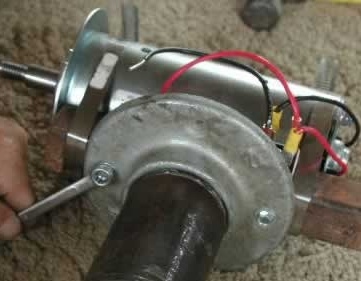
Mounting
Place the engine on a square tube and screw it to it using 8x19 mm bolts.
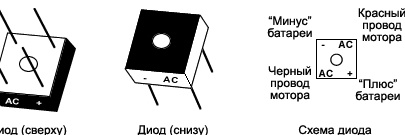
Place the diode on a square tube behind the motor at a distance of 5 cm from it. Screw it to the pipe with a self-tapping screw.
Connect the black wire exiting the motor to the “positive” input terminal of the diode (it is indicated by the AC on the plus side).
Connect the red wire coming out of the motor to the “negative” input terminal of the diode (it is marked AC from the “minus” side).
Position the shank so that the end of the square tube, opposite to the one on which the engine is located, runs in its center. Press the tail against the pipe with a clamp or vise.
Screw the shank to the pipe using two screws.
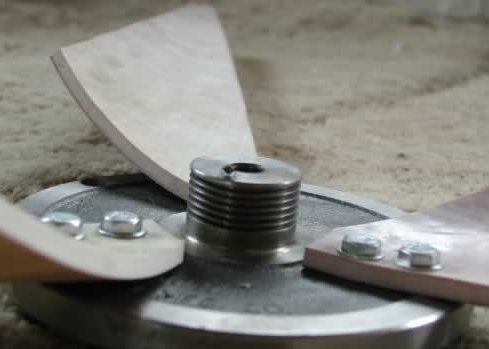
Position all the blades on the sleeve so that all holes match. Using 6x20 mm bolts and washers, screw the blades to the hub. For the three holes of the inner circle (closest to the axis of the sleeve), use two washers, one on each side of the blade. For the other three, use one at a time (from the side of the blade closest to the bolt head). Tighten tight.
Securely fix the motor shaft (which passed through the hole in the bushing) with pliers and, having put on the bushing, turn it counterclockwise until it is fully twisted.
Using a gas wrench, tighten the 50 mm nozzle to the masking flange.
Clamp the nozzle in a vise so that the flange is located horizontally above the jaws of the vise.
Place the square tube, which carries the motor and shank, on the flange and achieve its perfectly balanced position.
Once balanced, mark the square tube through the holes in the flange.
Drill these two holes using a 5.5 mm drill. You may need to twist the tail and the sleeve for this, so that they do not interfere with you.
Screw the supporting square pipe to the flange with two self-tapping screws.
Additional Information
To use a wind generator, you need a mast, wires, ammeter, charging controller and batteries.
The mast is one of the most important components of a wind generator. It should be strong, stable, securely fastened and easily lowered / lifted. The greater its height, the more wind your generator will be exposed to. Wire extensions should be located every 5.5 m of mast height. Stretch marks should be fixed to the ground at a distance from the mast base of at least 50% of its height.