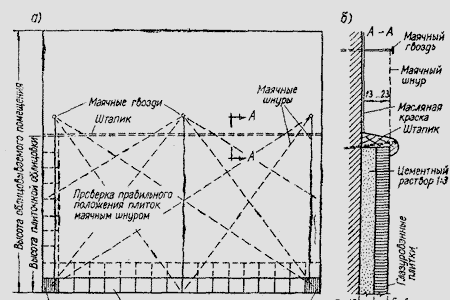
The bottom row will be made of cut tiles. Therefore, in order to fit a whole number of tiles from the second row from the floor, the second row must be done with special care and accuracy. Having established the location of the second row by the size of the tiles, you need to set the corner tiles strictly to the thickness of the suspension and the plumb line so that the corner tiles do not fall in any direction. Then a lace is pulled between these lighthouse tiles and the cladding begins. Facing in this case goes from bottom to top. When facing walls only to the height of the panel, you need to choose its height so that a whole number of tiles fit, starting from the first row.
Professional tilers do not deal with all this nonsense. After hanging, they lay the tiles from top to bottom from the ceiling or from the top of the panel. The top of the panel is pre-beaten with a lace. Laying the tiles from top to bottom, they reach the bottom row, and it’s how it goes: either from whole tiles, or from cut ones. The surface of the wall to be lined must be made “empty” or notched. When I was revetting my bathroom, and my walls were concrete, I was very tired of hammering it with a hammer, making a notch. Then I took a drill with a victorious drill and made shallow holes in it. The tile holds.
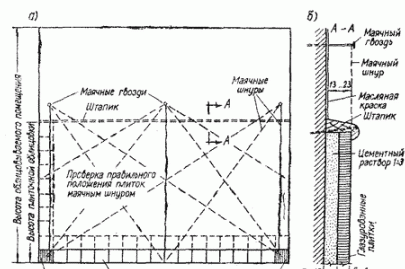
The lining process itself consists of soaking the tile with water (dip it directly into the bucket and hold there for 10-15 seconds), applying mortar to it and pressing it against the wall. Prepare the solution in a ratio of 1: 3.
To obtain incomplete tiles they need to be cut with a glass cutter. After the cut, the tile is difficult to break due to its small size. You can break it with pliers or sharply hitting it on some corner edge, for example, a stool. The easiest way to break it is to put it in the gap between the door frame and the door leaf (where the hinges are).
At the end of the lining at the bottom, the tiles are framed with cement skirting boards. Above, in the absence of special cornice tiles (they are semicircular) - with a solution.