
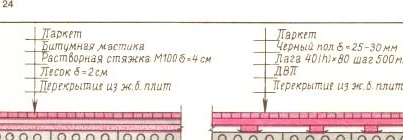
Before proceeding with the flooring, it is necessary to carry out preparatory work. Parquet flooring can be done on a cement-sand screed or on “black” wooden floors (Fig. 24).
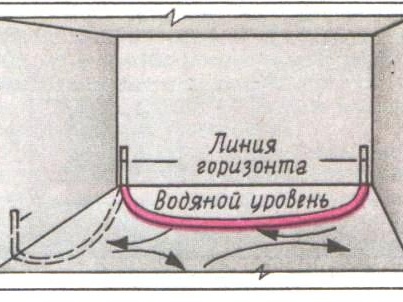
Preparation for parquet floors should be perfectly smooth. For this purpose, a water level is required. The water level is two glass tubes interconnected by a rubber hose. Water is added to the level, according to the law of communicating vessels, the water will occupy a horizontal position in both glass tubes. By the position of the water in the tubes on the walls, the horizon is crossed out (Fig. 25). The horizon is crossed out on all four walls in sequence, moving the level tubes. Outlining the horizon, you must come to the same point where you started. At what height from the floor to cross out the horizon - it makes no difference.
Now you need to measure the distance from reinforced concrete slabs to horizon points. The smallest distance indicates that in this place the plates are pulled up. Here from this place we will measure the thickness of the preparation for the floors. The thickness of the preparation is determined from the number and thickness of the preparation layers. For cement-sand preparation, this thickness is 6 cm (2 cm - sand, 4 cm - mortar). Sand preparation (in the second version of fiberboard) plays the role of sound insulation, under certain conditions it can be neglected (for example, you live on the 1st floor). In this case, the thickness of the cement screed is 15 mm. A solution for screed needs a strong one - Ml00 (for cement M400 the ratio is 1: 4, for M200 it is 1: 2).
After determining the thickness of the preparation, it is necessary to cross out in place the second line equal to the thickness of the preparation. Having measured the distance between the horizon and the preparation line, you need to transfer it to all other walls. You got the top level of the future cement floor. Mentally add to this mark the thickness of the parquet and figure out if your doors will open. If it happens that the doors will not open, look, maybe there is an opportunity to slightly lower the floors below. If you fail to lower the floors, well, then you will have to file the doors.
Floor marks must be taken out equally in all rooms of the apartment. When you get all the marks on the top of the training, pull the lace and beat off the line. A well-visible line will help to better prepare. For wooden floors, all work is done in the same way. Only repel not the top of the "black" floor, but the top of the lag.
Cement preparation allows you to lay not only parquet floors, but, for example, linoleum on a warm basis or tiled. Correct installation of the lag can allow you to perform ordinary wooden floors from the floor battens.
In cement preparation for linoleum or tile floors, you can perform "radiant" heating. Such heating is often used in kindergartens, so that the floors are warm. What it is? The pipe is launched into the floor in the form of a “coil” over the entire area of the room. Stop valves are installed at the ends of this penis, and hatches are made in the floor. Hatches are needed in order to regulate the pressure in the register or completely turn it off. Typically, both ends of the register are cut into the "return" of the heating system, so that the floors are warm, not hot. I propose to outwit everyone (forgive me for energy) and embed one end of the register both in the "return" and the "feed" together. Put two shut-off valves and adjust the floor temperature depending on the temperature of the water supplied. After installing the register, it is stained and cement floors are poured. “Radiant” heating can only be used in floors with high thermal conductivity: linoleum, tile, marble, etc. This system is not suitable for wooden floors, since they do not allow heat to pass through well.
In the bathroom, "radiant" heating can be looped to hot water. They came, turned on hot water for the bathroom, the floors began to heat up, turned off the water - and the floors cooled down. In this case, it is necessary to provide a jumper with a shut-off valve. In the event of an accident in the register, so that water can be turned off in it, and it would go to the tap.
How many years can "radiant" heating operate? Under the condition of normal, non-aggressive water and without draining the water from the system (frequent draining of water from the heating system leads to acidification of the pipes) it will last 20-25 years. This is a normal time, as according to the norms, the first overhaul of new buildings should be carried out in 25 years. Of course, the quality of register welding should be very good.
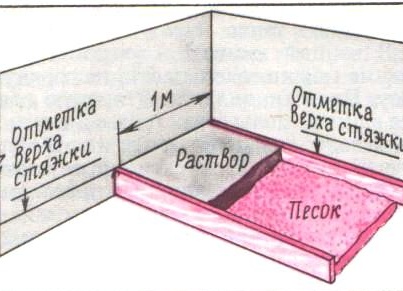
Back to the floors. We have a mark of a cement-sand screed in the form of a line on the walls. You can fill the sand to the required thickness. This work does not require special accuracy in the height of filling. As you fall asleep, it will be so (do not leave heaps of sand, of course; flatten). After filling sand along the dash on the walls, you need to install two edged boards about 1 'm apart. This distance does not matter. The main thing is that you have enough hand length when grouting floors. The top edge of the boards should be installed along the line. So that the boards do not fall, they need to be knocked together with something in two or three places (like a ladder). Now that you have the guides, you can fill the mortar screed (Fig. 26). The solution is leveled and smoothed with a trowel or even “ironing board”. The “ironer” is placed on two guide boards and stretches along the solution at both ends. In the student construction team, this “ironer” was aptly nicknamed the “Beetroot” manual surface vibrator. (Why “father-in-law”? The answer is in the title). Rearranging the guide boards, fill strip after strip. If you will fill the floors quickly, then the boards need to be set immediately to the whole room. Otherwise, when dismantling, the non-cured solution will float.
The setting time of the screed is 7-8 days. On the third day, she will gain 30% of strength, it will be possible to walk on it, on the 7-8th day - 50% of the strength, on the 28th day - 90%. Cement gains further strength over the years.
Parquet on a cement screed is glued on bitumen mastic. For better adhesion of mastic and screed, the latter should be smeared with a primer. The primer or primer is made of bitumen MIII-MIV. In one part of bitumen, molten and cooled to 80 ° C, pour 2-3 parts of gasoline or kerosene. All mixed until a homogeneous liquid. Then the screed is coated with this primer using Kvach. “Kvach” is a kind of broom, but instead of branches at the end of a stick, ropes 30-40 cm long or just a rag are tied.
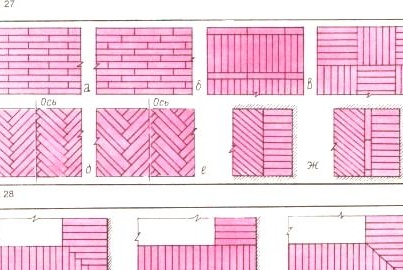
While the primer dries, select the floor pattern (fig. 27).
The floor pattern can be done from wall to wall or from corner to corner.The adjacency to the wall with or without a frieze, as well as the pattern, can be varied using different types of wood parquet. For example, parquet and frieze are made of beech, and the frieze line is made of bog oak. The frieze is executed on two or four walls. Pairing the frieze can be done on the "mustache", ie from corner to corner, ladder or basket (Fig. 28).
Bituminous mastic for gluing parquet is prepared as follows: MS bitumen is heated in a boiler until foaming stops; finely ground rosin is introduced into the dehydrated bitumen, everything is mixed. Then, after cooling the bitumen to 80 ° C, gasoline is introduced into the mixture and mixed. As a percentage by weight, cold mastic consists of 75.5% MS bitumen, 21.5% gasoline, 3% rosin.
With prolonged storage, the mastic may thicken, it must be heated in hot water. On open fire, gremastastic is prohibited, gasoline in it may catch fire.
Flooring starts with laying dry lighthouse "Christmas tree", or lighthouse row. To do this, pull the lace at the same distance from the wall. And lay out the lighthouse row or “Christmas tree” dry on it, orienting the lighthouse row and the lace as it should. You can stack the lighthouse row on the mastic. The lace should be firmly fixed on nails hammered into the preparation of the floors. The lighthouse row must be laid with special care. The slightest kosin or insufficiently dense laying of parquet boards will lead not only to kosin drawing, but also to cracks (and this is a marriage).
The mastic is drained in small portions and leveled with a spatula. The bar is embedded in mastic. The next plank is also embedded and pressed against the one laid in advance, driving the groove into the comb with a hammer.
After laying the entire lighthouse "Christmas tree" (row), the gap left between the wall and the floor is filled with hot bitumen (not with mastic, but with bitumen). I forgot to say: when laying the lighthouse row, so that it does not move, it must be wedged against the wall with pieces of wood. When filling the gap, these wedges must be removed. The gap is needed so that in the future the floor can expand from possible moisture. After laying the entire floor, these slots are covered with skirting boards. Skirting boards should be attached to the wall, not to the floor.
After laying the lighthouse row, the entire parquet is laid row by row.
Parquet floors on the "black" floors are mounted not on mastic, but on nails. The nail is driven sideways into the groove of the plank. In general, fastening as ordinary genital rails. Only nails need the sea. Nails need a length of 40 mm. Three nails are driven into each bar.
When driving a parquet board, the groove in the comb needs to be prepared in advance with a solid wood gasket (in order to hammer through the gasket, and not crumple the parquet strip). The corners of the herringbone flooring abutting against the wall must be cut with a hand saw to create a gap.
When laying on "black" floors, fiberboard or glassine is usually laid under the parquet. So, I do not advise fiberboard to lay. Once we set up a fiberboard in the palace of culture. After the commissioning of the facility, very conscientious cleaners were received there. After several wet cleanings (about a year later), the fiberboard sheets got wet and swollen. The floors had to be redone.
After laying the parquet, it is cycled (small wit). Then polished. For these purposes, there are special looping and grinding machines. If they are not, you can plan the floors with an ordinary electric plane, releasing the knife by 0.5-1 mm, and sand it with sandpaper.
By looping, all irregularities and pollution of the parquet are eliminated. By polishing smooth out small irregularities and scores of the fiber. After polishing, the floors are varnished, 2-3 times (in the light - against the light - in the light). Before each stage of work, starting with screed and finishing with varnish, the floors must be carefully swept.
Parquet floors - this is the final part of the finish, they need to be laid after all kinds of painting and pasting.
And now for "cool" masters, the floors are from parquet boards.Parquet boards are the top of parquet art, only cabinet makers are higher.
The shield consists of two parts: base and cover (Fig. 29). The base is made of coniferous wood. It is a massive strapping on spikes with crossbars and filling from the boards. Fastening the base to each other, as well as the coating to the base, is carried out on high-strength, waterproof adhesives.
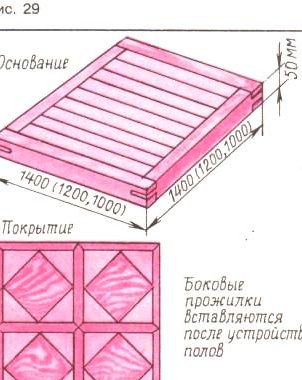
Cover strips are selected according to your specified pattern. The edges of the shields are difficult to fit without a gap, so the coating is 8-15 mm narrower than the base. Lateral veins are filled after flooring. The drawing is made of one type of wood, playing with the arrangement of fibers, or of different types of wood, playing with color. The wood used can be very diverse, starting with a Christmas tree and birch and ending with beech and chestnut. The veins are best made from bog oak, they are black and well dissect the pattern. Where in Central Russia to get a beech or hornbeam? Perhaps nowhere. But we have a nut, cherry, apple tree, etc.
Now the base is made easier from a plywood sheet 10 mm thick.