
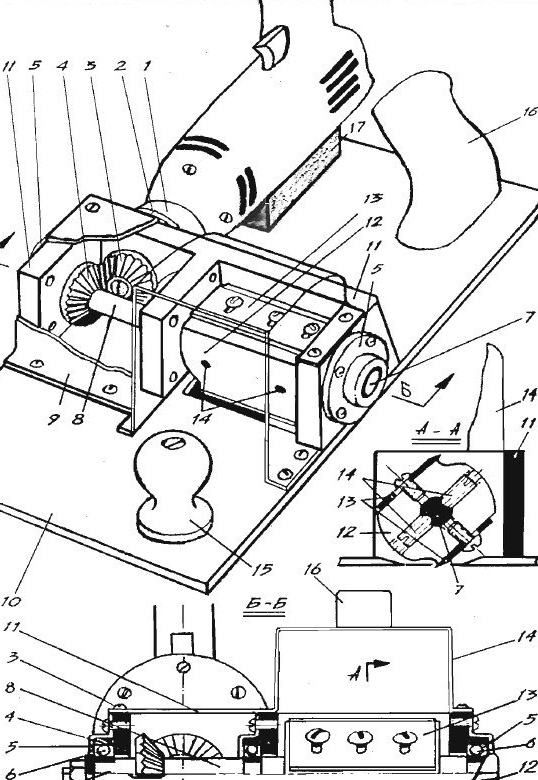
Fig. 1. Planer from a drill.
Knives 1 mm protrude above the cylindrical surface of the drum and 0.5 mm above the working plane of the base 10, which slides along the processed board. Knives alternately cut thin flakes-flakes, grab them and throw them out through the diffuser of the casing 9. Torque is transmitted to the drum through spindle 7 and a pair of bevel gears 3 and 4, one of which is fixed to the cone of the electric drill spindle. Before you start making a planer, pick up a pair of bevel gears with a maximum diameter of not more than 38 mm. The minimum diameter of the driven gear 4 along the end of the teeth must be at least 18 mm, so that the spacer sleeve 8 can be placed on the shaft 7. Select three bearings for mounting the shaft with a diameter of 10-12 mm. Based on the dimensions of the bearings and the selected conical pair, determine the dimensions of the planer and proceed to its manufacture.
The main parts of the planer are made on turning, milling and drilling machines. You will also need a bench tool. The most difficult part of the planer is the drum 12, the processing of which requires strict symmetry of all the flats, grooves and holes. Violation of symmetry will lead to a displacement of the center of gravity of the drum and, as a result, the occurrence of vibration. On a lathe made of duralumin or steel, grind a cylinder with an internal hole for the spindle 7. On the drilling machine, drill five holes: three for the screws for fastening the knives and two for the pins 14. On the milling machine, remove two parallel flats for fastening the knives 13. With a cutter, make another two identical grooves required for chip discharge. After threading the screws and pins, finish the internal bore for the spindle with a reamer. Make 13 knives from a finished knife from joiner's planes, having previously removed hardening (vacation). Pay attention to the accuracy of the location and the accuracy of adhering to the dimensions of the three longitudinal. holes for mounting screws. Accept a knife sharpening angle of 20 °.
Turn spindle 7 from tool steel, harden and grind to the size of the bearing. Turn all five spacer sleeves 8 out of steel. When assembling, put them on sequentially, starting from the blind end of spindle 7. On the lathe, also grind three flanges 5 for mounting bearings 6 of spindle 7.Two of them closest to the conical pair should have a bore for the bearing slightly deeper than its height. This is necessary to prevent premature wear of the bearings, the reason for which is the axial elongation of the spindle 7 as a result of heating during operation. The third flange should firmly press the bearing against the end of the housing 11, so the depth of the bore hole is taken 0.1 mm less than the height of the bearing. Landing holes are bored strictly under the outer diameter of the bearing (sliding fit). Case 11 is a U-shaped bracket with walls 8–10 mm thick. Take a block of duralumin or PCB of suitable size and using a drill and a regular hacksaw, cut out two grooves, on the place of which there will be a conical pair, and on the other - a drum 12. Drill a large hole parallel to the main axis of the housing under the spindle 7 with spacers 8 and four holes with subsequent threading under the screws for fastening the flanges 5. Depending on the size of the electric drill, the connecting plane of the housing 11 with the end face of the bearing flange 2 should be machined at an appropriate angle to the base 10. Backlight Lyta hole and cut the thread at the screws connecting flange 2. The base 10 is best made from steel or duralumin plate thicknesses of 3 or 5 mm. At the base, strictly by marking with a drill and then finalizing with a round file, cut the working hole for the drum 12. Then drill holes for fastening the case, casing 9 and handles 15 and 16 with screws and countersunk screws. To securely fix the electric drill on the base, it is good to make a wooden wedge / 7. The most important operation for assembling the planer is to install the spindle 7 with all attached parts in the housing 11. It is laborious and therefore must be carried out after carefully fitting all the components to each other. First fit the end bearing 5 firmly onto the hardened and ground spindle.
Bearing is carried out as follows. In a vice, clamp a piece of thick-walled pipe with an inner diameter of 0.5-1 mm more than the diameter of the spindle. Place the bearing on the pipe end and insert the threaded end of the spindle into its hole. Lubricate the polished surface with oil and lightly hit the hammer on the blind end of the spindle and drive it into the pipe. Then put on the spacer sleeve 8, place the drum in the housing and place it on the spindle. Along the longitudinal axis in the housing, a spacer, a second ball bearing, a second flange, a third spacer, a key, a driven gear 4, a fourth spacer and a third ball bearing, then a sleeve, a spring washer and a tightening nut that gently tightens the whole set are sequentially put on the spindle . After that, use pins 14 to fix the drum on the spindle and tighten the screws that secure the flanges 5. The final operations to finish work on the planer will be to produce a shaped casing 9 and diffuser 14. They will protect the working bodies from chips, and your fingers from injuries. Cut them out of sheet duralumin with a thickness of 1.5-2 mm.