
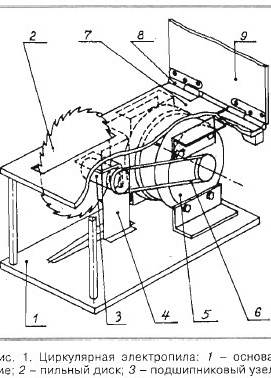
A circular electric saw is a very useful thing in any household; according to the degree of necessity, it is perhaps in second place after an electric drill. If you have to use the saw and not particularly often, still at the slightest opportunity to manufacture parts I recommend to get such a machine. The saw of the proposed design can be equipped not only with a saw blade with a diameter of up to 200 mm, but also with cutting and grinding wheels, a milling cutter and a universal woodworking head.
The main components of the electric saw in the proposed embodiment have undergone significant structural changes associated with structural strengthening and layout changes: the unit is frameless (Fig. 1). Unlike the prototype, this saw design provides not only wood sawing, but also planing and milling, and tool sharpening and metal cutting are also possible.
The basis of this design is an electric motor from a washing machine, for example, type DAO-A. The advantage of this electric motor is its exceptional reliability, and given that it operates in more favorable conditions in the electric saw, it makes direct sense to ensure its operation in a more forced mode, replacing the start relay with a capacitor starting system, which will be described below.
The base of the saw is sawn from plywood or board with a thickness of at least 20 mm with dimensions of 300 x 500 mm. The electric motor is fixed to the base with MB screws with a conical head using angles of size 50 x 50 mm and a length of 140 mm, attached to the electric motor by its own standard coupling bolts so that the horizontal shelves of the corners are directed outward from the engine.
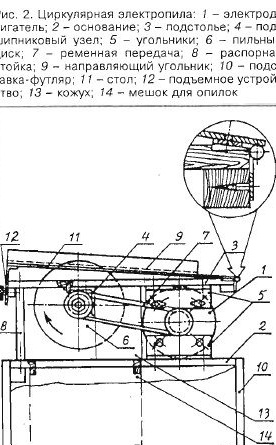
In a similar way, a support made of plywood with a thickness of at least 15 mm and having approximately the same dimensions in plan as the base is attached to the upper part of the electric motor (Fig. 2). The openings in the squares that serve to attach them to the engine, in order to ensure the tension of the belt drive, are of elongated shape. Instead of the standard nuts of the upper engine tightening bolts, a steel bar with a size of 120 x 20 x 4 mm with M8 threaded holes was installed into which the bolts were screwed. The underframe and base in the area opposite the engine are connected by spacers made of a metal bar with a diameter of 15 mm.
The ball bearings of the shaft on which the saw blade and the belt pulley are mounted are installed in the housing of the bearing assembly. As for the manufacture of the housing of the bearing assembly, shaft and parts used to secure the saw blade (Fig. 3), it is advisable to entrust their manufacture to a qualified turner, since not only the safety and reliability of the machine in operation, but also quality woodworking.
The housing of the bearing assembly is machined from steel 20, it is designed for the installation of bearings of type 203, which can, for example, be taken from the water pump of Moskvich 402-408 automobiles or purchased in a car shop. It is desirable to make the spindle shaft and the fastening parts of the saw blade made of higher quality steel, for example, steel 45. The dimensions of the fastening parts of the saw blade allow installation of disks with an inner hole diameter of 32 mm and 50 mm.
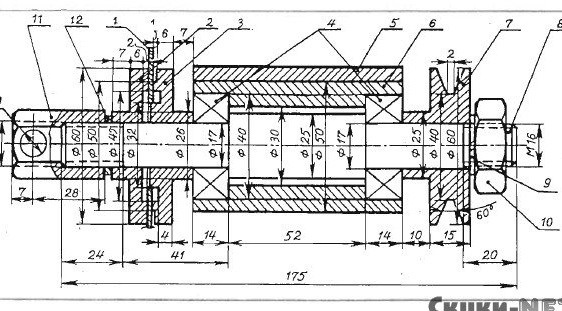
The housing of the bearing assembly is welded to a steel square measuring 75 x 75 mm with a wall thickness of 5-6 mm, length 82 mm, with which the bearing assembly is fixed to the base using MB screws with conical heads. Threaded holes used to attach it to the base must be drilled prior to welding using a template, with which holes are subsequently drilled into the base. The bearing seats are welded with chalk to prevent welding of metal spatter before welding. It should be noted that all subsequent holes in the parts to be joined are recommended to be drilled together during the rough pre-assembly process, including sawing a hole in the underframe, which serves to install a cutting tool with an approximate size of 200 x 30 mm.
The desktop is made of duralumin with a thickness of 4-5 mm or textolite, vinyl plastic or duralumin with a thickness of 8-10 mm. To pass the saw blade, a slot about 10 mm wide is made in the table. This can be done later, in the process of checking the operation of the machine. A boss is screwed to the end part of the underframe, to which halves of detachable card door hinges 90-100 mm long (right and left) are fastened with screws of M5 diameter, which include mating halves with pins, M5 conical head screws attached to the desktop. The counterparts to ensure the orientation of the countersinks in the hinge plates with the fastener heads are interchanged: the right half is joined with the left, and the left with the right counterpart.
In the opposite part of the table there is a support-lifting device that provides smooth adjustment of the rise of the edge of the table relative to the table and, accordingly, the required output of the edges of the cutting tool relative to the table surface. At the first stage of manufacturing the machine, generally speaking, you can do without a lifting device by securing the table on the underframe and adjusting the table lift by setting the washers.
Before pressing bearings into the housing, they must be lubricated with LITOL-24 grease. When using bearings with other sizes, the dimension chains of the bearing assembly housing should be adjusted. Nuts are preferably used ready-made. The driven pulley can be adapted from an old washing machine or machined from an aluminum alloy.
The drive belt should be approximately 600 mm long; otherwise, cutting tools with a diameter of 200 mm or more will not be possible: 1 Some washing machines are equipped with just such belts. In combination with a small diameter cutting tool, of course, "shorter belts can also be used.
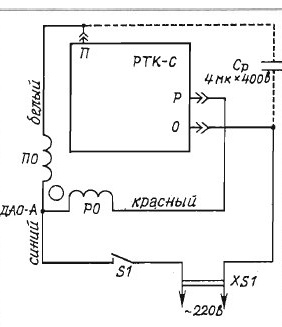
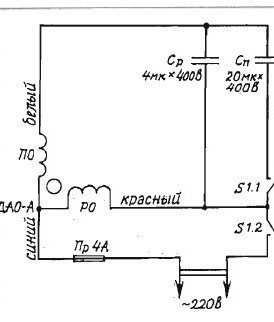
The standard scheme for turning on the electric motor of the saw is shown in Fig. 4. The starting relay of the RTK-S type is fixed near the motor so that the arrow on its body is oriented vertically upward - otherwise the relay will not work correctly. Practice shows that it is more advisable to use a capacitor starting system (Fig. 5), since it is noted that with a working capacitor, the engine torque is noticeably greater.
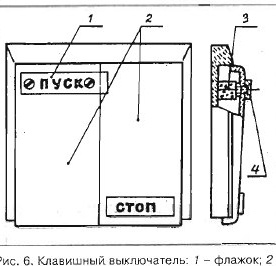
Capacitor starting system does not require the use of a starting relay. The starting capacitor is automatically switched off with the help of a modified two key switch. The Start key (Fig. 6) is equipped with an elastic element - a piece of foam rubber or sponge rubber measuring 5 x 10 x 20 mm, which ensures the key is returned to its original state. The checkbox attached to this key provides automatic operation of the second section of switch S2, which supplies power to the electric motor.
The electric motor is started by pressing the "Start" button for the time during which the electric motor reaches its operating speed. After releasing the press, the “Start” key with the elastic element returns to its initial state, opening the SI contacts, which disconnect the starting capacitors, while the “Stop” key remains in the on state, closing the S2 contacts. The motor is stopped by pressing the Stop button. When using a capacitor starting system, it is necessary to install a fuse for a current of about 6A.
To adjust the belt tension, the nuts of the tie rods are released and the underframe is displaced relative to the engine, after which the nuts are tightened again. It should be borne in mind that during intensive use of an electric saw equipped with a capacitor start-up system, the regular transmission belt may turn out to be the weakest link in the machine. In this case, a belt drive with a double belt can be used.
When using the standard motor start-up system, it is also advisable to connect the capacitor Cp to the terminals of the start relay “O” and “P”, as shown by the dotted line in Fig. 4, although the starting relay monitors the instant of increasing current quite clearly, not allowing the electric motor to develop significantly more power.
The details of the electric motor start-up system are mounted on a metal shield z-shaped in place, which serves to protect the electric motor from sawdust. The shield is made of galvanized steel roofing and fastened with M8 nuts to the protruding ends of the lower coupling bolts of the electric motor at a distance of about 35 mm from it and screwed to the base with screws. A key switch is mounted on the front surface of the shield, and capacitors are mounted on the back side.
An MB bolt is attached to the table with a guide made of a duralumin bracket measuring 50 x 50 mm and a length of 600 mm, in which a family of holes with a diameter of 6 mm is drilled, allowing the guide to be fixed to the table parallel to the saw blade at the required distance. It is advisable to install steel threaded bushings on the table.
At the base of the saw, make a trapezoidal slot with the dimensions: On the bases of the trapezoid 70 and 30 mm, the height of the trapezoid is 150 mm. The slot serves to dump sawdust from under the disk into a storage plastic bag, which is put on the neck made under the slot and fixed on it with twine or elastic. Sawdust is useful as a mulch in gardening, as well as a litter for the cells of small animals, such as hamsters. Of course, for keeping animals sawdust from chipboard, etc. use is not allowed.
The power saw is installed on a massive stand made of hardwood boards, such as birch, with a thickness of at least 25 mm. Inside the stand, near the corners of the box, lugs of size 40 x 40 x 40 mm are placed, on which the base of the machine rests. The stand serves as a case for storing the saw, for which the saw is turned upside down and placed on the same boss, but can also be used as a hopper for collecting sawdust, as it is equipped with a bottom.
The design of the spindle assembly allows the installation of a wide range of various cutting and grinding tools. Speaking about the selection of saw blades, we can recommend first to buy a blade for longitudinal sawing with a thickness of 1.6 mm, a diameter of 200 mm with 48 teeth.Generally speaking, the engine power of the saw is not very significant, so do not try to fit the saw blades of large diameter and thickness; do not buy disks intended for cross-cutting: if a longitudinal saw and sawing across the fibers is quite satisfactory, then when you try to saw longitudinally using a cross-cut saw, you get pretty hard.
It should be borne in mind that when sawing large amounts of chipboard, a conventional steel saw blade “sits” very quickly due to the presence of various solid inclusions in the material. Therefore, if you need to saw significant quantities of chipboard, I advise you to get a saw blade with cutting edges equipped with carbide inserts.
Quarters are most productively selected with a mill with an outer diameter of 125 mm, with a landing hole of 32 mm. It is extremely useful to get a cutting disc for metal with a thickness of 3 mm, with a seating diameter of 32 mm, and an outer diameter of up to 200 mm, although using centering washers, it is possible to install disks with a seating diameter of 22 mm. In this case, cutting metal and profiles will not be any problems for you. If you are using a milling cutter or a cutting disc, the hole in the desktop may need to be expanded slightly.
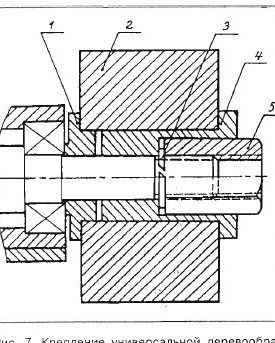
Drawings of parts that secure the universal woodworking head (UDG) to the spindle are shown in Fig. 7. By the way, I was forced to incur expenses associated with the acquisition of UDG and the manufacture of mounting parts due to the fact that the Rebir type electric plane, type I-5709 made in Latvia, broke down literally after 4 hours of relatively unstable work - the electric motor burned down. Judging by the fact that the spare anchors instantly disappear from the shelves, I realized that the reliability of this plane is extremely low and should get a more reliable tool. I note that in the case of using the UDG, it will be necessary to make a special working table, since for the passage of cutters fixed in the head, a hole width of 55 mm is required. Cutters for UDG can be made from commercially available planer knives by machining them on cutting and emery wheels on the same machine.
Prior to sawing, in order to avoid damage to the teeth, saws must be carefully inspected for the absence of nails and other inclusions. This rule should be especially strictly observed when processing used wood. If metal inclusions are detected, they should be removed. If the engine stops due to overload during sawing, turn off the saw immediately, eliminate the cause of the overload and turn it on again. The reason for the frequent recurrence of such situations may be a blunting of the cutting edges of the saw blade. In this case, you should use a personal or "velvet" file of a semicircular or rhomboid section and sharpen the cutting edges, which can be done without removing the disk from the machine. After this procedure, the saw will work again, like a "beast." Along the way, I note the need to control the separation of the cutting edges of the saw teeth, which should approximately be 0.6-0.8 mm. She doesn’t like to saw without a divorce! You should also periodically strip the keyboard.
When trimming the edges of non-trimmed boards to get even edges on the board, you first need to “beat” the line with a hemp or cotton cord rubbed with charcoal or chalk. It would also be nice to get an auxiliary support roller, which can be taken from the squeezing device of the washing machine, fixing it on a stand of the appropriate height ..
Having lifted a desktop, it is possible to establish an abrasive stone and to use the machine for tool sharpening. A disk made of plywood with a diameter of up to 250 mm with a glued skin (“button accordion”) will allow grinding of parts.A polished circle, which is a package of round fabric blanks sandwiched between two discs, will facilitate the process of polishing metal and plastic parts with polishing paste.
It is very convenient to store the cutting and fixing tool in a metal can with a diameter of 300 mm from under the film. At the bottom of the can, put a piece of cloth soaked in oil, place the saws in a pile (it is desirable to separate them with cardboard spacers), wrap the ends of the cloth and close the can with a lid. Now the tool is not afraid of corrosion. You can attach an eyelet to the box, allowing you to hang the box on the wall.
When working on the machine, observe safety rules: be sure to use safety glasses, work with gloves or mittens. Remember that new fingers instead of the cut off never grow back, and it is still very difficult to take off the cut off, despite the tremendous successes of medical science.
I wish you success in your work!