
 The technique of sewing from pieces of fabric in Russia has been developing for a very long time. From time immemorial, we have known how to patch silk sundresses and chambers with rags of the same material or a piece of fabric of a different pattern and color. But isn't patchwork sewing found in Ryazan folk finials, where the ornament consists of sewn colored stripes? And the patterned headdresses of the Tula peasant women, patches turning into the basis of the composition of the peasant costume of neighboring provinces?
But as an independent type of creativity, patchwork mosaic spread widely and began to come into use only in the 19th century, when factory color prints and satins began to be imported into the villages, replacing homespun wool, linen and hemp. Shirts, other clothes and household items were sewed from chintz, and the remaining pieces were stacked in chests, then creating the famous “grandmothers” brightly colored blankets, blankets, carpets. Sewed by hand. It was not possible to fully collect everything - there was not enough fabric. Collected gradually, as new colored pieces appeared in the house. First, a pattern was drawn from what was already in the house. A simple geometric ornament was taken with an alternation of the same shapes: stripes, triangles, squares, rhombuses - what was seen in creativity, embroidery. The craftswoman was not embarrassed, if initially there was not much fabric. She proceeded from the existing one, making up a pattern on a third or a quarter of the total size of the future blanket. When the shreds were over, the finished part was put aside in anticipation of new ones arriving to supplement and continue the work.
In America, where there are no long traditions of other types of folk art, sewing from pieces of fabric is the main home creativity that millions are engaged in. Each product is presented as a work of art, shows, festivals are held, people exchange experiences. Crafted items are valued very highly. Old patchwork bedspreads and rugs are carefully collected in museums and private collections. For example, in Switzerland there is a collection of old patchwork American products. It covers the time from the second half of the XVIII century almost to the present day.
These things are a living story: this is how the simple wagons of immigrants who move through the uninhabited places of the Midwest are seen. Similar items were sewn in Central America and even in Australia.
In old products you can see how the pattern gradually developed, how carefully the material was handled by the craftswoman, what was the sequence of work and how, if some piece was missing, a different fabric similar in ornament was also taken to a complex, almost completed pattern, also taken from old shirts, dresses, bedspreads, shawls. Things were worn out, but in some places they retained the original freshness of the shades of the dyes and the strength of the textiles themselves. On other bedspreads, you can see the use of only two or three fabrics, which are combined into one product with a spectacular ornament, thanks to which the thing becomes a work of art and begins a new life. Often the pattern is so intricate that you can not even see traces of the old material. Ornaments were brought with them from Europe, borrowed from the Indians ...
Now patchwork around the world is undergoing a new birth. It has become a kind of hobby for many women, and often men. Things are sewn by professional textile artists and homework mistresses. Someone invents new abstract patterns, while someone uses ready-made stable forms accumulated over the centuries. They earn a living by doing this, decorate their home, make gifts ...
Sewing from small fragments of materials of different textures and composition (using different fabrics: wool, rayon, cotton, silk, natural jacquard, artificial fabrics, etc.) is a very exciting pastime - akin to solving crosswords. Let's dream up on a given topic and put together our patchwork mosaic.
 What is sewn from flaps? Covers on the bed and sofa, on chairs and armchairs, curtains, aprons, pot holders, heating pads for teapots, various handbags and covers, napkins and tablecloths, vests, cardigans, skirts, coats, trousers, hats, gloves, jewelry. Isn't the list impressive?
How to get started? Firstly, it is necessary to have an idea of some types of ornament widely used in this type of needlework, to know the technology of sewing them, and the method of connecting fragments into a large product - both technical and composite. Secondly, be able to process the edges of the motive and the entire product.
Now let's analyze more specifically how patchwork is sewn, where to start and how to end.
The main thing in the work is the choice of material: from which rags to sew.
The most used textiles are cotton. Chintz, satin, calico and even cambric. These are printed fabric factory-made fabrics. Patterns are the most diverse. The background under the picture can be any conceivable and inconceivable shades. They all iron well - they are ironed, they look neat in the product.
Professionals like to use cotton fabrics with the addition of artificial yarns or with various impregnations that give certain properties, such as: wrinkling less, do not require starching. The patterns on them are the same as on chintz. There may be more cells with different pitch strips, abstract stains and winding strips, fantastic plants, figures of animals and birds. From silk textiles, dense opaque materials from natural and artificial fibers are popular.
Beautifully and for centuries, things are sewn from woolen fabrics of the most diverse textures of surface and thickness. For example: the old school uniform will go into business. Brown dresses and black aprons for girls and blue trousers and jackets for boys. If you add shreds of any bright color to them, then there is already a selection for the plaid.
Drapes are good for large bedspreads and wraps (old coats, jackets, any trimmings). But for processing it is necessary to have a sewing machine with a “zigzag”, as seams are best done in thick materials butt-to-neck, that is, put the pieces tightly together to avoid thick knots where several pieces join.
In the West, old embroideries, fragments of printed scarves and shawls, old lace, old silk fabrics, etc. are widely used in patchwork.For example, a pillow, embroidered by my grandmother, broke up at the seams, dried up, but partially the ornament retained the vivid sound of colors and a fragment of a bouquet of flowers. This fragment with flowers is cut out and inserted (sewn) into the middle of the geometric motif, which serves as a frame, highlighting the semantic accent of the new, but not embroidered, but patchwork pillow.
Knitwear is also used in patchwork, but less frequently than other materials. Knitted shreds unpredictably stretch and do not hold the desired shape. They need to be planted on glue flesin or starch and only then cut and sew.
In addition to fabrics, for work you need threads of the most varied colors from No. 80 to No. 30. The threads must be very durable and not tear from the slightest tension. Black threads have a wonderful property: when you don’t like the color selection in the finished product or some color “creeps forward”, you can change the whole color by quilting with a thick black thread or laying on top of a decorative black stitch - the pattern on your eyes will become more balanced and will merge into a single whole.
To build a drawing on paper, a simple pencil, ruler and compass are taken. To apply the contour to the fabric, a piece of soap or chalk is used. In extreme cases, drawing on the fabric can be applied with a simple pencil from the inside, but in no case can you use a felt-tip pen and a ballpoint pen. Their stripes will remain spots on the surface.
Scissors should be very sharp and intended only for sewing.
If we choose a specific repeating pattern, then first you need to estimate the size of your product and the size of a small part - the unit of measurement of this item. For this small part, we make a template by which we collect the whole thing. As a material for the template, any cardboard boxes are used.
Before starting work, all fabrics (except for drape) are washed or, if they are clean, simply dipped in slightly warm water (even if the fabrics are new), starch, dipping into the ready-made solution, then well ironed in a wet state.
We cut out either according to pre-prepared cardboard patterns, or draw a contour directly on the fabric, if we sew without patterns and patterns. Be sure to consider allowances for seams, which in different products can be of different widths. On average, allowances are made from 0.5 to 1 cm. If the edges "crumble", which is typical for silk fabrics, then they are processed before sewing with a "zigzag" or overlock if knitwear is used.
Now about the technology of joining-stitching-sewing flaps.
Method I - the oldest, designed for a geometric homogeneous ornament. We cut the shreds according to a pre-made pattern and at the same time we make inserts from thin cardboard equal to our shred without allowances for seams. The fabric is wrapped around the cardboard insert by pulling the allowances on the seams with a simple basting seam from the inside, fixing the corners with two additional stitches so that the part does not unfold (Fig. 1, a). Having thus covered the required number of patches, we sew them together first in a small motif - be it a square, strip or socket, and then we collect from these motifs a large cloth of our product. On old engravings you can see a picture where a man sits in a nightgown and a cap in the bed between the pillows and is engaged in pulling shreds on cardboards - a rather funny sight.
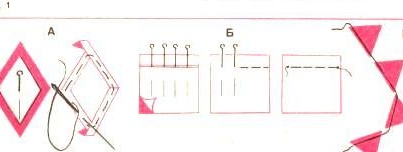
Covered flaps begin to sew together, without removing the cardboard inserts. To do this, fold them with their front sides and stitch them over the edge with a connecting seam, grabbing 2-3 threads of one flap at the fold and 2-3 threads from another covering. Cardboard is not flashing. He is then pulled out. At the end of the row, when two flaps are sewn, the thread is fastened with a bundle. This is how large bedspreads with a pattern, for example, “Grandma’s flower garden” of hexagons, are assembled, since they are difficult to connect by car. When the whole panel is ready, one or two corners are opened from the inside in each shred and the insert - cardboard is pulled out.
Method II - also known in the last century.Flaps are cut out with allowances for seams, then they are chipped with pins, marking the place of the future seam; pins are stuck perpendicular to the seam vertically (Fig. 1, b). Then a needle with a thread is taken (always at the end of the knot) and from pin to pin, the flaps are sewn together with small, frequent, accurate stitches with a needle forward seam or a basting seam. At the end, the seam is fixed. Thus, small flaps are sewn into large panels. Many, having read about the basting seam, will be perplexed: is the connection really strong, whether it is still necessary to fix it. Believe me, this way collected many objects that are now in museums, and at one time well served the owners. It is important to clarify: after joining, you need to iron the seam allowances in one direction (preferably towards the darker material). The method is good for working in the summer at the cottage, when there is no sewing machine at hand.
Method III - A modern traditional way of sewing on a sewing machine. Flaps stitch together in pairs. You can speed up the work by the fact that each time the thread after sewing is not cut, and a new pair of flaps chipped with pins is laid (Fig. 1, c). After grinding, it is immediately necessary to iron the seams on two sides, although sometimes they are done on one side, as in the previous method.
Ironing should take as much time as the material is cut, that is, quite a lot. This is one of the important components of patchwork.
The basis of many patchwork compositions is a geometric ornament, which often resembles a children's mosaic. It is the most common because it is lightweight, understandable, with a small variety of components with a huge variety of combinations. What can be done from a combination of triangles and squares, we will consider.
The main forming unit - the part for constructing the pattern of the blanket, plaid and the mass of other products - are squares, triangles, rhombuses, segments of a circle, hexagons. The “wild” style is also “squeezed” into a square shape, when irregularly shaped rags are sewn together as you like, then squares are drawn on this panel, the fabric that has already been cut is cut, and a certain rhythm is organized by alternating color spots, a composition of squares is created.
Large things are assembled from many separate elements that alternate in a certain order: there is a series of squares, each of which has the same pattern. It is possible to alternate in a checkerboard pattern.
Patterns of pieces of different fabrics make up the motive. The assembled, stitched motive has a stable character, a specific name, which was given in association with various phenomena and objects. Consider the most common motifs taken from ready-made large things.
The motive “mill” (Fig. 2, a) is assembled from two strips, each of which has two squares, consisting of two triangles, contrasting in tone. It can be assembled by taking two dark and two light squares. Cut them diagonally and swap them. “Mill” is a pattern that is found in carpet weaving of the Caucasus and Central Asia, in the embroidery of different peoples. Without using another ornament, from the "mills" you can collect a small pillow and a large bedspread.
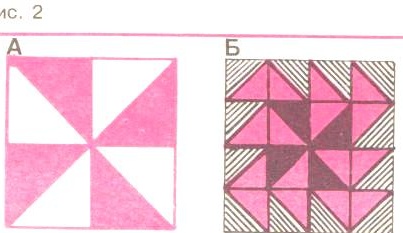
The “complicated mill” motif is an ornament that is found only in patchwork, because it was invented specifically for it (Fig. 2, b), but at the heart is a simple “mill”. This pattern is also sewn into strips, but there are more of them. The figure shows that the pattern is made up of only two elements: triangles and squares. The sequence of sewing this motive is as follows:
- First, a drawing is made on paper on a smaller scale in order to calculate how many triangles of each color are needed;
- the size of the triangle is calculated in full size, a template is made;
- triangles follow the pattern;
- triangles are rolled off by car in pairs, in squares;
- everything sewn is carefully ironed;
- a pattern of squares;
- connection starts, i.e.Stitching into strips: either the vertical right stripe is first assembled, and then all the others, or the horizontal lower stripe first.
Akin to the "mill" - the motive "spinner", reminiscent of the ancient symbol of fertility (Fig. 3, a). It is collected similarly to the previous motive in squares and then in stripes. It should be borne in mind that some squares are made up of two triangles, and some are simply cut out entirely, so the pattern of the triangle should be larger so that when sewing two triangles, the resulting square is equal to the finished, not cut.

The motif “card focus” (Fig. 3.6) consists of two triangles of sizes, built on the basis of a square. The total square is nine small squares (3 - in height and 3 - in width). The template is done as follows: the square is cut diagonally, the resulting triangle is divided in half (divide the right angle into two parts). It turns out a large triangle and a small triangle - this is the pattern. In order not to get confused in the color and sequence of composing the motive, first take black, blue rags and add white polka dots, cut and lay out according to the picture and only then sew sequentially in strips: first, in each square, sew all the triangles together, and then the finished ones squares. The motive, although complex, is popular among many craftswomen, and each calls it in its own way. Sometimes even funny things happen when someone decides that he is the author of this ornament, which is not one decade old.
The “star” motif (Fig. 4) is found in a wide variety of variations. In patchwork technology, it is designed very well. There are several dozen variations. This motif is assembled from triangles and squares, from rhombuses, each part can consist of several small pieces of the same geometric ornament. The middle, in turn, can be filled with a “mill” or other motive.
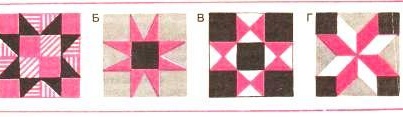
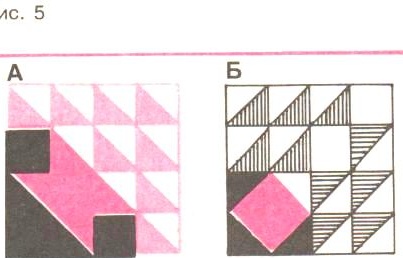
The motif “basket with flowers” also exists in many variations (Fig. 5). Each “basket” can be made of different fabrics with many shades, as the soul desires. Sometimes several “baskets” alternate in one blanket, differing in color spots and the shape of the basket itself and the direction of the petals-triangles. The “basket” is also sewn together first in squares and then in stripes.
Try to apply any motive described above in the manufacture of a small product: pillows, needle beds, napkins, aprons. Undoubtedly, work will be a pleasure.
As a basis, not only a square, but also a rectangle can serve. To start, we will sew a simple rug on the wall, but if the fabrics available in the house are not very beautiful and bright, then you can use it as a blanket on a chair or sofa.
Our rug (Fig. 6, a) has a size of 100x80 cm (height to width, without allowances for seams). It is performed from triangles that are obtained from a rectangle. The size of the finished rectangle is 10x20 cm. The triangle will turn out if the rectangle is cut one diagonal into two parts. Thus, we obtain a pattern (without allowances for seams). You can make a template in the form of a frame (Fig. 6.6), the inner triangle is the finished view of the flap, and the outer triangle is a pattern with allowances for the seams. Since in our product only one type of triangle is used, it is more advisable to make such a pattern.
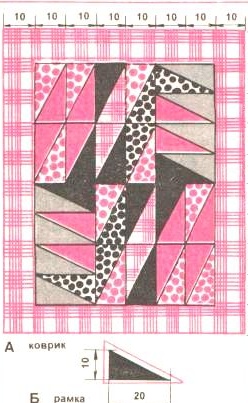
There should be six fabrics for this work. One fabric should be much more than the rest, since not only several triangles, but also a border are cut out of it.
So, we make a template from cardboard, iron the fabrics, apply the template and carefully cut it out:
10 triangles of white to red polka dot fabric No. 1;
12 triangles of red fabric No. 2; 8 triangles of black fabric No. 3; 6 triangles of fabric white in black polka dots number 4;
8 triangles of gray fabric No. 5;
4 triangles of fabric in a cage + border number 6.
You can calculate in advance how much fabric you need. For example: 8 triangles of fabric No. 5 will fit on a 90x15 cm flap. Accordingly, you can calculate the right amount of material for work and for the rest of the fabrics. This is important if you are going to sew from new purchased material.
- Stitch the triangles according to the pattern between each other. You should get 24 rectangles. Carefully ironing seams.
- Sew the stripes: first, the upper one, consisting of four vertically placed rectangles and two horizontal ones. The sequence is as follows: we grind two horizontal rectangles between each other, and four vertical rectangles are sequentially stitched to them. The seams are ironed.
- Stitch the remaining three strips, ironing.
- Putting together the four resulting strips of ornament - grind, iron.
- We cut out the stripes of the border, which will be equal in width to one of our rectangles, and in height equal to the height of the panel + 10 cm from each narrow side + allowances for the seams (2 strips). The top and bottom is equal to the width of 6 rectangles + allowances.
- First we grind the border from the panel on the short sides. Ironing.
- Stitch vertical border stripes. Ironing.
- We cut out the lining, equal in size to our panel, that is, 100x80 cm + allowances for the seams around the perimeter of any fabric except linen. The wrong side should be done as carefully as the front side of the product. It is best to use dark plain satin - black, navy blue, dark green, dark red.
- We connect the upper patchwork part with a lining by means of stitches. You can lay a layer of batting or synthetic winterizer between them to give a surface relief and mask unsuccessful seams. The stitch may be the easiest in the picture - vertical stripes along the seams. The stitch line must be drawn at a distance of 1 cm from the seam on both sides (left and right). On the rim, one or two vertical stripes must also be quilted at a distance of 2-3 cm. You can simply repeat the contour of the mat, stepping back from the edge.
- The edges of the product are processed with an oblique trim, preferably plain and dark. The necklace can be sewn in parallel stripes: top and bottom, left and right, or you can cut it long so that it is enough for the whole product. The edging should be wide to well cover two or three layers of the mat. Its average width is 3-4 cm (taking into account allowances, turns on the seams). It is sewn in the following way: we apply the ribbon with the front side to the front side of the mat and sew on the machine around the perimeter of the product. One bottom corner remains uncovered. We finish it at the end.
- We wrap the tape on the underside of the mat and manually sew it along the perimeter with a secret seam, without tightening it too much. The left corner is cleaned manually by a blind seam. Our mat is ready. It is easy to manufacture and effective if the fabrics are well matched.