

welcome all the inhabitants of our sites! When checking for new homemade products, I often come across "poorly taken" photos - often these are darkened, blurry, and flash-lit frames. I give recommendations and advice, people have to redo all the work on a new one. To avoid this, I found an article on the network where needlewoman zolushka on her blog tells in detail how she removes her master classes.
Read this article, practice a little, create a "mini studio", as a result you will get great photos, the work will easily pass the test and will appear on the pages of "homediy.washerhouse.com"!
Tips for shooting master classes from zolushka:
Here is another great material on this topic:
There are some easy ways to take a good homemade photo of yourself. home conditions. The easiest is to use light from the window. Winter lighting - the sky, covered with an even layer of clouds - is ideal. Direct sunlight is less suitable because it gives too contrasting differences in bright light and deep shadows.

Let's get started.
1. As a background, I recommend using a plain fabric, wooden board or plain sheet of paper. Or not so simple - now you can buy textured watercolor paper, paper with a splash of gold foil for painting with Chinese ink, or, for example, a set of multi-colored corrugated cardboard:
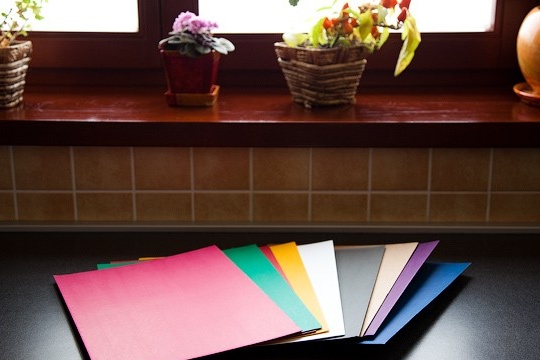
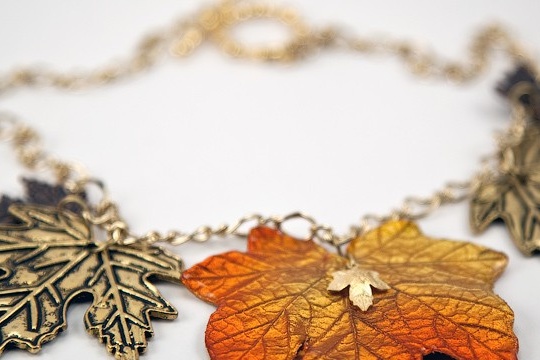
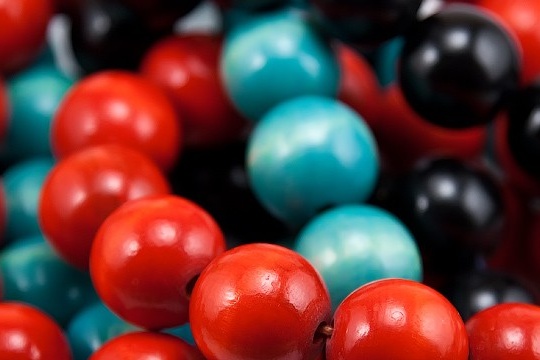
2. The best and most universal color for the background is white. However, there are exceptions: it is better to shoot white objects on a gray background, and sometimes, if you really want to, you can indulge in contrasts (red - green, yellow - blue). Place your work of art in the background, turn off the flash in the camera, and shoot:
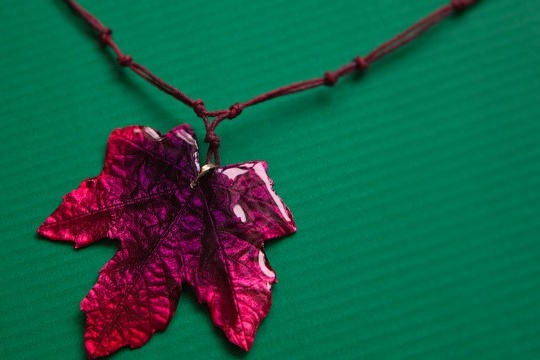
Result: soft shades, rich colors and moderate highlight sufficient to emphasize the glossy surface of the pendant.
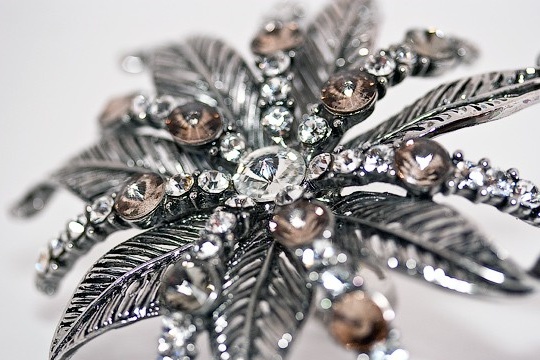
Important! With glossy and shiny objects, you need to carefully select the angle:
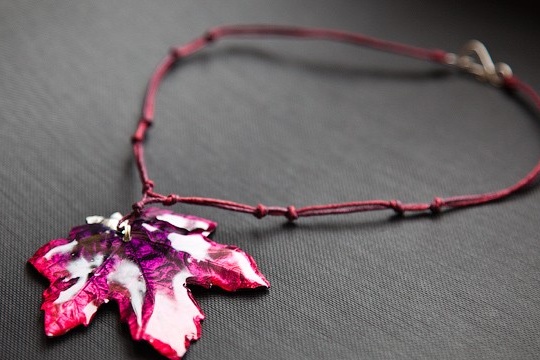
Result: too much light is reflected on the surface of the pendant.
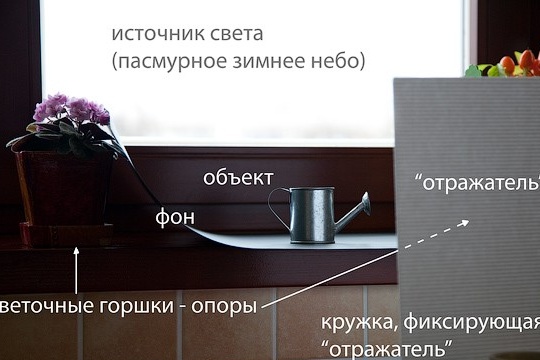
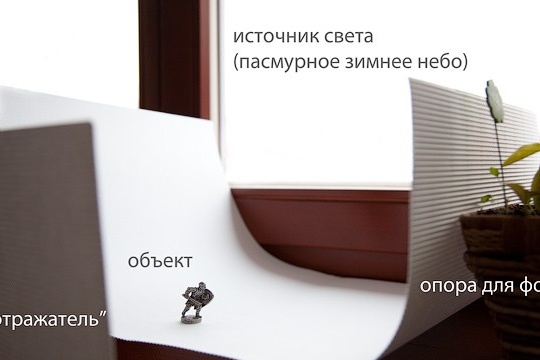
3. If the subject is not flat, we will need not only a horizontal, but also a vertical background. And here everything is simple - take a more authentic sheet and lean its edge against a pot of violets of a suitable height support. We put the object so that the bent edge of the sheet is behind it, and remove:
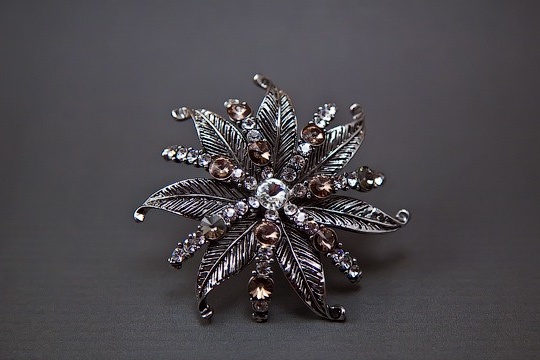
Result: clearly defined contours, contrast with a dark background.
4. However, when shooting non-planar objects of light, it is no longer enough to illuminate the side of the object opposite from the window. Here a reflector comes to our aid - a sheet of white cardboard:
Option with a white cardboard background:
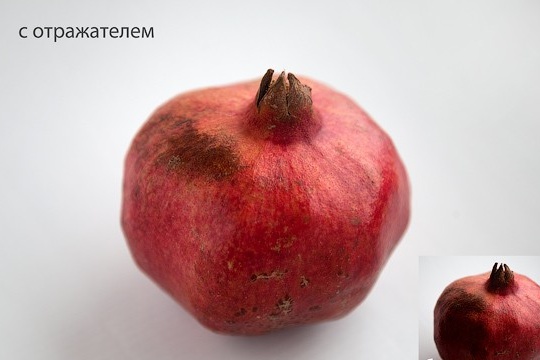
5. What does the reflector give?
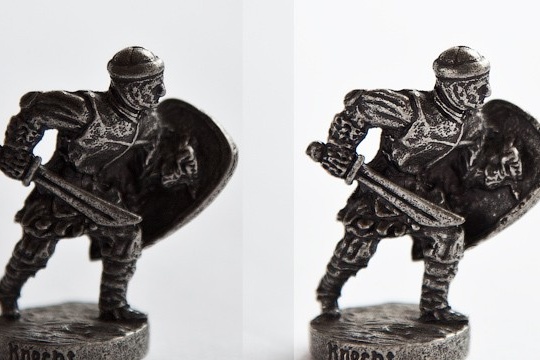
Result: small parts without a reflector are lost in the shade. The reflector highlights them, at the same time emphasizing the uneven texture of the metal.
Check if your photos meet the above criteria? Background, clarity, color adequacy, detail. If at least one of the items is not completed, you can safely delete the photo. If everything is in order - congratulations! What is left? Put in the corner your logo with an address and post a photo on the blog.
This rather simple method of subject shooting at home has a significant drawback - it acts only in the daytime, and the day is short now.
What to do for those who do not have the opportunity to shoot during the day - to surrender to the mercy of the light from the floor lamp and the built-in flash? In no case. For example, this photo was taken on a winter evening without professional lighting:
How to photograph subjects in poor light
“So you do not have the opportunity to photograph in the afternoon?” Do you work, or study, or just the windows of the apartment overlook the north pole with an endless polar night, and there is never enough light? So, the method described in the first part of the series does not suit you.
Let's try another one.
Without normal lighting, a good photo will not work. The built-in flash is also not an option, it “distortes” colors, makes a “flat” picture and gives a lot of extra shine. But do not despair. On the way home from work, or studying, or hunting for polar bears, drop by the supermarket and get there an unnecessary cardboard box measuring about 50x50x50 cm, more - you can, less - I don't advise. At the same time, buy a roll of tracing paper, a skein of transparent or white scotch tape, a sheet of white corrugated cardboard (a tight paper will also work) and a stationery knife.
Unless, of course, you have all this stuff in the pantry. Check it out. At the same time, make sure that the medicine cabinet has a band-aid, a bandage and iodine - just in case, because you have a fascinating process of curly carving on cardboard.
And, of course, count the table lamps in the apartment. There should be at least three, and they should shine with a power of 60 watts at least. If there are not enough lamps, you can buy inexpensive lamps on clothespins.
And you also need a table tripod. You can buy the easiest.
So, you have returned from the supermarket and are ready for achievements.
Let's check:
1 cardboard box with a size of at least 50x50x50 cm
3 light sources (in the form of, for example, table lamps) with a power of at least 60 watts each
1 table tripod
1 roll of tracing paper
1-2 skeins of transparent or white tape, and it is better if it is matte rather than glossy
1 sheet of whatman paper or corrugated cardboard (50x100)
1 ruler or tape measure
1 stationery knife (as well as iodine, bandage and adhesive - just in case)
Then everything is quite simple.
1. Carefully cut square “windows” in the side faces of the box, leaving indents from corners of 3-4 centimeters. The result should look something like this:
Result: I got quite broad faces, because the box donated by the supermarket is made of soft cardboard.
If you have the opportunity to choose, take a rigid box and make the edges narrower.
Do not overdo it - too narrow edges are also not needed.
2. Cut the tracing paper into even squares. The length on each side should be 4-5 centimeters longer than the length of one side of the “window”, so that the tracing paper overlays. Stick squares of tracing paper over the windows, fixing them with tape along the corner edges. I cut windows from all four sides because I was too keen on the process and could not stop in time (I hope this recognition will never fall into the hands of psychoanalysts), but actually three are enough.However, if before shooting you suddenly find that the tracing paper on one of the sides is torn or dirty - the fourth window will act as a backup. Decide for yourself how you prefer.
3. So, the windows are cut out and “glazed” with tracing paper. Tracing paper scatters light well, making shadows soft and shallow. Now fix the background (corrugated cardboard or whatman paper), attaching it to the bottom of the box, arrange the light sources (two on the sides, one on top) so that the light scattering through the tracing paper falls into the background. And voila:
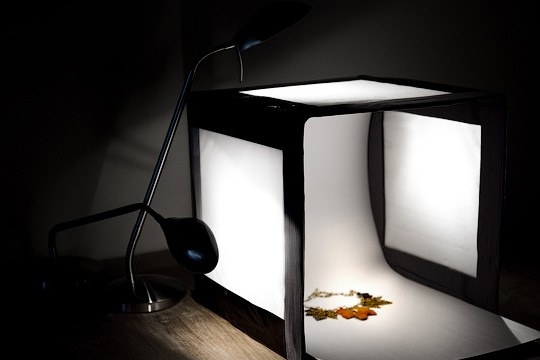
Result: working micro studio.
For the greater beauty of the shot, I turned off the overhead light, but this is not necessary for the production process.
4. Now screw the camera to the tripod and turn on the macro mode in the camera. This mode implies that the photographed subject will be in focus, and the background behind the subject will remain blurred.
5. If the picture goes yellow, adjust the white balance. Do not be alarmed, it only sounds scary and incomprehensible, but in fact it is no more difficult than fastening the camera to a tripod. Go to the camera settings, open the WB menu and select one of the programmed modes. To combat yellowness, the “Incandescent lamp” setting is suitable, usually it is indicated by an icon in the form of an Illich bulb. If the picture goes blue, set the mode to “Fluorescent lamp” - an icon in the form of a long cylindrical lamp.
What is it?
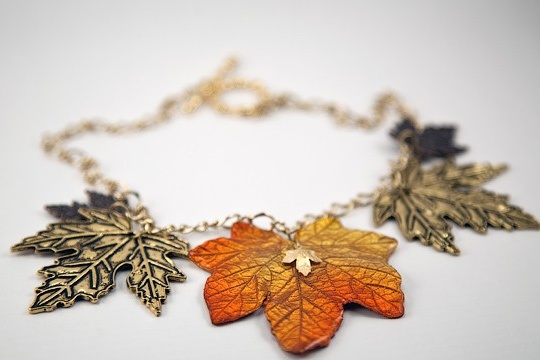
Result: soft shadows, juicy orange color, moderate highlight on the edge of the pendant.
Result: the smooth surface of the metal is well worked out, and everything sparkles very elegantly.
Result: fine details worked out, the shadows are soft, enough, but not too much shine.
Here, not white, but gray cardboard was used as the background.
Result: the surface of the wooden beads is well emphasized, and the triple glare on each ball adds volume.
By the way, a photobox for subject shooting does not have to be cut out of a cardboard box - everything that can be used to make a cubic frame is suitable. Dimensions 50x50x50 are optimal for shooting not very large objects, but if you are going to shoot, for example, bags, a 40x60 or 50x70 box will work too. A tripod and light sources are needed in any case, and this is a major waste. Adhesive tape, tracing paper and a clerical knife will not require impressive financial losses. And over time, when sales rush up, and your chests begin to break and burst from gold doubloons, I recommend buying.
I hope that bandages, iodine and a band-aid did not help anyone.
And a few more tips:
1. Background
Creating a background plays a large role as a photograph, for example, if the subject you are photographing is light or white, then a darker shade should be used as the background to highlight the subject being photographed, and vice versa if your subject is dark, then the phot must be selected in light colors.
As a background, you can use a Whatman paper, but in no case do you bend it, but fix the upper edge above the table and smoothly put the lower one on the table, fixing it in the corners. In the middle of this design, put the subject that you are going to photograph. As a result, you will get a beautiful smooth background.
2. Light or backlight
Light is a very important part in photography. If you have good bright weather outside, you can take pictures on a table or a pedestal next to the window, but there are cloudy days or a photo you need to take in the evening, then it is time to think about lighting. As a backlight, you can use various lamps and fixtures.
If you install the lamp on one side, a shadow will appear on the opposite side and the brighter the lamp, the darker your subject will cast a shadow. This problem can be solved if you put a sheet of foil on the opposite side to reflect light or a simple sheet of white paper - it will also reflect light.
3. The camera
The first thing to do is to check whether the flash is turned off. In practice, I know how the built-in flash spoils the frame. And do not forget about such a function as macro photography. Photos taken in macro mode are very beautiful, especially when you need to highlight some part, and the rest will be a little blurry.
Before you start taking pictures, you need to make some settings, for example, if you take pictures in sunlight, then in the lighting mode, select sunlight, in artificial light - an incandescent lamp. This is necessary so that the photo has the correct shade.
Another not unimportant moment when taking pictures is how you hold the camera. For a photo to be clear, the camera must stand steady. For example, put the camera on a stand, a tripod, or more correctly say a tripod, which will greatly facilitate the process of photographing, because holding the camera in trembling hands can ruin the photo.
4. A few words about the shooting itself
You can write endlessly about how to shoot a particular object correctly, because each subject has its own characteristics, as well as what exactly you want to emphasize in this subject. To do this, it is worth considering your subject from all sides (angles). Be sure to take several shots on each side and at every angle, so that later you can choose from the many shots exactly those that turned out to be the most successful and interesting.
If your subject is large, then it is worth taking a few pictures of individual sections, so that you can consider in detail.
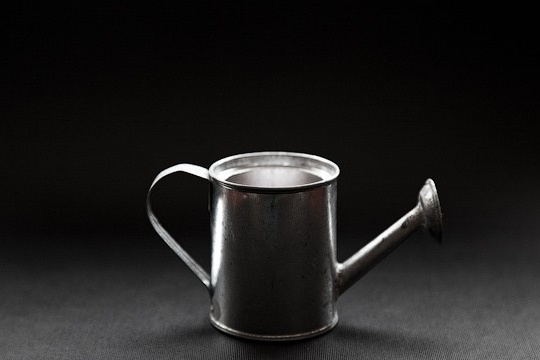
When photographing an entire object, you can add some small objects to the frame, which in turn will not harm your photo, but rather will be a small addition, for example, photographing a busy watering can, you can put a rose flower or a small bouquet of wildflowers, depending on how the watering itself is decorated. It is worthwhile to carefully place beads or some other jewelry in the casket that also accentuates your casket, and scatter small coins next to the coffers. There can be a lot of examples, but every little thing that you add to the frame should correspond to your subject. And again, I focus on the fact that in the photo session you need to do as many frames as possible from different angles and from different angles.
These tips should be enough to master the basics in photographing homemade!
Master new techniques, make useful home-made products and get only positive emotions from it!
With respect, Nicholai.