

Module three was introduced in construction. This module is one for the whole country and adopted for the convenience of construction according to standard drawings. The module means that all the distances between the axes of the bearing supports (walls, columns, beams, etc.) are divided by the number 3 without a remainder. This module at one time made a revolution. Reinforced concrete products began to produce a length of 3; 4,5; 6; 9; 12; 18; 24 m. In projects, the distance between the axes of the supporting structures began to provide the same dimensions. All this made it possible to assemble houses and structures from various elements, as in the children's designer.
Thanks to this module, you determine the load-bearing walls. Lift your head up and see how your floor slabs lie. Knowing exactly that the plates have a length of 3; 4,5; 6 m, you can determine which of the walls are load-bearing and which are partitions. (Attention! Some plates produce a length of 4.2; 5.9; 6.1; 6.3 m). Sometimes a stove can rest one end in yours and the other in a neighboring apartment. Determine the supporting walls by the floor slabs, check yourself for wall thicknesses. In a brick house, the internal load-bearing wall is made in the thickness of one (250 mm) or one and a half bricks (380 mm). Given the thickness of the plaster, this size will be slightly larger. In a panel house, the load-bearing wall has a size of at least 200 mm. The fact is that on the inner wall of the slab they are supported, as a rule, from two sides, and the length of the support of the slab should be at least 10-12 cm. In the houses, there may also be internal self-supporting walls. These walls carry a load of only its own weight. Floor slabs are placed along such walls. In these walls, as a rule, there are ventilation, plumbing and sewer risers or it is inter-apartment walls. External walls can also be load-bearing and self-supporting.
So, the basic rule for determining load-bearing walls: floor slabs are based on 2 walls, their direction is perpendicular to the wall; wall thickness sufficient to support the slabs; the distance between the axes of the bearing walls is a multiple of 3 without a remainder.
For example: the distance between the outer and inner walls with a thickness of 40 cm is 5 m 70 cm. We add the length of the bearing plates 15 + 15 cm. We get the size between the axes of 5.70 + 0.3 = 6 m. 6 is divided by 3 without a remainder. The direction of the plates is perpendicular to the walls. Conclusion: these walls are load-bearing.
With a large repair, the load-bearing walls are unnecessarily better not to touch.
Partitions. These walls have a thickness of 8 to 12 cm, with plaster up to 16 cm.Partitions do not carry any load except their own weight. In relation to the floor slabs, they can be arranged as you like: along, across and even obliquely. Their location in the apartment is associated only with the general layout. Partitions are that most of the work associated with the repair.
Draw a new plan of the apartment, leaving on it only the bearing walls and the front door. Now you can feel like an architect and start creating. You can forget about the windows, they can be laid or break new ones. Below I will tell you how to do it. But you only need to remember: if you swipe at the windows, you will get permission from the authorities so that you do not violate the appearance of planet Earth with your work.
The second thing to remember when drawing up a project is the availability of existing water supply, sewage and gas communications. When placing the kitchen at the other end of the apartment, water and gas can be brought there, where under the floor, where under the ceiling. And what about the sewer - the question? Difficulties will arise with ventilation. Therefore, in your creative impulses, please do not forget about these points.
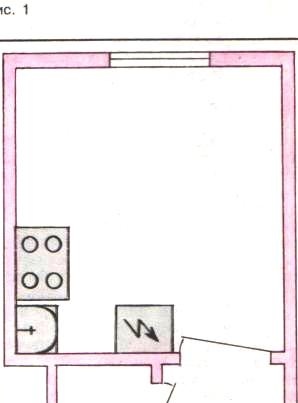
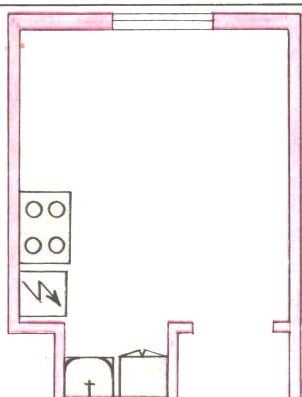
To illustrate what can be done with the layout, I will give two examples. Before you is a typical kitchen
room with adjoining pantry. Having removed one partition and having locked the closet door, the kitchen has changed. As you can see, the pantry ceased to exist, the area of the kitchen has increased. The sink, along with dirty dishes, migrated to a secluded corner, where he found a place and a cupboard for dishes. The refrigerator went off the road and took a seat in the corner. The kitchen won in an area of only 1.5 square meters, and after placing the same of furniture it seems that she doubled. The pantry, of course, is a pity, but it is completely replaced by mezzanines in the corridor.
A special question is about doors. In my opinion, doors are required in bedrooms, toilets, and bathrooms. You can do without doors in a common room or kitchen. However, this is only my opinion (Fig. 1, 2).
Second example:
reconstruction of a two-room "Khrushchev". I would like to say a few words in defense of the "Khrushchev". At the time, these apartments did a good job. They relieved social stress. People were relocated from barracks and cellars. In the 50-60s people did not have money for their own housing. With the system that existed in those days, this was perhaps the only possible way out. No one will argue that these are good apartments.
But they are still better than barracks. Moving to them, people improved their living conditions. How could millions more be resettled in a short time? Of course, now they are morally obsolete, as the "five-wall" is outdated in the villages. For some reason, it doesn’t occur to anyone to blame the village hut, but they blame the five-story building for anyone.
Five-story buildings laid the foundation for a typical design, which, of course, progress. These "Khrushchevs" need to say thank you. The people who built and who received these apartments are still alive and remember how happy it was when they moved into these houses. You have to be more tolerant of your past. Not everything was so bad, it was good.
But now, when the architects had their hands free, they designed such houses that you wonder! The question often arises - did some architects learn anything else besides how to draw beautiful pictures? I will not touch on this topic widely. But, despite the fashionable individual houses with turrets on the roof, what do such houses give besides beauty? Headache. With their steep roofs and numerous turrets, these architects increase the catchment area. An unorganized stream of water is turned into an organized turret. And they forgot about the drainpipes - ugly. So water flies from 8-10 m and everything in one place, eventually in the basement and under the foundation. And what will happen in the winter between these turrets? And in winter there will be a "snow bag", which in the spring will collect moisture from the air and get heavier. After a few years, the roof in this place will bend and leak. And the main purpose of the roof is to protect the house from atmospheric precipitation. But, moreover, it is impossible to get to this roof in order to repair it, they forgot about the dormer windows, the turrets start right from the wall.Ask architects to show how you can get to the roof through these turrets! Normal people do not have a propeller on their backs.
I don’t say badly about all projects, there are very good ones. But people should remember that not everything that is painted on glossy paper is good. Before building “fashionable” houses, consider how they will be operated. This applies not only to roofs, but also to layouts.
However, back to the main topic - two-room "Khrushchev". Kitchen - 6 square meters. m, a bathroom - combined, a large room - a walk-through, a small one looks like a pencil case, the hallway is designed for pygmies. The only advantage is a large storage room (Fig. 3).
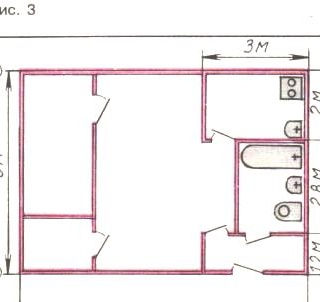
The floor slabs lie along the axes 1 and 2 and rest on the walls along the axes A and B. The distance between the axes A and B is 6 m. Therefore, the walls along these axes are load-bearing. Walls on axes 1 and 2 are self-supporting. Moreover, in the wall along the axis 2 there are risers of the sewer, water supply and ventilation. A gas pipe was laid along the same wall. All other walls are partitions; if necessary they can be dismantled.
I deliberately do not show the location of the windows, because this is not a concrete redevelopment project, but just an example. Although I do not work “from the ceiling” and the layout of such an apartment really exists.
The main purpose of the redevelopment of such an apartment is to increase the area of the kitchen and hallway, to share a bathroom. This can be achieved only by reducing the living area. These are the rules of the game.
I will present to your court one of the options (Fig. 4).
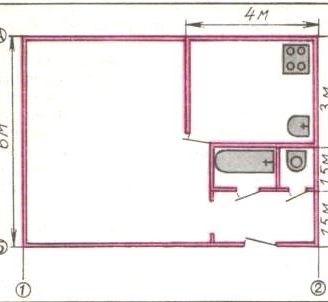
The room turned out to be large, but one, the kitchen increased, the bathroom was divided, the entrance hall increased, but not significantly. We had to sacrifice a pantry and one of the rooms.
I repeat, this layout is the result of my creative imagination, and no one else. Perhaps your option will be much better. By my examples I try to show that redevelopment is possible in principle, and therefore has a right to exist.
After the rearrangement on the plan of plumbing fixtures, it is necessary to solve the problem with the supply of water to them and the removal of sewage.
I did not touch the ventilation in this example, and it stayed where it was. There are no big problems with the water supply: the pipe will go through the toilet and bathroom, and these are technical rooms. A person who owns welding will cope without my prompts, he will bend the pipe as it should. For those who do not own welding, it is advisable to make plumbing on threaded joints. To do this, after completing the partitions (or in the drawing), it will be necessary to measure the necessary distances, make blanks and stock up with fittings and connecting parts.
The valves include valves. To the connecting parts: straight square; a transition elbow (from a larger diameter to a smaller one), a straight and transition tee, a tee with two transitions, a straight cross, a transition and with two transitions a cross.
To draw all these adapters and crosses do not see the point. It is impossible, in fact, to draw in a car repair manual what standard nuts are!
I allow myself to take a place in the journal only with a picture showing the connection principle (Fig. 5).
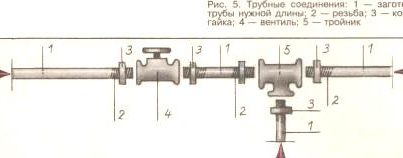
Before connecting to the thread, it is necessary to wrap a flaxen strand soaked in some kind of oil paint.
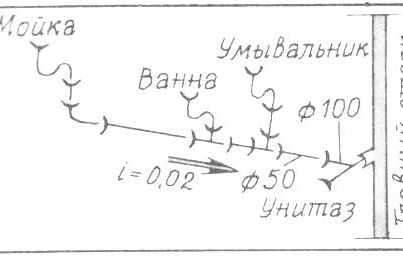
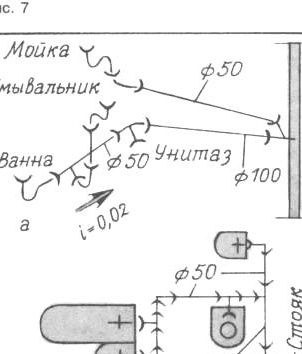
With sewage, the situation is somewhat more complicated. Sewer pipe should be made with a slope of 0.02 (2 cm per 1 m of length). Initially, sewage was carried out along the wall along axis 2 (Fig. 6). After reconstruction, the scheme will change and will be like this (Fig. 7).
Due to the fact that I moved the toilet to another place and moved it far enough from the riser, the bias may not work. Two exits are possible. Try to put a toilet with a high outlet. If the bias does not work, and in this case, the toilet must be raised.
In the bathroom, it is enough to raise the floors only under the bath (or put it on bricks).And in the toilet you need to raise the whole floor, having previously decided for yourself where to make the step. Before or after the toilet door? Both are inconvenient. Unfortunately, there is no other way to resolve the issue of sewage. It is for this reason that I asked at the very beginning of the article not to forget about sewage.
When designing sewers, you should know that there are shaped parts: bends 90, 135, 150; tees - at 45, 60, 90; crosses - 45, 60, 90. All these shaped parts are also subdivided according to the diameters of the inlet and outlet openings. Thanks to these parts, the sewer system can assemble the most unthinkable configurations. Do not forget only about the bias and do not make too many turns.
Cast iron and plastic sewer pipes are connected to the fittings by inserting into the socket. In cast-iron pipes, a rope from a resin strand is wrapped in rings at the end of the pipe and is choked into the socket of the next pipe or fittings. The tarred strand ends at 2/3 of the length of the socket, the remaining 1/3 of the part is sealed with cement mortar. In plastic pipes, instead of a tarred strand, rubber o-rings are inserted (included with the pipes), then they are also sealed with a solution.
The project has been completed, we are starting the repair.