
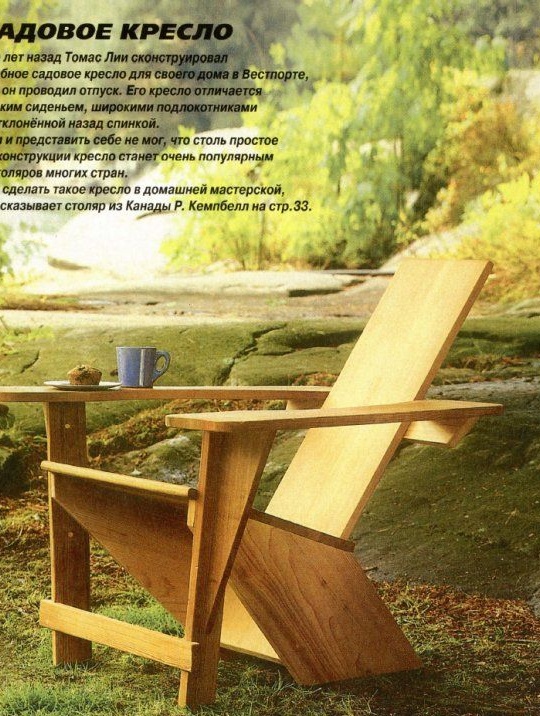
Plastic chairs look alien against the backdrop of nature. If you want to create an atmosphere of comfort, a wooden chair will be indispensable. In addition, for its manufacture does not need to have special skills.
Materials and tools:
1. The tree from which the details of the future chair will be cut. A cedar board up to 20 mm thick is recommended. Aspen, larch are also slightly susceptible to decay. You can opt for oak, walnut, beech. Pine is undesirable due to its high sensitivity to mechanical stress.
2. Dowels 24x60 mm, made of hardwood, about 30 pieces.
3. 20 pieces of brass screws with a diameter of 4.5x50 mm and the same amount with a diameter of 4.5x32 mm.
4. Sandpaper, which has a grain size of 220.
5. Furniture lacquer or drying oil.
6. Polyurethane adhesive.
7. Masking tape.
8. Cardboard for stencil.
9. Manual milling cutter.
10. Planer.
11. Circular saw.
12. Drill.
13. Hacksaw.
14. The grinding machine.
15. The screwdriver.
16. Clamps.
17. Pencil, tape measure, ruler.
Operating procedure:
First of all, you need to cut blanks for the chair. Wide panels are used to create armrests, backs and rear legs. Wide panels, in turn, can be created by gluing boards selected according to the texture and color. In advance, you should choose the grooves for the dowels at the ends, so that after the completion of the cutting of parts they are invisible. The rear legs are cut using a cardboard stencil that is encircled on the workpiece. The blanks themselves are pulled together with masking tape and cut out with a small margin. The size of the parts is adjusted using a planer or milling cutter. The back is cut out so that the glue line is located in the middle of the panel. The lower end of the back is recommended to beveled at an angle of 12.5, and the entire upper edge is rounded off by a radius of 9 mm.
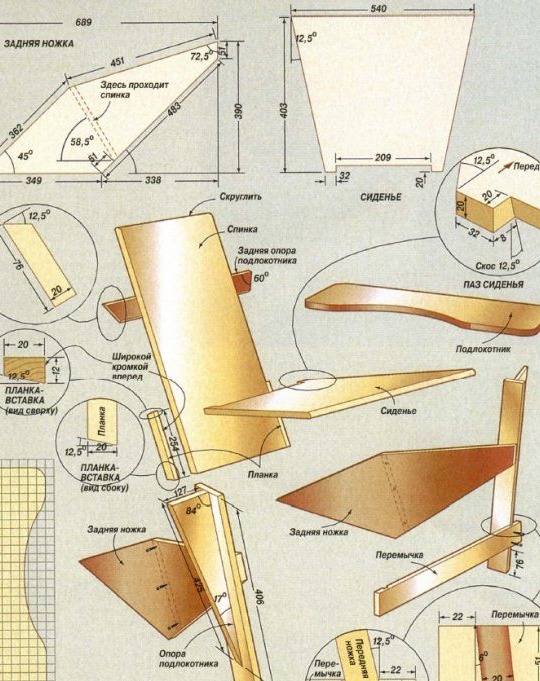
Now you can start assembling the product. Using 50 mm screws and glue, the rear legs are attached to the back. In this case, holes for fasteners must be prepared in advance, otherwise the risk of cracking is high. The side ends of the back should be connected to the legs at an angle of 12.5 degrees. Congestion overlap strips inserts. The inserts are screwed on with the same screws as when attaching the legs. To check the correct position of the back, just check the coincidence of the ends of the strips with the opposite ends of the legs. If there is a match - the back is located correctly.
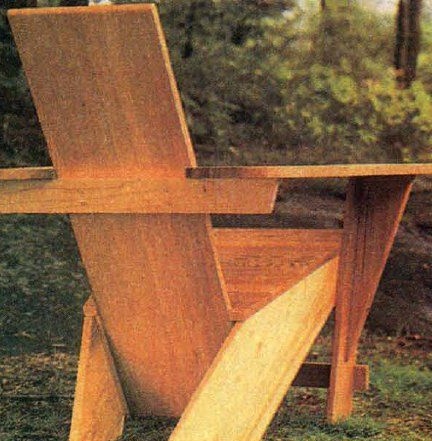
Particular attention should be paid to the seat.Its strength depends on the correct location of the boards from one leg to another. Parts are cut using a circular saw, and the sides are marked. Next, the outer line of the sides is carefully processed. The raw ends are temporarily not moved. After that, a groove at the rear end is selected and the bottom of the groove tilts 12.5 degrees to the face - all this is done for the joint density. The front end of the seat is rounded, it is screwed to the legs, the side edges are ground.
When cutting the front legs, the upper and lower edges are chamfered by 6 degrees. Using 32 mm screws, the front ones are screwed to the rear, the joints are treated with glue.
Extremely important is such a detail as a spit, which gives stability to the entire product. This jumper is cut out depending on the distance between the legs of the chair, after which a groove is applied to them. In this case, the bottom of the groove should go at a degree of 12.5 to the face, the depth of the high side should be 9 mm. Joining is joined with 32 mm screws and glue.
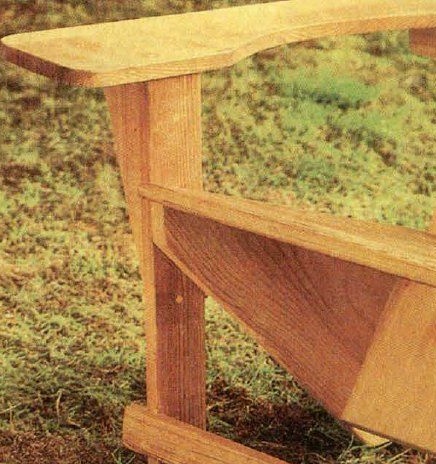
Now you need to create supports for the armrests. They should be wedge-shaped with bevelling at 6 degrees of the upper edges. These supports are screwed to the legs, glue is added.
The next stage is the armrests and the rear support. The ends are cut at an angle of 30 degrees, and the upper edge is 31.5 degrees. The ends are cleaned with sandpaper.
Next, all the details you need to collect together. The back support part is clamped to the back with clamps, armrests are installed. It is very important to follow the strict horizontal line of the armrests, before this the clamps are slightly weakened. After reaching the necessary line, they are tightened, and the rear support part is screwed to the back. The armrests are screwed with 50 mm screws and reinforced with glue. Screw caps are masked with wooden corks and sanded. All this is impregnated with hot drying oil, dried and varnished.
It’s easy to create such a chair, but the result will exceed expectations, bringing in country comfort setting.