
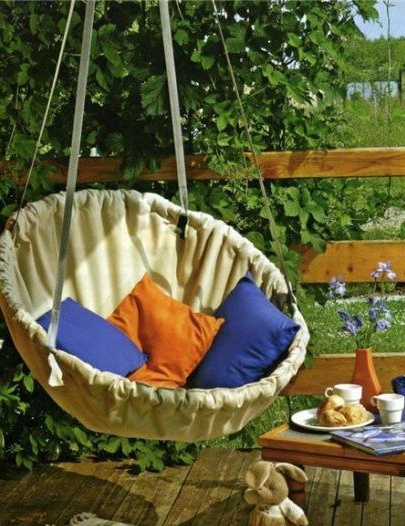
If you want to surprise both family and guests unusual, but at the same time comfortable the furniture, it is worth stopping the choice on a hanging chair. It is much more comfortable than a hammock, but not so much effort will be required to create it.
Materials and tools:
1. A steel hoop with a diameter of 90 cm. As for the options, then everything is very individual and depends on the location of the future chair, its size. So, gymnastic is suitable only if the product is intended for children - the weight of an adult is unlikely to positively affect the strength of the chair. The same goes for a metal pipe. A metal-plastic water pipe is recommended, moreover, it is inexpensive.
2. To connect the hoop - screws, wood or plastic inserts.
3. Fabric made of durable material with a width ranging from 150 cm to 3 m.
4.8 m line.
5. Non-woven, doubler or braid for trousers.
6. Metal buckles of 4 pieces.
7. An iron ring capable of supporting the weight of a chair attached to the ceiling.
8. Sewing supplies, scissors, tailor's centimeter.
Operating procedure:
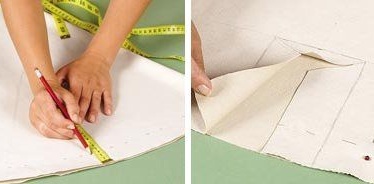
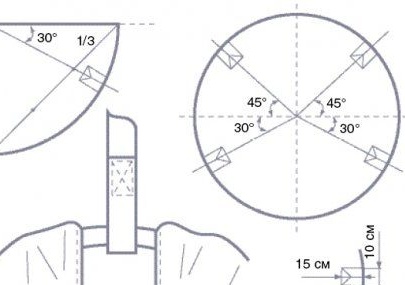
Any work begins with preparation. And, having prepared the hoop, you should carefully deal with the fabric. If in the process there are doubts about the required size, leave more allowances - then the excess can be cut off. Therefore, it is best to opt for a size of 3 meters. Two equal squares are cut out of this fabric, each of which is one and a half meters in length and width. Each of the parts is folded four times. The fourth part of the circle, the radius of which is 65 cm, is marked from one of the corners. A line is drawn along the marks. Two identical circles are cut out from the squares, from the edge of which 4 cm are counted inward. Then a dashed line is drawn.
Holes for slings are marked on the first lap. For this, the material is neatly folded into 4 parts and ironed. You should focus on the folds. As a result, two slings should have an angle of inclination to the bend of 45 degrees, two more - 30 degrees.The corners are marked, the circle turns and ironed. As a result, there are axes that indicate the places where slots for slings should be located.
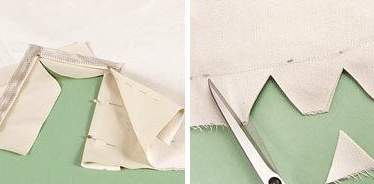
Now on each axis it is necessary to designate rectangles, the height of which should be 15 cm, and the width - 10 cm. Inside the Y-shaped marking is done - it is on it that should be cut. The circles are folded together so that the shared thread of one part does not coincide with the other - thus, an acceptable shape of the cover is provided. Circles are chipped so that the marked one is on top, after which cuts are made.
Slit places bend inside out. The resulting perimeter rectangle is glued with freezelin or doubler. You can sew the most ordinary trouser braid - thanks to it, the fabric will not crumble. Next, a complete cut is made and cut off along the edge, taking into account an indent of 3 mm.
Now two circles are grinding together, taking into account the distance of 4 cm from the edges. This allowance should be made toothed around the entire perimeter. After that, the cover is turned out by the front side and neatly ironed.
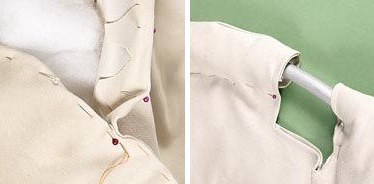
The next step is cutting the filler strips. The hoop is sheathed by them. You can make two layers. The resulting frame is inserted into the case. Circular parts are sewn together, for convenience, the ring moves to the edges. When stitching, indentation from the edge is 7 cm.
The edges of the unbroken hole that was left under the hoop are turned inside out, notches are cut and chipped off the front side. This is necessary so that the geometry of the circle is not subjected to deformation. Next comes the stitching and stitching on a typewriter with an indent of 2-3 mm. The cover is pulled off, while the hoop moves to the stitched edge.
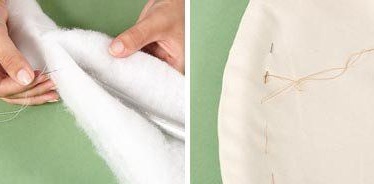
The synthetic winterizer is cut and fixed with threads, and the edges are woven with a hidden seam. Next, the cover on the frame is fixed on a 7-centimeter mark. After 4-5 stitches, you can tighten the knot. Subsequently, between rows of 7-8 cm.
The sling is cut into 4 parts, it is desirable to melt the ends. The end is threaded into a hoop, forming a loop, is sewn. A similar procedure is repeated with each sling.
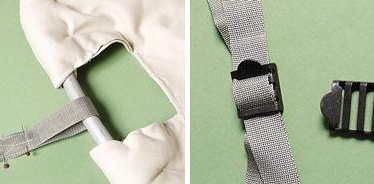
At each sling, the free end is threaded into buckles, then into a ring, then again into buckles - this will allow you to easily adjust the height of the product and its angle of inclination. All slings are assembled in an iron ring.
A cozy flying chair is ready for a minimum period! It fits perfectly as in home setting so in country. And children from such a find will be delighted.