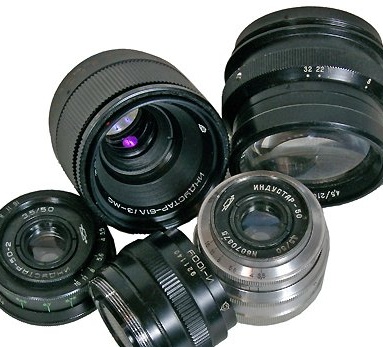
Camera Owners "Zenith" appreciate the lens Industar-50 for excellent image sharpness. In addition, this lens has small dimensions and weight - important factors in the conditions of long excursions or trips. Therefore, the failure of this lens is perceived as a significant loss.
But do not rush to get really upset! Carefully inspect the lens barrel, and if it is not damaged, despair is premature. The fact is that over the years, industry has released quite a lot "Industarov" in the most various frames for apparatuses of families FED and "Vigilant". Naturally, the mechanisms of many cameras of old releases are now “unrepairable”, so their serviceable lenses are useless. When the author needed a Fedovsky Industar-50, several friends immediately offered him such lenses from their already unnecessary cameras.
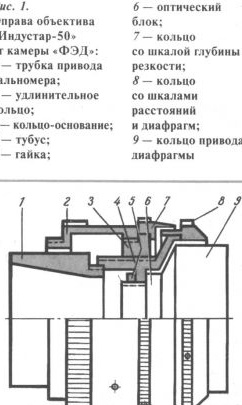
Move the optical unit to the frame for a modern Zenithhaving a large diameter connecting thread (M42x1) is not difficult - you only need to know some design features of the lenses and the order of their assembly-disassembly. This will be discussed further. We note immediately - for our purpose, optics in a fixed, “rigid” frame are best suited. Since the external inspection does not allow us to clarify the relationship between the lens parts, we use fig. 1 where the lens Industar-50 from the camera FED shown in section.
The basis of the design of the entire lens is a ring 3, in the running internal thread of which a tube 4 can move, where, in turn, an optical unit 6 is fixed with a nut 5, with a ring 9 controlling the diaphragm. A blackened tube 7 is screwed into the rear end of the tube, interacting with the cam of the range finder when the lens is on the camera. On the tube 4 is also kept ring 8 with scales of distances and diaphragms. An extension ring 2 is screwed onto the ring 3 (namely, the thread cut on the other end of the ring 2, the lens is attached to the device). In addition, ring 3 carries a grooved ring 7 with a depth of field scale.
Frame for Zenith with M42X1 thread differs from that examined by the absence of a range finder drive tube and extension ring, a different configuration of rings 7 and 8, as well as black coloring on the outside.
Now back to Industar-50 from the camera FED and try to disassemble it (see. Fig. 1).To remove the optical unit 6 from the “native” frame, first slightly unscrew the screw located on the smooth part of ring 2 (all screws are shown in Fig. 1, but they do not have reference designations). Then we unscrew the ring 2. The tube 7 is removed without difficulty, if you do not forget that its thread is left. Now remove ring 8 by loosening the three screws on its grooved girdle. At the end of nut 5, there are two round holes that serve to screw-unscrew the nut (a measuring instrument from the case is suitable as a key for the nut if you insert its needles with blunt ends out). Unscrewing nut 5, hold the edge of the tube 4 and the frame of the block 6 with the other hand.
At "Zenit" in the same way, remove the nut and ring with the scales of distances and apertures, and then remove the damaged optical unit. Of course, we will clear the freed “black” frame from dust and specks.
Before mounting a new unit, screw the tube 4 to the end, which will correspond to the position of the tip to “infinity”. The block is placed in a tube so that the index (point) on ring 9 is opposite the index (label) “3.5” on the scale of ring 7. While holding them in this position, tighten nut 5. The final operation is to install ring 8, label “oo ”Which should also be opposed to the already mentioned index“ 3.5 ”on ring 7.
In a similar way, it is possible to use an optical unit from the same lenses to the Zeniths of earlier releases, which have in common withFEDami " connecting thread M39 x 1.
In principle, it is permissible to use optical blocks from lenses Industar-50 and Industar-22 in a retractable (inside the camera) frame. Their difference from lenses in fixed frames in a slightly different form of the diaphragm drive protruding outward, made in the form of a short ring with corrugation at the end. To remove such a block, you will have to pull out the friction-retained black ring at the back of the recessed frame, after which the mounting ring we need will open here - the one closest to the edge and having the largest diameter. Turnkey grooves are visible at the end of the ring. A metal plate with a thickness of about 0.5 mm and a corresponding width will serve as the latter. After unscrewing the indicated ring, it is sufficient to remove the small screw located on the side surface of the recessed frame. Now it is easy to remove the block together with the front platband, on which the divisions of the diaphragm are indicated. In the future, the platband should be associated with the front ring 8 (in Fig. 1) of the frame to Zenith.
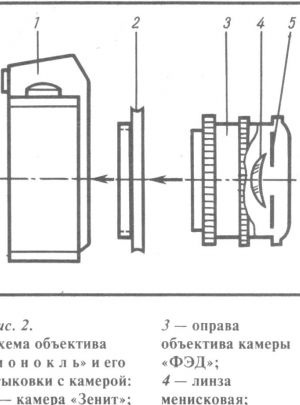
So, your DSLR is on the go again. And what to do with an empty donor rim? It will be very useful if your photo holding has a prefix of the brand PZF for retro photography. Few people know that its removable rear ring with an external M42x1 thread has an M39x1 thread in front just for the frame that can be easily turned into a monocle lens. Such a lens gives a soft, plastic design, advantageous when shooting portraits. The degree of softening depends on the size of the diaphragm installed in front of the lens. The latter should be collective, such as a meniscus, and put the concave side to the subject to be removed (Fig. 2). If necessary, extend the lens further forward between the camera and the adapter ring from the PZF attachment. Standard extension rings with M42x1 thread are placed. (When shooting on black and white film, it is advisable to use a yellow filter.)


