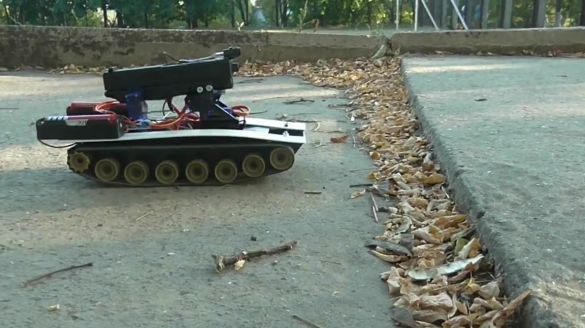
In past materials, we made reviews of videos on the manufacture of various toys for radio control. We continue this theme. This time we suggest you familiarize yourself with the process of manufacturing a radio-controlled tank.
Let's start with the author’s video
We will need:
- finished chassis;
- Arduino Nano;
- 3 servos;
- rotary system;
- toy pistol;
- joystick PS2;
- receiver to the joystick;
- box for batteries;
- rechargeable batteries;
- wires;
- laser.
In the finished chassis, the purchase link of which is presented at the end of the material, there are two engines, two gearboxes, there is a switch and a compartment for batteries. According to the author of the idea, buying a finished chassis will cost less than hand-made. If the batteries you plan to use do not fit in the chassis compartment, as in the case of the author, you can hide the motor driver there.
The first step is to fix the receiver from the joystick to the chassis. To do this, remove the lid from it.
Also remove the cover from the gearbox.
We make two holes on the cover, which will be used to fasten the cover with screws.
Fill the nuts with which the screws are clamped so that they do not unscrew when driving and do not fall into the gearbox.
Now you need to fix the engine driver. According to the author, when using wires with special connectors, the compartment will not completely close, so you need to bite off the connectors, strip the wires and solder directly to the outputs on the driver.
Before installing the driver, you need to take care of the rotary system for the muzzle of the tank. To do this, we disassemble the plastic rotary system and install two servos in it. The first will be responsible for horizontal movements, and the second - for vertical.
We assemble the rotary system back.
Install the system on the tank body.
In the case you need to make 3 additional holes. Two of them are needed for the motor wires, and a wide hole will be needed for the bus in the control of the engine driver.
Next, we saw off the bottom of the gun, which will serve as the barrel of the future tank.
The gun must be connected to the servo. To do this, just make a hole in the servo drive and the gun body and connect with a screw.
The next step is to connect the trigger of the gun to the servo. To do this, drill holes on the trigger and the nozzle on the servo. We connect the elements with a piece of wire.
In the upper part of the rotary system, two through holes must be made, which also must pass through the barrel of the gun. These holes will be used to mount the barrel on the turntable.
Let's move on to programming the Arduino Nano board.
We collect the remaining components according to the scheme below.
On the upper part of the chassis we install pieces of a ruler that will serve as wings. We install battery compartments on the wings.
Glue the laser to the barrel with hot glue.
Our RC tank is ready.
References to accessories:
1.
2.
3.
4.
5.
6.
7.
8.
How to program Arduino:
1. .
2. .
3. .
4. .
or .
5. Pour the sketch on Arduino.

