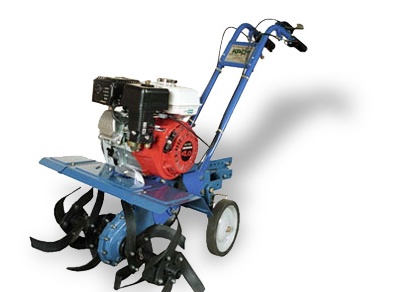
Motocultivators "Mole"produced by the Moscow MPO them. V.V. Chernyshov, gained wide distribution among gardeners, gardeners, who usually buy them in a complete set with rotors, which is enough to till the soil in individual areas.
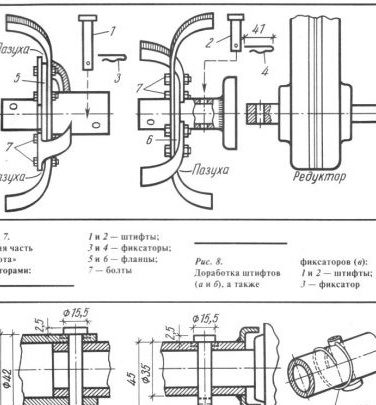
In fig. 7a shows a part of a cultivator with left side rotors. On the example of this part, we will analyze some design flaws Moleor rather, the shortcomings of its rotors. First of all, we note that the rotor knives are very blunt, and the pins fixing the inner rotor on the gear shaft and the outer rotor on the inner rotor protrude too much from the rotor shafts. As a result, the roots and stems of plants are wound on the protruding parts of the pins, which, together with the soil, clog the space between the inner rotor and the gear housing, as well as between both rotors. All this creates an additional load on the gearbox shaft, and the rotors begin to rotate unevenly.
The spring clips that are inserted into the holes in the pins are also too long, which maximizes the winding of roots and plants on them with the above consequences! Again, bolts that hold the knives to the square flanges of the respective rotors are longer than necessary.
From the first drawback - blunt knives - I got rid immediately after the acquisition Moleby sharpening them on an emery until securing to the flanges. The remaining shortcomings I identified after the first spring tillage in 1994 and, of course, eliminated them, which greatly facilitated the further operation of the "Mole".
Now a little more about fixing other shortcomings. In fig. 8, a and b show the diameters of the pipes of the rotors and the length of the pins inserted into the holes of these pipes. It can be seen that pin 1 protrudes from the corresponding pipe by 9 mm, pin 2 by 11 mm. To "drown" the heads of the pins, I made grooves in the rotor pipes on one side with a diameter of 15.6 mm and a depth of 2 mm, and reduced the cylindrical parts of the pins to a length of 44 and 36 mm, drilling through holes in them at a distance of 2.5 mm from the ends with a diameter of 2 mm.
Instead of the old long clamps made of wire with a diameter of 2.5 mm, I made rings (like rings for carrying keys) from a spring wire with a diameter of 1.5 mm. The ring is inserted at one end into the pin hole (Fig. 8, c), fixing it on the pipe. Over 3 years of work, there were no cases of loss of rings during soil cultivation, and the accumulation of roots and soil practically stopped.
I shortened the bolts 7 (see Fig. 7) by 5 mm and screwed on them nuts 5 mm thick (2 mm thinner than they were).
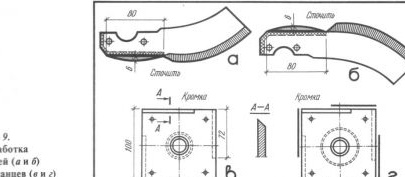
All knives at the attachment point to the flanges I sharpened by 6 mm, as shown in Fig. 9, a and b, so that these edges are flush with the edges of the flanges. Then, the edges of the knives, hatched with cross lines, were sharpened at an angle of 45 ° (if we sharpen the metal on one side when sharpening the knife, then on the other when chamfering). At the flanges of the left rotors (Fig. 9, b and c), I also sharpened the edges at an angle of 45 ° from four sides at a length of 72 mm. At the rotor flanges on the right side of the gearbox shaft, the edges were sharpened on the same sides, but the sharpening was shifted to the opposite edge of the rib (in Fig. 9, places of such sharpening are opposite the bold lines).
A similar refinement of knives and flanges eliminated the sinuses, reduced the accumulation of soil and flat edges of flanges and knives in them, and simplified the operation of the cultivator.


