
Having collected a certain amount of information about power plants based on wind energy, the author came to this model of a wind generator. For the most part, it consists of plywood, aluminum and magnets. With steady wind, this model The generator is capable of producing up to 50 kW of energy per month.
Materials and tools that the author used to create this model of a wind generator:
1) Plywood 5 and 10 mm thick
2) Steel tape with holes 1.5 m.
3) Bolts and nuts
4) Rod 60 cm long 10 mm in diameter
5) 10 mm nuts for the rod 6 pcs.
6) Thin sheet metal, or elastic plastic
7) 9 wooden blocks measuring 10 x 25 x 450 mm
8) Equipment for installation of a generator
9) Drill with various drills
10) Scissors for metal
11) Hacksaw
12) Keys
13) jigsaw for plywood
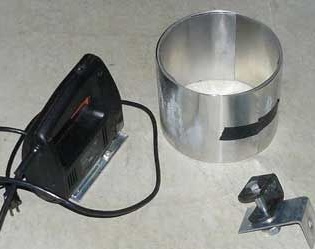
14) a generator from a lawn mower
Let us consider in more detail the design of this windmill and the stages of its assembly.
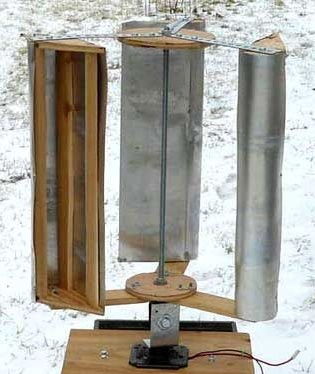
Choosing the concept of a windmill, the author focused on drawings and design from the Ed Lenz project. This wind turbine is a type of Savonius, but with some modifications that allow all three wings of the structure to use the generated lifting force of the wind, which is more effective than standard Savonius.
The original Lenz installation has the following dimensions 120 cm high, 90 cm in diameter. The author decided to slightly reduce the size of the wind turbine to 45 cm in height and 53 in diameter.
After determining the design of the windmill, the author proceeded to manufacture the blades according to the drawings.
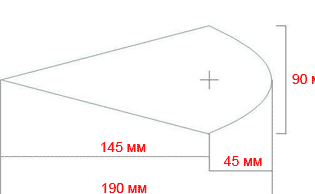
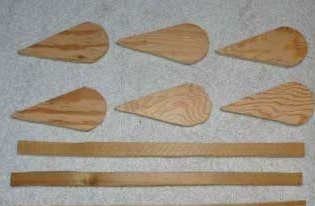
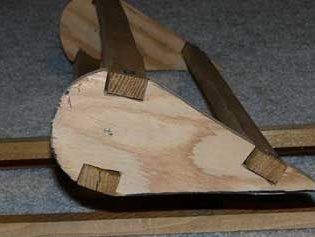
The droplet shape provides excellent aerodynamics of the wing. It is necessary to cut 6 parts, since this model of a wind generator has 3 wings. The size of the blades was also reduced by about half from the original design of Ed Lenz.
To begin with, the author cut out a cardboard template according to the presented scheme, and then made 6 contours of parts on it on a plywood sheet. After that, the parts were cut using a jigsaw along the existing contour.
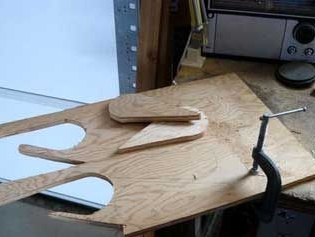
To connect two parts in one wing, you need to make wooden planks. The length of the plank is determined by the height of the wing, the author made 9 planks measuring 12 by 25 by 530 mm.
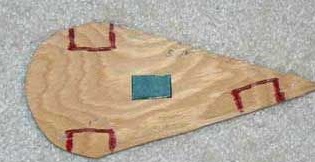
Then, using a pencil, grooves for installing wooden planks were marked out. Thus, two grooves were cut out on one side of each part and one groove on the other side.
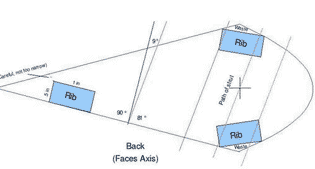
According to Lenz’s calculations, the pointed end of the blade should be turned 9 degrees back to the center of the wind turbine. However, if you consider that this angle is not enough for the effective operation of your particular model of windmill, then you can always adjust this angle after assembling the wind turbine.
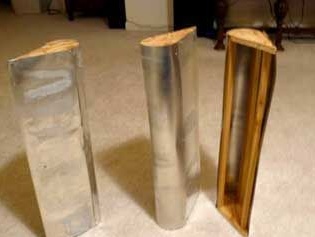
After all the necessary details were prepared, the author proceeded to assemble the blades. To do this, he inserted the strips into the corresponding grooves on the upper and lower parts. Moreover, it is important to maintain the evenness of the surfaces so that there are no protrusions of the strip beyond the edge of the plywood part.
As a fastener, the author used 5-7 mm screws that pass through the bar and through the plywood. Also, for greater reliability, you can fix them additionally with glue, but this is not necessary.
Then the author decided to cover the round and back of the blades with aluminum sheets. On each blade, the author used two pieces of aluminum sheet, which were fixed on several screws.
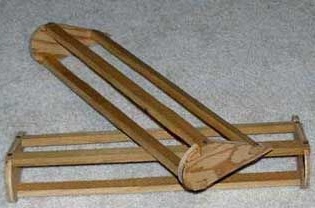
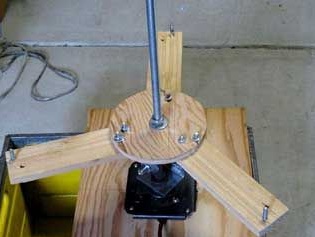
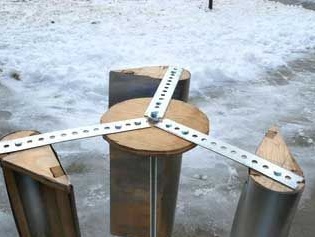
Further, the author began to manufacture the rotational part of the wind turbine. For this, two circles were cut out of plywood with a diameter of 20 cm and a thickness of 10 mm. Three circles of 120 degrees were marked on the circles, which determined the places of the struts. In the center of both discs, a hole was drilled to install a metal rod, which would be the axis of the structure. Thus, the wings are mounted along the central axis on two plywood disks with spacers, which in turn connect the tops and the base of the wings.
The author also performed the spacers as follows: for the lower part, wood was used, and for true, a strip of galvanized metal 1.5 meters long was taken. Holes were punched in the metal along the center line. The racks were also reduced to a length of 280 mm. Next, the author placed at the end of each rack, at a distance of 25 mm from the center of the circle, one line 120 degrees. Then a couple of holes were drilled in the rack and they were fastened with bolts through the plywood circle.
On the lower part of the shaft axis, at a distance of 6 mm from the end, a 12 mm nut was wound. Then, from below, a plywood disk was dressed on the rod, and from below it was fixed with another such nut. The disk on top of the shaft was dressed in the same way. After the height of the structure was adjusted, the nuts were tightened tightly so that the discs did not turn.
After which the author proceeded to install the wings. The wings were also bolted.

Then the author connected a 24 V generator from a lawn mower to this design. Since the shaft protruding from the end of the generator was 10 mm in diameter with a thin thread, the author decided to use the fastening of the L-shaped bracket to the motor shaft. Then, bolted, bolted the U-shaped connector to the L-shaped bracket.
Cutting holes in the plywood under the engine, the author installed a generator and secured it with bolts.
The generator was connected through an inverter, which converts direct voltage to alternating current, to the batteries.
After testing the wind generator, the author came to the conclusion that although it rotates fast enough, one generated voltage is too small. Therefore, in the future it is planned to replace the engine used as a generator with a more powerful model.