
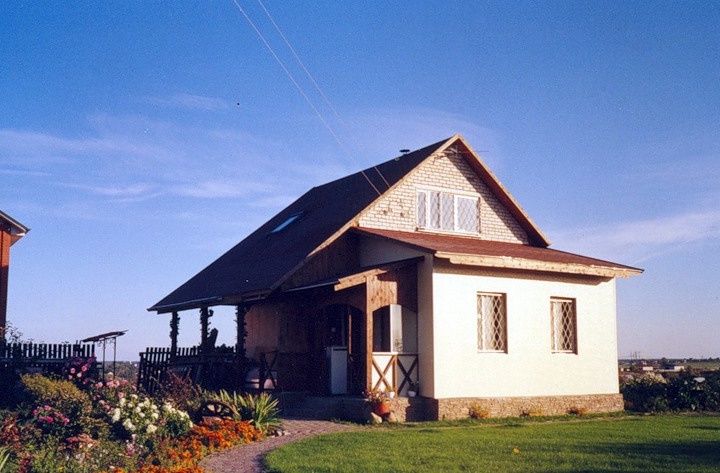
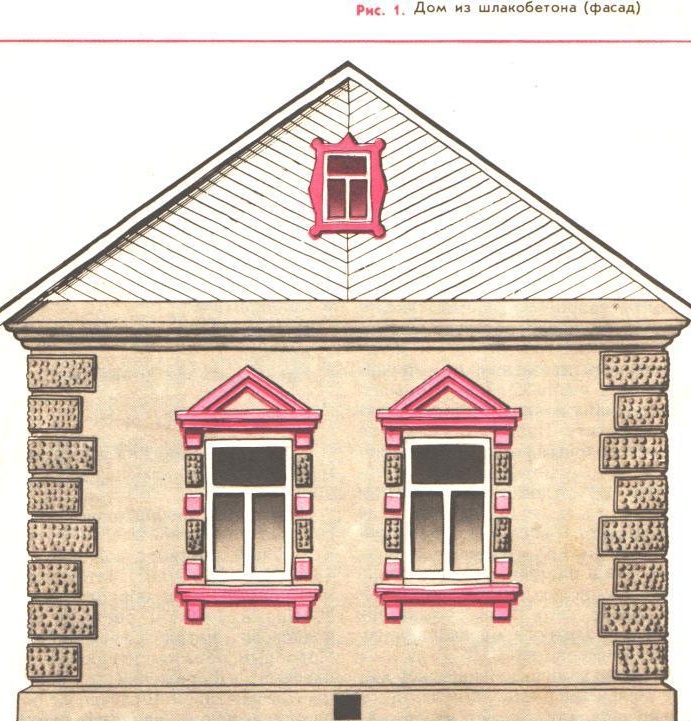
This country the house (Fig. 1), built by the author, stood for 20 years and would stand for another 50 years if the village turned out to be promising. The house was dry and warm. And for its construction, cement, slag and, of course, skillful hands were required.
The country house begins with the foundation
First things first I had to dig a trench under the foundation. The soil was clay, and the dimensions of the trench were small: 50 cm wide and 50 cm deep.
The foundation decided to make a tape filler of brick debris up to 7 cm in size (note that the crushed stone should be clean, free of dust and fine crumbs). The whole country house was built on clean water.
River sand was poured with an even layer on the bottom of the trench (layer thickness 15–20 mm). He laid halves of bricks on the sand with gaps of 3-5 mm, and poured on top of the prepared brick gravel with a layer 10 cm thick (Fig. 2).
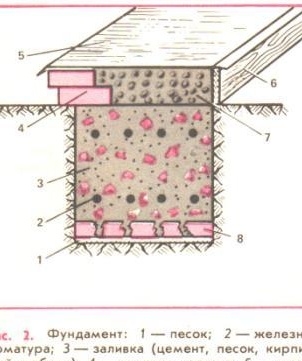
In an oblong box I prepared a dry mixture of cement and sand in a ratio of 1: 5 (by volume). Before preparing the solution, cement and sand were always thoroughly mixed in dry form until a homogeneous mixture was formed.
Since sand and cement quickly settle in the solution, the foundation was poured from a bucket. That is, first a dry solution was poured into the bucket (1/2 bucket), and at the edge of the trench, stirring the mixture, added water to the top to the bucket. Having prepared the solution, immediately poured the whole bucket onto the rubble. In this case, the entire solution must pass through the rubble. If a hill is formed from above the solution, then the solution is thick. It is necessary to fill the solution from the bucket not in one place, but along the perimeter of the entire foundation through 30-40 cm to ensure uniform pouring. After the first layer is completely filled, it would be good to put at least one thread of thick wire in the middle of the trench along the entire perimeter. I myself put thin pipes from heating as fittings.
It would be good to fill the entire foundation flush with the ground in one day. When filling the trench with a solution, I laid it in three layers. In the upper layer, 5-10 cm from the surface, provided another reinforcement. Do not forget, of course, to check the "horizontalness" of the foundation by level, spirit level, etc.
From the outside of the house I made an inlay with two whole bricks, thereby expanding the foundation by 10 cm. That is, now its width has become 60 cm, and the height of the foundation is increased by 2 thicknesses of bricks. Now, on the inside of the foundation, we strengthen the formwork board and fill the gap between the inlet bricks and the formwork with slag sand and cement concrete.The concrete components (slag, sand, cement) are taken in a ratio of 6: 1: 1. I recommend dosing the components of the solution in buckets.
First, mix cement with sand well, and then mix this mixture with slag. Water is added to concrete depending on the humidity of the sand and slag, but note that the solution (do not forget to make the last!) Should not be liquid and could be tamped.
Having poured concrete into the foundation formwork flush with the upper inlet brick, we make an even screed from cement mortar with a thickness of 10-15 mm from above. When preparing the mortar for screed, 4-5 parts of sand are taken for 1 part of cement.
After 2-3 days, you can lay waterproofing on top of the screed, for example, from roofing material (preferably with one continuous tape without tears). If you still have to join the ends, you need to overlap them so that the ends of the roofing material overlap each other by at least 50-60 cm. The best waterproofing is obtained from roofing material or roofing felt laid on hot bitumen, that is, a layer of heated bitumen is applied to the concrete screed , and roofing material is laid on bitumen. It is more reliable, of course, to stick another one on the first layer of roofing material using the same bitumen. The sides of the roofing material must necessarily hang from the sides of the foundation at least 5 cm.
Cap
So the foundation is finished. Now in turn is the basement (Fig. 3). Like the aerial part of the foundation, we make the outside of the base with brick cladding, which can be folded from uneven halves, of course, laying them with irregularities inward, which will improve their bond with concrete. The height of the cap is usually 60-75 cm.
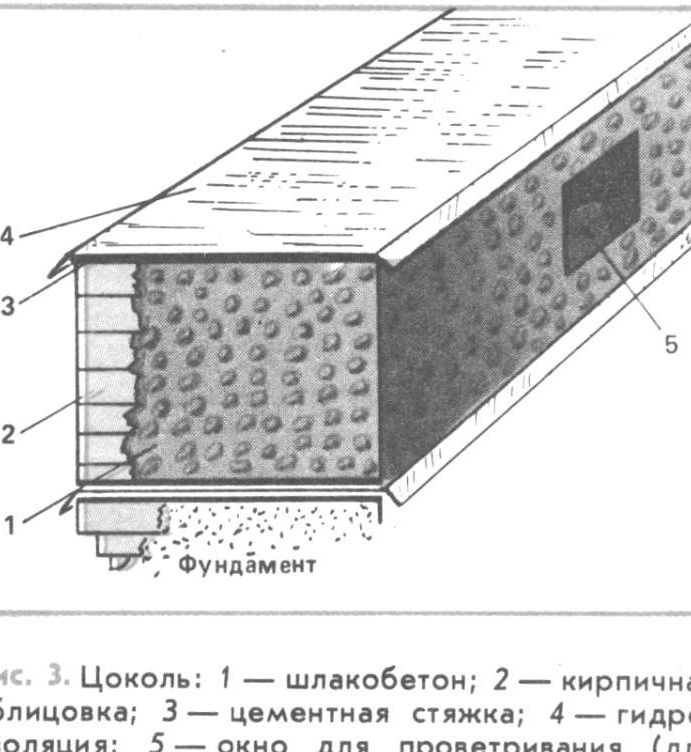
Note that the higher the base, the better the underground will be aired. Of course, before starting the construction of the basement, it is necessary to lay a cement screed 5-10 cm thick on the foundation waterproofing. Be sure to provide windows in the basement for ventilating the underground. During concreting, nets can be fixed in the windows (wire or made of reinforcement). At the top of the basement, as on the foundation, a cement screed is made, waterproofing is laid with skillful hands and again a cement screed, which is carefully leveled with a trowel. The composition of the slag concrete for the base is the same as for the upper part of the foundation.
Walls
First of all, for future walls, it is necessary to build a formwork from wooden panels 40–45 cm high (Fig. 4). Racks, fastening shields, it is better to dig into the ground. The distance between the stands, of course, depends on the thickness of the boards in the formwork panels and on the width of the walls (do not forget to 5 cm for the gap). The main requirement for formwork is that during ramming its boards do not bend, which will become clear at the first ramming together with backfill.
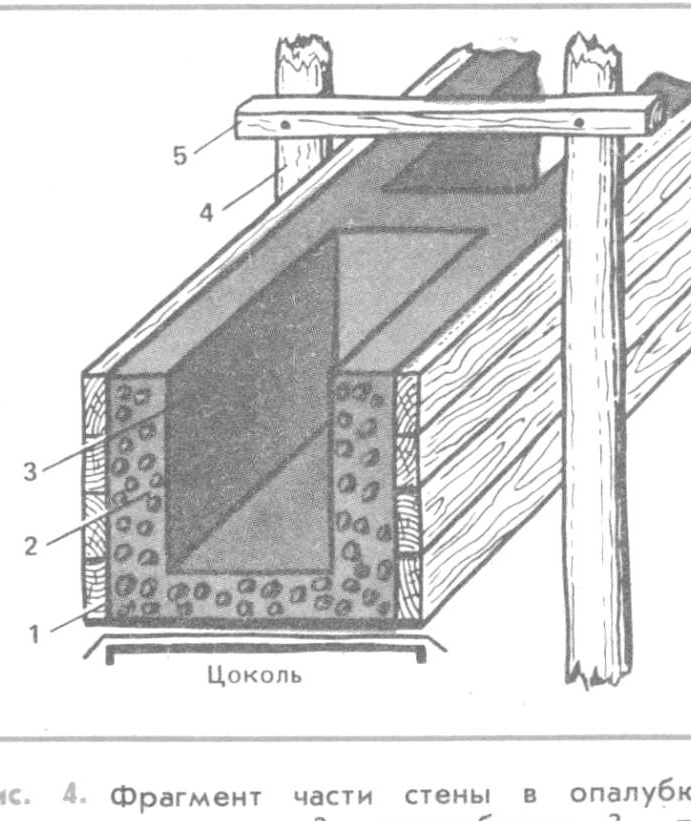
The racks on top are knocked down by strips, but you can also fasten the shields. The sides are fixed with wedges driven between the shields and racks into the gap, which is also necessary for more convenient removal and installation of the shields in another place.
As a rule, the walls of houses are usually made of monolithic concrete, but due to a lack of cement, the author decided to experiment and built walls of slag cement not solid, but with channels.
But it is better to actually country houses made of slag-lime-cement concrete. Lime does not allow the walls to damp, and they will be warmer. If there is little lime, you can limit yourself to lime concrete from waterproofing to windows. In principle, slag-lime cement cement can be composed of components taken in a ratio of 10: 1: 1 (by volume).
Slaked lime should be filtered through a fine metal mesh so that there are no lumps, and diluted with water so that the concrete mix is better mixed. It is more convenient to add water a little with a watering can.
But back to the walls. The author concreted the country house with just two shields, so that a lot of material for formwork was not required, and it’s easy to work with such shields. After installing the formwork (panels), the concrete is initially spread out with a continuous layer 10-12 cm thick along the cement screed and compacted. Then, on this layer at a distance of 10-15 cm from the shield, a piece of plywood or thick stiff sheet is placed, 35-40 cm high, 50 cm long (Fig. 5). The gap between the shield and plywood is carefully filled with concrete.The layer should be so high that, neatly compacted, it does not collapse if the plywood is removed. You can fill the free space between the plywood and the shield with backfill, and then, carefully removing the plywood, repeat the operation at the opposite shield, but backfill already do it flush with the layer of already laid concrete. During operation, make sure that the backfill does not get into the concrete.
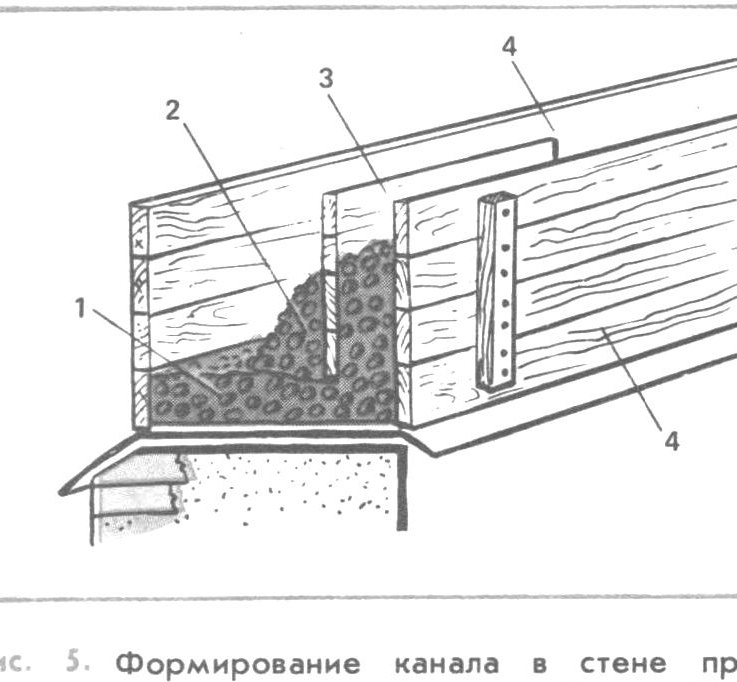
In the walls, every 30-50 cm transverse partitions are made with a width of 10-15 cm. The coincidence of the partitions is not necessary. The resulting square voids are covered with fine slag, preferably from non-coking coals, expanded clay.
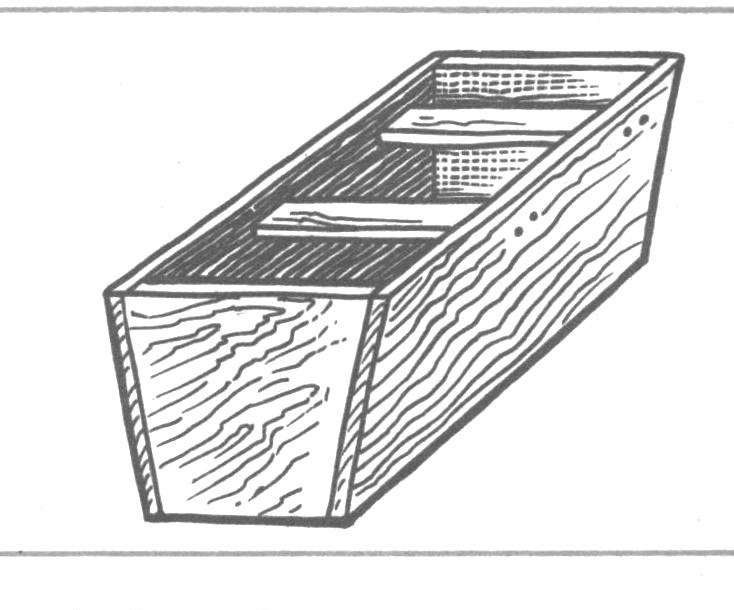
For the formation of voids, it is convenient to use a special plywood box with slightly sloping walls, so that the box is easier to remove from the wall after pouring concrete (Fig. 6).
The corners of the house are monolithic - 50X50 cm. In the doorway, the wall thickness is 25 cm, in the window - like the walls.
To decorate the windows with platbands, an additional formwork will be required (Fig. 7), consisting of two vertical boards (a distance equal to the width of the brick is provided between the boards). Using this formwork, bricks were strengthened in the sides of the platbands, which, protruding from the wall, form a platband, as it were, giving the window an elegant look. So, on the brick window sill, in the interval between the formwork boards, a spacer 65 mm high and a thickness equal to the thickness of the formwork board is placed.
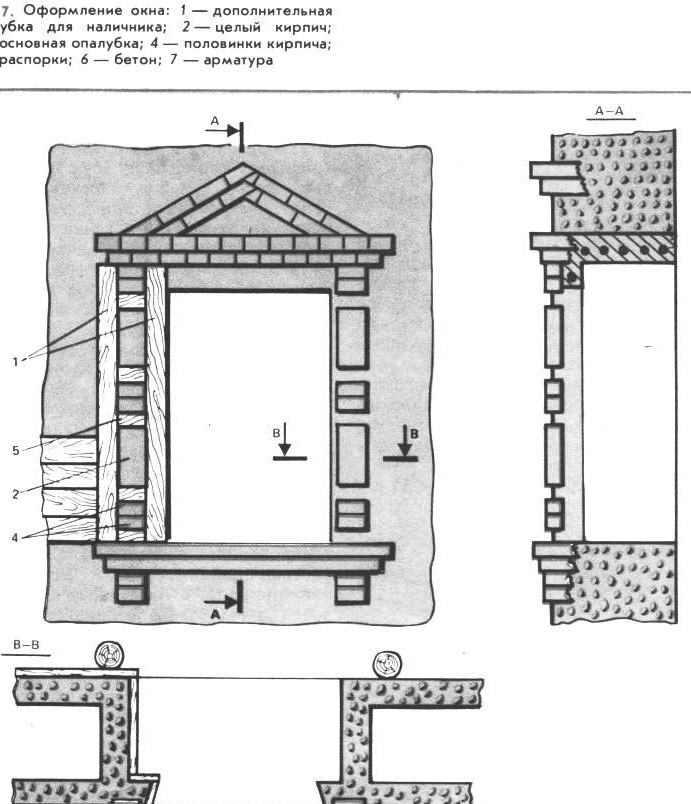
On the spacer in the space between the boards, two halves of bricks are installed (dry), then the spacer and the whole brick are put on them again. On it again a spacer, half a brick, etc.
Bricks are inserted in the process of concreting, and the stacked mortar presses them to the board, which is nailed to the outer sides of the boards of additional formwork.
The bottom of the windowsill is made as the basement of the house.
The overlapping of the window and doorways is carried out with monolithic jumpers, for which the formwork is made in the form of a box. At the bottom of the formwork, so that water does not flow out of it, a plastic film, roofing material, glassine are laid. It is necessary to lay wire reinforcement (5-6 pieces) in the lintels, the ends of the reinforcement should be bent and go to the piers not less than 25-30 cm. The height of the lintels is 12-15 cm. The concrete is prepared in sand.
The cornice is laid with brick lining, like a basement.
Under the ceiling beams - matrices, a platform of slag sand-cement concrete (6: 1: 1) with a thickness of 10-12 cm is laid out (Fig. 8). A beam of logs is placed on the beams, into which the rafters are cut.
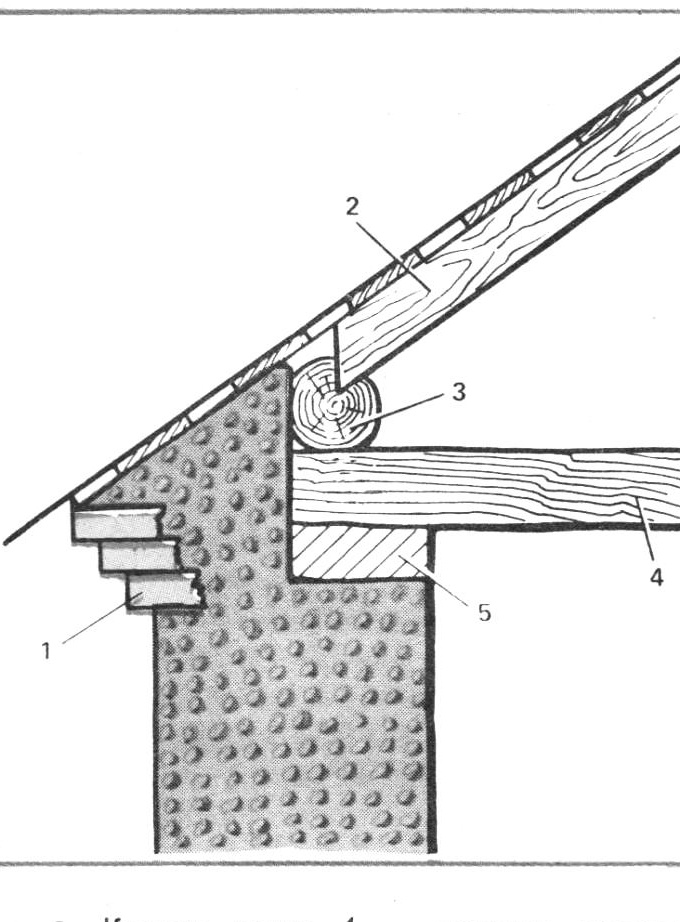
Pilasters were made at the corners of the house - ledges that should protrude 25-30 mm from the wall of the house, as well as platbands.
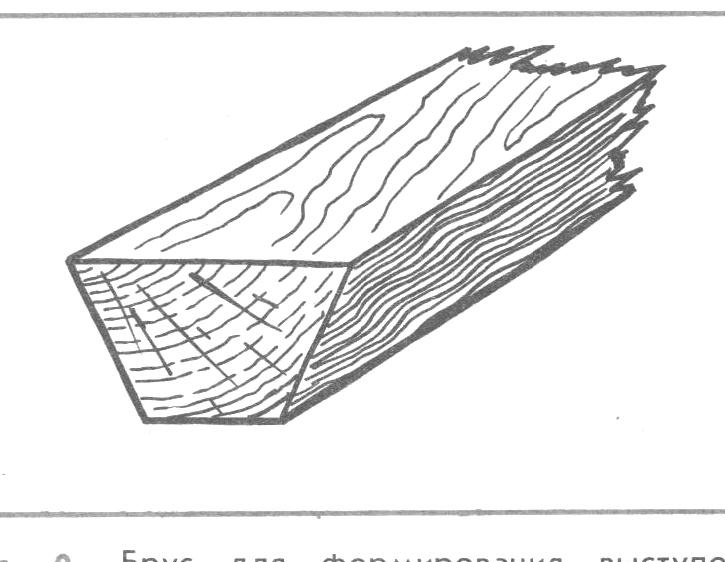
Pilasters are made as follows: the angle from the base to the cornice is marked into rectangles, half of which are 6-10 cm less (see Fig. 1). Prepare the bars 50X25 mm, and then process them so that the section of the bars has the shape of a trapezoid with a smaller base - 10-15 cm (Fig. 9). Nail the bars to the wall with the wide side up along the lines for marking the rectangles. Drive half of the old, curved nails into the surface bounded by the bars and plaster the rectangles. Align the rectangles filled with plaster with the help of a block and a half. Through a metal mesh nailed to the frame with cells from 5 to 10 mm, throw the solution onto the surface of the rectangles with force, as a result of which tubercles form on them. The frame with the net should be kept at a distance of 15-20 cm from the wall. At the end of the plastering work, remove the bars, at the side, trim the chamfers (bevels) with a grater, making them smooth. The walls of the country house, of course, plaster.
Ceiling
On top of the ceiling beams, the bars are nailed, and on them they put down boards shattered from the boards. On the boards, in turn, lay the insulating material. From below, sheets of plywood, hardboard or other material are nailed to the beams.
The internal width of the house is 4 m, area 27 m2.The house was heated with a cooking stove twice a day in the conditions of Moscow frosts, which required 2 tons of anthracite coal for the whole winter.
Under the floor you can make underground.
The author’s house was without a blind area and there was no dampness.
The house, made with skillful hands, stood for about 20 years and did not acquire a single crack.