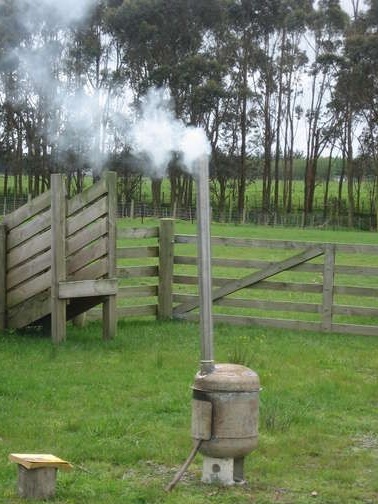
Often, going to rest for a couple of days in nature, there is not enough such a thing as a stove. Using the oven is very convenient to cook, in addition, with it you can cook something that can never be done at the stake. For example, in the oven it is very convenient to make pizza, and indeed any other pastries. In this article we will look at how do it yourself you can build a small portable stove for tourism, hunting or fishing.
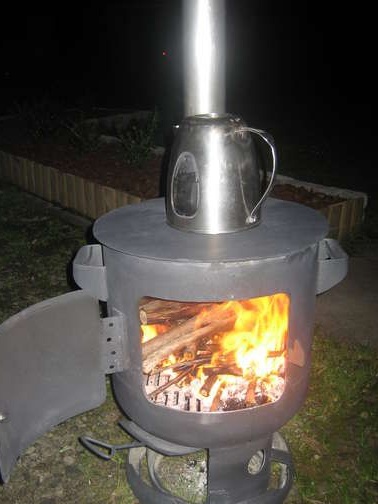
Among other things, such a stove can also work as a potbelly stove, that is, with it you can heat the room.
Materials and tools for the assembly of the furnace:
Necessary materials:
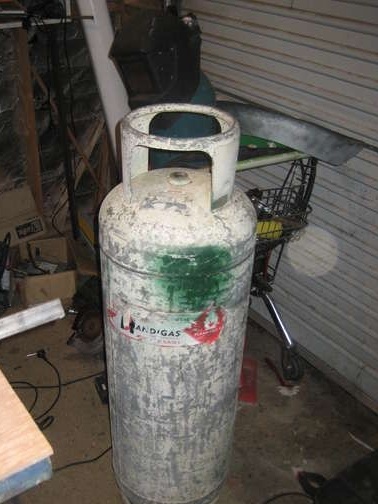
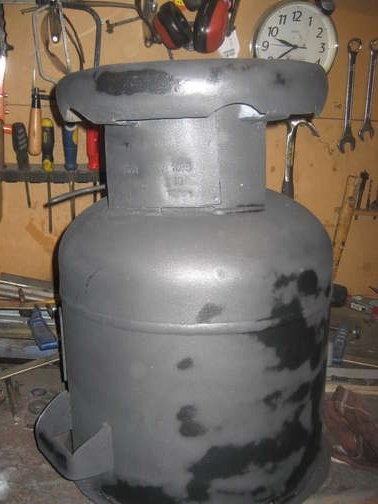
- gas bottle (high);
- a pipe with a diameter of 100 mm (for a chimney);
- metal door hinge;
- cast iron grate;
- paint for stoves (as an example of Krylon);
- furnace thermometer;
- cold welding.
Instruments:
- swara;
- drill with circular saws;
- a grinder with a large number of cutting wheels or a gas cutter.
The process of making a camp stove
Step one. We cut the balloon
DANGEROUSLY!
Before you start cutting the cylinder, it must be thoroughly washed and dried, otherwise gas vapors may cause an explosion. To do this, the valve of the cylinder is unscrewed, and water is poured inside. The procedure is preferably done a couple of times. Then you need to dry the cylinder well, under it you can make a fire and move to a safe distance.
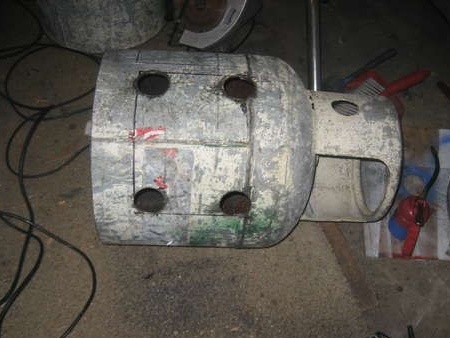
As the basis for the furnace, the author decided to use the upper part of the cylinder. On the circumference of the balloon, draw a line along which the balloon will then be cut. To make the line smooth, you can use a couple of glued sheets of paper. If cutting will be carried out by a grinder, then cutting discs of 100 * 1 mm in size are well suited for such purposes.
From the bottom of the balloon you also need to cut off the rim, while you need to try to keep it intact, as it will still be needed.
As for the bottom of the container, it must be cut so that the incision is slightly higher than the weld.
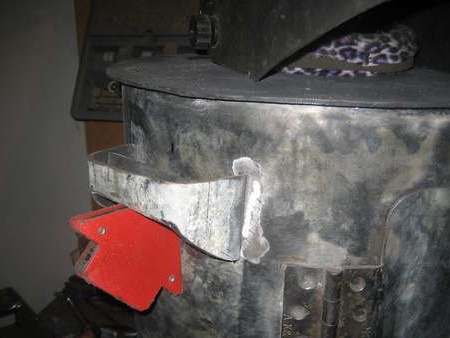
Step Two Making the firebox door
First you need to mark the door, then the author using a hole saw 50 mm drills the corners of the hole. Between these holes the metal can be cut using a grinder. As a result, a rectangular window with rounded corners is formed.
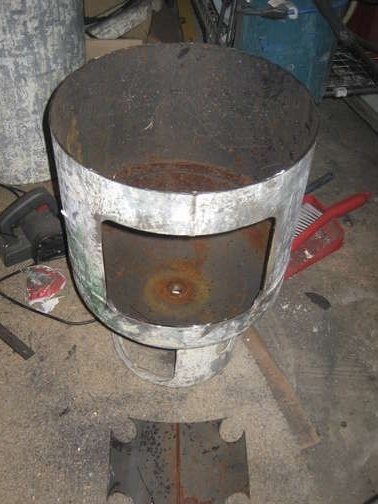
After that, you can cut the door. To do this, you will need the remains of a cylinder or sheet metal. The door is made a little larger than the furnace.The door is fastened with a door hinge, which is welded to the oven itself and the door.
It is important to note that the cylinders are galvanized, and this complicates the welding process. If such a cylinder is caught, the welding spots must be sanded with a grinder. The door needs to be adjusted so that it closes the firebox as tightly as possible.
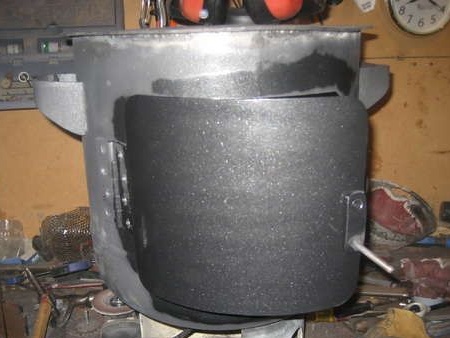
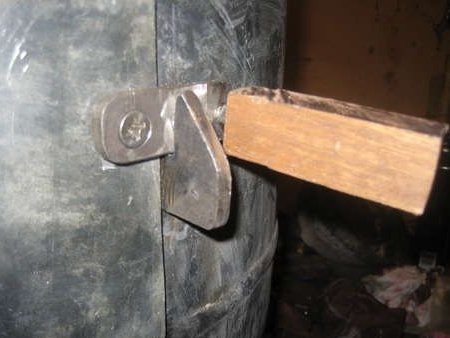
When the door is installed, it can open. For such purposes, the author makes a shutter. A piece of solid wood can be put on the shutter handle to make it easier to open a hot stove.
Step Three Manufacturing blower
It is necessary to make a hole in the bottom of the plate, this will be blown. For it, you need to make a valve, for such purposes it is necessary to cut a piece of metal in size a little larger than the hole. Since the valve should fit as tight as possible to the bottom, it must be leveled with a hammer.
The valve should go along the blower easily. To do this, two guides must be welded to the bottom of the stove, they can be made from a corner. Corners need to be bent in the shape of the base of the stove. Now you can weld the handle. So that the valve moves only to a certain position, a roller can be welded to it.
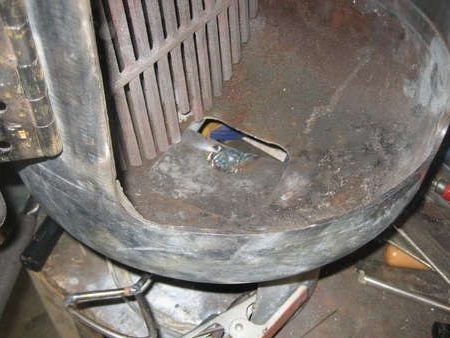
Next, the author cuts out a cast-iron grate. To do this, markings are applied to the grate and a circle is cut. This circle should fit in the cylinder.
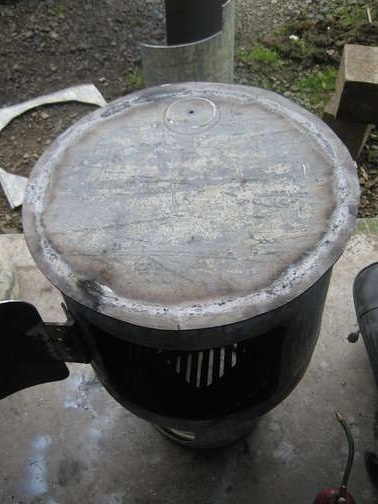
Step Four Brazier Installation
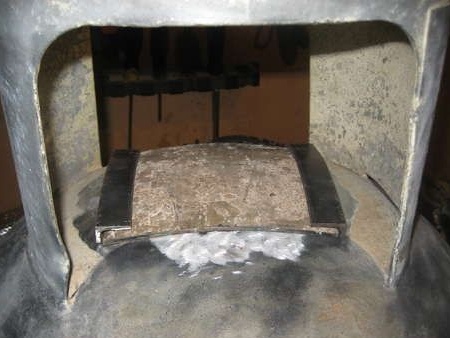
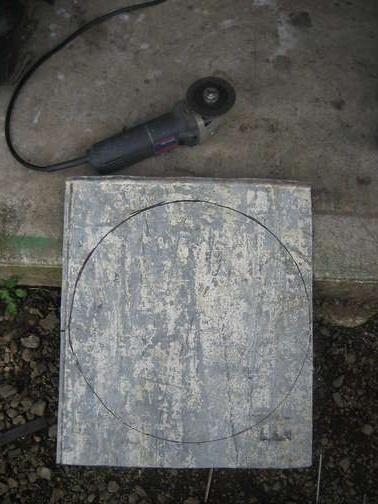
A 6 mm thick sheet of steel will be needed to make the fryer. For such purposes, a piece of the middle part of the cylinder is suitable. First, the author cut out a quadrangle from the sheet in order to align it; he drove a couple of times along the sheet with a machine. Then the sheet is finally leveled and adjusted with a sledgehammer.
Now you need to put the oven on a sheet and draw a contour around it, you can make it in chalk. The circle is easiest to cut with a gas cutter. To do such an operation with a grinder is quite problematic.
Now the frypot is welded to the furnace, first you need to clean the edges and install the grill inside.
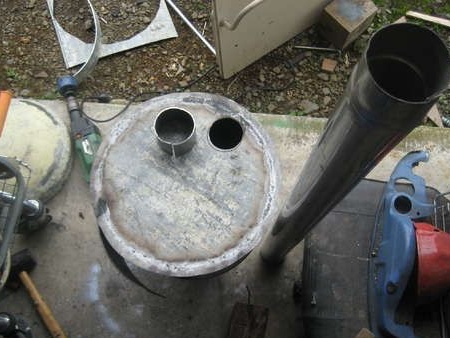
To install the pipe, from a sheet of metal you need to bend the ring. In size, it must be such that the pipe enters it tightly. Then a hole is made in the brazier for the pipe, and a ring is welded on top. The hole is drilled on the opposite side of the firebox. If there is no hole saw of the required diameter, then the hole can first be drilled smaller and then enlarged. To increase the hole, a grinder is suitable with several sharpened cutting discs mounted on the spindle.
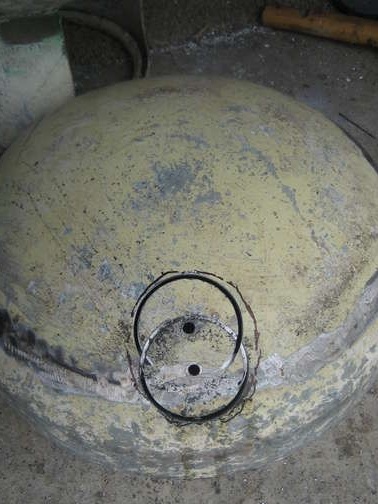
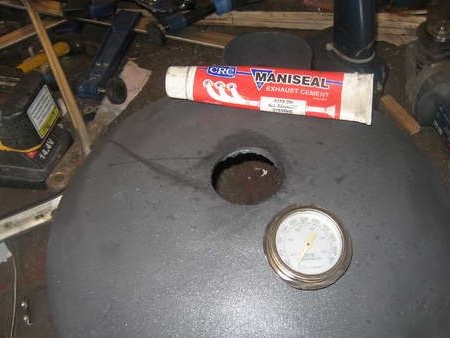
Step Five Cover making
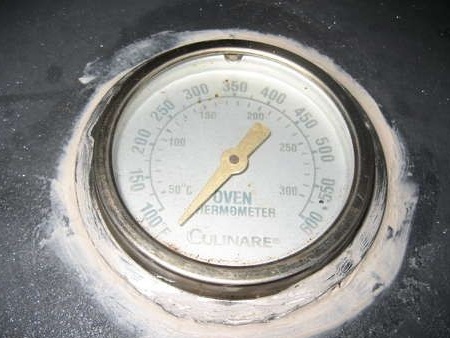
To fix the chimney, you need to make another ring. The height of the ring should be approximately 10 cm. The ring must be adjusted to the cap, taking into account its curvature. Then you can drill a hole in the lid. If you wish, you can install a stove thermometer in the lid. To do this, a hole of the desired diameter is drilled in the lid, and the device is attached using cold welding.
The author made a handle for the lid from a cart. This pen is good in that it dissipates heat well. Such a handle does not heat up much at a temperature of even 260 degrees.
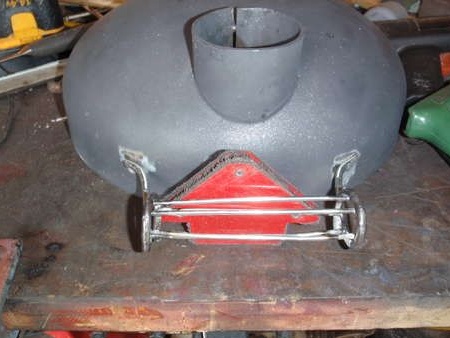
Step Six Handle Installation
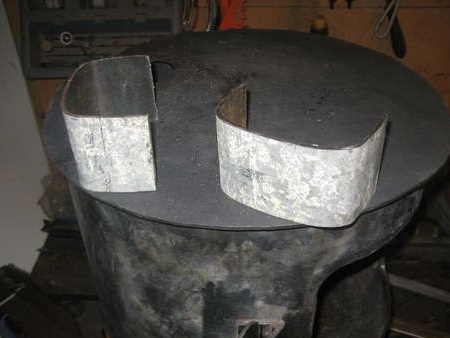
For the manufacture of pens suitable metal strips, they should have remained after cutting the balloon. They need to be bent in the form of an arc and make cuts, which should pass to the center from the corners. With the help of such cuts, the lower central part of the handles is bent inward. After the edges of the handles are folded, they can be welded to the stove.
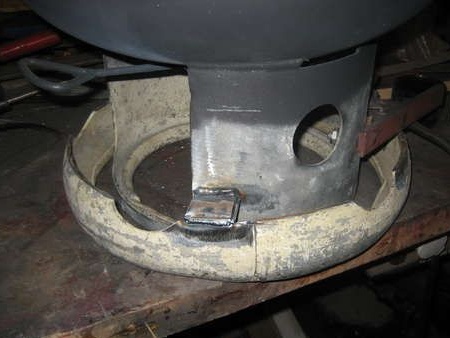
Even for the furnace, you need to increase the supporting surface so that it stands more reliably. For such purposes, you will need a rim that was previously sawn off of the cylinder. To connect the rim and the base, you will need a pair of steel strips, and then welding comes into play.
Seventh step. Furnace test
Before painting the oven, it must be checked, at the same time, the old paint will burn in the process. When checking, it is important to monitor the operation of the valves, as the metal expands when heated, and the valves can wedge. If so, they will need to be further developed. When the oven cools down, it must be treated with a metal brush.
Step Eight. The final stage. Painting
If the oven is assembled correctly and no further modifications are planned, homemade can be painted. For such purposes, a special heat-resistant, oven paint will be needed. It is recommended to apply in several layers.
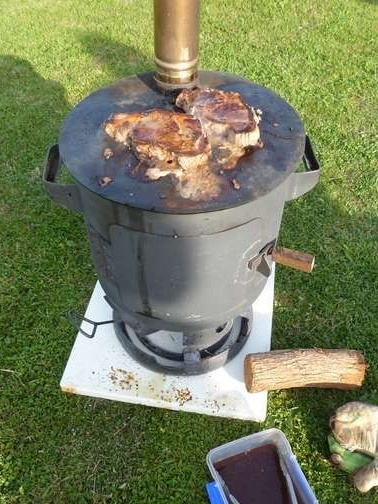
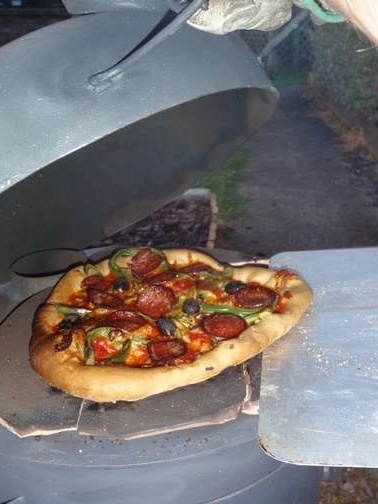
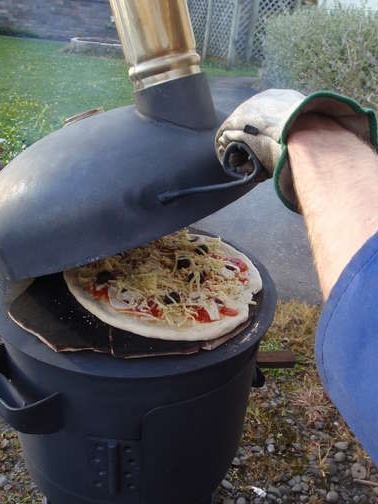
If you plan to cook pizza in the oven, then for such purposes you will need a ceramic tray. Before cooking, you need to light the stove and let the fuel burn out a bit. The oven is designed in such a way that smoke gets into the chamber during cooking. If you need to get less smoke, then for the furnace it is necessary to use solid wood. No need to heat the furnace with glued-wood waste and the like, as this can be hazardous to health.
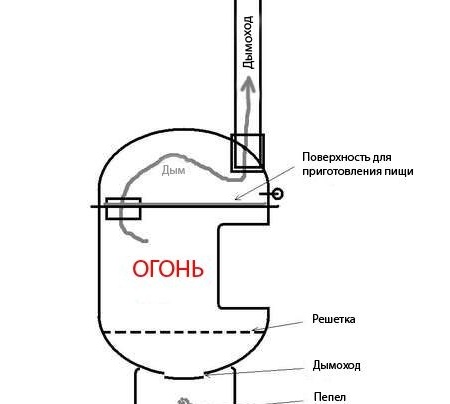
Regarding temperature control, there are two ways to do this. First of all, it blew, if you close it, the fire will die down, and the temperature in the brazier will drop.
You can also adjust the temperature with a lid, it is installed above the fryer so that the chimney that is built into it is turned relative to the outlet of the fryer 180 degrees.
If you want to lower the temperature, the chimney is placed on the same axis as the hole in the fryer, that is, all the heat will go directly into the pipe. For the preparation of pizza, the optimal temperature is 200-260 degrees.