For many years, many fishermen have not used accessories to clean the bottom of a reservoir and are not even aware of their existence. Of course, we are talking about lovers, but there are also avid fishermen among them, for whom fishing is a holy hobby and the best option for free time. In part, this unpopularity of the bottom mower is caused by the habit of fishing in deep-sea rivers and lakes, as well as at paid rates, where fishing spots are usually cleared in advance and awaiting customers.
But sooner or later, every fisherman finds himself in much less comfortable conditions - for example, on a feral pond overgrown with algae - and fishing threatens to develop into a real nightmare.
Some of the species of fish prefer such places, however, when it is reared, there is a great danger that the fish will break loose. And in the worst case, the hook will catch on something, the fishing line will become tangled - and you will ruin the tackle.
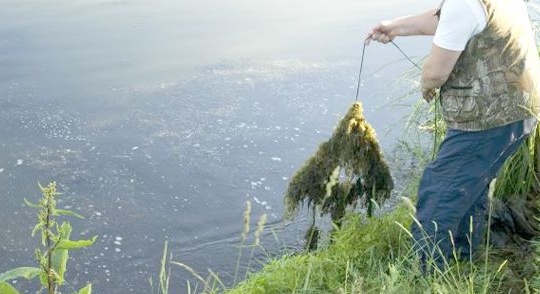
To prevent such failures and return home with an excellent catch, the bottom braid comes to the rescue of the fisherman - simple device for cleaning the bottom of the pond from algae, which we will make today do it yourself.
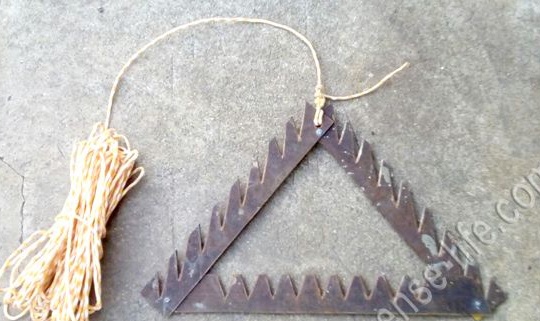
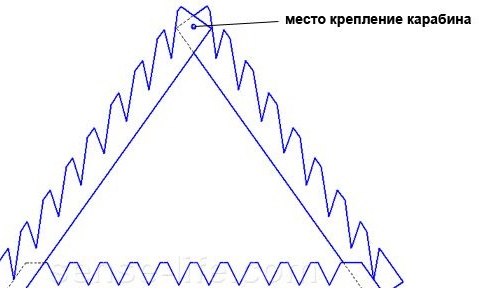
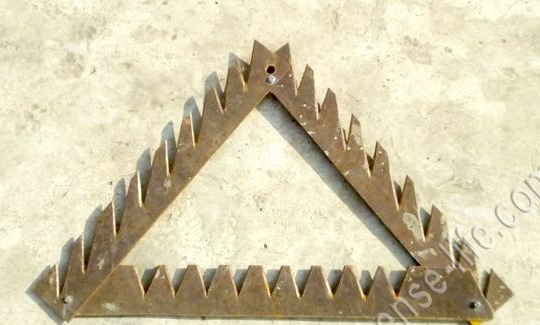
The bottom braid in our case will be three metal plates with sharpened teeth, interconnected in the shape of a triangle. It is folding and folded does not exceed the size of a folding hunting knife.
Making braids is a simple and not at all lengthy process that does not require any special materials. For this you will need:
1. Materials:
- sheet metal (2-3 mm. thick);
- M5 bolts and nuts - 3 pcs.;
- a small carabiner for attaching the cord;
- synthetic braided cord.
2. Tools:
- a grinder and a cutting disc for metal;
- drill and drill bit for metal;
- file;
- set of wrenches;
- roulette or ruler;
- a pencil.
Step 1: making braid blanks
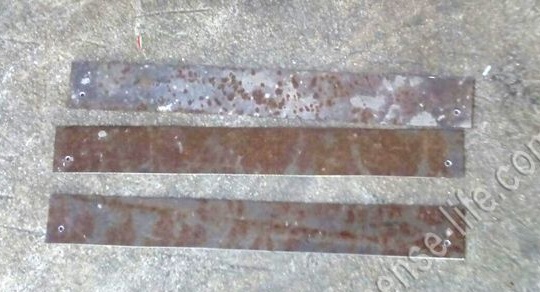
For workpieces, you need metal with a thickness of 2-3 mm. For these purposes, any trim length of 500 mm is suitable. Of course, stainless steel is the ideal braid material. But it is rare for anyone on the farm to cool down idle, so you can use the usual metal, which we will later process properly so that it does not oxidize.
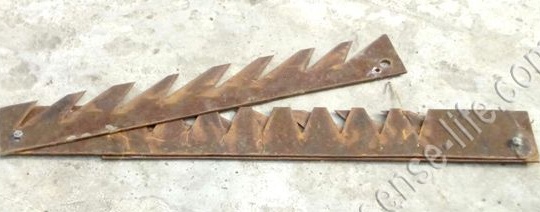
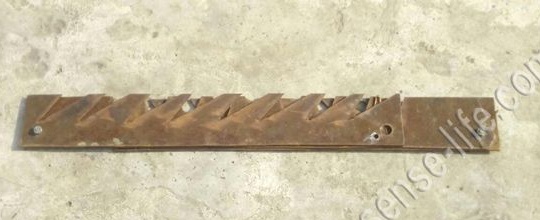
Mark out a sheet of metal. We need to make 3 parts 500 x 50 mm. Cut using a grinder.
If we subsequently connect the stripes together, we get an equilateral triangle. However, it was experimentally proven that the manufacture of a bottom braid of this design is much more complicated.Therefore, omitting the details, we only note that two of the three plates we have to shorten by 50 mm.
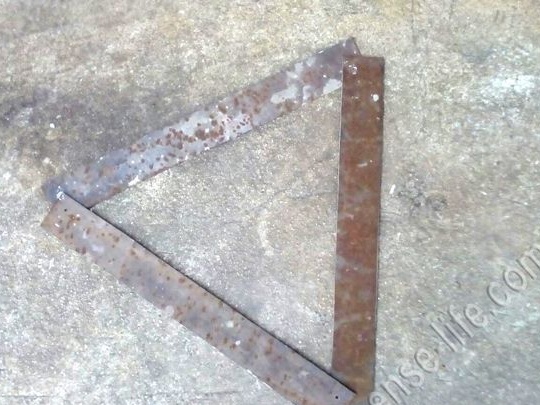
Thus, we got 3 parts: two plates 450 x 50 mm and one plate 500 x 50 mm. Drill holes for bolting with a drill and you can proceed to the most critical stage.
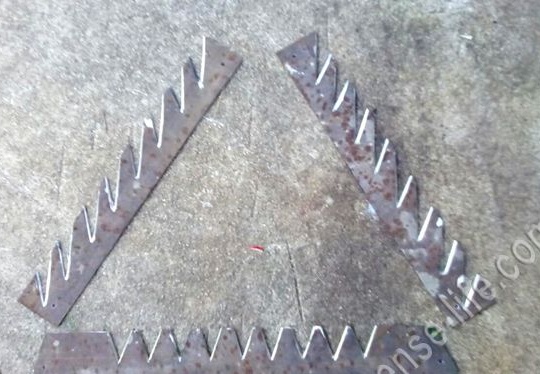
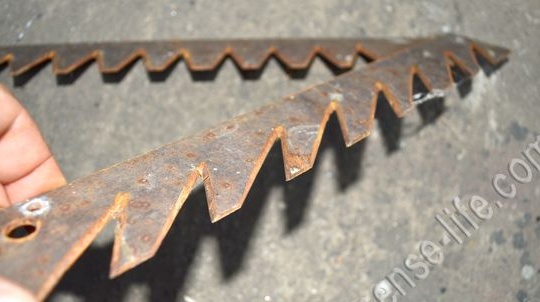
Step 2: cutting and sharpening the teeth
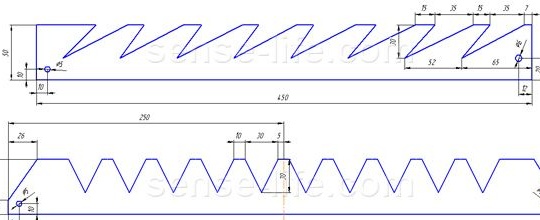
With a pencil, mark the contours of the future teeth on the plates and cut them with a grinder as shown in the photo below. The teeth should be located at a slight slope in the direction of movement of the unit, so that the spit effectively captures the algae.
If necessary, you can use the drawings below.
Now, armed with a trihedral file, proceed to sharpen the teeth. Sharpening in our case is one-sided and the cutting edge is located on top.
If the metal thickness allows, it is possible to grind the teeth with a grinder, having previously fixed the part with a clamp. However, the size of the teeth is quite small, and when using a grinder, difficulties may arise, as a result of which the workpiece will be damaged. Therefore, choose the tool for this operation at your discretion and to the best of your skills.
We used a file for sharpening the teeth and were satisfied with the result. Now, the braid will cope with the soft structure of algae fibers and young reeds without problems.
Step 3: processing metal parts
All metal parts must be protected from corrosion. Several times a year, the braid can be treated with a rust converter, having previously cleaned the surface of contaminants. Simply brush the transducer and let the scythe dry for a few minutes. Strip with fine sandpaper and repeat the operation.
If you think that this is not enough, treat all the parts with a converter and paint with a primer or profile paint for metal. Let the coating dry as instructed.
Step 4: Build
We connect the parts with bolts and nuts using wrenches.
At the top of the triangle, drill a hole for attaching the rope.
Attach the cord to the braid using a carabiner. This measure will prevent its destruction and the cord will not break at the most inopportune moment.
Choose a durable synthetic cord for the braid, preferably braided - thick enough so that it does not bite into the hands under load.
Scythe is ready, and we are sure that thanks to our photo instruction, its production took you very little time.