
Hello to all lovers homemade and builders in the shower. As in most cases, many friends dream of a large, comfortable, as well as a folding table for skill and embodiment of their creative ideas. And the idea of a folding table, there is an idea with the reason that in our small apartments and houses it is often not possible to build a full-fledged table, not a kitchen one, but just for creativity.
In this article I will tell you how the author realized his dream of making such a folding table and brought it to life. Drawings and manufacturing instructions are included.
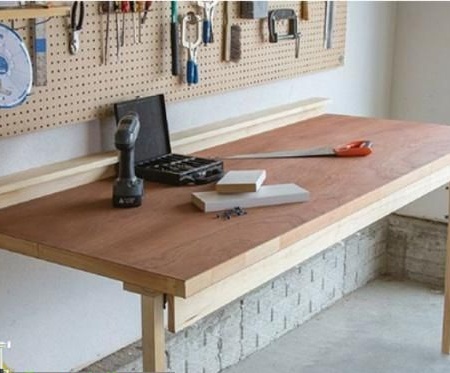
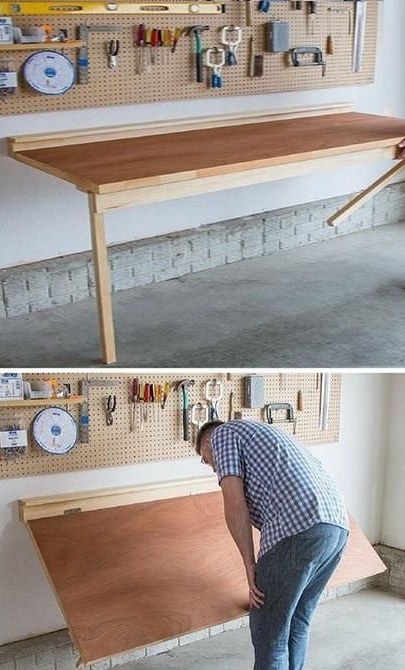
The idea of this table is useful in that the folding work surface is suitable for many applications in small-scale applications such as a house, garage, and even a workshop. Also, the advantage of this table is the usefulness at the time you need, if you wanted, laid out a table, made it, and when not needed, folded it, thereby saving space.
There is nothing superfluous in this assembly - a working surface with folding supporting legs. As well as a wall mount combined with a shelf on which it is convenient to clean the tool or other things when moving.
The author suggests that we take the usual wooden door to the main part of this table, since most often we don’t have to buy such a door, and therefore it’s not difficult to get used wooden doors now. People over time change them to metal or plastic, and good wooden doors are simply thrown away. If closer to the point, then finding such a door is not difficult, but you can not bother about the appearance, there are a grinder and paint for such cases.
To assemble this folding table do it yourself will need:
* The door is wooden, any unnecessary from a solid board or hollow body with reinforcing ribs in the form of battens will go to the countertop, everything will depend on what exactly you are going to build on this table.
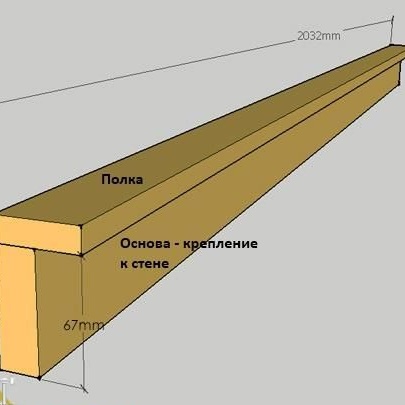
* Boards, two pieces, measuring 20 x 94 x 2032 mm from pine or other wood for the rear shelf and front crossbar.
* 1 board 32 x 67 x 2032 mm for wall mounting.
* 2 trimming 20 x 67 x 100 mm for fixing the legs (a certain height can be set in place using the brackets).
* 2 bars 44 x 44 x 860 mm per leg.
* A set of cotter pins, as well as screws for assembly.
* 3 loops per 100 mm and screws to them.
* 2 folding brackets with a clamp for legs with screws.
* 4 dowels from 6 to 8 (optional) x 90 mm for attaching the table to the wall.
You will also need tools:
* Level, for smooth installation of the table.
* Drill, drill and curly cue ball screw.
* Grinder.
* Tape measure and pencil.
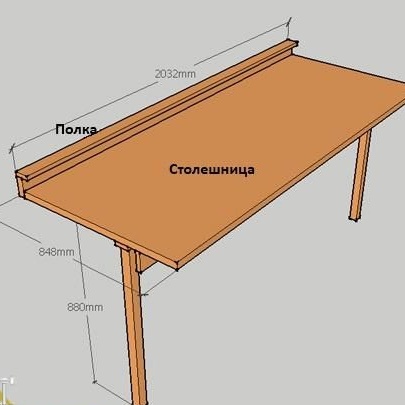
In this situation, the general drawing looks exactly like this, unlike your door, the dimensions, accordingly, will be different, so you should not look for just such a door, just by analogy, estimate the dimensions of your door by the ratio.
When all the materials with the tools are ready, we begin the assembly.
Step one.
Using a tape measure, we measure the dimensions from the door and write on a piece of paper, all measurements are necessary, as well as the main ones: width, height, length. We figured out the dimensions, go ahead.
Step Two
After measurements, using a jigsaw or circular saw, we cut out the shelf and the wall mount from boards, the dimensions of which are, respectively, 20 x 94 mm, and 32 x 67 mm. The length of these parts is equal to the length of your door.
A large number of hollow doors have a standard height of 2032 mm, but just in case, it is better to measure, do not be lazy before sawing boards.
Step Three
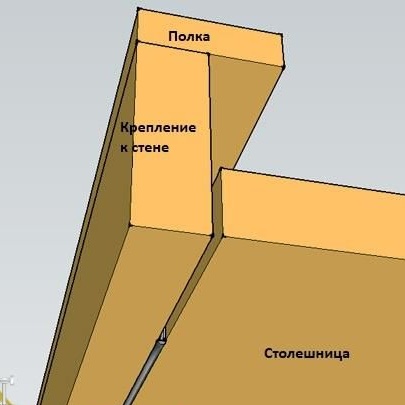
We assemble a functional shelf for tools and other things, and also do not forget about fastening.
This stage has two parts for making the table, this is the mount and the upper shelf. It will be more efficient to fix them on cotter pins, if you do not have enough skills in this technology, then easily and simply drill holes, make a hole under the hats of the screws, and then screw the screws into place. The heads of the screws can be hidden with putty, or with wooden corks mixed with glue, followed by grinding and then polishing.
Step Four
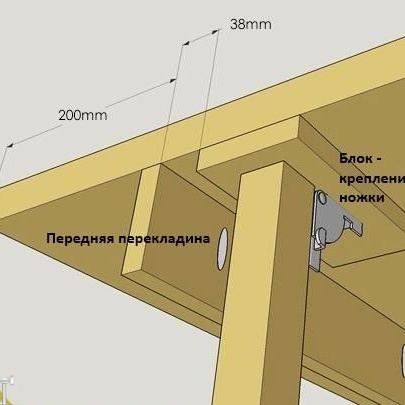
We fix the front bar under the lower mounting part of the countertop.
Besides the fact that its function is in the delimiter when folding the table, it also adds rigidity to the table, which will give a longer service life.
We fix it in any way you like, as an option with long screws or with the help of cotter pins, you can also fix it on the corners without any problems.
Step Five
We saw two assembly units with a jigsaw: the leg is a bar for fastening. When cutting, be careful with the jigsaw, as its parts have sharp corners connected with the electric motor, also observe safety precautions and wear gloves and goggles. After sawing out the two components, you need to install them.
There are no exact sizes for the other table; according to your table, correlate the sizes. We fasten the newly made legs and the base under the loop using 30 mm long screws. We assemble the folding system for the same fasteners, which will serve as staples, with which you can remove the legs.
Advice when choosing a staple: choose those that are stiffer in composition of the metal, and should also have a latch that prevents them from folding or opening spontaneously.
Step Six
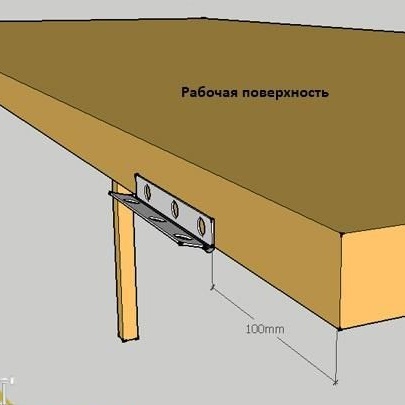
The installation of hinges on our countertop is quite simple and understandable, therefore, without hesitation, we fasten three loops. Having retreated 100 mm from the edges of the door, we fasten two brackets, and put the last one in the middle, I think everyone knows how to find the center. The axis of the loop located in the center should be located so that it descends beyond the lower edge of the countertop.
Seventh step.
Now you need to fasten the shelf to the table, which also plays the role of fastening,
we do it with the same 30 mm screws.
Step Eight.
Fastening to the wall is the final stage. First, place a place for fasteners, then
measure the total height of the foot from the floor (in this case, 860 mm, depending on the door used, the dimensions may vary) together with the base of the foot mount (20 mm).
We make the horizon line using the level, I am sure that they do not need to talk about the rules of use, so we move on to the next. Above this horizontal line we install the mount, combined with the leg.After that, we pull it with powerful dowels or strong screws to the wall (the used fasteners depend on your material, to which everything will be fastened, in the case of wood we attach to the screws, if the surface is more crumbly, then the dowel).
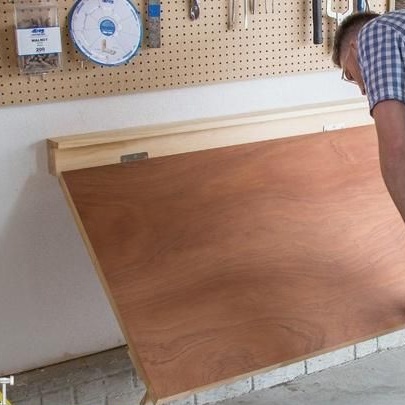
Our folding table is ready for this, now you can tinker with it whatever your heart desires, and if necessary it can be folded / unfolded, as well as transported. Thanks to all.