A few years ago, the lightbox was a luxury accessible mainly to professional photographers. Their various models are not widely represented in the market for photo products, although they remain not as publicly available in value as we would like.
However, in everyday life, a lightbox is necessary not only for professionals, but also for people who are inclined to bring any initiative to the ideal, including subject photography.
Are you a cook and dream to post quality photos of your culinary masterpieces on your blog? Or maybe you are a young parent and would like to capture every creation of your baby for a family photo album? Photograph souvenirs from their distant lands to tell friends about them. Collect electronic catalog of your own library or arrange an art studio from your paintings online.

In any case, you will need your own miniature photo studio, and today we will tell you how to arrange it by making a lightbox do it yourself without the use of expensive materials and tools.
If you plunge a little into the theory, then the lightbox or light box (light box), as it is also called, is a mini photo studio, a semi-closed zone with a uniform background and the most even lighting across its entire surface. Thus, the background element and light play a key role here, and everything else is the details of the frame, which can be made from almost any material at hand. In our case, from cardboard.
We chose cardboard for rational reasons. First of all, it is the cheapest and easily accessible material. It is lightweight and can be easily folded for transportation if shooting takes place outside your home or studio. In addition, we will use a ready-made box with its own structure, which will save us time and imagination for further creative activities.
So, in order to make a lightbox, you will need:
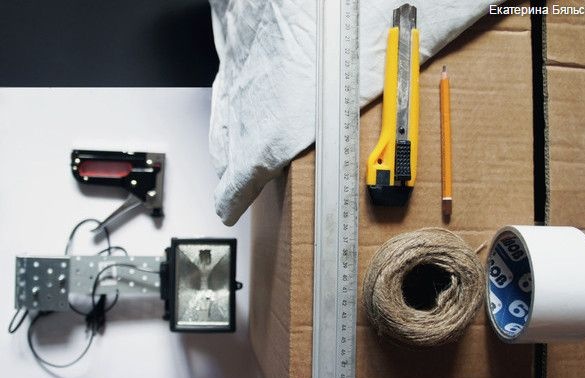
1. Materials:
- cardboard box;
- adhesive tape;
- a sheet of Whatman paper in A3 format for the background;
- a piece of white fabric (not too dense for matter to transmit light);
- two to three table lamps on flexible legs with cold light.
2. Tools:
- ruler or construction tape;
- clerical knife;
- a stapler powerful enough to work with cardboard or a glue gun;
- scissors;
- marker or pencil.
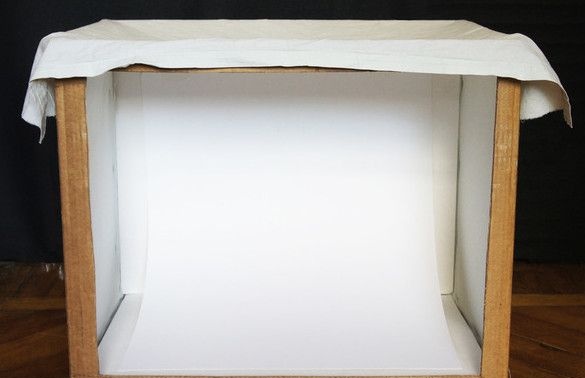
Step 1: making the frame
If you decide to use a sheet of Whatman paper in A3 format as the background, you will need a box 40 cm high, 50 cm wide and 30 cm deep. In the event that you do not have a box of suitable size, visit the nearest post offices of carriers for packing cargo they offer customers a wide range of cardboard packaging in all shapes and sizes.
Ultimately, your job of preparing the box is to leave the supporting structure and remove all unnecessary, arranging windows in all walls except the bottom and back wall, which will give the product additional rigidity.
Marker the location of future windows. The cardboard that you leave on the contour, on the one hand, should fulfill the function of the supporting structure, and on the other hand, not prevent light from entering the lightbox. Therefore, find the necessary compromise without cutting too much from the box.
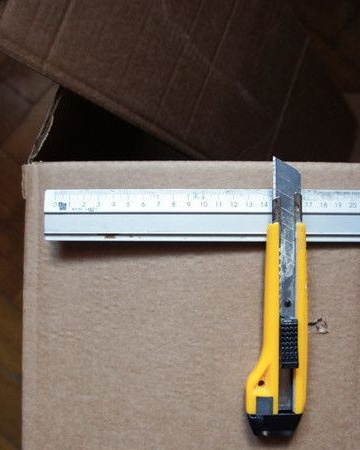
Cut out the opening windows using a ruler and a sharp clerical knife.
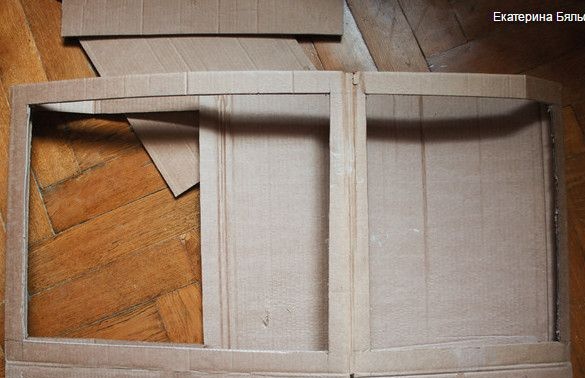
Please note that in the process, the edge of the frame already prepared properly can break, which in our case is more than undesirable. Therefore, act carefully and carefully. However, if such a small nuisance still occurred, you should not throw the box away. Simply reinforce the fold line with a piece of cardboard using a glue gun.
Tape the edges of the cardboard box with tape to protect the lightbox from minor mechanical damage. In addition, adhesive tape will give the finished product a more finished and aesthetic appearance.
Step 2: wrapping the frame with fabric
As a material for the walls of the lightbox, a sheet is quite suitable. In any case, the main thing here is that the material should not be too thin or excessively thick and properly transmit light.
You will pull the fabric from the inside and onto the walls in which the windows are made, since it does not play the role of the background, but refers to the lighting element. Thus, you will need three pieces of fabric: on the two side parts, as well as on the top of the light box, if you plan to use the upper lighting during the shooting process.
Mark and cut pieces of fabric of the required size. If it is not possible to overcast the edges of the fabric, leave a little allowance, bend the edges and sew them by hand or sew on a typewriter so that they do not crumble. If you nevertheless overcast the fabric, there is no particular sense in leaving excess for allowances. Everything will look neat anyway.
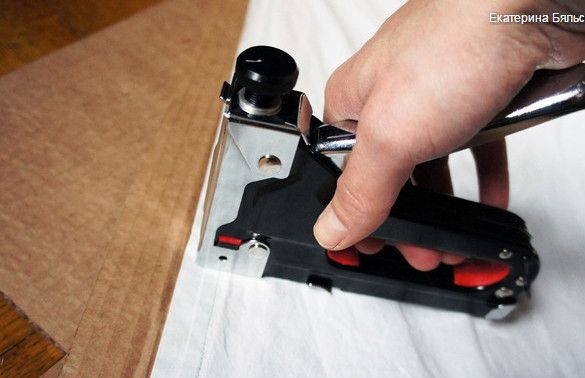
Stretch and secure the fabric evenly on the inside of the openings. To do this, use a stapler or glue gun.
Step 3: setting the background
This, of course, is the easiest stage of all, since all that remains is what to put in place a piece of paper. But we still allow ourselves some advice.
Firstly, we strongly recommend not to be limited to a white background, but to purchase several multi-colored Whatman paper at once and experiment a bit. In any case, you can’t just do without a black background, so you should pay special attention to it.
Secondly, for the convenience of the workflow, a sheet of whatman paper is better to be attached at the top and, if desired, at the bottom with a stapler or in any other way so that it does not slip and does not bend under the pressure of exhibits for photographing.
Before you start making lightboxes, once again think about what size the area for photographing will suit you. If the lightbox turns out to be too small, you will constantly go beyond the borders of the Whatman paper, and you will have to overwrite all unnecessary photos with the photo editor. With a large number of processed photos, this takes a lot of time.
Step 4: Install Lighting
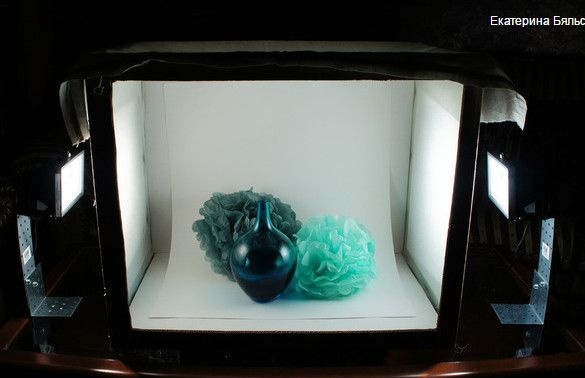
For lighting, we used street projectors, which were mounted on a frame of metal building corners. You can use table lamps or lamp clips.However, make sure that the light in all of them has a cold spectrum.
It is better if they are LED lamps that do not heat up and which can be safely put close to the fabric without fear of burning the house. If you use incandescent lamps, do not leave the lightbox in an active state unattended to avoid fire and do not place the lamps too close to fabric and cardboard.
Please note that at the top of the lightbox, a lighting window is also present and you can easily use a third light source. This will greatly improve the overall lighting and reduce shadows if necessary.
Lightbox is ready. We just have to add that in order to shoot with it, it is not necessary to have any professional skills. Every photographer with something - yes, he begins and learns new in the process of the next shooting, as professionals are not born, but become.
Therefore, quickly get down to work, and we have no doubt that such a lightbox will find application in the hands of any lucky person who has already managed to acquire a camera.