
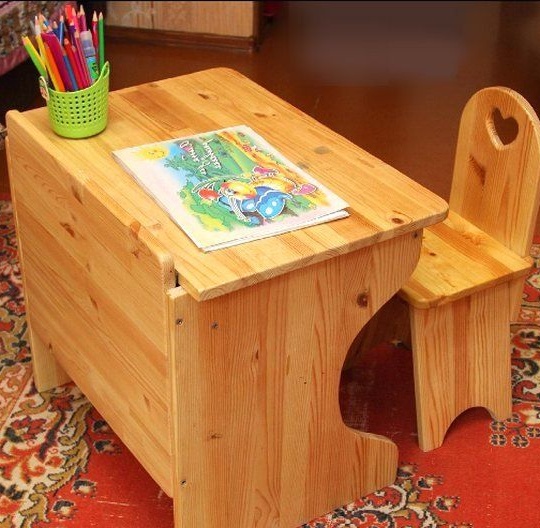
Hello to all lovers homemadeas usual in every school there is such furnitureas a school desk, which is the main part of the interior of any educational institution. The desk can also be used with advantage at home, which is why it was decided to make the desk do it yourself for children. In this article I will tell you how the author made a small desk at the age appropriate with his own hands and a comfortable chair, which allows you to conveniently flip through picture books, draw, hang from clay or lay out toys. Before manufacturing, we need to decide on the materials necessary for this.
In order to assemble this homemade product, we need:
* Piano loops 50 cm long.
* Con-firms.
* Self-tapping screws.
*Sandpaper.
* Metal corners.
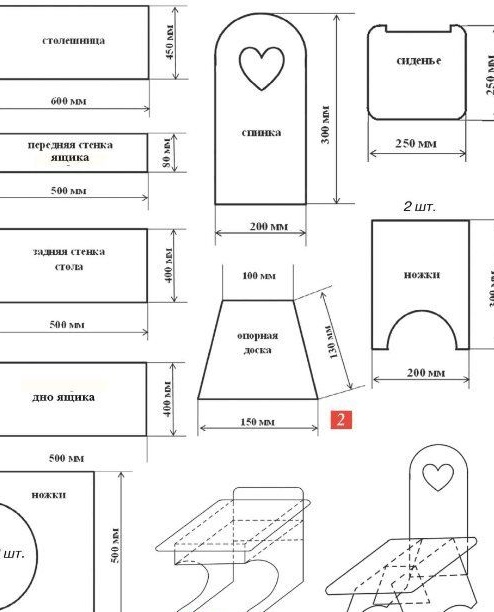
* Cut a furniture board from pine, for a school desk according to the scheme 1, and for a chair according to the scheme number 2.
That's all the materials are ready.
You will also need tools:
* Electric fretsaw.
* Screwdriver.
* Grinder to facilitate grinding work.
And this is how the drawing of our future school desk looks like, since making parts with dimensions taken from the head will be not only wrong, but also not accurate.
Step one.
First of all, you need to assemble the desk, and only then the chair, so we gradually begin the fascinating assembly process. As usual, all wooden parts should have the smallest roughness, which in other words just be encrypted. It is best to grind on a grinding machine or with a grinder, if it is not there, then you can use ordinary sandpaper. It should be processed with sandpaper with grain size first large P40, then medium P120 and smaller P220. We correct acute angles with a jigsaw, thereby rounding them. After grinding, you need to cut out the semi-circular notches in the legs, this is done so that the child who is sitting at the desk does not feel discomfort, and also so that knees do not rest when turning to the sides.
Step Two
Now you need to attach the legs with the bottom of the drawer, we do this with the help of a mat, it is better to screw them with a screwdriver into the holes that need to be done in advance, the diameter of which is slightly smaller. We lower the bottom 8 cm lower than the edge of each of the legs, as shown in the figure according to scheme 3. Then we fix the front wall of the box, taking into account that its upper edge should be at the level with the legs, so that the box turns out to be almost perfect and smooth.Armed with a screwdriver, we attach the rear wall of the school desk to them on the screws, the resulting protrusion should turn out several centimeters higher than the edges of the legs themselves.
Step Three
A school desk without a countertop, this is not a school desk, so we will attach it now, but we will need a piano loop for this, we need to fix it so that its free movement can allow us to raise and lower the countertop without any difficulties and sticking, and also to the surface when closing had a flat surface, for better contact and evenness. The result is a medium-sized drawer under the countertop, where you can store things such as albums, coloring books, accessories and many different little things.
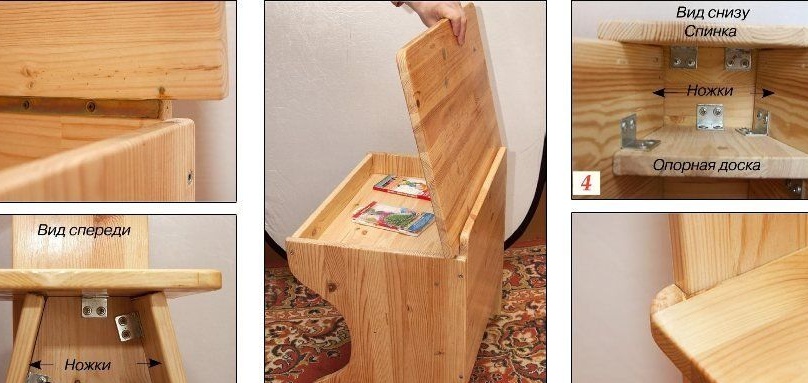
It is also worth considering that the protruding edge of the rear wall of the desk does not allow the handle and its like to slide down and fall on the floor, which can be left on the countertop without fear that the handle will roll off somewhere when the cover is lifted, as in photo 2.
Step Four
And so we got to creating a chair, we also make it from wood, after which its legs are fixed at an angle to the seat, which we fasten with a trapezoidal support board, it must be inserted in the middle in between, as shown in figure 4. to strengthen the structure, knowing that children like to swing on a chair, all its details at the joints must be fixed using metal corners that can be interconnected with furniture, see photo 3. We also fasten the backrest, as shown in photo 4. You can increase stability by cutting out on a knife ah in the supporting part semicircular recesses. Prematurely cut the groove for the backrest in the seat, which is shown in photo 5. The last one was rounded and cut in the shape of a heart in the upper part so the stool is easier to carry, it is easiest to cut such a shape using a jigsaw according to a previously drawn picture.
At the end, home-made furniture is varnished in two layers, protected from moisture and other influences.
Thank you all and good luck to you homemade.