
A pond in the midst of one's possessions is an incredible luxury.
Firstly, this is one of the most effective solutions in the field of landscape design. Indeed, the pond is usually the center of attention - not only households, but especially guests. In our country, for a number of reasons, it is not customary to please yourself with such excesses, even among wealthy and respectable families. Meanwhile, in some countries, the opposite trend is observed, and there a pond, flaunting in the middle of the garden - is not so rare.
Secondly, the value of a home reservoir is not always limited to aesthetics. You can show imagination and move on. If you approach the issue correctly, in the pond it is quite possible to swim for children and even adults, or, for example, to fish. In other words, make it truly functional.
We have long nurtured the idea of creating a reservoir on the site, and over time it came to the understanding that its size should not be less than 6 cubic meters. And then all the problems started.
The fact is that manufacturers of finished products offer their customers not so many options. Especially when it comes to such volumes.
You can, for example, purchase a plastic container with a volume of up to 2 cubic meters. The declared service life, however, does not exceed 10 years. And this despite the fact that the cost of capacity varies within 500 dollars. But, in general, it was possible to come to terms with anything, but not with sizes that absolutely did not meet our original idea.
The problem could be solved by the purchase of fiberglass containers, but then its cost would be simply unbearable.
Thus, we were forced to finally abandon the option with ready-made forms. There was only one thing left - to make the foundation of the pond yourself and use reinforced concrete for this.
The pond had to meet only a few requirements:
1. depth not more than 70 cm. This is a key factor guaranteeing the safety of young children. In addition, water at this depth will quickly warm up;
2. It was not planned to launch fish and plant plants for hygienic reasons.
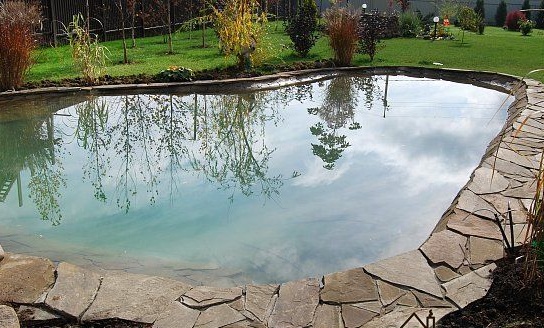
As a result, the pond, which you can see in the first photo, was made do it yourself, and the process took a lot of time, and also proved to be rather laborious. But we did not expect another from such a large-scale undertaking.
We will only say that we are generally satisfied with the product of our own creativity and now we enjoy the results of our work with pleasure.
If you want to repeat our feat anddo homemade pond do it yourself, you will need:
1. Materials:
- cement;
- sand (not sea);
- crushed stone of a suitable fraction for a 10 cm layer of a solution;
- plasticizer (dishwashing detergent can be used);
- roofing material;
- reinforcing mesh or wire with a diameter of 4 mm;
- acrylic primer;
- material for decoration (in our case, natural stone).
2. Tools:
- concrete mixer;
- Bulgarian with a circle for metal;
- buckets;
- shovel for working with a solution;
- a bayonet or American shovel for preparatory work;
- car;
- a knife for cutting roofing material;
- paint brushes for priming or roller;
- trowel for leveling the surface of the concrete layer;
- construction tape measure;
- building level and a long level rail for level measurement.
Step 1: choosing a place
Choose a place in advance. You can even enclose the territory that you plan to divert under a pond and imagine that it has already been built. Thus, it is easy to determine if you are not inadvertently mistaken with a place. After all, then it will be too late to do anything.
We recommend choosing flat and open areas, at some distance from large trees and shrubs, since in the fall during the fall season you will have to clean the pond.
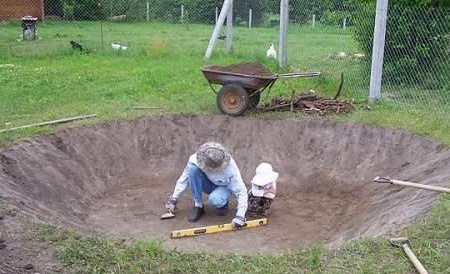
Step 2: earthwork
The volume of land is not so small and at the same time not as huge as it might seem at first glance. You probably saw in the photo that the pit for a reservoir of 6 cubic meters is not too big. However, be prepared that you will have to take out more than a dozen wheelbarrows of land, and it will not be easy.
Consider using part of the land nearby: to arrange an alpine slide, vertical gardening, or aboveground vegetable beds. You will find a lot of similar options.
Decide on the size of the reservoir, taking into account its volume and get to work. You will need a convenient two-wheeled car and, possibly, outside help at the final stage, when the foundation pit will be already quite deep.
Control the slope and bottom plane by placing the building level on a long rigid rail. And remember that the pond does not have to be strictly of the correct shape if you use such a plastic material in decoration as natural stone.
Make sure that the bottom has a slight slope. This will greatly facilitate the process of pumping out water with a pump, since all of it will be collected in one place.
Level and compact the bottom and walls of the pit before proceeding to the next step.
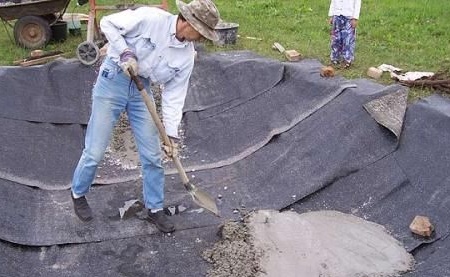
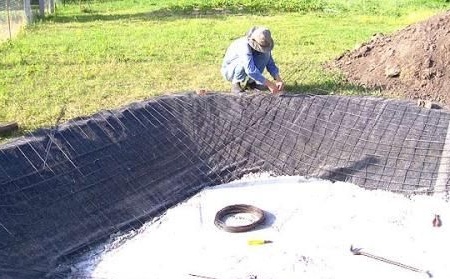
Step 3: waterproofing
For isolation, we used roofing material. Overlap it.
Be sure to plan allowances around the edges, as you will use them as formwork for the construction of an aboveground bowl. Its height will be at least 20 cm. The width of the aboveground part is arbitrary and depends on the subsequent decor. In our case, it turned out to be about 40 cm, because for the decoration we used a large flat stone.
Step 4: concrete work
Start building a concrete base from the bottom and move from bottom to top. To do this, prepare the first batch of the solution and adjust the ratio of materials, if you see that there is such a need.
As usual, preparing concrete for this kind of work, use cement, sand and gravel in a ratio of 1: 2.5: 3.5. Calculate the water consumption yourself. Keep in mind that the solution should not be too liquid, since it will have to be used on a gentle base. But it also should not be too cool, but such that you can easily lay and level its surface.
Before adding water to the batch, dilute the plasticizer in it. It can be replaced with a regular dishwashing detergent.
Mix sand and cement first, then add water and, only after thoroughly mixing the solution, pour crushed stone.
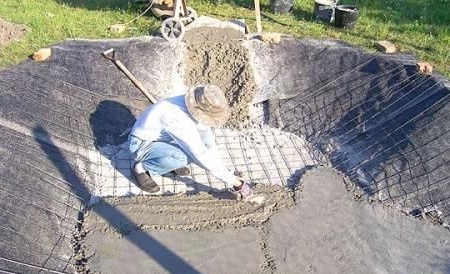
Lay a layer of concrete 5 cm thick to the bottom.
Now proceed with the reinforcement as shown in the photo below. For this, we did not use a finished mesh, but a steel wire with a diameter of 4 mm. From it, knit a grid with cells of 10 - 12 cm.
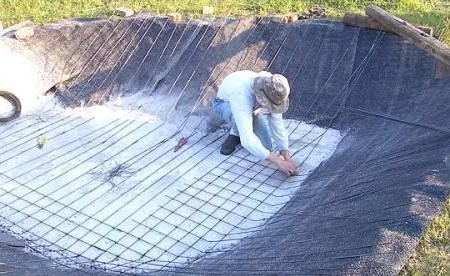
Lay the second layer of 5 cm of concrete on top of the mesh and wait until it sets.
Tie the wire into the net on the walls of the pond and begin to form concrete walls. To prevent the solution from sliding, knead it steep enough and work in small strips, moving in a circle.
It remains to form an aboveground bowl from concrete. Recall that its height will be 20 cm.
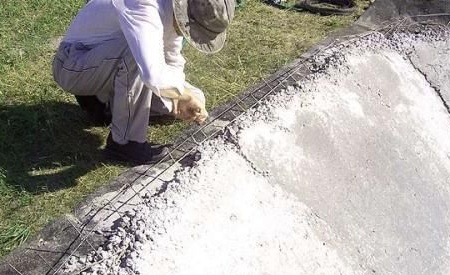
Bend the roofing material so that the formwork is formed, pouring a little soil under it. Lay the solution and give it the desired shape using a trowel.
Be sure to level the upper plane of the walls using the same combination of building level and a long rigid rail.
Finally, prepare a solution of sand and cement in a 1: 1 ratio, lay a layer of concrete on the bottom and walls to level them before finishing. The layer thickness should not be less than 2 cm.
Step 5: Waiting
It is necessary to let our concrete base stand. Concrete gains strength up to 28 days. All this time it must be moistened with water and protected from direct sunlight.
Step 6: priming
For priming, use an acrylic primer in several layers. We applied it with paint brushes, but you can use the roller if you want.
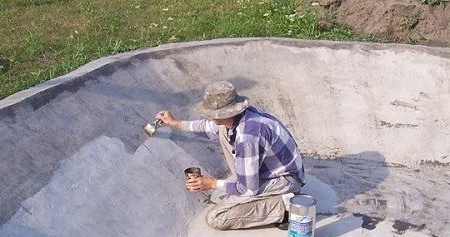
The primer will prepare the concrete for finishing, strengthen its outer layer and give the hydrophobic properties so necessary in our case.
To test the concrete base, fill the pond with water.

Step 7: Finish
We used flat pieces of natural stone for decoration and were very pleased with the decorativeness and overall appearance as a whole. You can come up with something of your own or join our initiative - it all depends on personal preferences.
And we hope that you did not back down and did all the work to the end. In this case, congratulations - your home reservoir of concrete and natural stone is ready!