» Construction » Stoves, fireplaces, heating »Do-it-yourself brick BBQ oven

DIY brick BBQ

Dear visitors of the site, from the master class presented by the author on the laying of a red brick barbecue stove, you will learn do it yourself build furnaces of various designs and shapes.

According to the author, one can apply fantasy in this matter, but not depart from building codes and laws!

The barbecue oven presented in the material is quite simple and a person who has no idea about the brickwork can completely cope with its masonry.

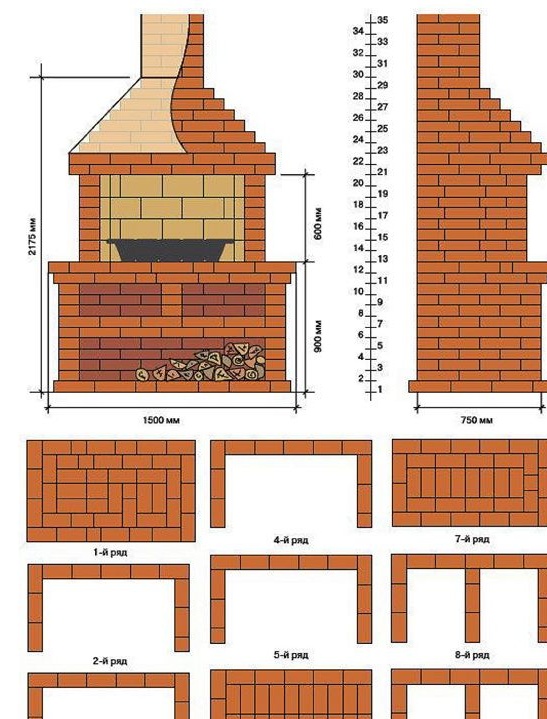
Having studied the schemes and photographs, everything will become clear, the video from the author is also attached to the article, where he will describe each stage in detail and in detail.
Well, let's get down to the analysis of the information provided.

Materials
1. brick (red ceramic)
2. brick (fireclay) slab
3. sand
4. cement
5. red clay
6. fittings
7. steel wire
8. sheet metal 0.7 mm
9. metal plate 2 mm
10. 30 mm board
11. gravel

Instruments
1. shovel
2. concrete mixer
3. hammer
4. trowel
5. level
6. roulette
7. putty knife
8. hacksaw
9. scissors for metal
10. Bulgarian

The process of building a do-it-yourself red brick barbecue stove.
And so, before starting construction it is necessary to determine the location of the future furnace, on your site.

ATTENTION! The furnace should be located at a distance from the capital buildings, in order to avoid fire, because sparks can be carried by the wind, it is also necessary to install a metal spark plug. (Follow fire safety rules!)

After a suitable place is found, it must be cleaned from growing grass, stones, shrubs. If you chose a clean place then "this is wonderful!" and you can start construction, but at the beginning, study the drawings and diagrams presented by the author and determine the type and shape of the future furnace. As the author says, “you can dream up a bit here”
DIY brick BBQ
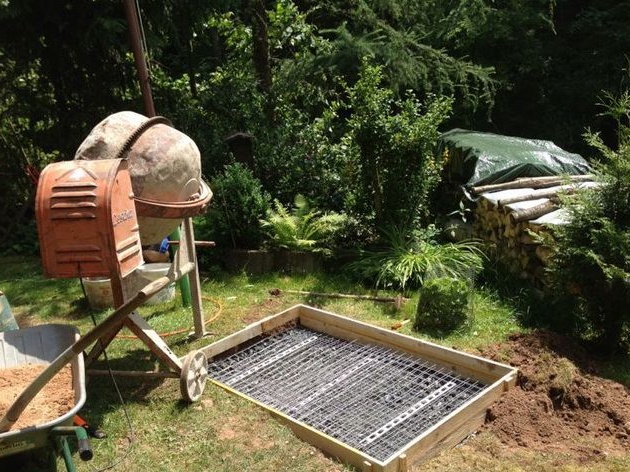
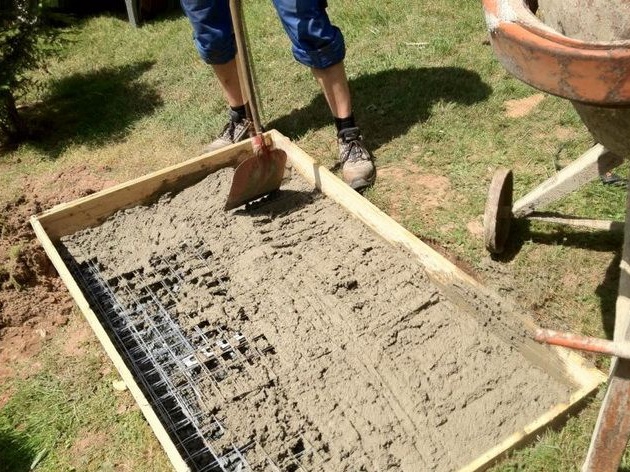
Then a hole is dug to a depth of 40-50 cm, it is needed to fill the foundation. Gravel is poured onto the bottom, sand is over it, wetted with water and rammed (a sand cushion is created) A formwork box is made from a 30 mm board. Also, reinforcement connected by knitting steel wire is laid inside the pit. in the form of a lattice.
Then the resulting cavity with reinforcement is poured with concrete prepared immediately on the spot using a concrete mixer.
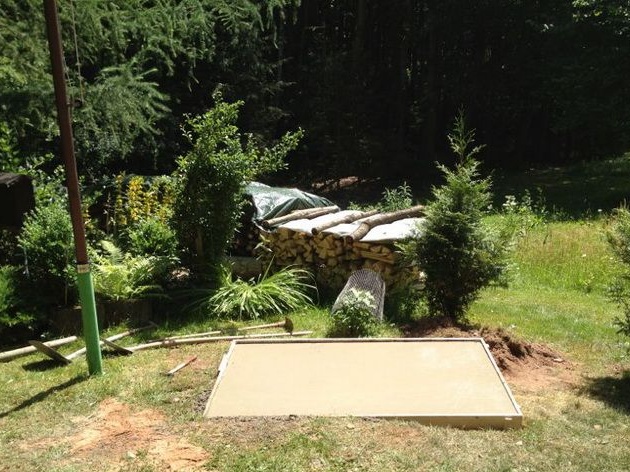
After the foundation is poured, you will have to wait until the cement dries and gets stronger, the minimum time is 1.5 -2 weeks. While cement will harden, it is recommended to periodically moisten it with water, so it will become even stronger.
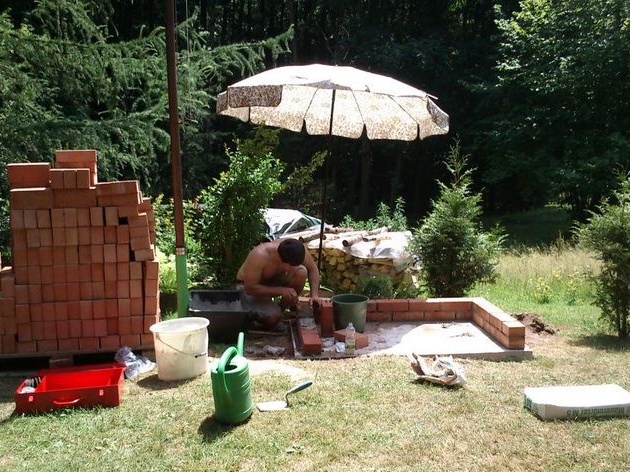
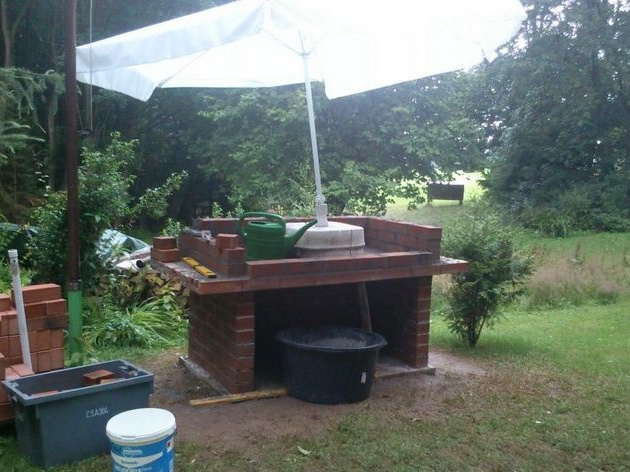
As soon as the foundation dries, you can start laying brick, but first you need to lay a layer of waterproofing in the form of roofing material, it will not allow moisture to destroy the lower part of the base of the brickwork. The author starts laying the brick from the corner, he also protected himself from the scorching summer sun and, in order not to receive a sunstroke during work, set up a beach umbrella.
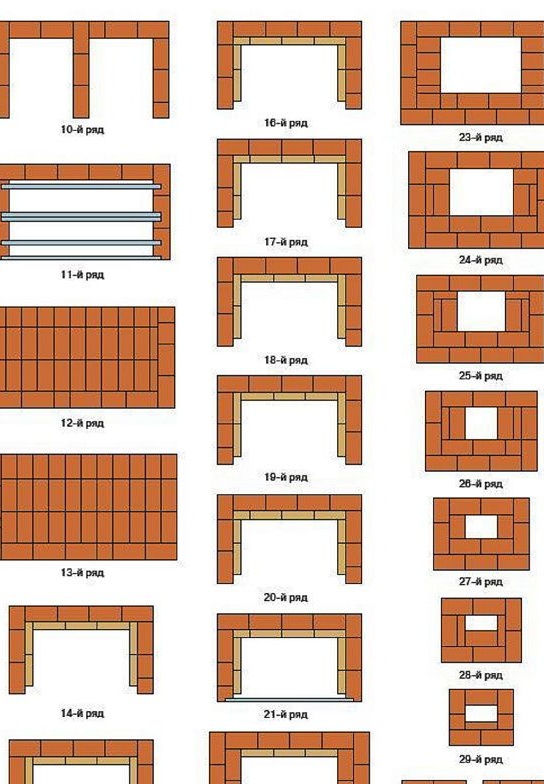
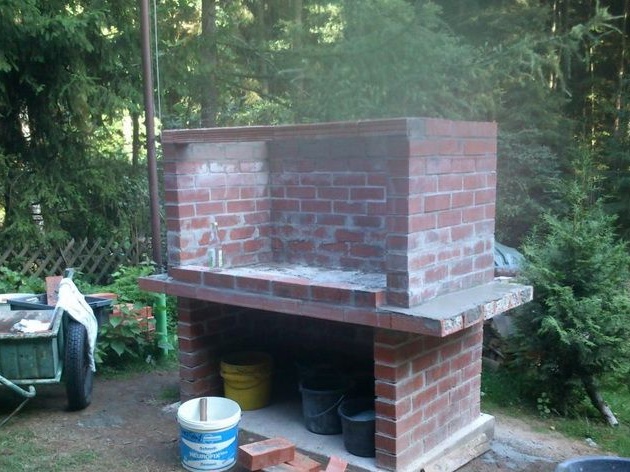
And so, brick by brick, the walls of the furnace rise.
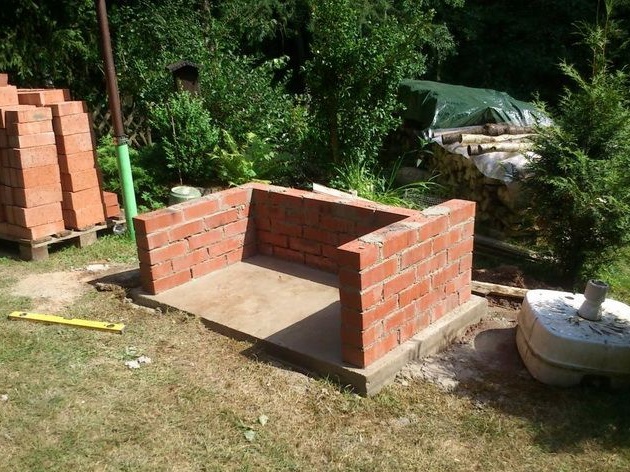
In the lower part, the author leaves space; it is necessary for drying and storing firewood or coal.
A transverse laying is made of reinforcement and a metal sheet, and then the furnace itself is laid.
ATTENTION! For laying the furnace, you should use exclusively clay mortar and in no case do not use a cement mixture, because harmful emissions during heating of the cement will evaporate and settle on your food, which can lead to disastrous consequences for your health. So be careful!
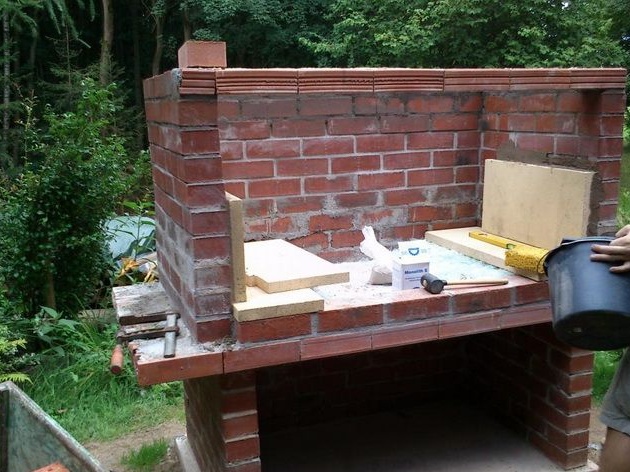
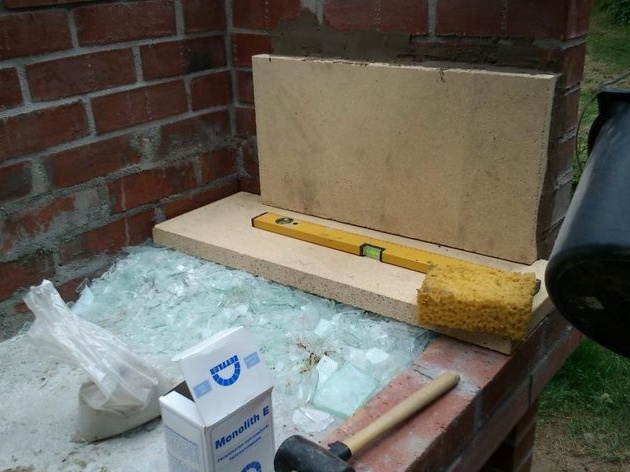
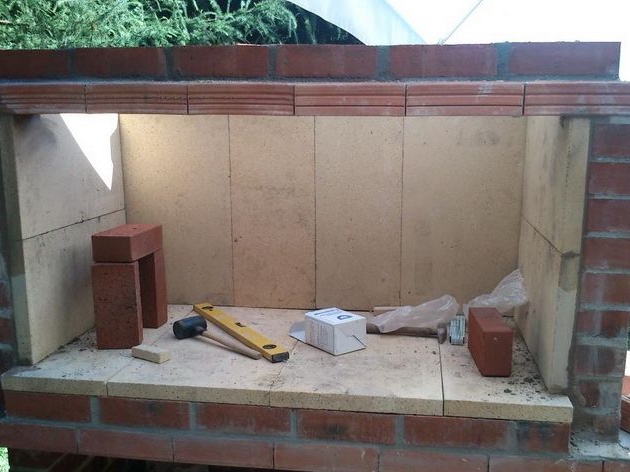
Inside, the stove is laid out with fireclay refractory bricks, in this case the author used stoves, which is much more convenient, simpler and faster to install.
Also, the master falls asleep broken glass in the gap between the stove and the brickwork, the author does not give a description for this action ?! "Probably the secret ingredient" If anyone knows the answer? Write in the comments.
Continues to spread the oven inside.
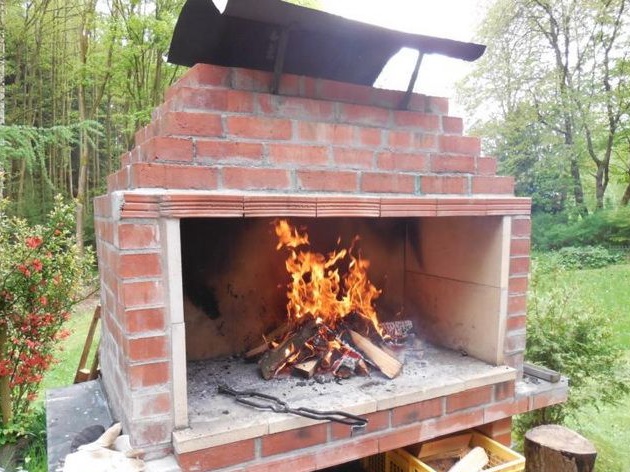
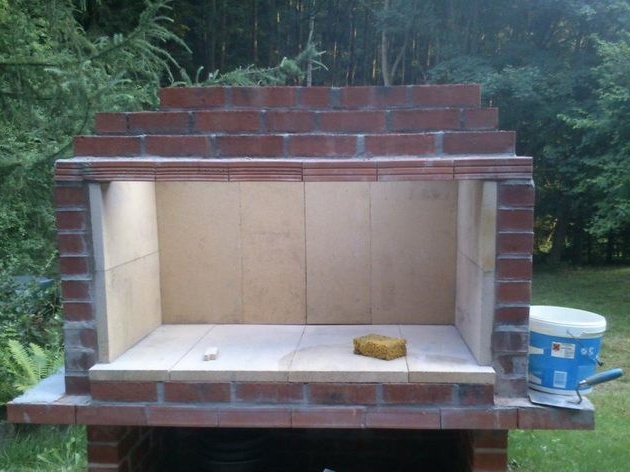
That's actually what turns out in the end.
Next, the pipe is laid down tapering to the top and a spark arrester cap is installed. made of sheet metal 0.7 mm on metal racks 2 mm thick.
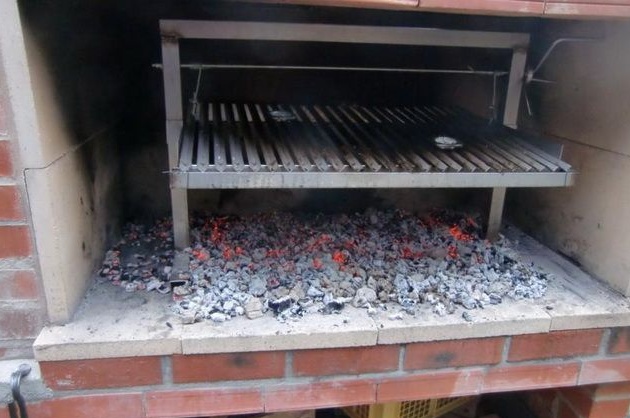
Inside, a special grill is placed on the legs for a barbecue, by the way, you can calmly grind this yourself yourself "but that's another story."
That's the whole construction process, as you see, there is nothing complicated, and if you wish, any person who knows how to hold the tool in his hands will cope. Now, every weekend, the author will cook meat on coals and delight his relatives and friends.

You can also watch the video footage. teaching masonry stoves.
This concludes the article. Thanks for attention! Come visit often, do not miss the latest in the world of homemade goods!

This article is for informational purposes only!

9.7
9.7
9.7

Add a comment

    • smilesmilesxaxaokdontknowyahoonea
      bossscratchfoolyesyes-yesaggressivesecret
      sorrydancedance2dance3pardonhelpdrinks
      stopfriendsgoodgoodgoodwhistleswoontongue
      smokeclappingcraydeclarederisivedon-t_mentiondownload
      heatirefullaugh1mdameetingmoskingnegative
      not_ipopcornpunishreadscarescaressearch
      tauntthank_youthisto_clueumnikacuteagree
      badbeeeblack_eyeblum3blushboastboredom
      censoredpleasantrysecret2threatenvictoryyusun_bespectacled
      shokrespektlolprevedwelcomekrutoyya_za
      ya_dobryihelperne_huliganne_othodifludbanclose
6 comments
If you mean that I - then this is not true! After all, the concept of "master class" means "to demonstrate masterful performance and explain, teach. Simply put," Show and Tell "..
Here the author showed, but did not tell everything. I just added on ...
.... So, here, most likely, not a "master class", but a "thematic conference" ... We share our experience! We tell someone that knows ....))))
Maybe someone will come in handy ....
smiles So who is the master class here?
Author
Many thanks! Very interesting and informative.
as you can see, there is nothing complicated, and if you wish, any person who knows how to hold the tool in his hands is not enough. Now, every weekend, the author will cook meat on coals and delight his relatives and friends.

Only there is still a lot of subtleties .... For example, the clay mortar itself ... It’s rather difficult to prepare it ... I, as a “stove-maker-amateur”, when I was engaged in chimney-stove affairs, acted easier - I went to the nearest brick factory and took there unbaked raw brick. After soaking, he added liquid glass to it - and voila! )))) For the furnaces, of course, I took a special fireclay composition.

Brick...It’s also not so simple ... Not everyone is suitable for the oven !!! It is necessary to choose with a uniform color. In no case, not "spotty", without cracks and caverns, if you do not want it to crack later ... A twisted "ringing" - also will not work !!! It is better to soak the brick before laying in a container with water and get it only immediately before work. Otherwise, he will suck out all the moisture from the solution, and such a seam will spill out during the firebox. In general, the oven is stronger, the longer it dried! (Like concrete, by the way) ...

.. Drying .. A very crucial stage !! In this case, be sure to exclude direct sunlight !!! The first flushing should be done no earlier than two weeks later !! A very small amount of firewood (one fifth of the estimated load). The next day - a little more, about one third ... And so, in a couple of days, bring to normal flood !!
If damp spots appear somewhere on the surface during the combustion process, carry out a fire the next day without increasing the amount of firewood ...

These "little things" are very important!
Also, the master falls asleep broken glass in the gap between the stove and the brickwork, the author does not give a description for this action ?! "Probably the secret ingredient" If anyone knows the answer? Write in the comments.

This is what my grandfather taught me.))) This is not a "secret ingredient" .... Just done it is not quite right !!!
I will explain. Under any furnace, until the furnace is completely calcined, it experiences enormous temperature differences - after all, on one side it can already contain a smut, and on the other it will still be cold !!! (“under” is a noun! The firebox floor) In any case, when the wood burns up, the hearth heats up with “spots” ... The thermal conductivity of refractory materials is high enough, but the thickness of the hearth is small, and therefore the heating does not spread fast enough !!! And this, with a large temperature difference, can lead to cracking. In addition, fireclay refractory, and ordinary brick have different thermal conductivity (therefore, they, for example, can not be put with dressing each other).
For this reason, under the hearth you need to make a layer with high thermal conductivity! In the old days, as our grandfather said, we used natural flint, which is full in the fields (a solid mineral of blue-blue color). Now glass is perfect for this !!! This layer instantly warms up, removing heat from the "hot spot", and distributing it evenly over the entire area of ​​the hearth. (In the likeness of aluminum inserts in the bottoms of pots and pans made of stainless steel, which also eliminates the "spotted calcination" of the bottom and burning in these places). Only the layer should be dense and fit snugly - and therefore broken glass is mixed with sand. And here the author for some reason did not.)
The same filling is used to deliver heat to the “cold areas” of the furnace, which, due to the particular geometry of the furnace, are removed from the furnace and channels, and can remain cold. A kind of coolant - heat passes quickly through the glass to the cold bricks and accumulates in them.
ATTENTION! For laying the furnace, use exclusively clay mortar and in no case do not use a cement mixture, because harmful emissions during heating of the cement will evaporate and settle on the food you cooked, which can lead to disastrous consequences for your health. So be careful!

Sorry, but not at all !!! Simply, the cement mortar is not used when laying furnaces due to its strong thermal expansion - it just cracks during the first firebox!

We advise you to read:

Hand it for the smartphone ...