
Hello everybody !
Tool box today is a very indispensable thing for every owner. Most of us have a lot of diverse tools, which we may not use very often, but nevertheless keep it, since not a single repair can do without it. In order for the tool to be in one place, and it was convenient to transport, we use special boxes. Often we just buy them at the nearest store, the assortment and variety allows us to do this. But why not make it yourself? The manufacturing process is not too complicated, anyone should cope, especially the thing done do it yourself, where it is more pleasant to use than the purchased option. This article will describe 4 different methods of manufacturing boxes, a photo report is attached.
Let's start manufacturing!
Manufacturing Method No. 1
We will need:
Material
- plywood;
- pine board;
- nails;
- carpentry glue.
Tool
- available cutting tool;
- drill;
- hammer;
- a chisel;
- manual frezer;
- ruler;
- a pencil;
- roulette.
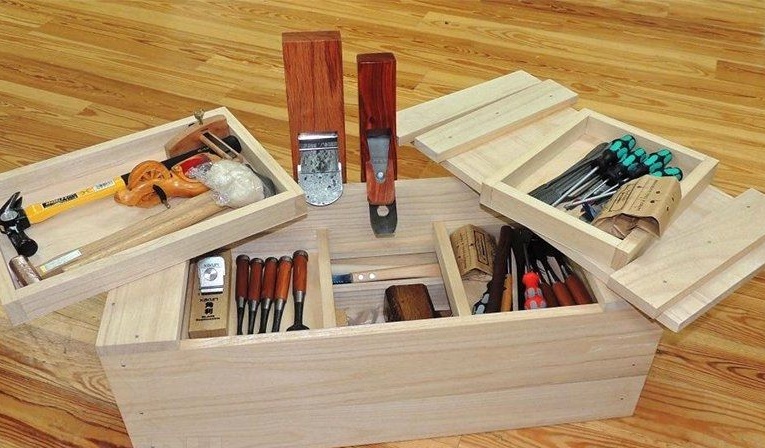
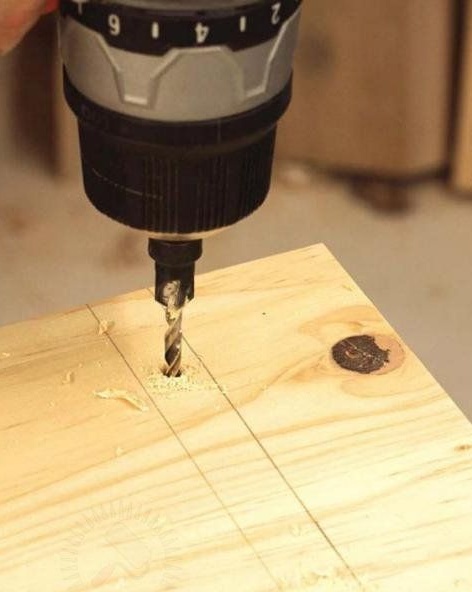
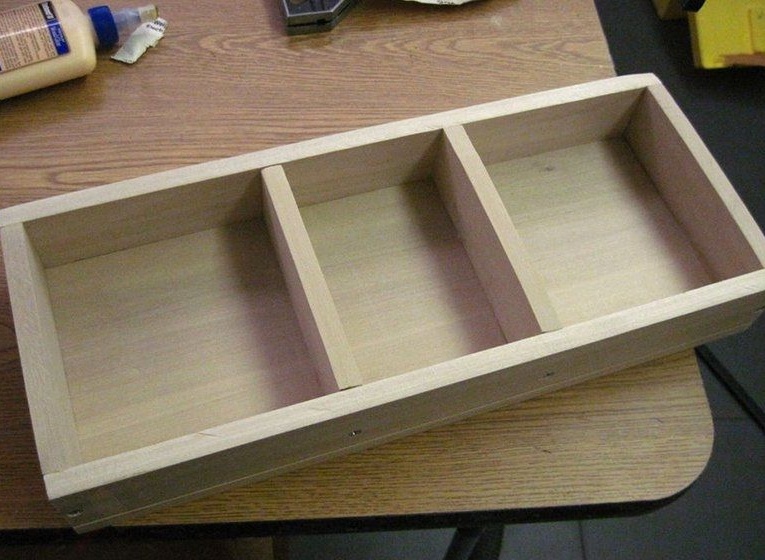
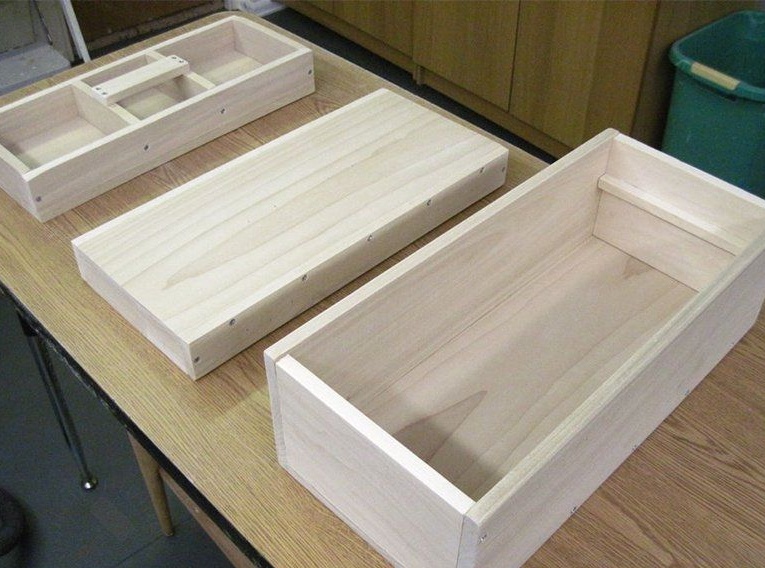
First of all, you need to find the necessary material, for this plywood or trim boards is suitable. Further, according to the presented drawing, you need to make markings, then cut out all the details of the case. It is necessary to make special grooves in which the partition will be placed, for this we use a manual milling cutter, or other available tool.

The diagram shows the following body parts:
1 - wall (2 pcs.);
2 - sidewall (2 pcs.);
3 - bottom;
4 - a groove along the thickness of the partition and a depth of 1 / 2–1 / 3 of the thickness of the material
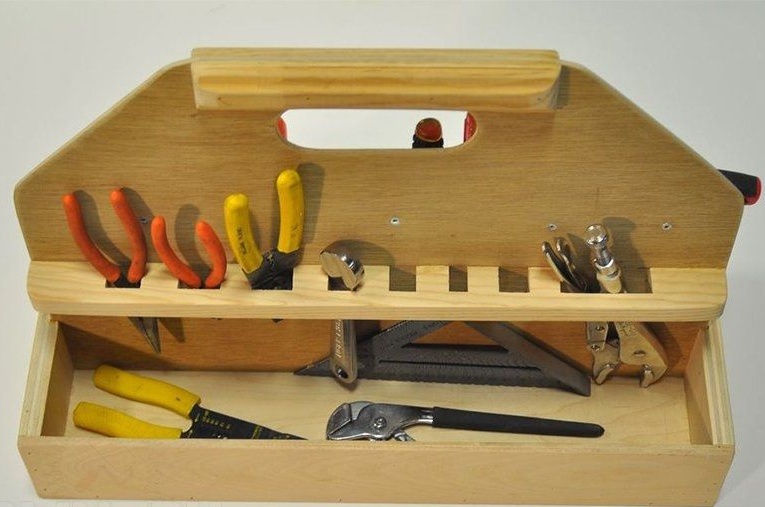
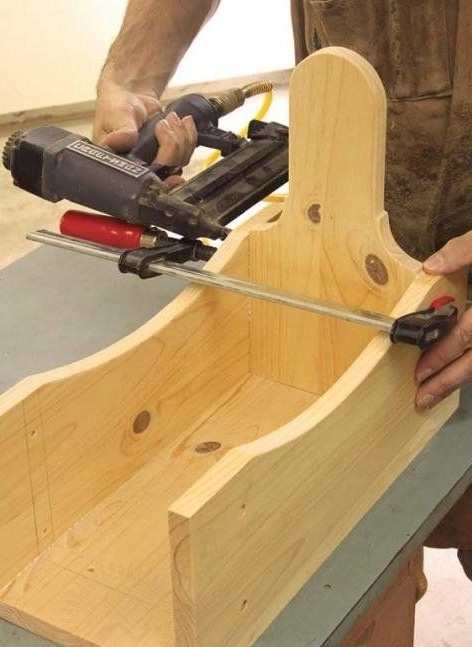
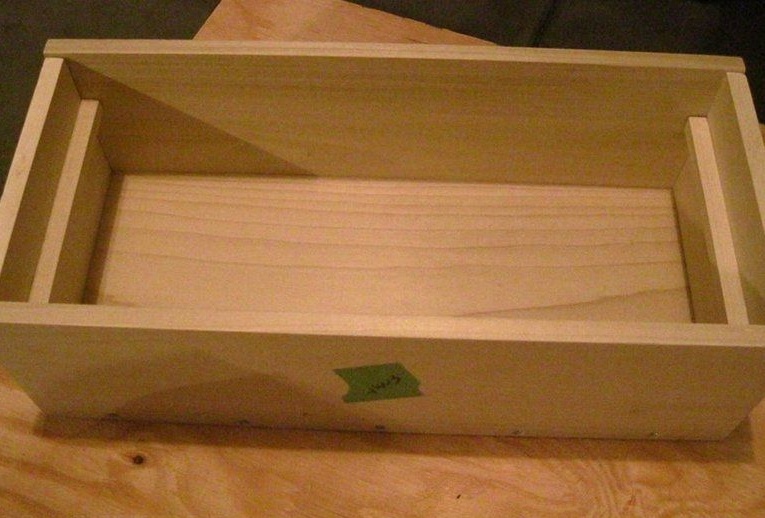
When everything is ready, all elements of the box body should be sanded. Next, we assemble the case together, fix the parts with carpentry glue, and then additionally fasten with small nails.
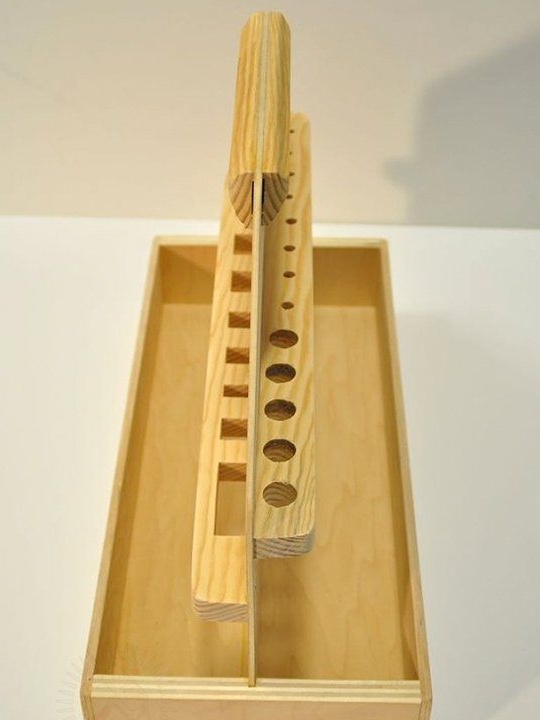
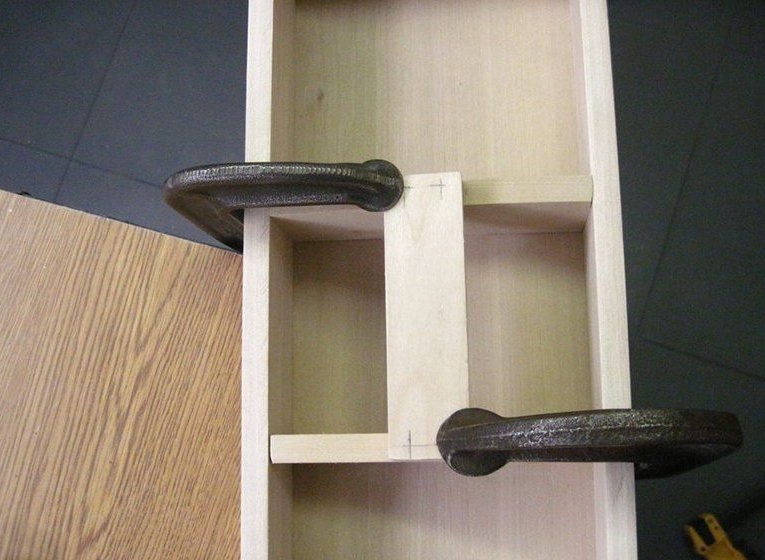
Now we make a partition for the box, we cut out a special handle, for this we use a jigsaw.
When the partition is ready, grease the grooves with carpentry glue and install it in its place.
Next, we make overhead handles from the boards, with the help of a plane we round the corners. Then we make tool holders from the rails, use a jigsaw, and a drill. The holes will be used for screwdrivers, and pliers, etc. will be installed in square cutouts. tool.
In order that the box does not get dirty, and there is protection from the environment, we varnish the surface.As a result of the work done, we get such a homemade box.
A method of manufacturing No. 2
Stool box

To make a box with our own hands, we need the following
Material
- plywood or OSB;
- wooden beam;
- self-tapping screws;
- carpentry glue.
Tool
- available cutting tool;
- screwdriver;
- ruler;
- a pencil;
- roulette.
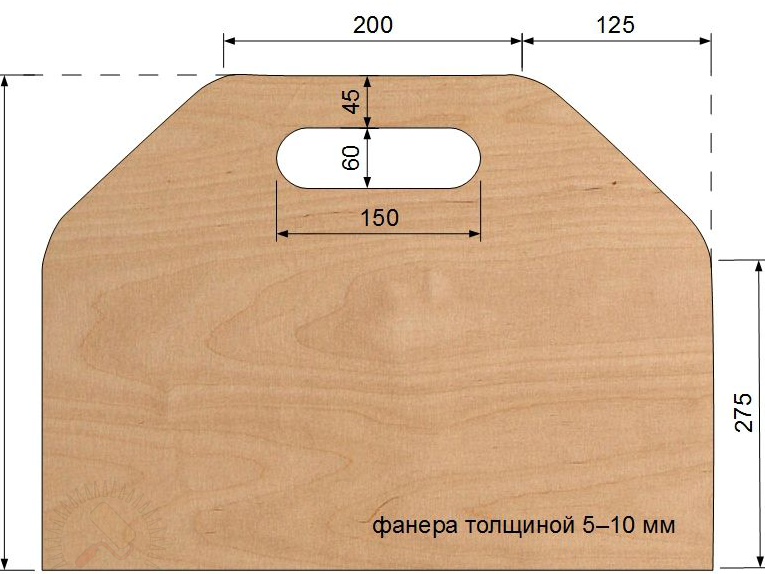
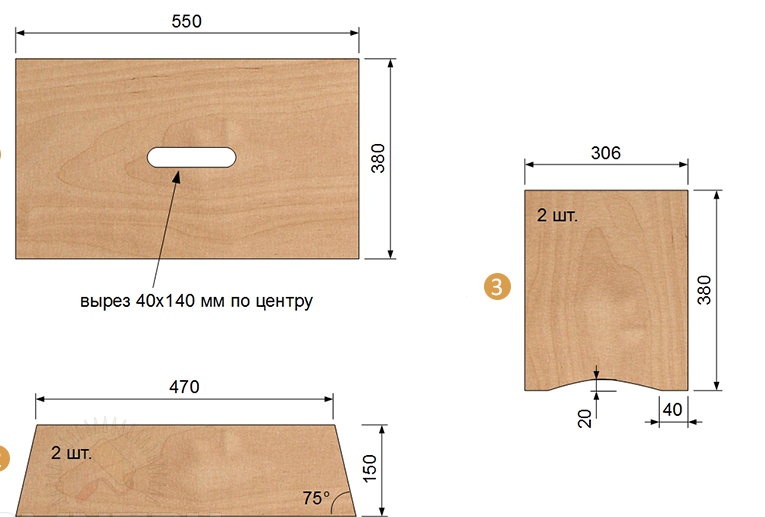
We take the existing sheet of plywood, mark it on it, and according to the dimensions presented, cut out the lid (Fig. 1), then the longitudinal legs (Fig. 2) and sidewalls (Fig. 3).
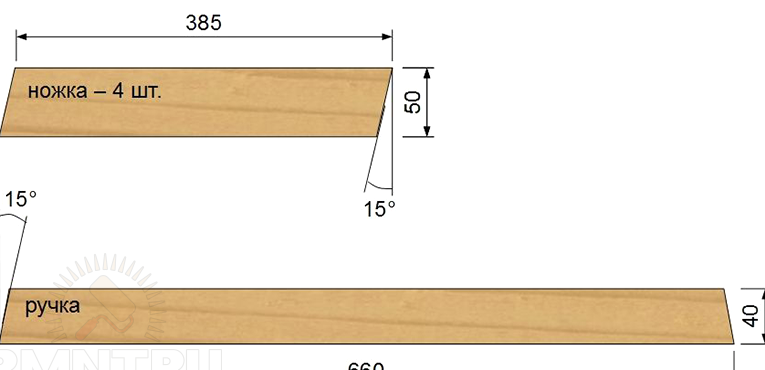
Next, we take a wooden beam with a section of 40x50 mm, cut out the handle, and 4 legs with bevels on the ends at an angle of 15 °.
Next, we assemble the structure together, we use self-tapping screws as fixing elements.
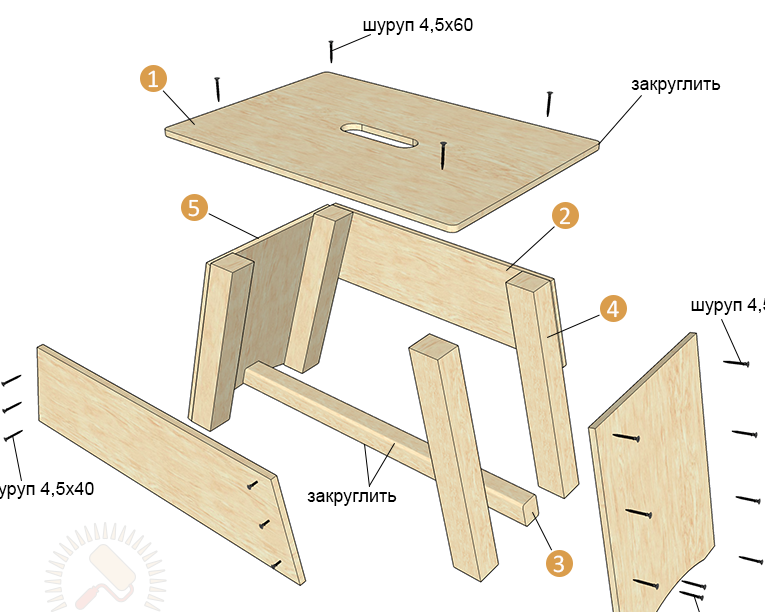
Parts layout:
1 - cover;
2 - king;
3 - pen;
4 - leg;
5 - sidewall.
When everything is ready, with the help of sandpaper or a grinding machine, round off sharp corners and clean the surface. Further, a protective coating can be applied.
The end result should be such an unusual tool box, which, if necessary, can be transformed into an ordinary stool, for this it is enough to turn it over and put it on its legs, with it it will be convenient to reach the place we need, at a time when growth does not allow to do this.
A method of manufacturing No. 3.
Box for the young master.
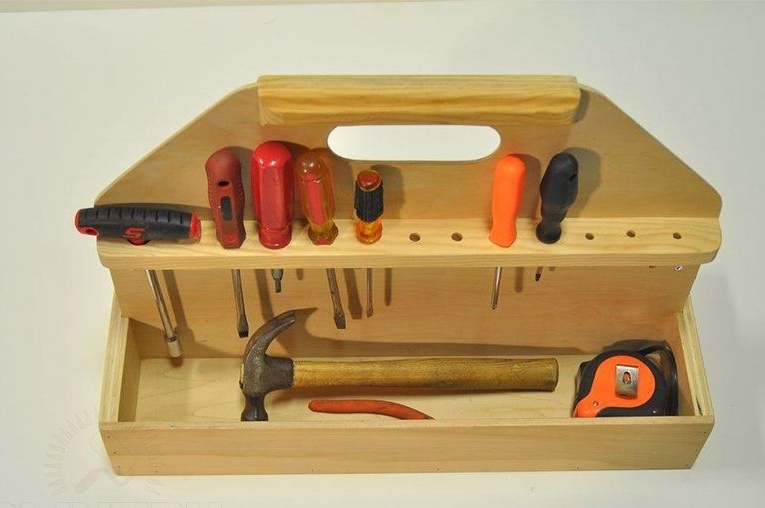
Does your child like tinkering? We offer to make a small box with him, where he will store his favorite tool.
To make a box with our own hands, we need the following
Material
- 16 mm boards;
- round wooden beam;
- self-tapping screws;
- carpentry glue.
Tool
- available cutting tool;
- screwdriver;
- ruler;
- a pencil;
- roulette;
- clamps.
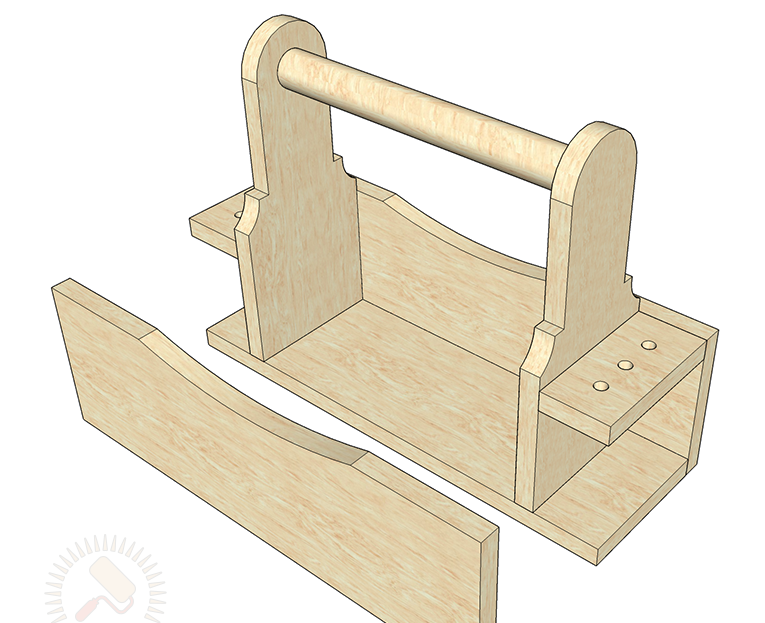
First you need to take the available boards with a cross section of 16 mm, then we mark out according to the dimensions provided, after which we cut the wood into the components we need.
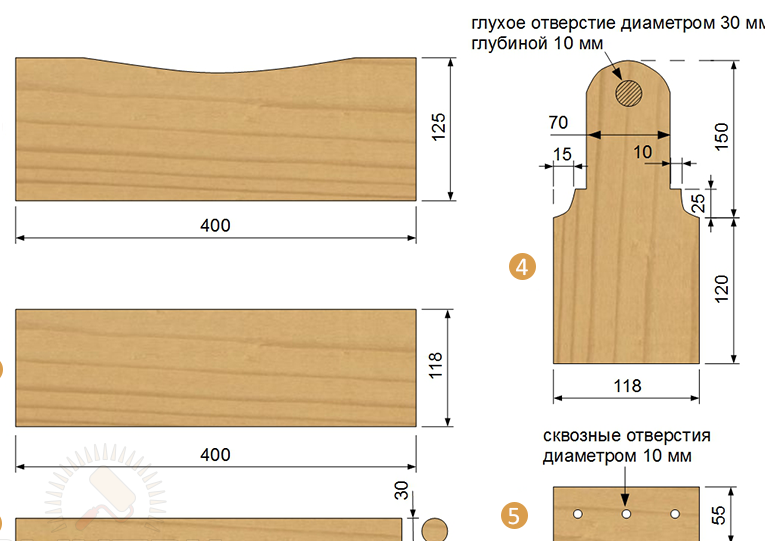
The drawing shows the following details:
1 - sidewall;
2 - bottom;
3 - pen;
4 - handle rack;
5 - holder.
Next, we mark out those parts where the parts will be fastened, drill holes for screws.
Using sandpaper, grind the surface and remove sharp corners. When everything is ready, we begin to connect all the parts together, first you need to connect the bottom and sides, then put uprights on the marked lines and at the same time set the horizontal handle.
We fix everything with glue and screws. Then we install special holders for screwdrivers.
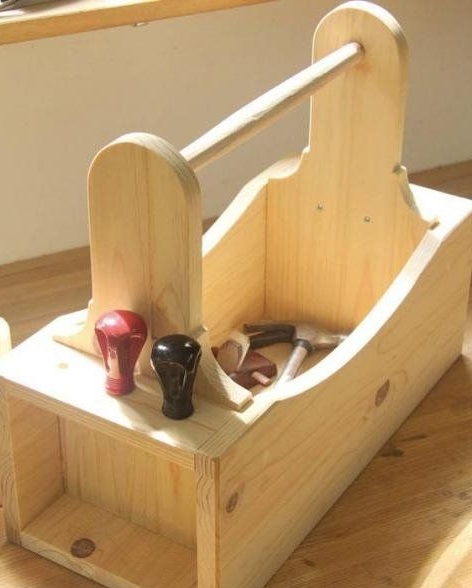
Now you can paint, color and coating, choose at your discretion.
The tool box is ready.
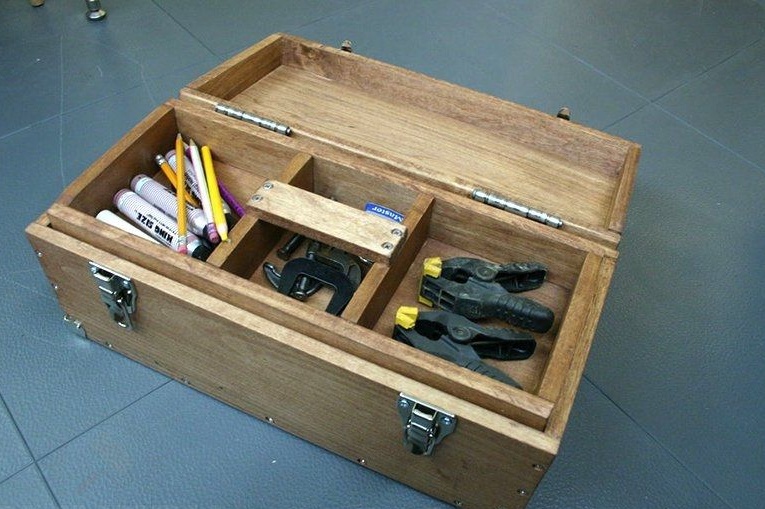
Manufacturing Method No. 4
The next version of the tool box is well suited for carrying various and necessary equipment for us, its appearance will be distinguished by solidity and reliability.
To make a box with our own hands, we need the following
Material
- the board is not thicker than 12 mm;
- self-tapping screws;
- carpentry glue;
- a pen;
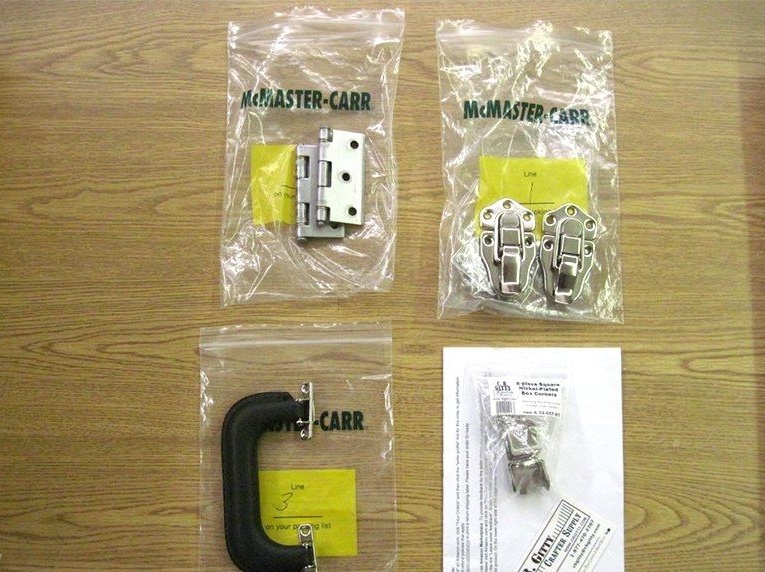
- corners of 8 pieces .;
- latch 2 pcs.;
- loop 2 pcs.
Tool
- available cutting tool;
- screwdriver;
- ruler;
- a pencil;
- roulette;
- clamps.
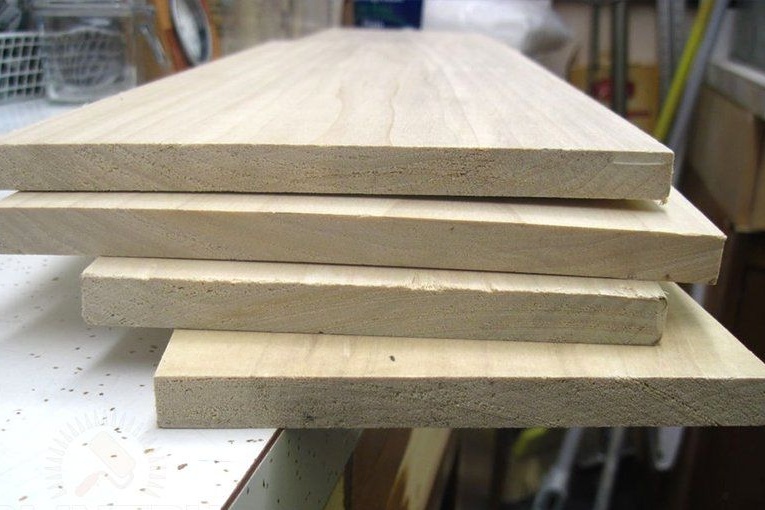
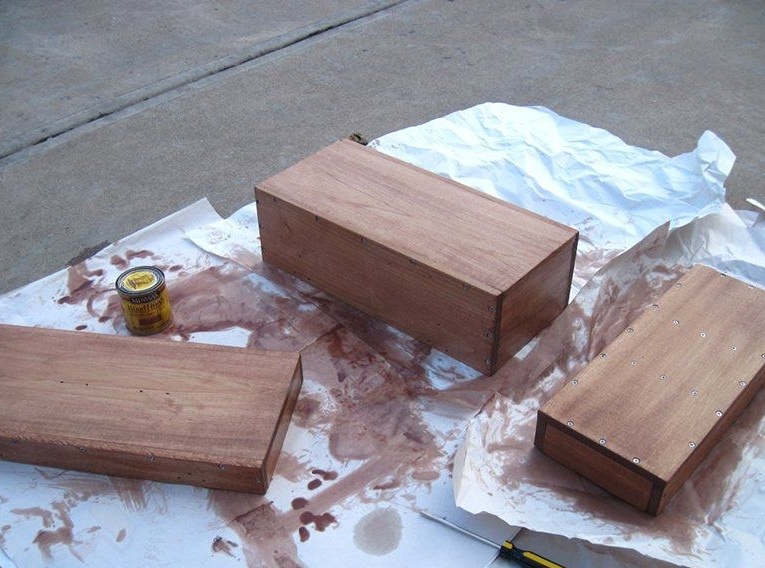
For the manufacture of the box we use such wood as: pine, linden or poplar. The most optimal thickness of the boards will be a thickness of 12 mm.
Next, we make the markup, according to the indicated dimensions in the drawings, and then saw it into its component parts, as shown in the photo.
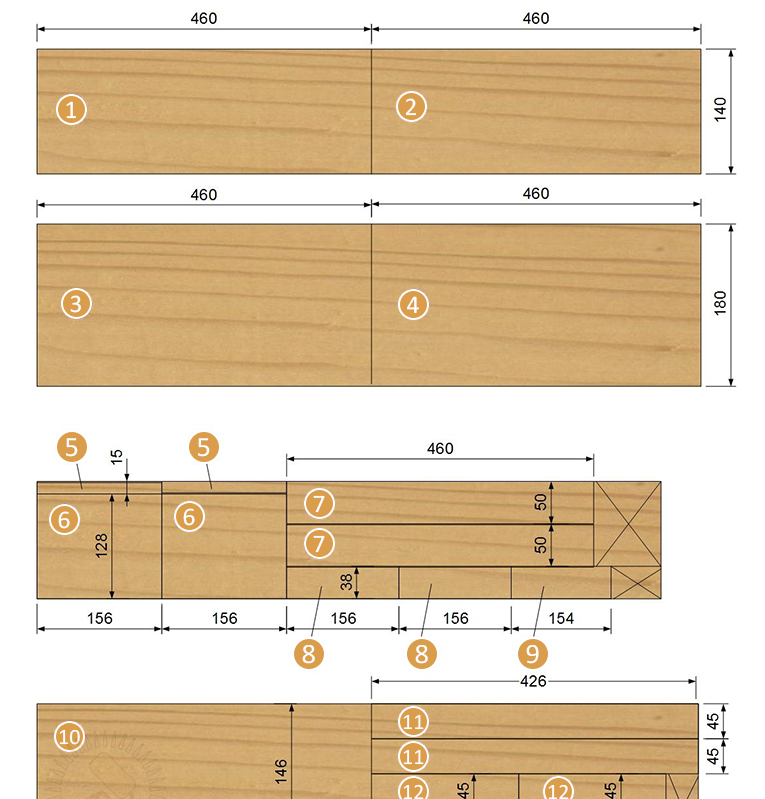
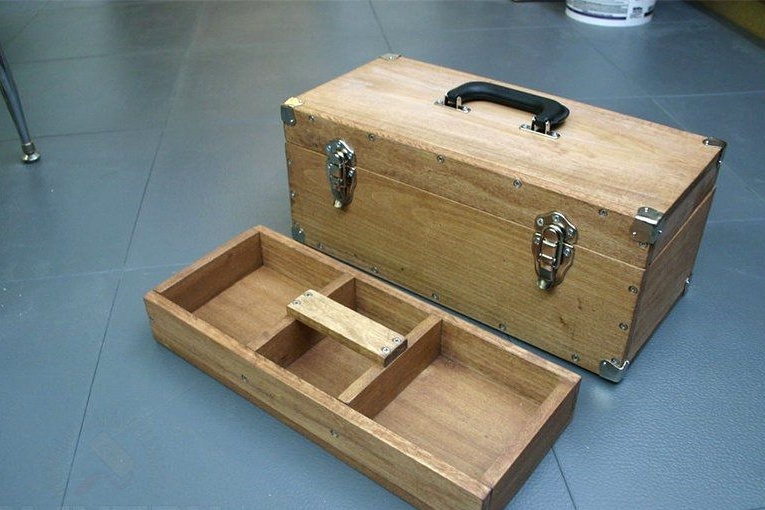
The entire list of necessary details.

In order to make sure that the cutting of wood is done correctly, you need to put all the details in a single box.
Next, with the help of sandpaper, you need to grind all the details, take a grain of paper 220. After that, it is desirable to number the details.
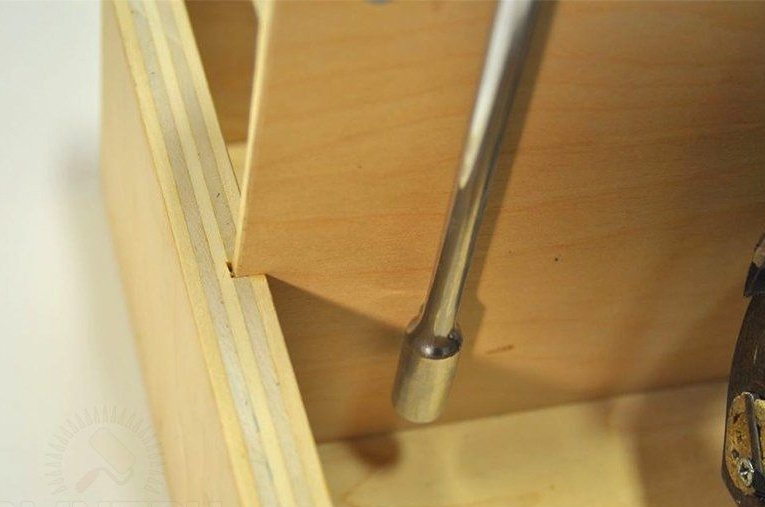
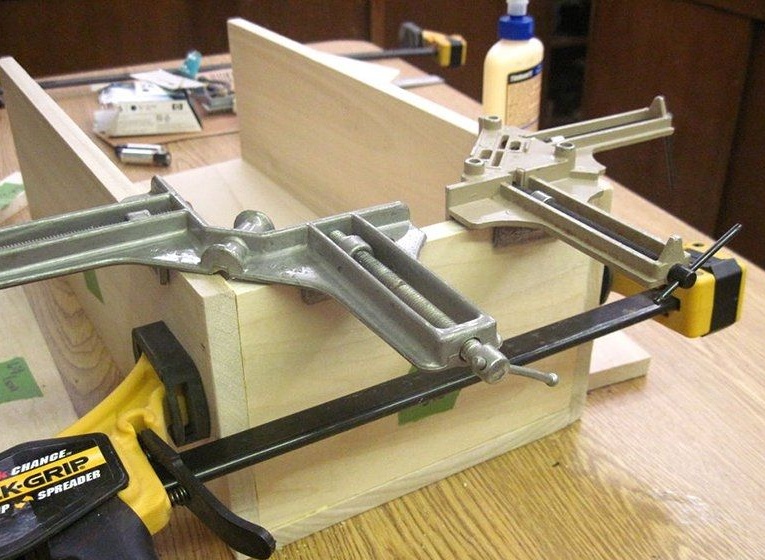
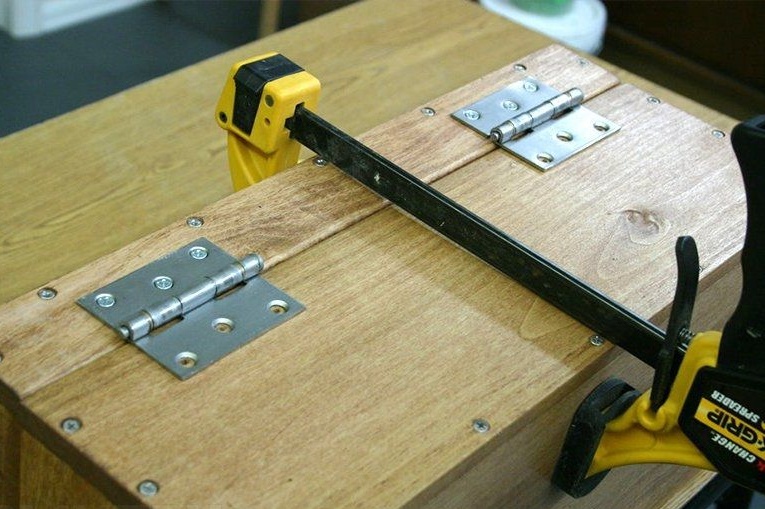
We begin to assemble the housing together.
First, we collect the lower part and the lid of the box, for convenience we use clamps and corner clamps. We fix the parts between ourselves with carpentry glue.
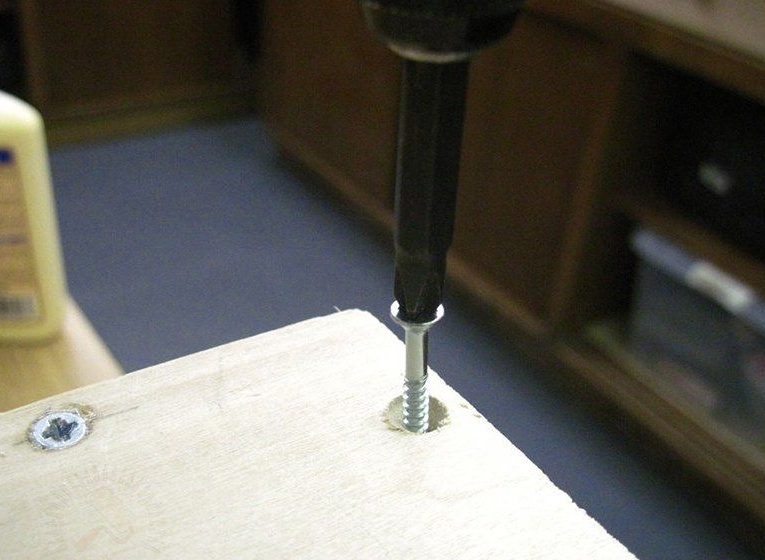
Then, using a drill, we drill a hole for self-tapping screws, we make a cored hole.
Now we fasten the case of the portable part, put the partitions, fix with screws.
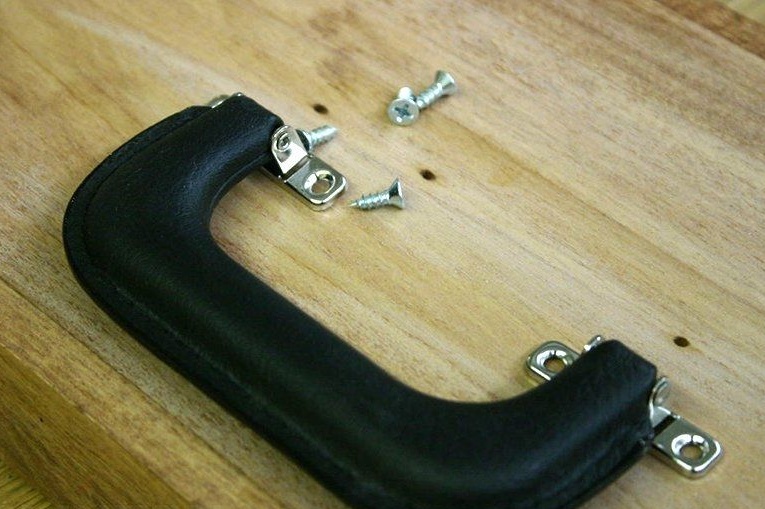
Next, install the handle that we need to carry.
Then you need to install two support rails inside the box, they should be at a distance of 30 mm from the top.
When all the parts are interconnected, we take sandpaper with fine grain, with which we remove the burrs near the screws, as well as erase pencil marks.
We cover the box with a protective coating, let it dry. If during painting the pile has risen on the surface, we clean the surface with “null” and repeat the finish.
We install the loops in their place, fix them with screws.
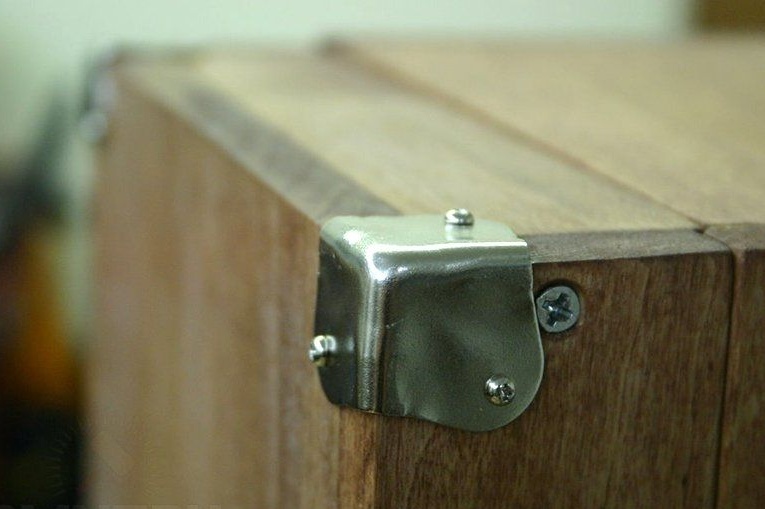
We fasten the corner protective pads.
Next, install the handle and latches.
The box is ready, you can fill it with the tool you need.
The article is over, thank you all for your attention!