
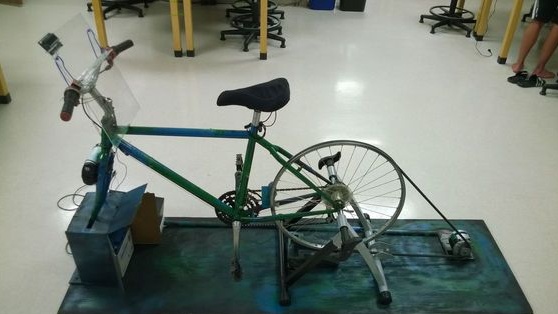
This homemade will be useful for those who like to ride a bike or exercise bike. Now it will be not only good for health, but also due to physical education, an electric current will be generated from which various devices can be charged, including mobile phones and a laptop.
The principle of the homemade work is quite simple, the most difficult to assemble electronic part. The mechanical part consists of a bicycle and a generator (a DC motor is used) connected by a belt. Further from the generator, the voltage goes to the charge controller, and then to the lead acid battery. Well, then you can spend energy at your discretion. For example, you can connect an inverter to the battery and convert the voltage to charge and operate various devices.
Materials and tools for homemade:
- bike (you will need a frame with a rear wheel);
- materials for fixing the bicycle frame (plywood, timber, bolts with nuts, etc.);
- DC motor at 24V;
- belt and pulley for connecting the generator to the wheel;
- 12V lead-acid battery;
- Charger type DC-DC;
- DC-AC inverter with USB outputs;
- microcontroller Arduino;
- MOS transistor;
- LED and photodiode;
- Hall Sensor;
- LCD screen;
- switch;
- 5V regulator, relay, diode, resistors, buttons and more.
Of course, the list of materials may be different, you should not accurately copy homemade, if you are smart, you can personally assemble your model on such a pattern.
The process of assembling a charging station:
Step one. We fix the frame of the bike
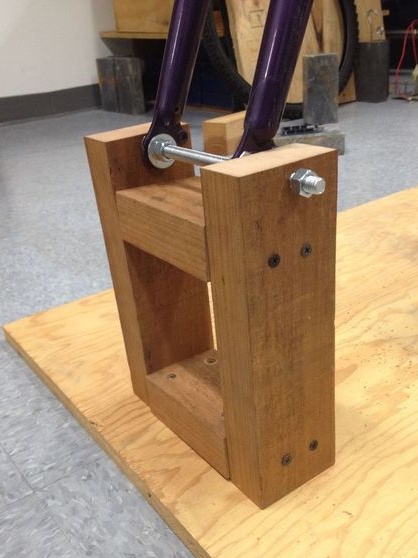
This step is one of the most important, because if the frame is not fixed properly, you can fall and get injured with the bike. The author fastens the front fork with a bolt and nut to the beam structure. It is not difficult to do it, you will need screws, a drill and a hacksaw.
Further, this design is attached to a 2X6 ’plywood sheet, this will be the basis of the design.
A training rack was used to attach the rear part, which greatly simplifies the process of attaching the frame. In such a rack, you can find a mechanism that creates resistance when the wheel rotates. But here it is not needed, since such a resistance will create a generator, so this mechanism can be removed.
Well, now it remains to connect the generator to the bike, as it is a 24-volt DC motor.The engine must be mounted on plywood, it is desirable that the design allows you to tighten the belt. The tire is not placed on the wheel, a belt is installed instead. Now you just need to tighten the belt so that it does not slip when charging the battery. But you should not stretch the belt too much, as this will increase the friction forces and the belt will wear out quickly.
Step Two Preparing the battery and controller
For such homemade work, you can use a different type of battery, but the author decided to stay on a lead-acid battery. Firstly, they are easily accessible, and secondly, much cheaper than lithium and others. But it’s important to understand that each battery needs a specific charging mode. For example, for a battery selected by the author, the charging voltage should not exceed 14V, and the current strength should not exceed 5.4A. Most often, data on battery charging modes is written on the sheet that is issued with it when purchased.
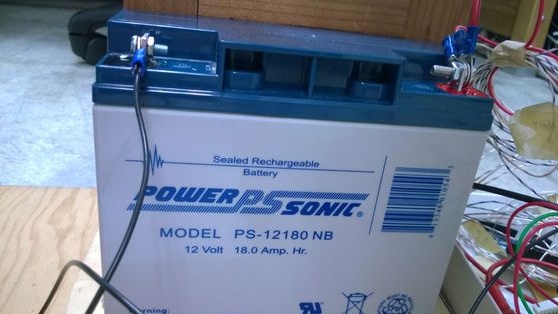
Choosing such a battery, you will have to monitor the level of electrolyte in it from time to time, since it evaporates when charging. However, it is not difficult, you only need to pour distilled water into it from time to time. If the electrolyte level becomes too low, the battery may short circuit.
It is also important not to overload the battery, as this will quickly reduce its service life. However, over time, batteries in any case lose their capacity, this can not be avoided, but with a careful attitude, the battery life can be significantly extended.
Now a few words about the charge controller. Of course, the easiest way would be to connect the wires from the battery directly to the generator, but in this case the battery will recharge and will quickly fail. In this regard, the charging controller is provided in the circuit. When buying a charge controller, it is important to pay attention that it must have an input and an output, this is necessary to charge the battery. The controller must accept a voltage of up to 24V, and output 12V with a maximum current of not more than 5.4A.
On sale you can also find universal controllers with which you can charge various types of batteries.
Step Three Inverter selection
In order for mobile and laptops to be charged from the charging station, an inverter will be needed, since such electronics cannot be charged directly from the battery. The inverter must receive 12V input and at the same time distribute voltage to the outputs of the USB ports through which charging will be performed. You also need to take into account the inverter power, the average phone consumes about 5 watts, and the laptop takes an average of 45-60 watts.
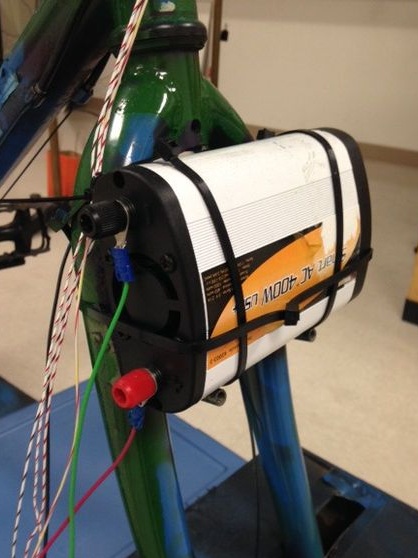
The author chose an inverter that can deliver up to 400 watts and has two USB ports. Connecting the inverter to the battery is very simple, you just need to connect two wires from the battery in polarity, and the circuit is assembled.
Step Four Arduino controller participation in generator operation
One of the drawbacks of homemade work was that to activate the charging process, you had to start pedaling and hold the power button for 3 seconds. To make the charging process fully automatic, the author decided to install an Arduino microcontroller, now he himself monitors the wheel speed, measures the voltage and decides when to turn on the battery charging.
Arduino will also turn off and on the inverter when it is needed, control is carried out using a MOS transistor.
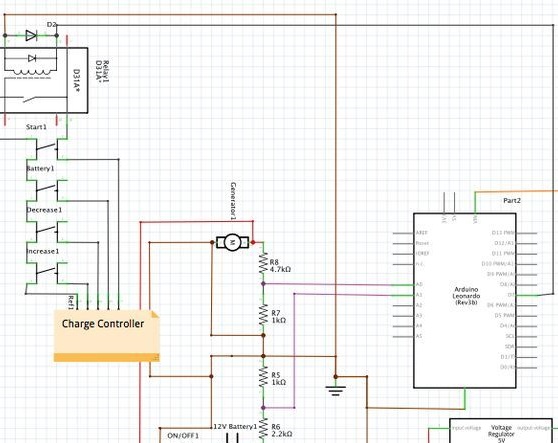
To get some statistics when riding this simulator-generator, you can install the Hall sensor on a homemade product, with the help of it the wheel speed is read. Using this data, you can calculate the distance traveled, the maximum speed, the number of calories burned, and more.
But the author decided to replace this solution with the installation of an optical sensor.
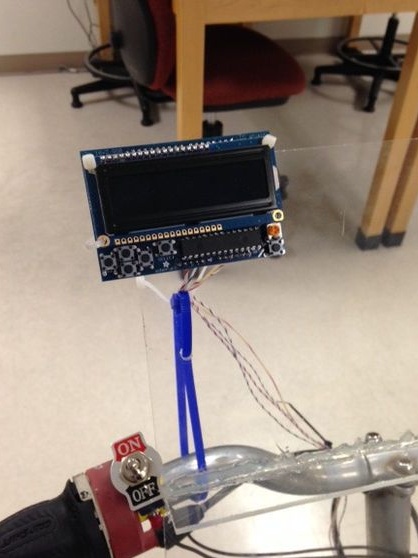
Step Five LCD screen
To make it convenient to get statistics about the operation of the simulator-generator, the author displayed the data on the LCD-display.Here you can see information such as:
- total operating time;
- distance traveled;
- generated power and more.
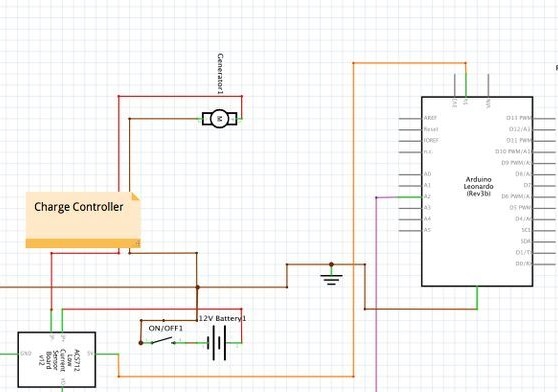
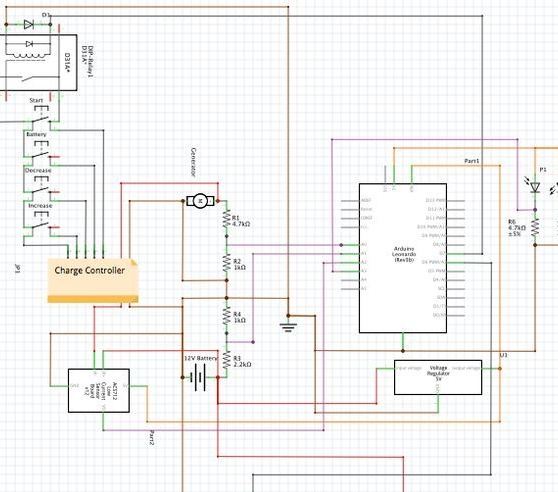
The final electronic circuit of the generator
Step Six Final stage
At the final stage, you need to carefully fix and install all the elements so that they do not interfere with the operation of the device. The author placed all the electronics to the right of the bicycle in a container, not counting the LCD screen and inverter. The wires leading to the rear of the bike were routed through a PVC pipe that was screwed to the plywood.
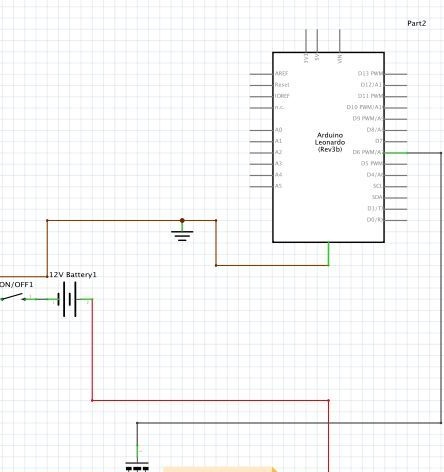
For security reasons, the author installed a switch on the steering wheel, with which, if necessary, it will be possible to turn off the entire power supply in the event of a breakdown. This switch is connected to the negative of the battery, that is, this is the so-called "mass". It is important that the switch contacts do not touch the metal steering wheel, otherwise it will not work. It is best to wrap the steering wheels with electrical tape before installation.
Subsequently, the author painted plywood to give home-made elegance to more elegance.
The homemade product is not yet fully completed, in the future the author plans some improvements. There is a need to make a heat sink for the charge controller, replace the optical sensor with a Hall sensor, optimize the program code, make a convenient menu, and so on.
All necessary Arduino codes are collected here.