» Construction »Do-it-yourself carport

DIY carport

DIY carport
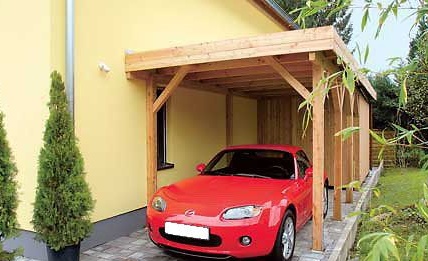
Dear visitors of the site, from the material presented by the author, you will learn and learn how to build a carport for yourself. As you know, all kinds of precipitation and direct rays of the sun adversely affect the paintwork. 
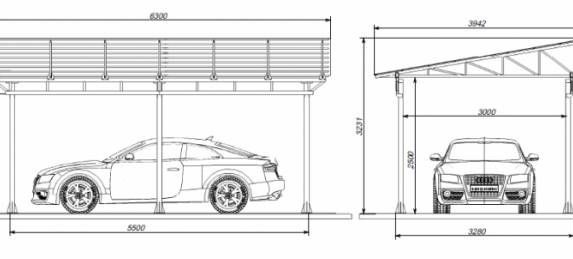
auto, also in our time, more frequent cases of hail and hurricane winds can also cause considerable damage. So, in order to protect his car from the vagaries of nature, our author decided to attach a small canopy for the iron horse to the wall of the house.

It was decided to take wood as the main material, because it is an environmentally friendly and kind material that does not rust and does not collect condensate, unlike metal. The master covered the roof with corrugated board. The timber was fastened to metal corners using self-tapping screws, so the design will be much more reliable. Also, with this design arrangement, material is saved due to the presence of the wall of the house.

And so, let's look at what the author specifically needed for the construction of the canopy.

Materials
1. wooden beam
2. professional sheet
3. screws
4. anchor bolts
5. metal fasteners
6. silicone sealant
7. aluminum metal strip
8. tin 0.5-0.7 mm
9. 30 mm board

Instruments
1. metal scissors
2. drill
3. punch
4. hacksaw
5. wrench
6. hammer
7. Bulgarian
8. roulette
9. corner
10. level

Step-by-step instructions for building carport do it yourself.

As in any other construction, everything should begin with the preparation of estimates, development of drawings and diagrams in order to calculate all the nuances. Also, the first thing to do is to determine the place for the erection of the canopy. Firstly, there should be free access to it, it should not violate the architecture of the house and fit smoothly into it. The site should be concreted or paved with paving stones, the easiest way is to fill it with gravel and compact it. An even and firm ground is necessary so that the car does not push through the ground and the wheels are clean.


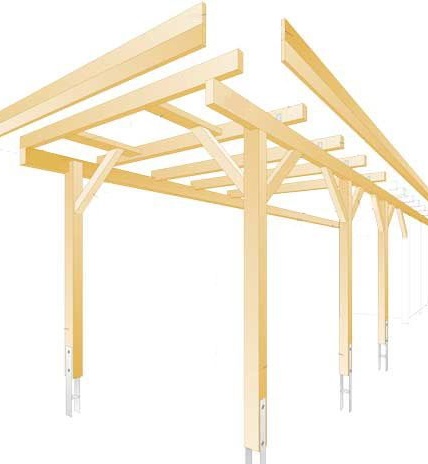
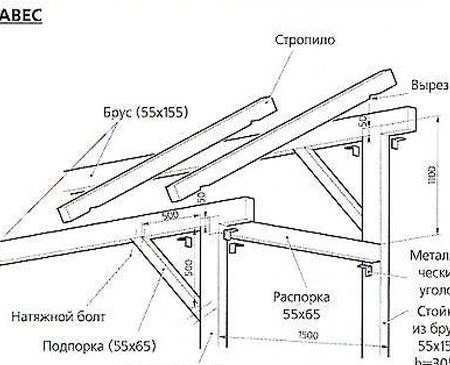
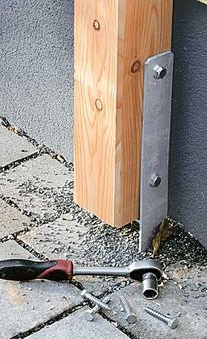
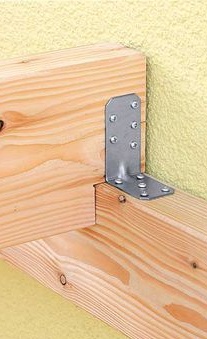
After all the preparations and reflection on the project, the author sets to work and he is faced with the task of erecting a frame from a timber with a ramp in one direction. First, the master takes the beam and fastens it to the wall of the house using anchor bolts and metal fasteners.
This is how it looks from the bottom
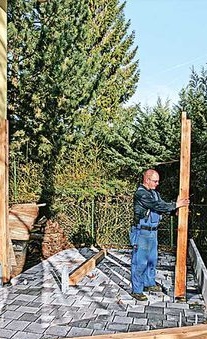
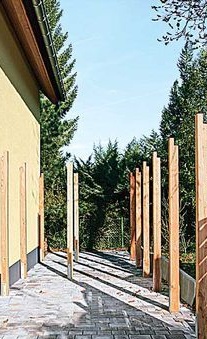
Next, the bars are installed in an upright position, attached to the paving stones on similar metal fasteners and anchor bolts.
And so along the entire length of the markup.
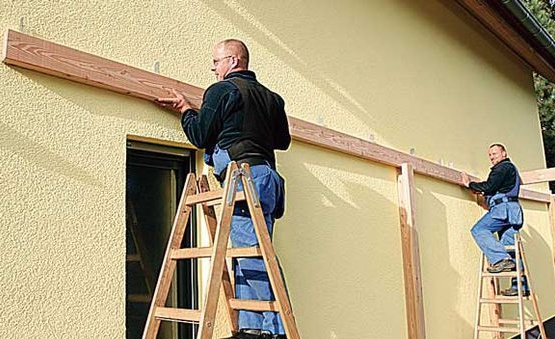
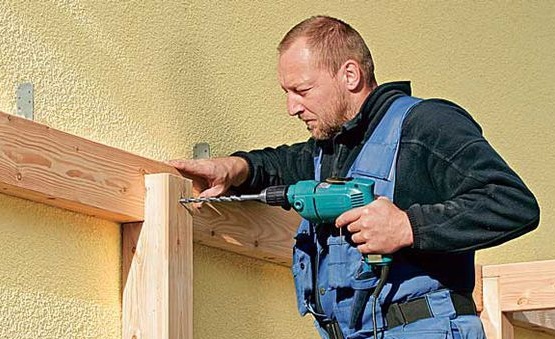
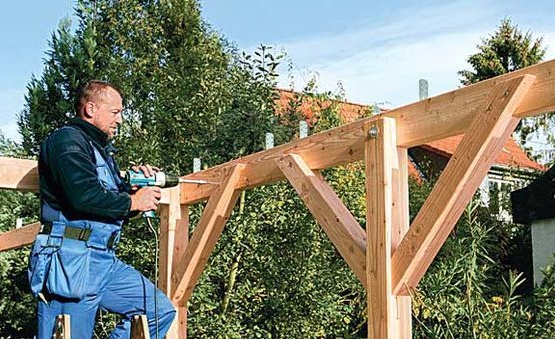
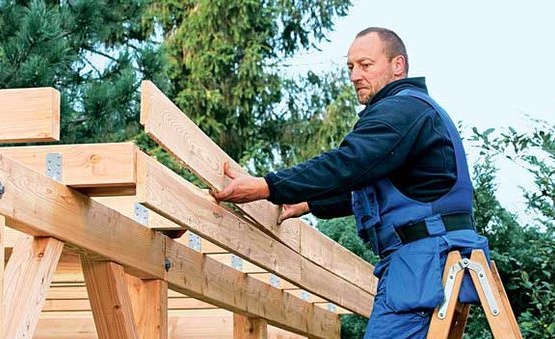
After the columns are fixed, the author proceeds to fasten the beam in a horizontal position directly to the wall of the house itself. This work is best done with an assistant, that is, one holds and the main drills and twists.
Also, to strengthen the structure, a number of vertical bars are added.
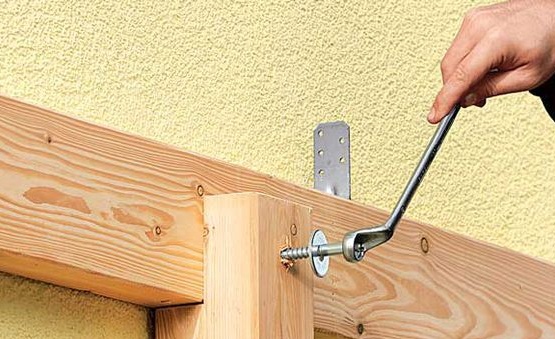
The bolts are tightened with a wrench.
That's what actually turns out.
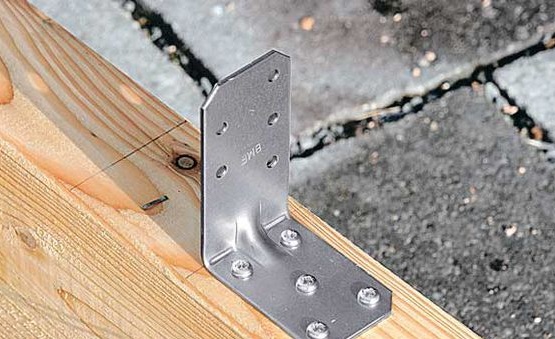
In the joints, the author uses a metal corner.

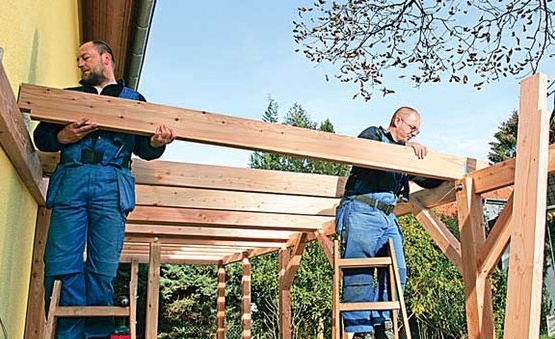
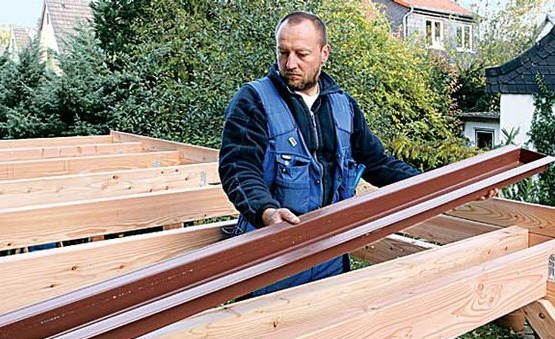
Next, the supporting beam is laid and jibs are made, the joints are twisted with bolts and nuts.
Then comes the rafters, it is also necessary to work together with an assistant.
This is how the beam is fastened to a horizontally located beam bolted to the wall of the house.
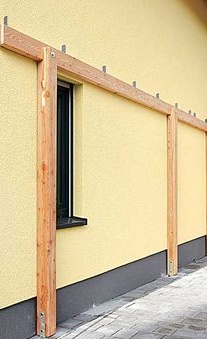
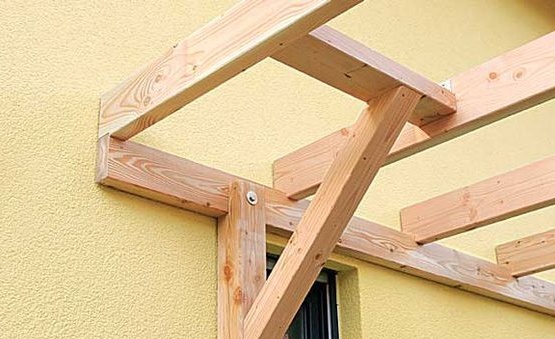
And such a frame turned out in the end, a slope in one direction.
The front beams are reinforced by installing a wooden spacer.
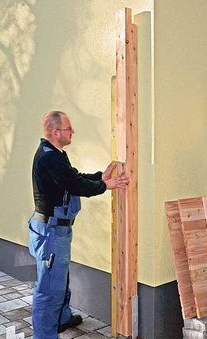
A 30 mm board is sewn onto the edge of the ramp.

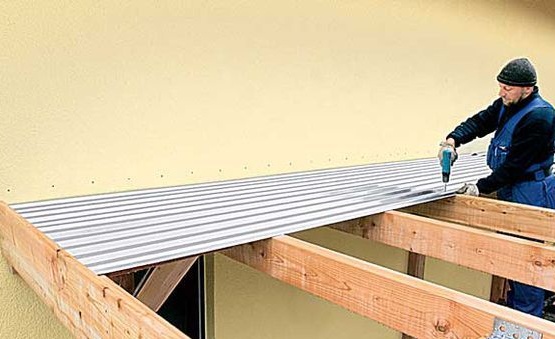
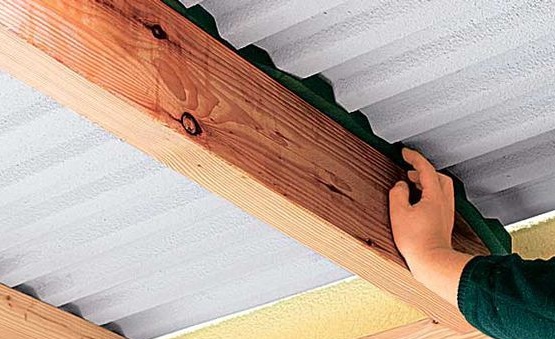
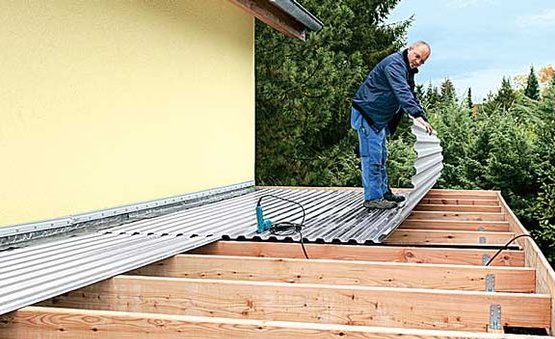
A professional sheet is laid on the prepared crate. Attention!You need to start directly from the wall of the house, closely fitting the sheet to the wall.
The professional sheet is lapped and fastened with self-tapping screws with a press washer.
You should start from the beginning of the stack and go upstairs making an overlap of 5-10 cm and 1 side on the side.
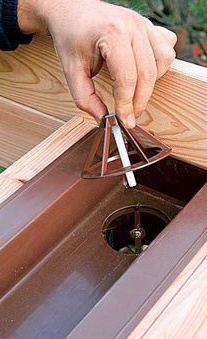
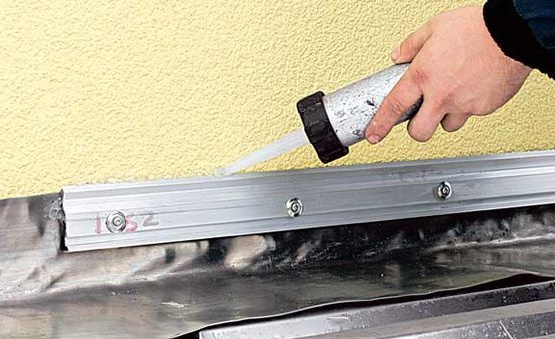
On top of the laid sheet along the wall, it is necessary to sew a metal corner of tin 0.5-0.7 mm to fasten with anchors under the aluminum plate, and the remaining slots must be covered with silicone sealant.
As can be seen from the material presented, this canopy can be done with your own hands without hiring professional builders or local craftsmen) You can also save on building materials, today you can buy professional sheets directly from production, and with a small defect and defect they are released much cheaper. The beam can also be found cheaper than taking a new one from the sawmill, there are many ads where they sell used construction materials. If desired, and build and save, it's up to you.

This concludes the article. Thank you very much for your attention!
Come visit often, do not miss the latest in the world of homemade goods!

This article is for informational purposes only!
0
0
0

Add a comment

    • smilesmilesxaxaokdontknowyahoonea
      bossscratchfoolyesyes-yesaggressivesecret
      sorrydancedance2dance3pardonhelpdrinks
      stopfriendsgoodgoodgoodwhistleswoontongue
      smokeclappingcraydeclarederisivedon-t_mentiondownload
      heatirefullaugh1mdameetingmoskingnegative
      not_ipopcornpunishreadscarescaressearch
      tauntthank_youthisto_clueumnikacuteagree
      badbeeeblack_eyeblum3blushboastboredom
      censoredpleasantrysecret2threatenvictoryyusun_bespectacled
      shokrespektlolprevedwelcomekrutoyya_za
      ya_dobryihelperne_huliganne_othodifludbanclose
12 comments
And how easy it is to clean this roof from fallen leaves! )))
yes Well, if only to amuse yourself, the author is not on the tour.
Quote: Valery
In this case, often, the cost of these "right" materials is equal to the cost of a finished canopy, built for sale by someone more dodgy ....

Here is one of the "F".
Quote: Valery
Anchor bolts "they screw into a tree .... The decking is laid on the crate (which is not here))))))

Another "F".
The canopy is made so that the car can be put on top, can withstand. "F"
Why such a powerful structure to "tie" to the wall, disfigure it? "F"
About a separate “F” flooring, from which the author decided that water, even with average rain, would rush to the center (gutters)? Will it flow with the same pleasure in other directions and under the whip of sheets?
I'm not talking about the amount of building material spent on such a simple design? Big "F"
Quote: To Delusam
Quote: Valery
I "staged" the article, not the canopy ....))))

yes And the article about the canopy, which was made through J ...

And yet, "through F" an article was written !!! A canopy .... He is not "through F". It’s just that I got the impression that it was built by a sort of “refined city dweller” who buys everything in the store ..))) And if there isn’t something exactly like he was told, then replace it with another - no, no! )))) .. At the same time, often, the cost of these “right” materials is equal to the cost of a finished canopy, built for sale by someone more dodgy ....
Apparently, due to the different cuts of the rafters, a slight bias was made to the middle canopy, from where the drainage is made: and further.The page in Google translation, if you "dissect" the link, you can see the original in German.
Quote: Valery
I "staged" the article, not the canopy ....))))

yes And the article about the canopy, which was made through J ...
So I’m saying - not a single technical moment has been voiced !!! That would be approximately, the child would describe the construction of the canopy - "you need to take the pieces of wood, attach one to the other and put a tin on top .... pardon
I "staged" the article, not the canopy ....))))
Quote: Valery
Apparently, there is still a bias and the ramp is directed back.
Nevertheless, it is said twice about the horizontal fastening of the bars, nothing is said about the slope.
Quote: Valery
transverse location of the receiving chute.
The gutter is generally somewhere in the middle of the roof, nothing is said about it, how it is connected with the drain - it is not clear. Perhaps this is due to the fact that, as can be seen from the first photo, the back of the frame is sheathed, some kind of room is made.
Well, and to the heap: nothing is said about wood processing.
Quote: Valery
And not quite "through w .." done ....

yes Valery said and carried it ... he set up a scam. And what is it called?
Apparently, there is still a bias and the ramp is directed back. (Orientation of corrugated board, transverse location of the receiving groove). Just because of the angle of shooting is not visible! And the author of the article focused on the unnecessary, without describing the important !!!
And not quite "through w .." done ....
... But the article itself is written .... well, I don’t know why !!! Here, certainly, the inscription "for informational purposes")))) is missing. All this scribble could be voiced shorter: "Here we take the pieces of wood, like this we attach and we get a canopy" xaxa The meaning would be the same.))))
... And if you are describing a TECHNOLOGY, then you need to indicate the TECHNOLOGICAL moments !!! ... ... What is the cross section of a bar for supports and rafters? How are the supports installed (with anchors through the corners? And why? To the paving slabs?))). What is the rafter step? etc.
..And then ... oh-oh-oh-oh ... "Anchor bolts" they screw into a tree .... The decking is laid on a crate (which is not here))))))
... Explain, please: WHAT is this article for? What can someone gleaning from it about to build a canopy? Only the appearance and layout! So for this one photo is enough !!!! And everything else is "poured water" !!!
Quote: Ivan_Pokhmelev
Although, for a roof without a slope, probably all the same.

dontknow And for me, everything is done through F ...
For a Russian climate, a roof without a slope is not the best option. The direction of laying the roofing is also highly doubtful: not from the edge, but from the wall (unless with the edge of the next sheet being pushed under the already laid, but not completely fixed), as well as the direction of the edges is not perpendicular to the wall, but parallel to it. Although, for a roof without a slope, probably all the same.

We advise you to read:

Hand it for the smartphone ...