
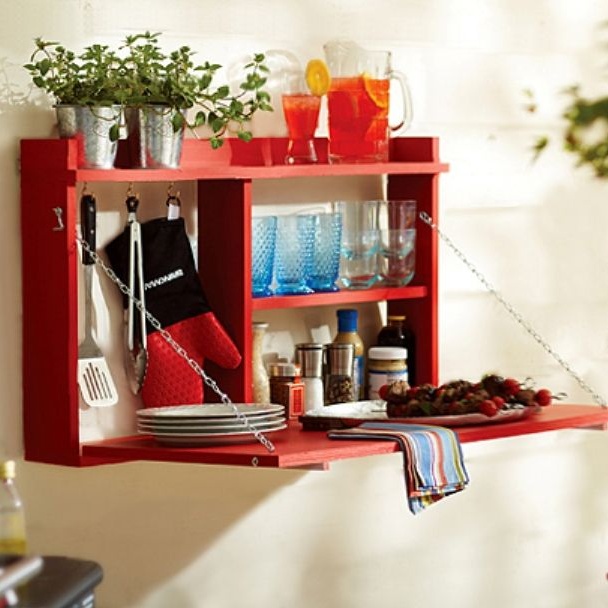
This summer-style bright wall-mounted sideboard with a folding table is the perfect complement to your terrace or patio. It can even be placed on the balcony. Who will turn it into a minibar, and for a small family, he will easily replace the dining table. In addition, such a compact sideboard is a truly wonderful solution for small houses and one-room apartments, where every square meter is appreciated.
The design allows you to make such a buffet of natural wood and durable sheet materials like chipboard or plywood. The author intentionally painted the product in bright red color to add colors to his home, however you can safely natural wood intact to emphasize its natural texture.
The design of the sideboard is assembled using screws and glue. Support legs are not provided here, their role is played by extensions from metal chains.
To make a wall-mounted sideboard with folding table do it yourselfyou will need:
1. Materials:
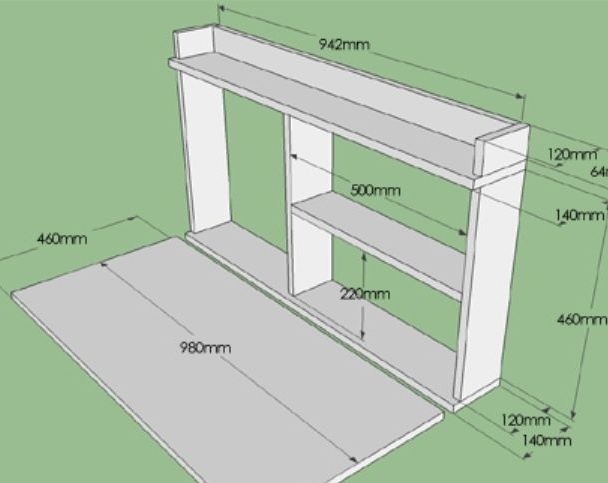
- pine board:
1. two parts 140x940 mm (top and bottom of the wall part);
2. three parts 120x460 mm (the sides of the wall, as well as the middle vertical crossbar);
3. part 120x942 mm (rear wall of the upper shelf);
4. two parts 12x64 mm (lateral parts of the upper shelf);
5. part 120 to 500 mm (inner shelf);
6. detail 460x940 mm (side table, assembled from boards or made from a single piece of sheet material);
7. a pair of rails up to 460 mm long to fasten the table boards together.
- wood or any durable sheet material (chipboard, plywood);
- self-tapping screws or furniture screws;
- glue on wood;
- metal chains for table extensions;
- paint is bright red;
- varnish on wood (optional);
- a hook with a loop for fixing the table when folded on the wall;
- accessories for hanging the buffet on the wall, dowels and screws;
- hinges for a folding table;
- S-hooks and screw rings for attaching table extensions.
2. Tools:
- electric drill;
- Sander;
- a screwdriver with a drill on wood;
- paint brushes and roller;
- construction tape measure;
- a hacksaw for wood or a jigsaw for sawing boards;
- marker or pencil;
- square.
Step 1: preparing the materials
Inspect the boards. You will need boards of the same width. Especially for the manufacture of countertops. When connecting stitches of different thicknesses using rails, the surface of the table will be uneven and it will be inconvenient to use it.Boards of different thicknesses should be pre-planed to remove excess wood.
Mark all the wooden elements according to the drawing in the photo below. Use a pencil or marker and a square - so that the cut line is subsequently strictly perpendicular. Saw boards and number them, which will help you avoid confusion during further assembly.
All parts should be carefully sanded. In particular, this applies to blanks from used materials. The polished surface of the wood is easy to paint, in addition, the protective and decorative paintwork will last you much longer. Particular attention in the grinding process should be given to the ends of the sawn boards. They must be smooth before you begin assembling the structure.
For the manufacture of tabletop doors, instead of boards, you can use durable sheet materials such as plywood and chipboard. The ends of the parts from chipboard and plywood should also be carefully sanded.
Step 2: assembly of the structure
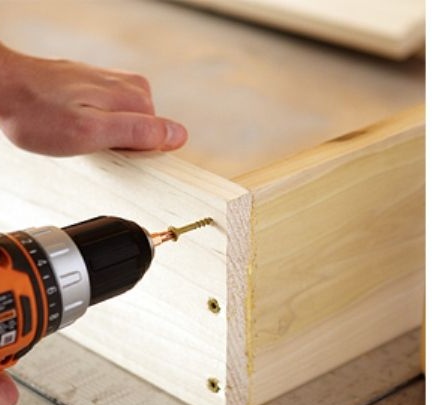
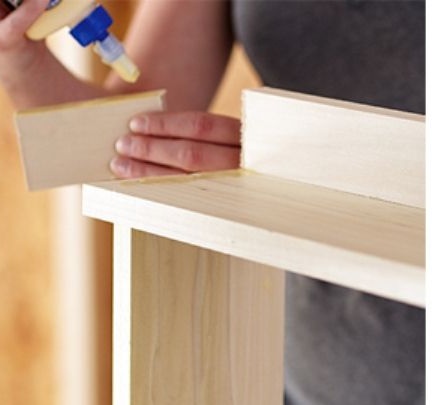
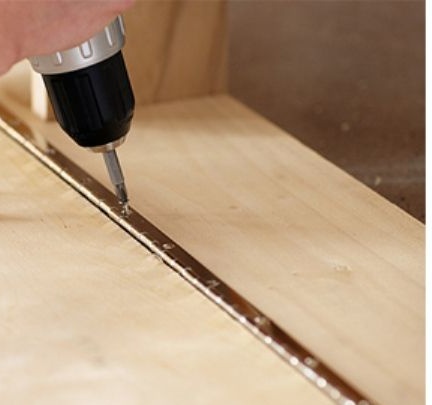
First, assemble the base frame from two parts 140x960 mm and two parts 120x460 mm. During the assembly process, coat the ends of the wooden elements with glue specially designed for working with wood. Remove excess glue with a damp cloth before it hardens.
Fasten the parts with screws, having previously drilled holes for them with an electric drill. This is necessary so that the boards do not crack when screwing in the screws. Check the inside corners of the frame with a square.
Add an internal vertical bar to the frame. Using glue, attach the details of the upper shelf to the sideboard. Fix the inner middle shelf in the same way.
Make a tabletop door and hang it on the hinges. The author used a continuous loop-strip in his work. You can follow his example or purchase single decorative one-piece hinges.
Step 3: painting the buffet
All wooden parts are properly machined and ready to be painted.
In accordance with your own preferences and conditions for paintwork, use spray paint or use the old fashioned paint brushes and a roller to paint your buffet. Apply a couple of coats of paint, letting each one dry thoroughly.

This could be done with wood processing. But if you want the product to serve you and your loved ones for many, many years, use wood varnish. Apply the first coat of varnish, wait for it to dry completely and polish the surface with fine sandpaper to form micro-scratches. After that, apply the top coat of varnish. This will prevent the buffet from chemical and even minor mechanical damage.
Step 4: Install Hardware
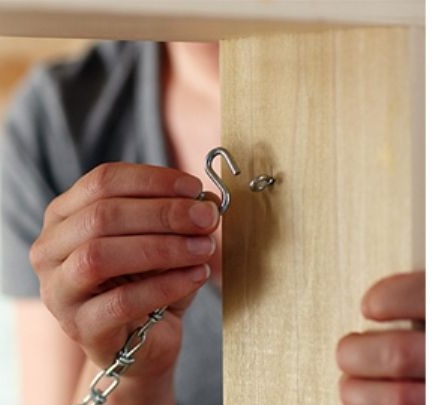
When closed, the countertop is fixed to the sideboard with a simple hook and loop closure. Install them on the side panel in any convenient place.
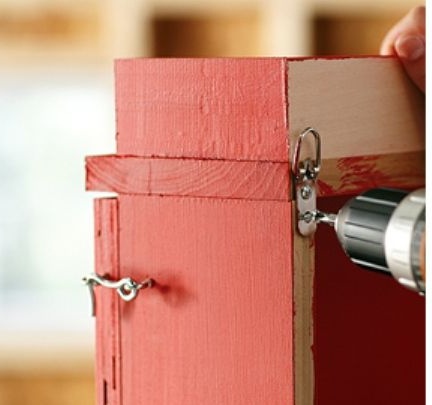
In order to fix the tabletop in the expanded form, you will need metal chains. Mark on the tabletop and side panels the attachment points of the chains and screw one screw ring one at a time. Fasten the chain segments with the S-hooks. The author needed 50 cm of metal chain on each side.
Step 5: installing the buffet in a permanent place
Now that the product is completely ready, proceed with its installation in a permanent place in your home. The photo below shows that the author used metal fittings to hang the cupboard on a screw screwed into the wall or a driven nail (in the case of wooden walls and partitions). If you plan to hang the sideboard on a concrete or brick wall, use a dowel and a screw. To do this, mark the mounting points on the wall.