
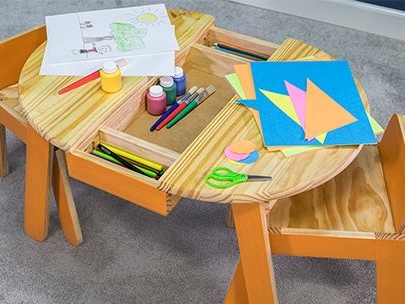
The author is convinced that this bright and functional table will inspire your child to be creative. It is made in optimal sizes, has a cavity for storing everything you need and is designed for two workstations. All corners here are removed as far as possible so that the child could not injure himself and injure himself.
Children furniture, whatever it is, it should be strong, bright and ergonomic. Poor quality materials lead to quick wear of product parts - and here you are again faced with the choice of the next children's table.
Meanwhile, children's furniture is just as expensive as adult furniture, although sometimes less material and other resources have been spent on its production.
That's why it is so profitable to make children's furniture do it yourself. Firstly, you get a great opportunity to come up with your own project, designed to meet the needs of your child.
Secondly, you can independently choose materials for furniture. This is important when it comes to the cost and safety of the final product.
In this master class you will learn how to make a children's table for creativity from wood and plywood. The author himself has developed the most simple, but at the same time functional design that will appeal to any baby.
In order to make a table and two chairs you will need:
Materials:
1. a piece of plywood for the manufacture of countertops with a diameter of 610 mm: two parts sawn in half;
2. 4 pcs x 67 x 457 mm - table legs;
3. 2 pcs x 67 x 619 mm - longitudinal strapping of the countertop;
4. 2 pcs x 67 x 349 mm - transverse trim countertops;
5. 2 pcs x 67 x 340 mm - internal partitions of the strapping of the countertop under the tray;
6. 4 pcs x 67 x 76 mm - protruding parts of the tray;
7. 2 pcs x 67 x 241 mm - external binding of the tray;
8. 241 x 603 mm - the bottom of the tray is made of thin plywood;
9.4 pcs x 67 x 314 mm - legs of the chair;
10. 2 pcs x 67 x 222 mm - side parts of the seat trim;
11. 67 x 286 mm - front part of the seat trim;
12. 2 pcs x 140 x 286 mm - seat parts;
13. 180 x 286 mm - backrest;
14. glue for woodwork;
15. furniture screws;
16. water-based paint;
17. varnish for woodwork;
18. screws for fixing the legs.
Instruments:
1. electric drill;
2. grinder;
3. jigsaw;
4. a screwdriver;
5. building tape;
6. pencil;
7. paint brushes;
8. homemade compass from a self-tapping screw and cord.
Step One: Material Selection and Preliminary Preparation
To make small parts, use a natural pine board. It must be pre-planed and have the same thickness along the entire length.
In order to prepare parts with a large plane, you can purchase thick pine plywood.
Pay attention to its quality, to the density of the gluing of the layers. You should not be confused by the smell of the material, because high-quality plywood smells like fresh wood. And it depends primarily on the glue used in the manufacturing process.
Pay attention to the choice of safe paint and varnish compositions for wood, as the headset will be used by children. Solvent varnishes are especially durable, but they should be painted with outdoors. You must make sure that after drying the varnish does not emit an unpleasant odor on the surface of the wood.
Step Two: Create a Scheme
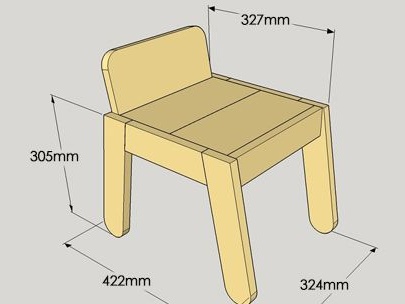
The author shared a ready-made computer diagram of the table and chairs with pre-defined product sizes. If you want to change the dimensions of the table or chairs, make changes and carefully calculate the dimensions of the remaining parts.
Designate a list of necessary parts for yourself so as not to miss anything. Decide which ones you will make from plywood, and which ones from natural pine.
Step three: marking and manufacturing of table parts
Start by marking the details of the table. Take a piece of plywood prepared for the countertop and find its center. At the indicated point, screw in a small self-tapping screw and, using a free loop, fasten a cord on it whose length is equal to the radius of the countertop. At the other end of the cord, also fix the pencil.
Circle the outline of the countertop and once again measure the resulting diameter of the circle to make sure that it is 610 mm or the size you previously determined.
Using a jigsaw, cut the workpiece. The countertop consists of two identical semicircular parts. Draw a straight line through the center of the workpiece and cut the countertop into two parts.
From a thinner plywood or fiberboard sheet, make the bottom of the tray. Saw a rectangle of the specified sizes.
Start marking the parts that you plan to make from natural wood. Saw the pine board into pieces of the required length.
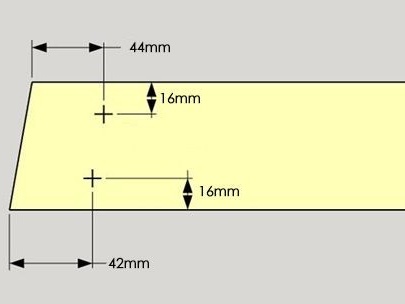
Leg blanks must be rounded on one side. That they were all of the same shape, use compasses in the marking process. Mark the semicircle as close to the edge of the part as possible so as not to cut off the excess and make the legs shorter than necessary.

Fourth step: marking and manufacturing of parts for chairs
In the list of necessary materials, the author indicated the amount of materials needed to make one chair. Multiply everything by two sets.
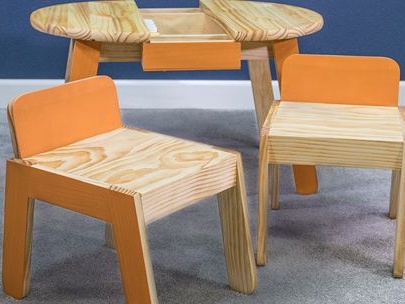
The chairs are made of pine, and the seat in this case is not solid, but made of two pieces. They can be replaced with plywood parts.
Mark and cut the boards into blanks of the desired length.
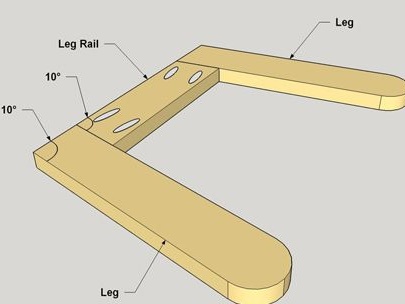
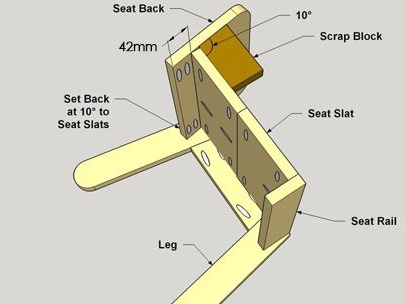
Please note that the legs of the chairs, like the legs of the table, are mounted slightly at an angle. Thus, their upper part needs to be slightly cut diagonally so that they go flush with the frame of the chair.
On the reverse side, the legs are semicircular. Work the workpieces in the same way as the table legs to round the edges.
Step Five: Assembling the Table
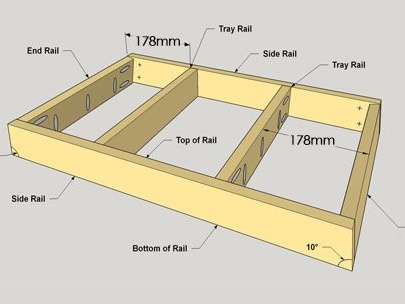
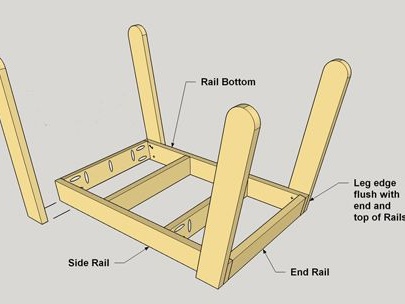
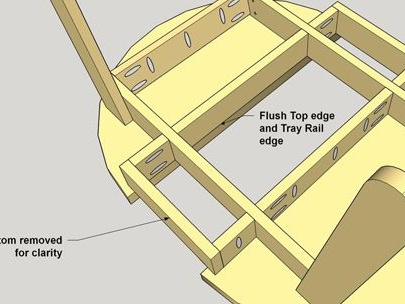
Start assembling the table with the manufacture of the frame. The author provided his master class with detailed illustrations in the form of schematic pictures in this regard.
Secure the legs to the outside of the frame. They are located slightly to the sides and trimmed properly so that the parts fit flush.
The author used furniture screws to fix the table legs. Pre-drill the screw holes.
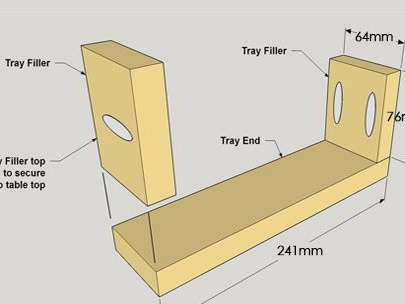
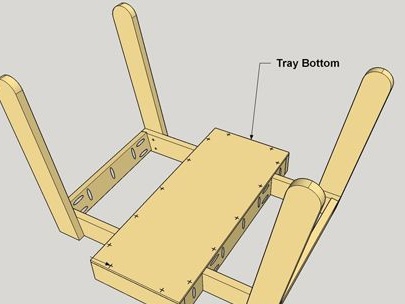
Prefabricated table tray. Its central part is located within the frame, and the outer ones are made of three parts each, which is not visible in the photo.
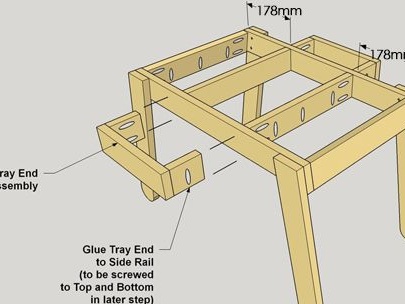
Prepare the external elements of the tray by connecting them with furniture screws or self-tapping screws. Fasten the side elements of the tray to the frame. Typically, such connections use countersunk diagonal holes for screws. You can do them using a drill.
From the back of the frame, hem the tray with the bottom of thin plywood or fiberboard.
Lock the countertop.During the assembly, you could carry it out without using glue, however, the author advises not to neglect this. Glue gives the joints the necessary strength.
When fixing the countertops without glue, you also can not do. Put a small amount of it on the frame, install the first part of the countertop on top and pull it with screws, after drilling holes for them. Repeat the same for the second worktop part.
Step Six: Build Chairs
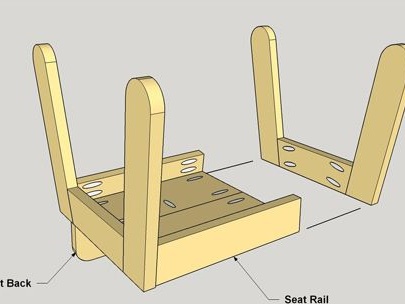
Start assembling chairs using the schemes from the master class.
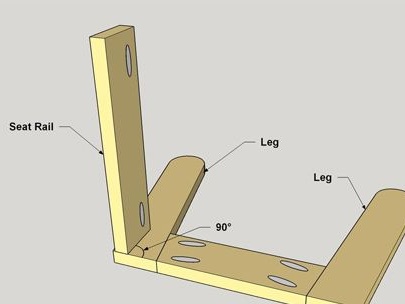
In the manufacture of the legs and side cross members of the frame, you took into account the fact that they are attached at an angle of 90 = 10aboutas seen in the assembly diagram.
The front of the frame is fixed at an angle of 90aboutand the back is also beveled, like the legs. To ensure that the backrest is at an angle, use a temporary wooden support. place it on the seat, fasten and fix the back using glue and screws. Now the support parts can be removed.
The seats themselves are made of two pieces of 140 mm wide each.
The chair is assembled using the same hidden diagonal holes, glue and screws. In the diagrams, the holes are depicted as open ellipses.

Seventh step: finishing
The author painted with orange paint the backs of chairs, the sides of the tray, as well as the legs of the table and chairs. To do this, he used water-based acrylic paint.
He painted the painted and unpainted surface of the headset in order to protect the material from damage, moisture and dust. Use varnish in several layers - it is always more reliable.
Before painting, finely sand the wood until it becomes smooth and pleasant to the touch.
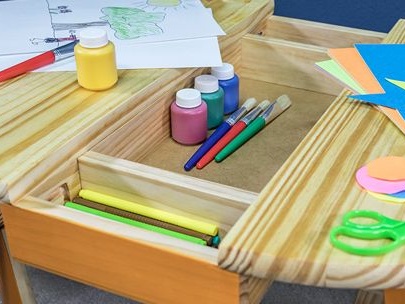
Children's table for creativity is ready!