
Furniture, so rarely brought from exotic countries, sometimes leaves a lasting impression. She often does not have much space in our interiors, because this is essentially a piece of someone else's culture.
However, modern interior design is very flexible and allows you to include arbitrarily extravagant decisions in the composition, use new materials, unusual shapes and amazing colors.
The borders of the world are conditionally open and we can exchange our distinctive culture with the culture of any nation, and furniture is nothing but its integral part.
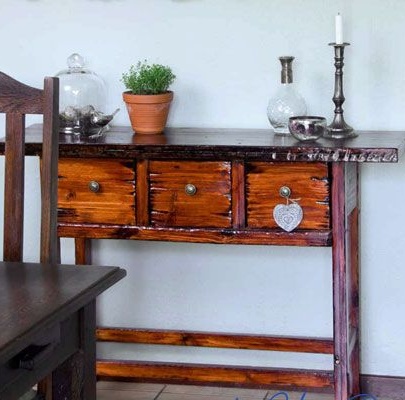
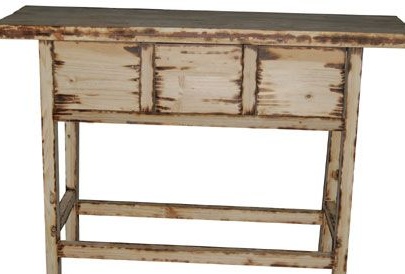
This amazing table is fake, although it looks authentic. It is stylized by the handiwork of Indonesian masters. Have you heard about the world famous resort of Bali? Such furniture is ordinary there, although not everyone can afford it.
The author of this workshop will slightly reveal the secret of the veil and tell about the special method of wood processing that made this project possible. You will also learn how to make a similar table using ordinary materials and the usual wood species.
To make this indonesian table do it yourself, you will need:
Materials:
1. pine board;
- 2 pcs x 380 x 1200 mm - worktop details;
- 2 pcs x 250 x 250 mm - side panels;
- 3 pcs x 200 x 250 mm - front panels of drawers.
2. bars and slats for the manufacture of the frame;
- 4 pcs x 44 x 44 x 800 mm - console legs;
- 2 pcs x 20 x 250 mm - side rails;
- 3 pcs x 20 x 830 mm - the rear and front crossbars, as well as the upper decorative bar under the drawers;
- 2 pcs x 44 x 44 x 200 mm - vertical crossbars between the drawers;
6 pcs x 10 x 10 x 300 mm - guides for drawers.
3. glue for woodwork;
4. three "antique" handles for boxes;
5. plywood or OSB for internal filling of the structure:
- 330 x 830 mm - support shelf for drawers;
- 6 pcs x 150 x 300 mm - sides of drawers;
- 3 pcs x 150 x 200 mm - back wall of drawers.
6. protective and decorative oil to simulate Ebony wood or similar to it;
7. glossy varnish compatible with oil;
8. furniture screws or self-tapping screws, nails;
9. A soldering iron or blowtorch for charring wood.
Instruments:
1. a hacksaw for wood, an electric jigsaw or other convenient tool for sawing parts from wood and plywood;
2. electric drill;
3. a screwdriver;
4. grinder;
5.a drill such as Dremel, Proxxon or Profile with cutters and grinding tips for wood processing;
6. hammer;
7. paint brush;
8. soft fabric without lint;
9. building tape;
10. pencil.
Step one: selection and preliminary preparation of materials
Of course, in Indonesia this console would be made of Ebony. But you can use any tree species that is familiar to you, for example, a pine. It has sufficient strength, and yet is easy to handle.
In the case of using plywood, you will need quite a bit of natural wood. However, the console table from this master class is not too large, and you can completely refuse the use of sheet materials, leaving them only a supporting shelf for drawers.
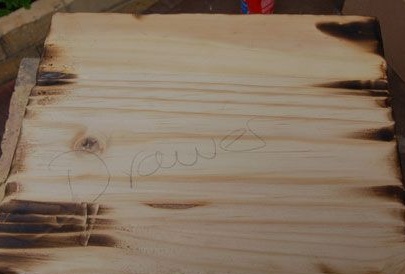
Choose a well-dried pine with a beautiful pattern. Avoid large knots on the surface of the boards.
Boards must be pre-planed and adjusted in thickness. Pre-grinding in this case is not necessary. You can return to it at the stage of painting, immediately after the final assembly of the structure.
Step Two: Parts Manufacturing
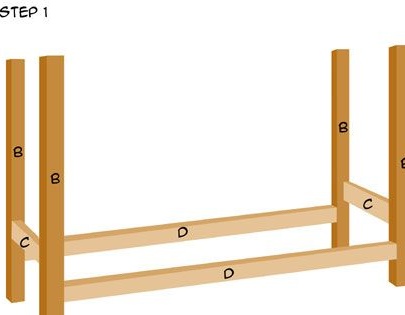
The author provided a complete list of parts and their sizes for the manufacture of the console. For your convenience, there is even a frame diagram.
You can change them. In this case, draw your sketch on paper, carefully calculate the sizes and make your own list of necessary elements.
Mark the parts on plywood, as well as the parts that need to be made of natural wood.
In order to get even corners and edges, use a square and a long tape measure. The square is an indispensable tool when it comes to marking product details.
Cut the console elements from sheet material and saw the board into pieces of the required length. Fold out the details and check the list to make sure you haven't missed anything.
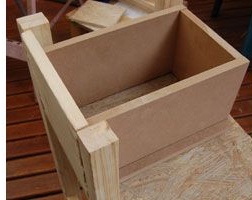
Step Three: Assembly
Start by assembling the frame. You can use slot joints if you have a milling machine or a manual milling cutter at hand.
Bars and slats can be attached to each other butt-to-butt. This is a less durable connection, but under certain conditions it will last quite a long time.
And in order to make the frame strong, use wood varnish. Put a small amount of it on the end of the rail, press it to the junction with the bar and screw the screw on the back side, fixing the connection. Remove excess glue immediately with a damp cloth.
As you can see, with such a combined connection, it is not necessary to wait until the glue seizes and use all kinds of clamps and clamps. A screwed screw in time will securely fix the part, and the glue will prevent the connection from loosening over time.
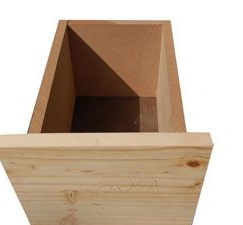
Collect all three crates in turn. Only their front panel is made in this case of natural wood, as can be seen in the photo below. Feel free to use quality plywood. It is durable and convenient in the further operation of the product.
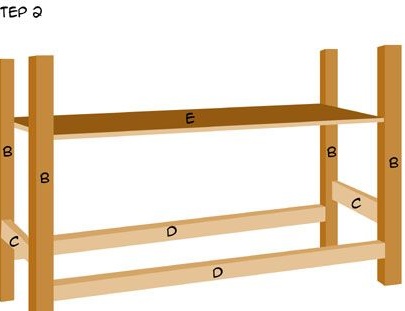
Assemble the drawers, the frame, fix the support shelf for the drawers and put them in place. Thanks to the shelf, the drawers will easily slide out.
The countertop is made of two boards. They are glued without using screws. In this case, use metal connectors on the back to secure the tabletop to the frame.
This is necessary, because in the process of moving the console, you will most likely lift it by the countertop, and the connection may not be too strong for this.
Step Four: Grinding and Aging Wood
Start sanding with a grinder, giving the surface a pleasant to the touch smoothness.
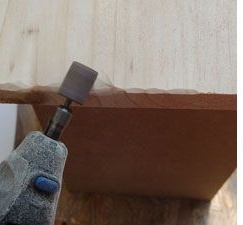
Now you need a drill. This is a small power tool (however, there are cordless models), which allows you to process small parts and small surfaces. In our case - wooden.
Therefore, prepare a profile cutter and grinding attachments for wood. They have significant differences.
Work the edges and edges of the panels with a drill, simulating irregularities as shown in the photo below.
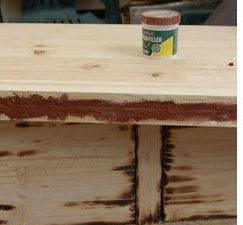
Aging wood is an equally important stage.Moreover, this is the second secret wood processing method that gave birth to this project.
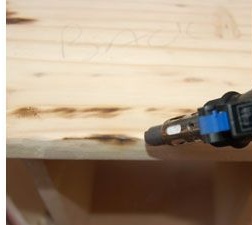
But the fact is that you should resort to such an unconventional method as carbonization of a tree. The author used for this his soldering iron with a remote tip from Dremel.
In extreme cases, you can use a small blowtorch, but the result will be very different. You can try a regular soldering iron.
Step Five: Woodworking
Painting is the final stage of processing decorative wood processing. For this purpose, use protective and decorative oil for wood, which will create the very imitation of Ebony.
Such compositions perfectly protect the wood from darkening, exposure to moisture and ultraviolet radiation, and prevent the formation of fungus and mold on the surface.
In addition, the oil gives the tree a characteristic velvet glow. However, in this case, this is a useless effect, since you will be applying varnish on top of the oil.
The author chose a glossy varnish, but you can experiment and get matte or semi-gloss. All this is a matter of taste and personal preference.
It is very important to choose a varnish that is compatible with oils, otherwise the previously applied coating will interfere with the adhesion of the varnish and the wooden surface. Consult with a specialist in this regard.
Apply several layers of varnish, allowing each of them to dry thoroughly. Intermediate layers can be lightly sanded with sandpaper. So, each new layer will partially penetrate into the previous one and the coating will be very durable and resistant to mechanical damage.
In the process of furniture restoration, experts apply this method everywhere, sometimes applying up to 6-7 layers of varnish.
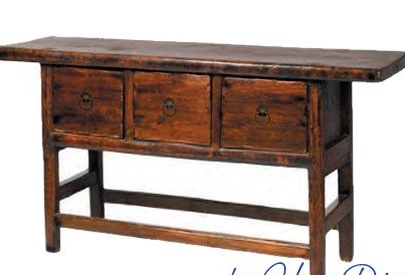
The console table in the Indonesian style is ready and will become a real decoration of your home!